I have finished my sister’s baby quilt! 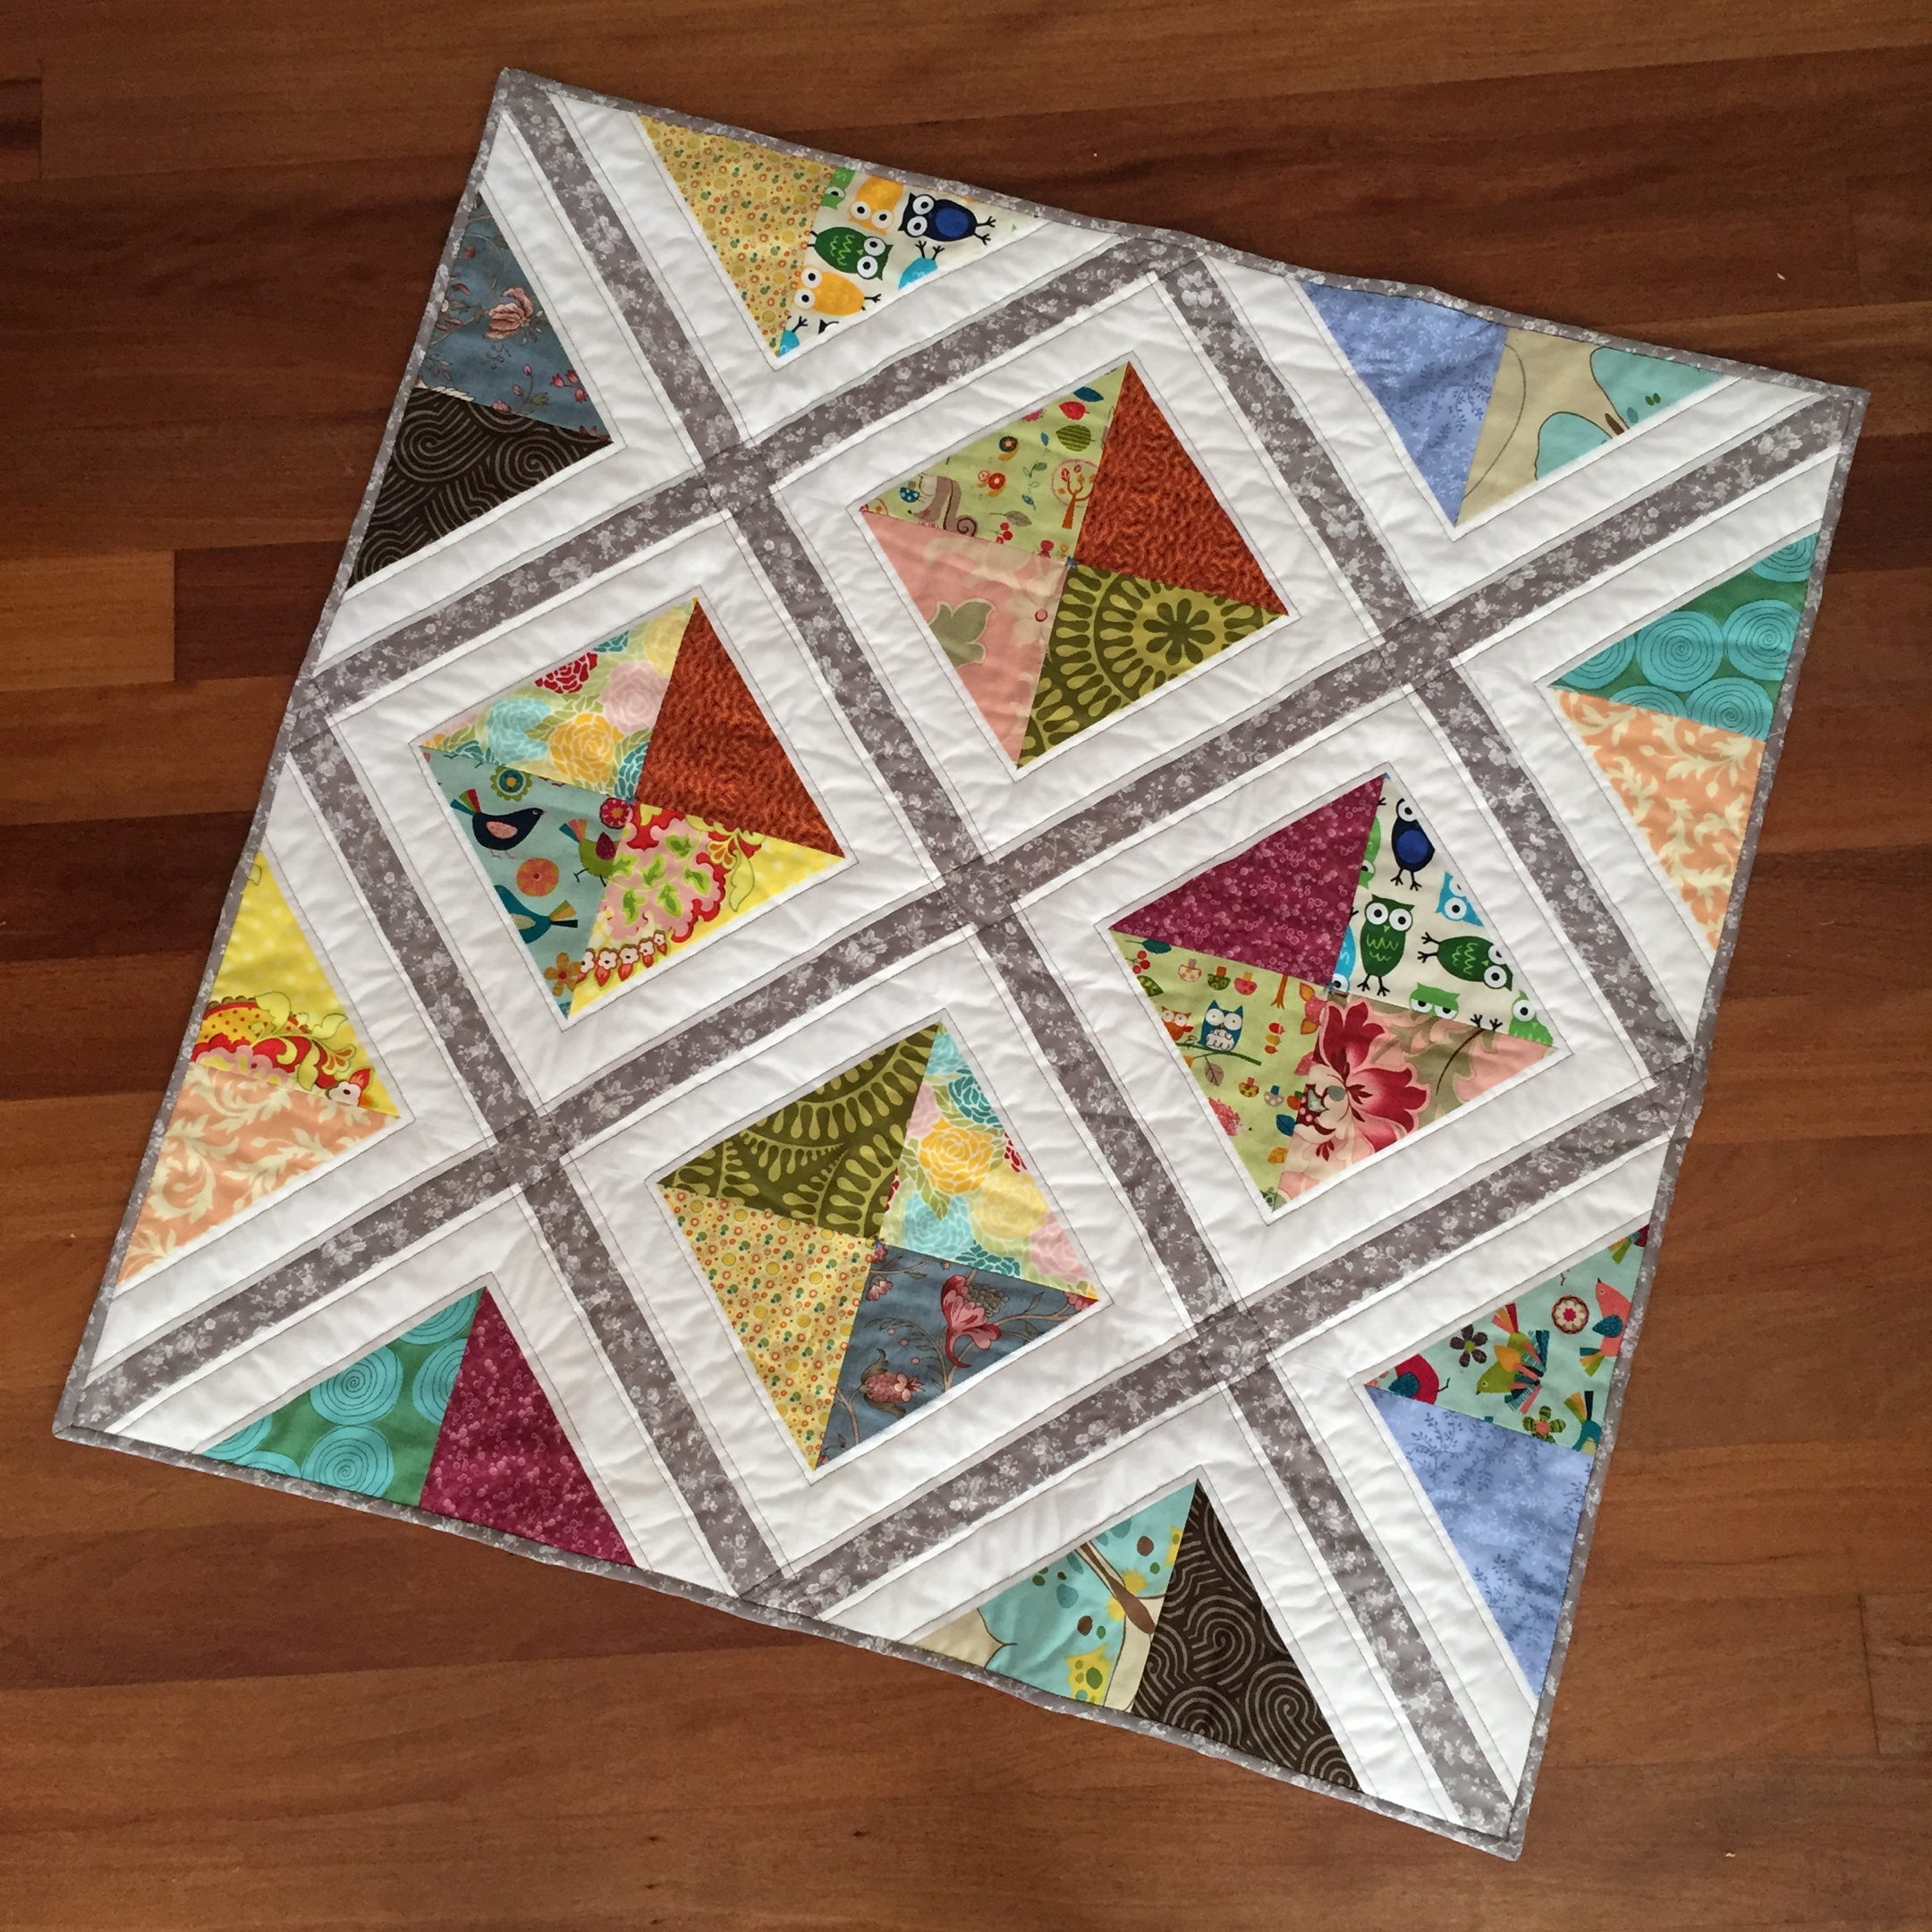 I called this one “hoot!” because the little green owl seemed to pop out at me. Some of these fabrics are so cute!
 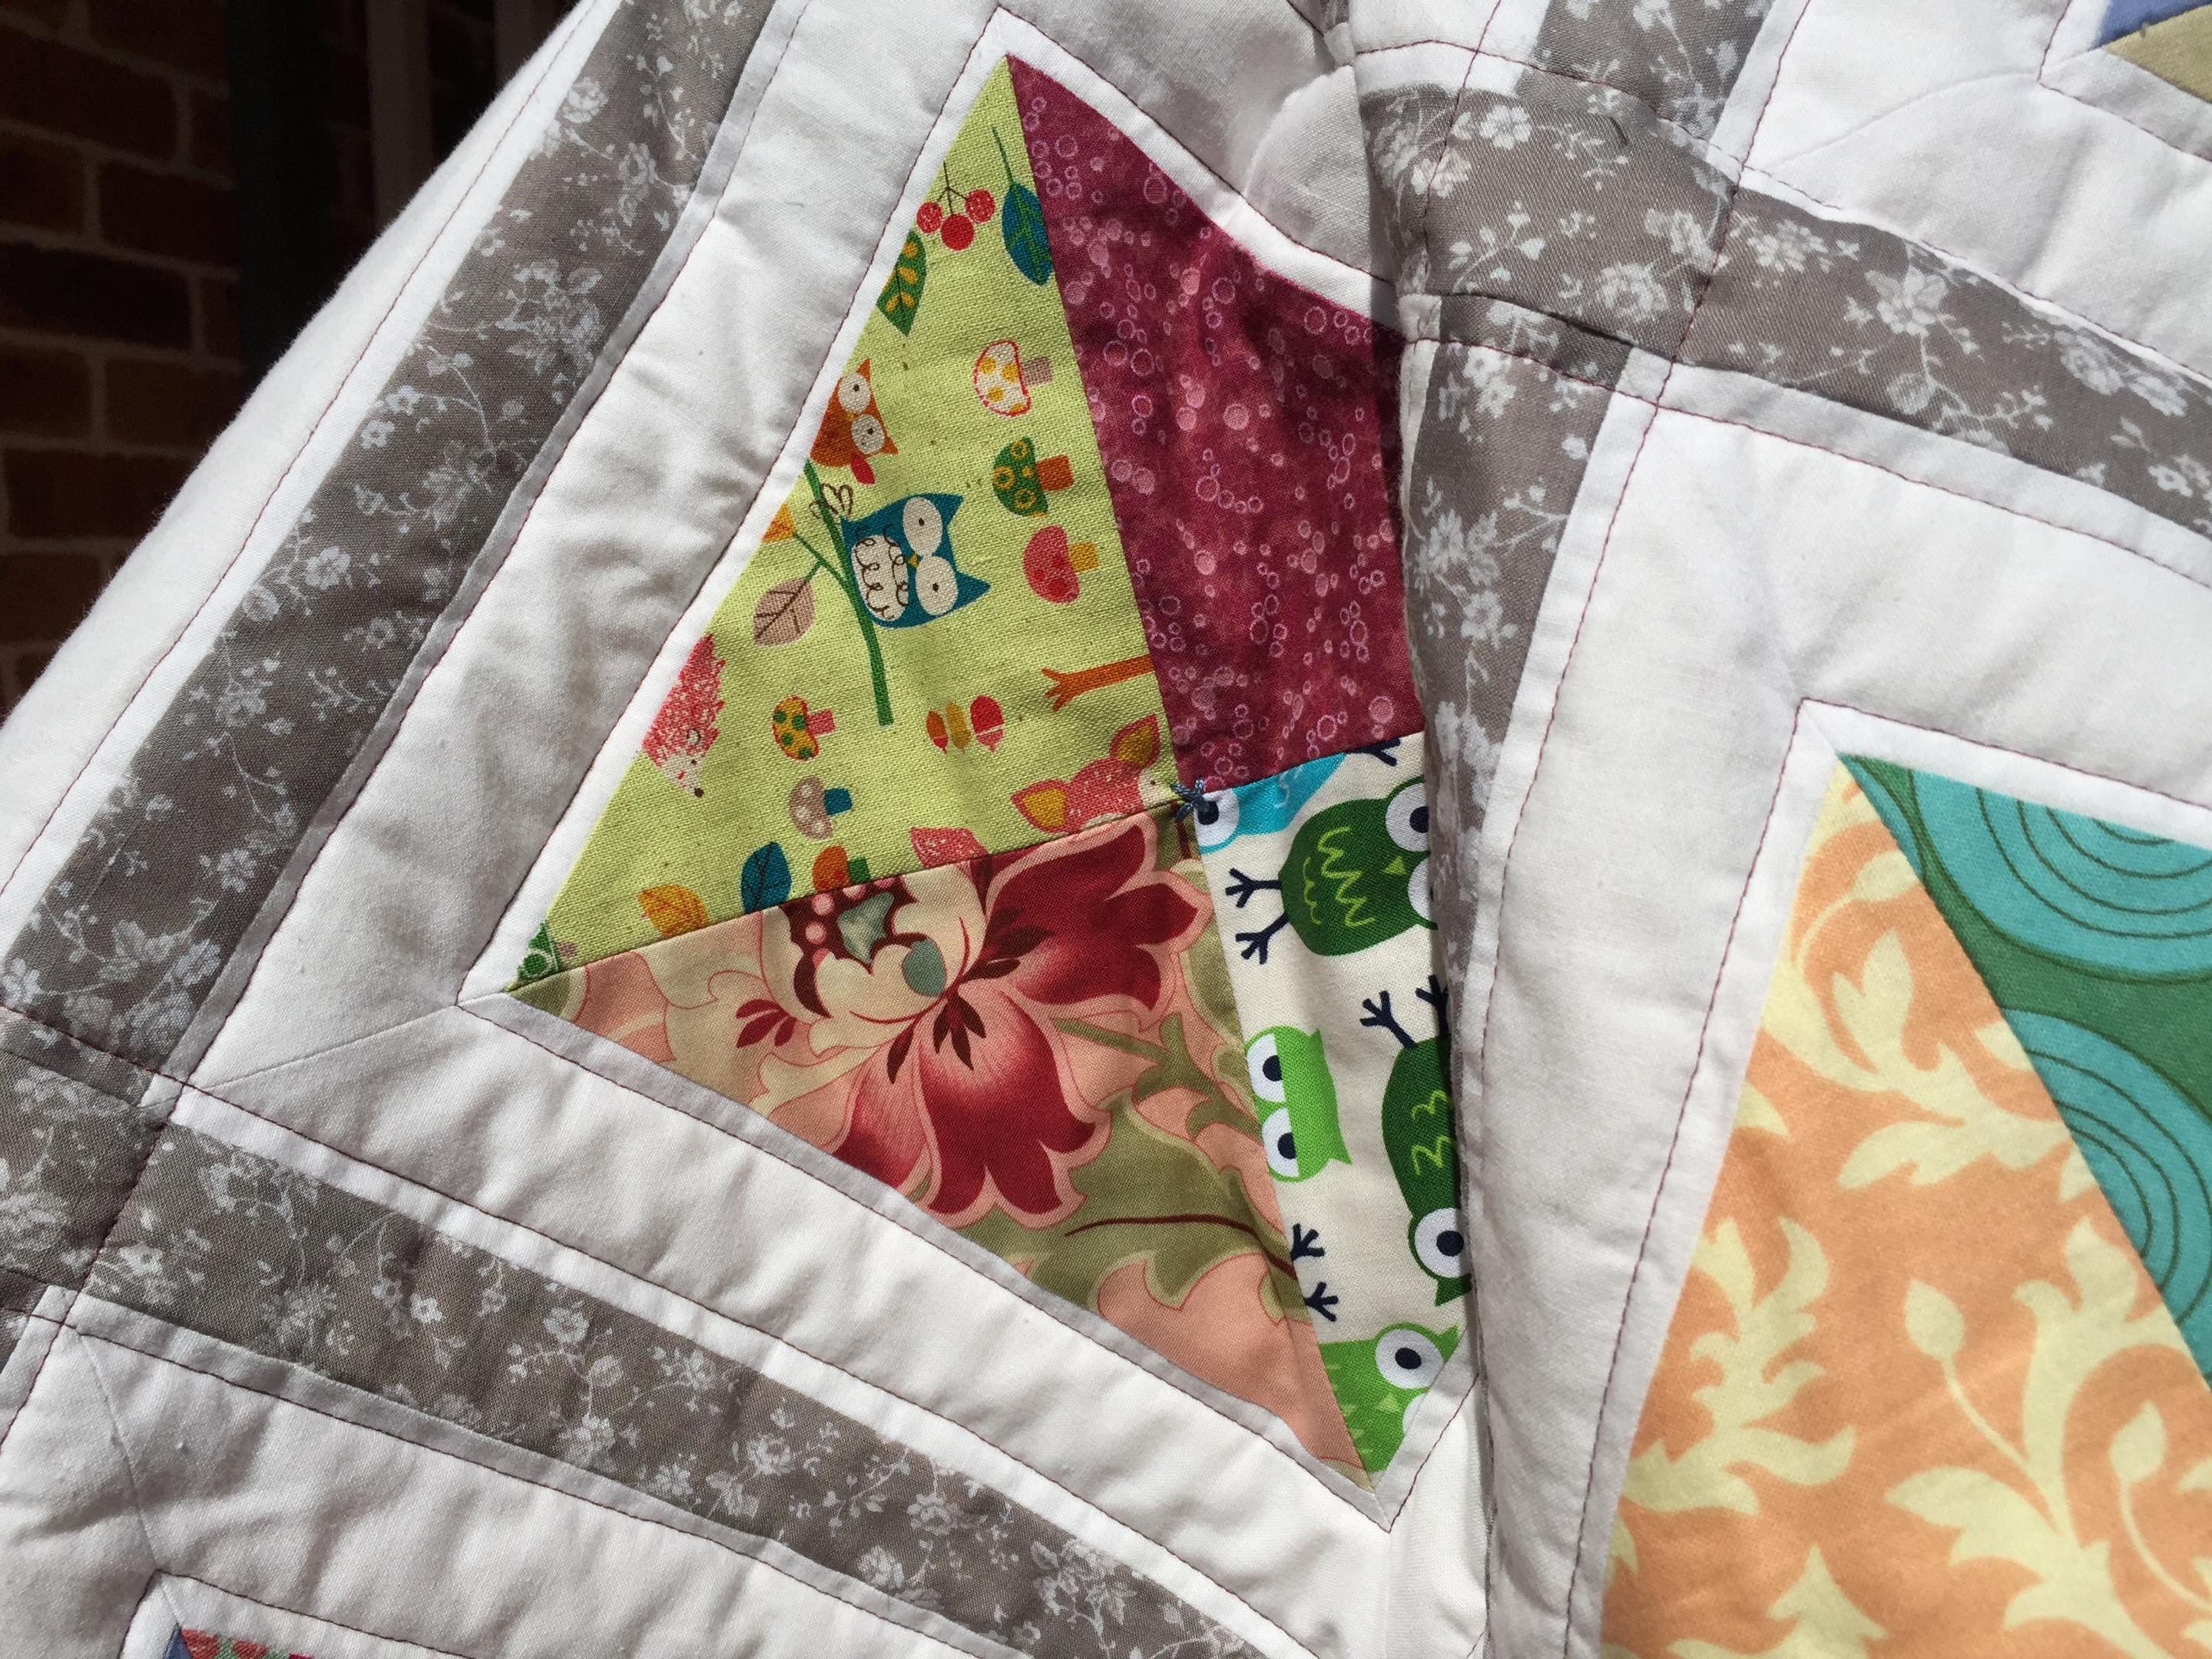 In my tutorial for this quilt top I showed how to put the diagonal sashing together. I decided to echo the diagonal lines with some quilting in contrasting thread.
 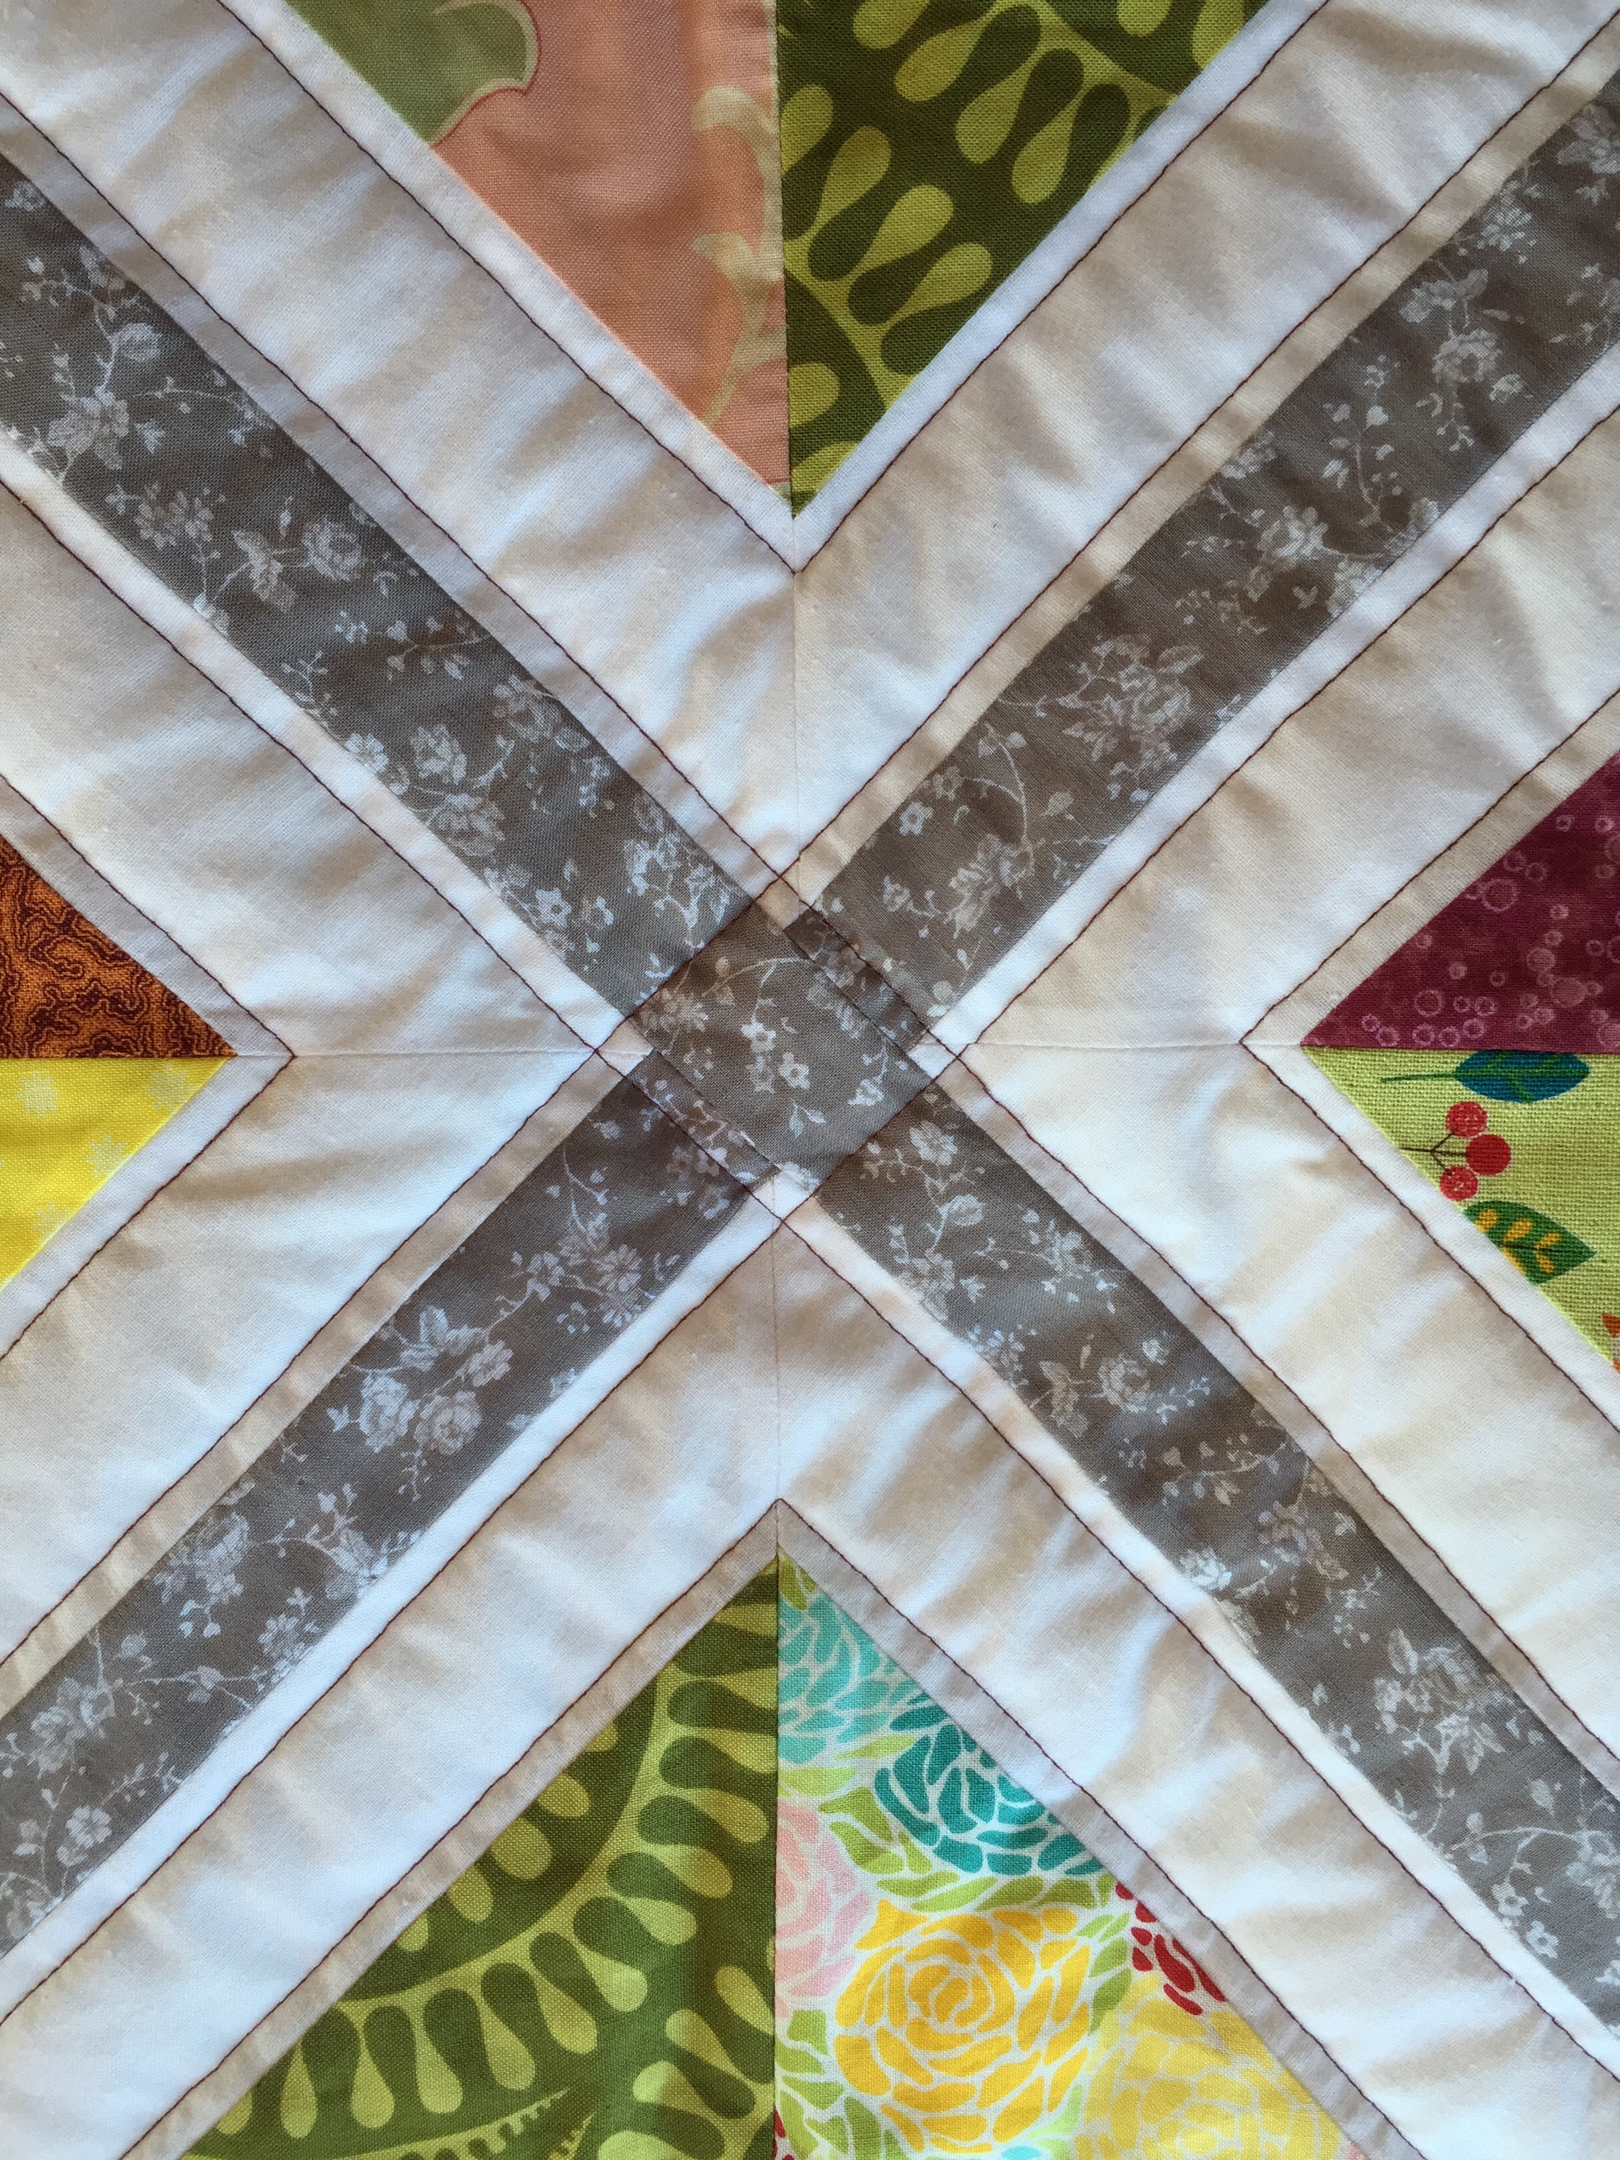 At the centre of each coloured square I placed a single tie, in blue thread. I would have used a button, here, if the quilt was destined for an older child!
  I debated whether I should put a felt fabric flower in the centre instead, but decided against it on the principle that it would be too fussy, and maybe also still choke-able.
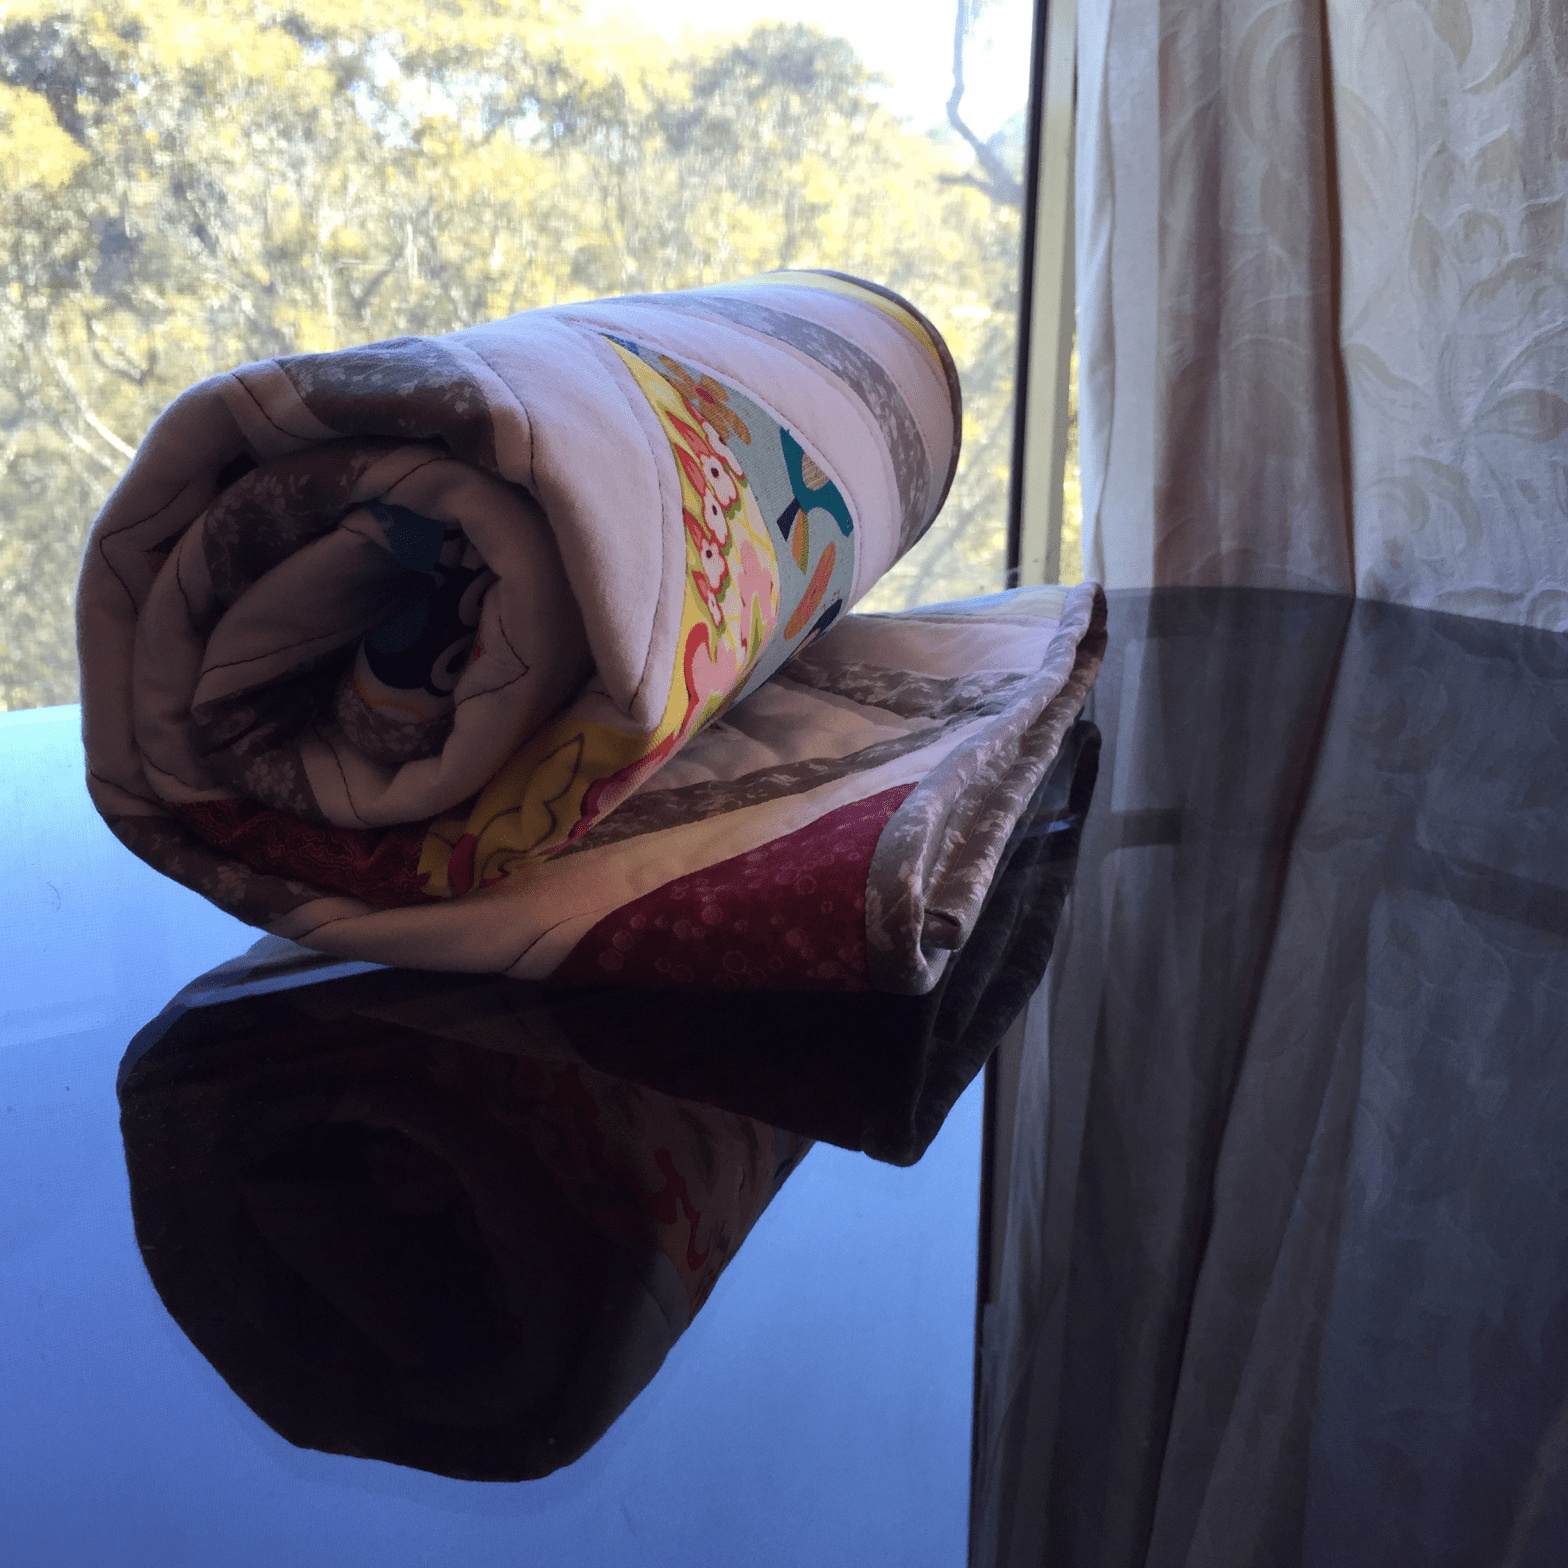
  The backing of the quilt is a flannelette baby wrap from when Will and Evie were little. Now that they are grown out of these, I’m using them up in meaningful gifts like this one, or to make children’s clothes (winter nightgowns, for example).
  My inspiration for this quilt came from this quilt, by Lee at Freshly Pieced. I had some orphan signature blocks (like in this example) that had never made it into a quilt. I cut my signature blocks in half, added a whole lot more, and used some grey sashing I found at the local Op Shop to complete the design.
  I think Rusty-Ted likes it, don’t you?
 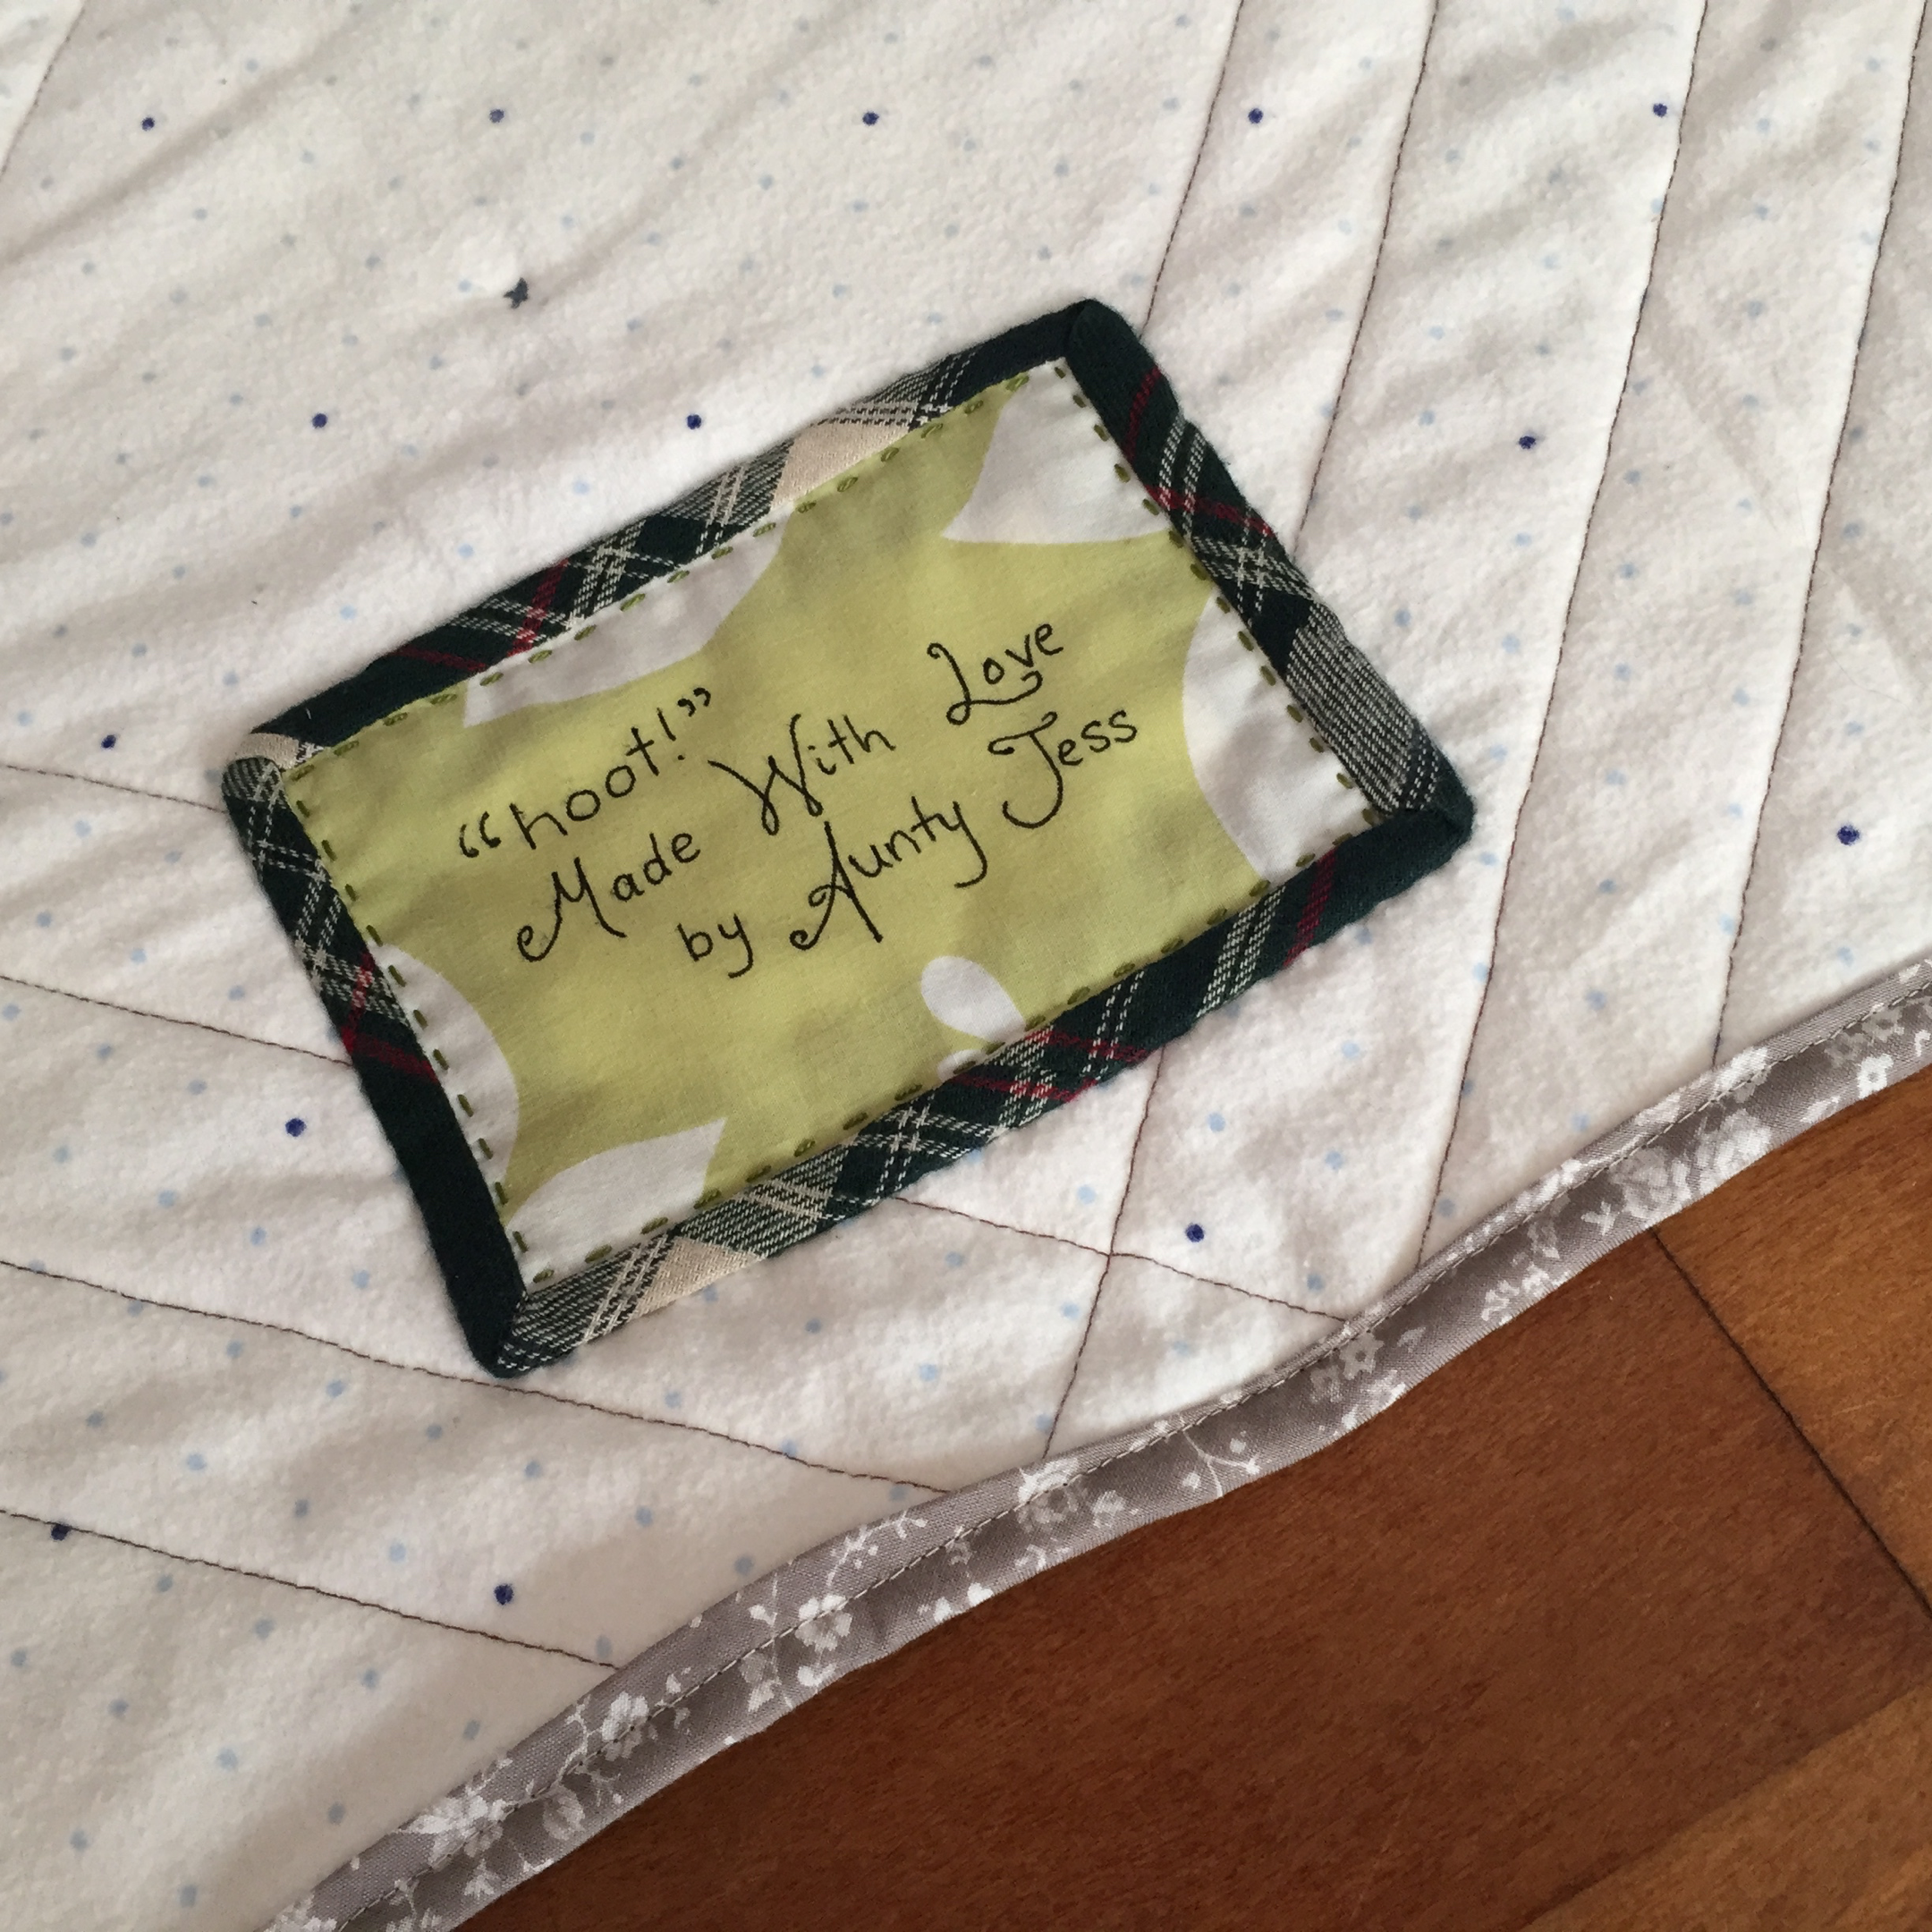 As this is destined for a new niece, I signed my quilt as “Aunty Jess”. As much as I’d love to keep this one for myself, it’s going to give me great pleasure to give it away, some time in December. Not long now!
 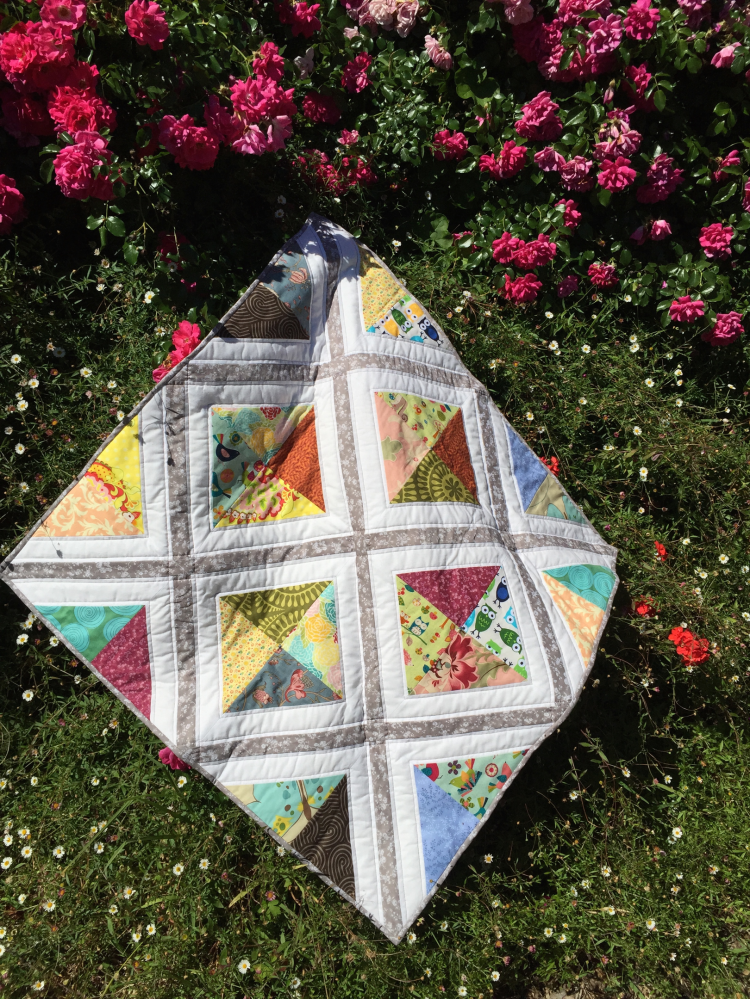 Linking up with TGIFF, and Crazy Mom Quilts. 🙂
Healthy lunch fun
Recently I purchased some new lunch boxes for the kids, mainly because I realised Will couldn’t open the small Decor boxes all by himself. As he is going to start school next year (yeah — jaw drop), I thought it might be a good idea to use boxes with lid clips.

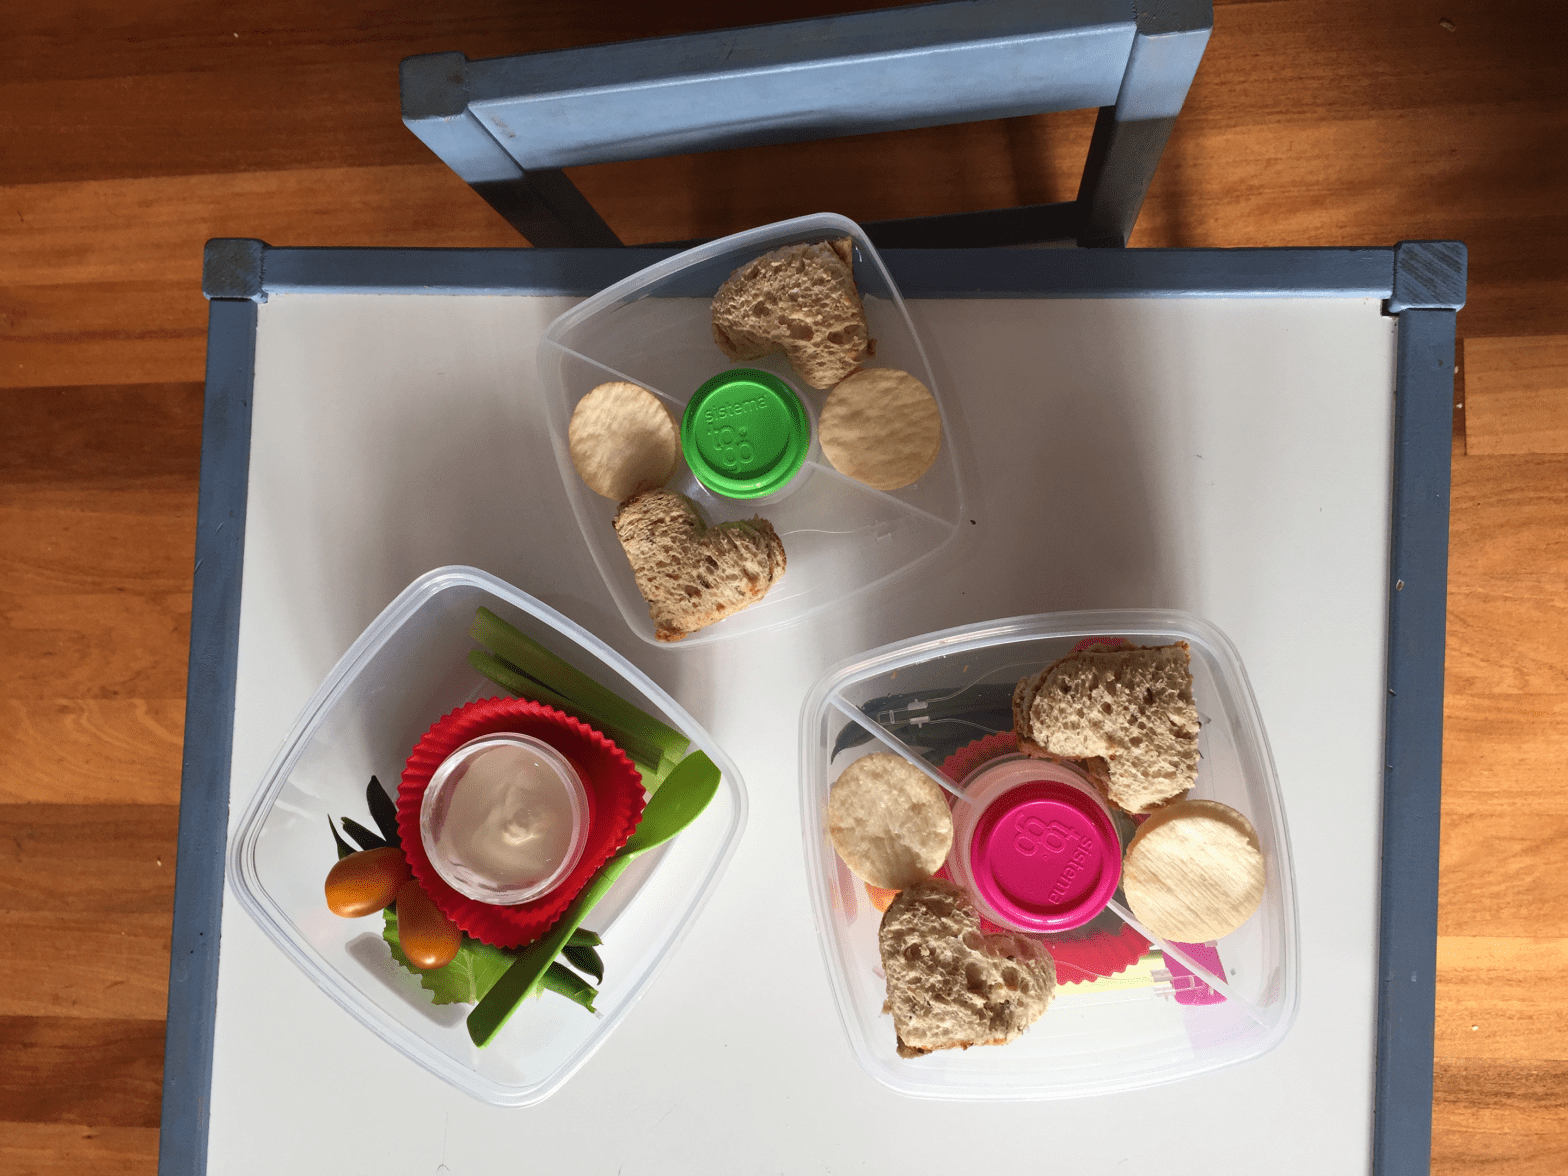
I had a lot of fun packing these lunches! In each box, I put:
- 3 celery sticks
- 4 green beans
- Half a mushroom, cut into pieces
- Two cherry tomatoes
- Some lettuce
- A small pot of honey-sweetened greek yoghurt
- Half a sandwich cut into heart shapes
- 4 plain rice crackers
- A pot of 4 green olives
I knew that some of the food would come back because the kids find the yoghurt quite filling. I was surprised to find that William had picked at his food:

Evie did a better job, leaving only a few bits in the bottom:

I think William wasn’t very hungry that day, or possibly there was an over-abundance of fruit at morning tea time! In any case, I let both kids have another go at the lunch box whilst I made tea.

Evie polished off most of her box, but William didn’t touch it (or his dinner either). That’s why I call my kids “Friend to Chickens”! The leftovers went out to the orchard for the chooks.
I continue to pack vegetables in their lunch boxes, even when I know they won’t eat it all. Why? Because that way this is a “normal” lunch. I want my kids to understand that vegetables form the bulk of what you should eat. They are not just a “side dish at dinner”.
You’d be surprised how many different vegetables kids will eat, if they get regularly served different choices!
Tutorial: Diagonal Quilt Sashing

Hello everyone!
I’ve been a busy bee over the last couple of weeks, preparing for the crazy Christmas and Birthday season that is looming upon me! William was born two days after Christmas, and now I have a soon-to-be-niece arriving somewhere around December 14, so there is much to do!
Luckily I had a couple of ideas for quilts already tucked away. 🙂 The quilt I chose for my sister’s babe is a variation on the original wedding quilt I started for her. (I still haven’t finished her wedding quilt, btw, but a Free Motion Quilting foot is totally on my Christmas list, so next year IT’S HAPPENING!)
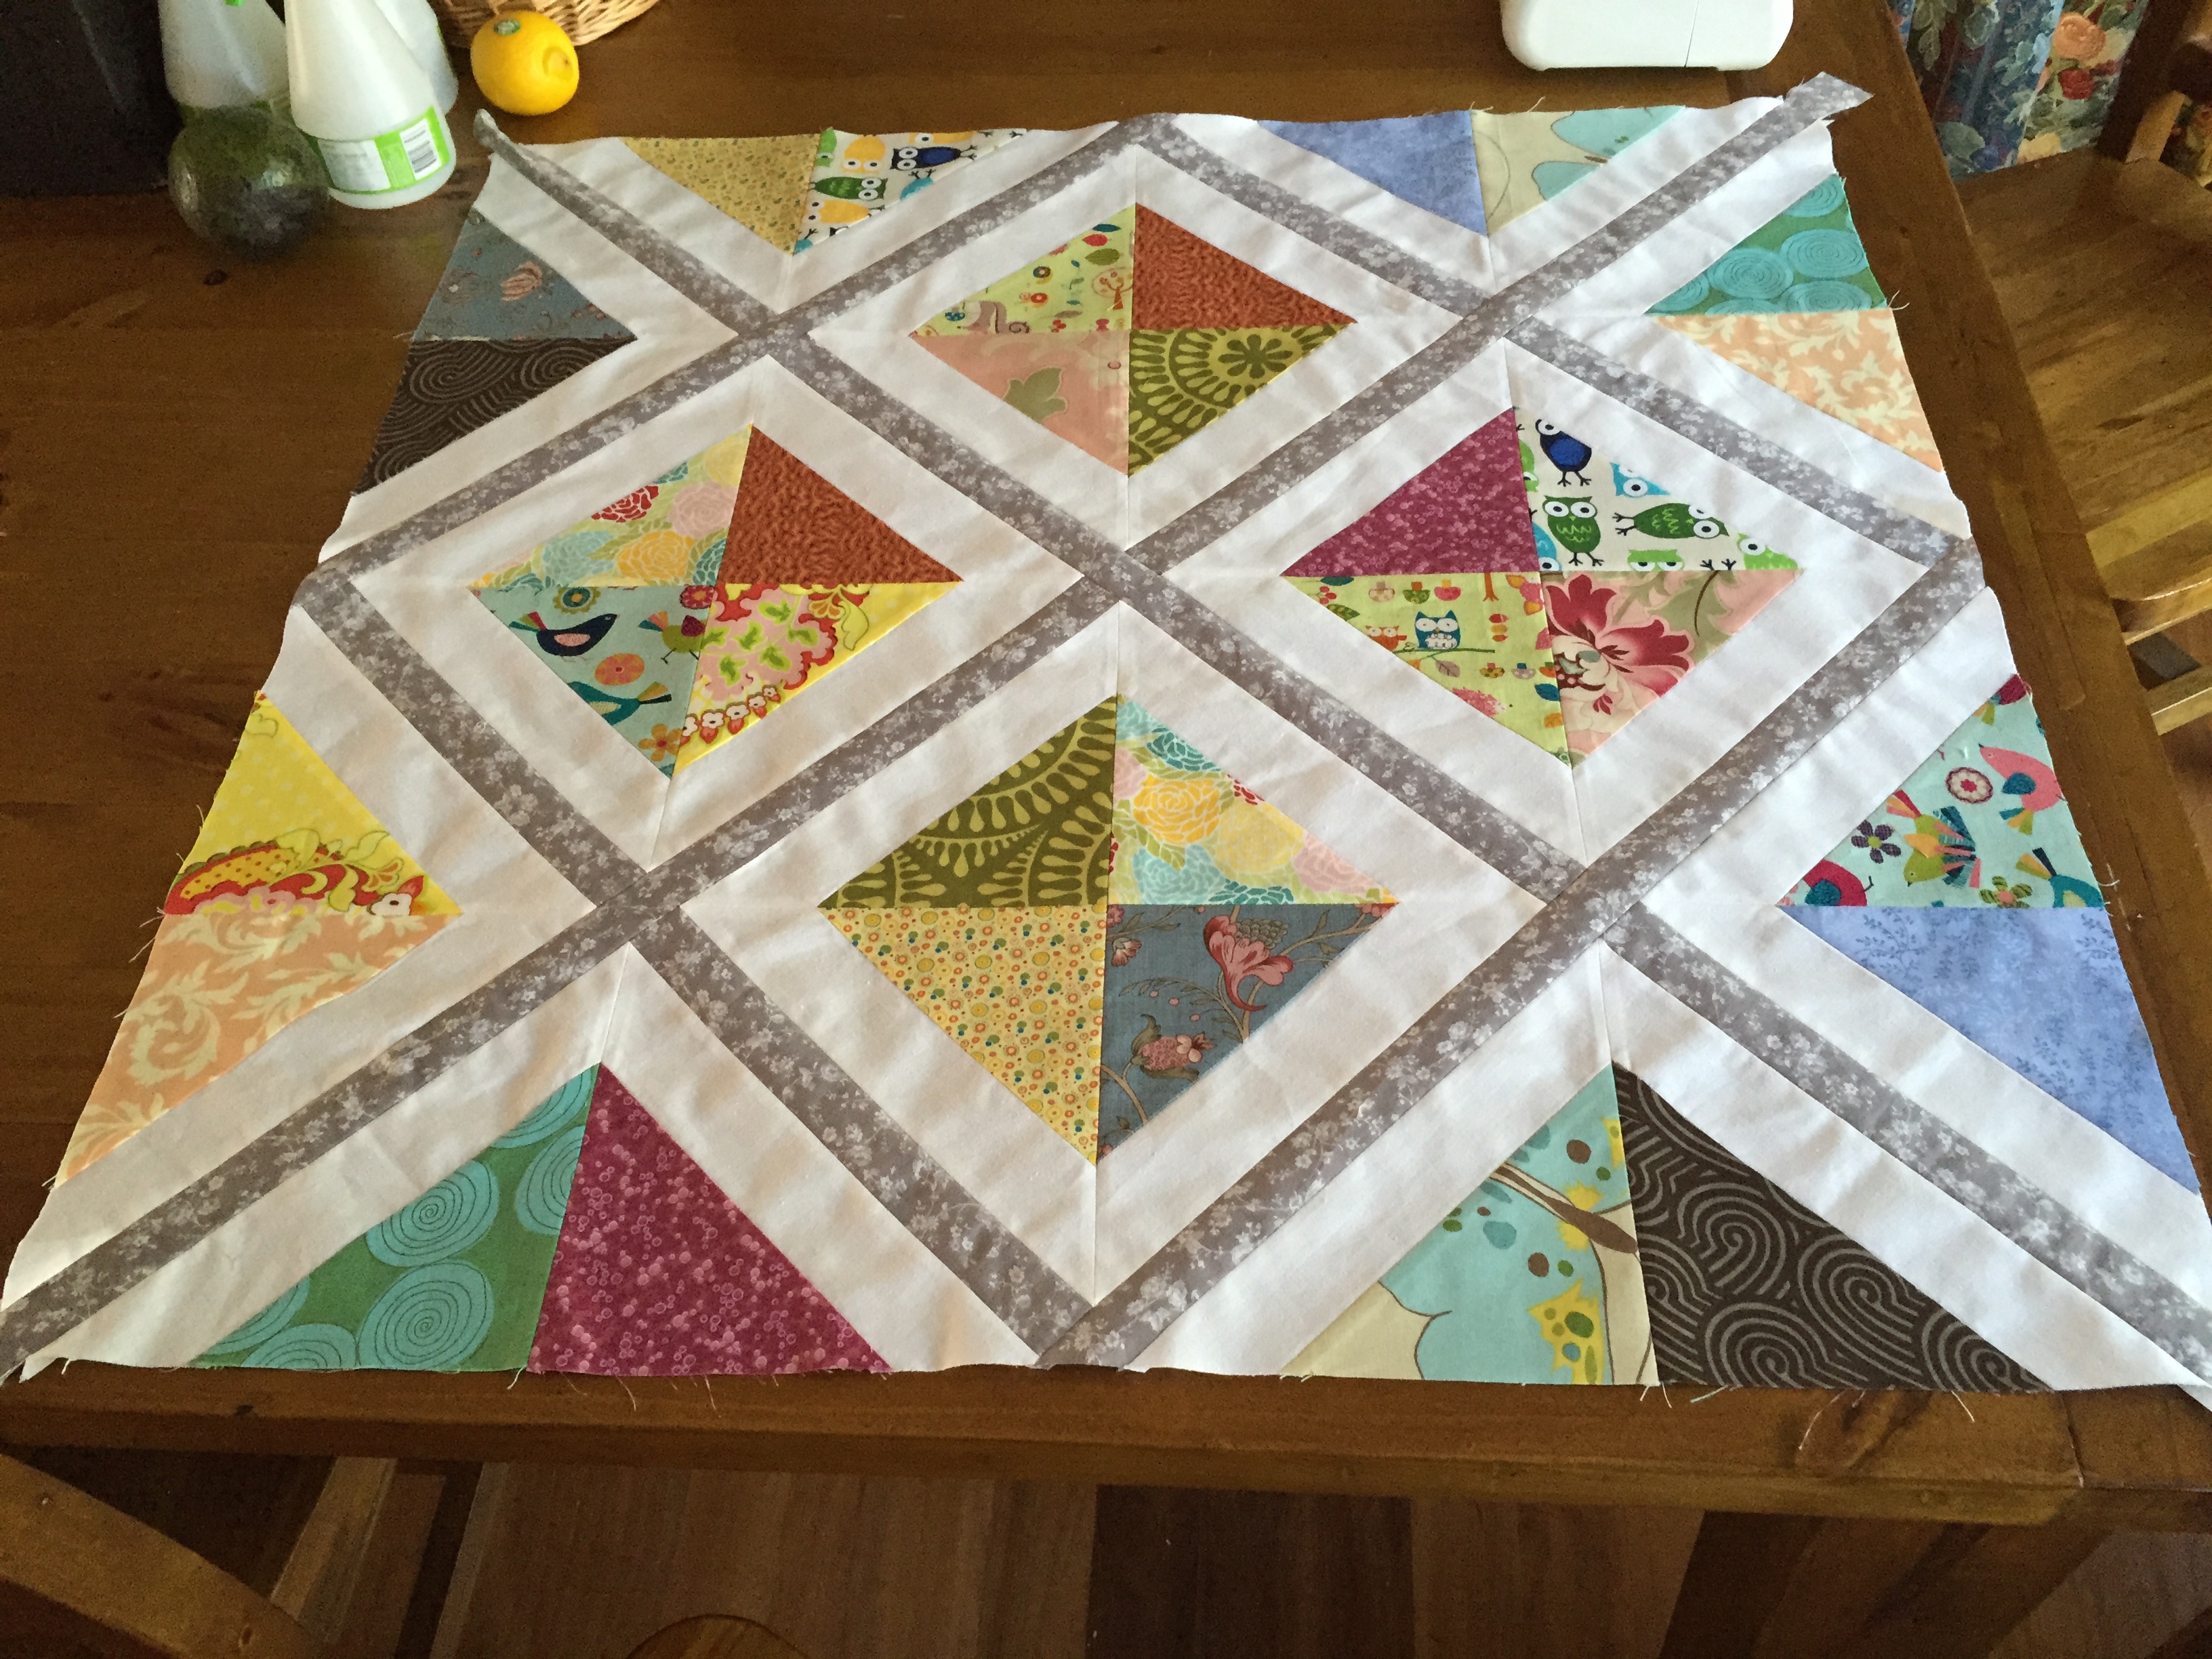
Today I wanted to share a tutorial for putting diagonal sashing into a quilt, based on the quilt top I made:
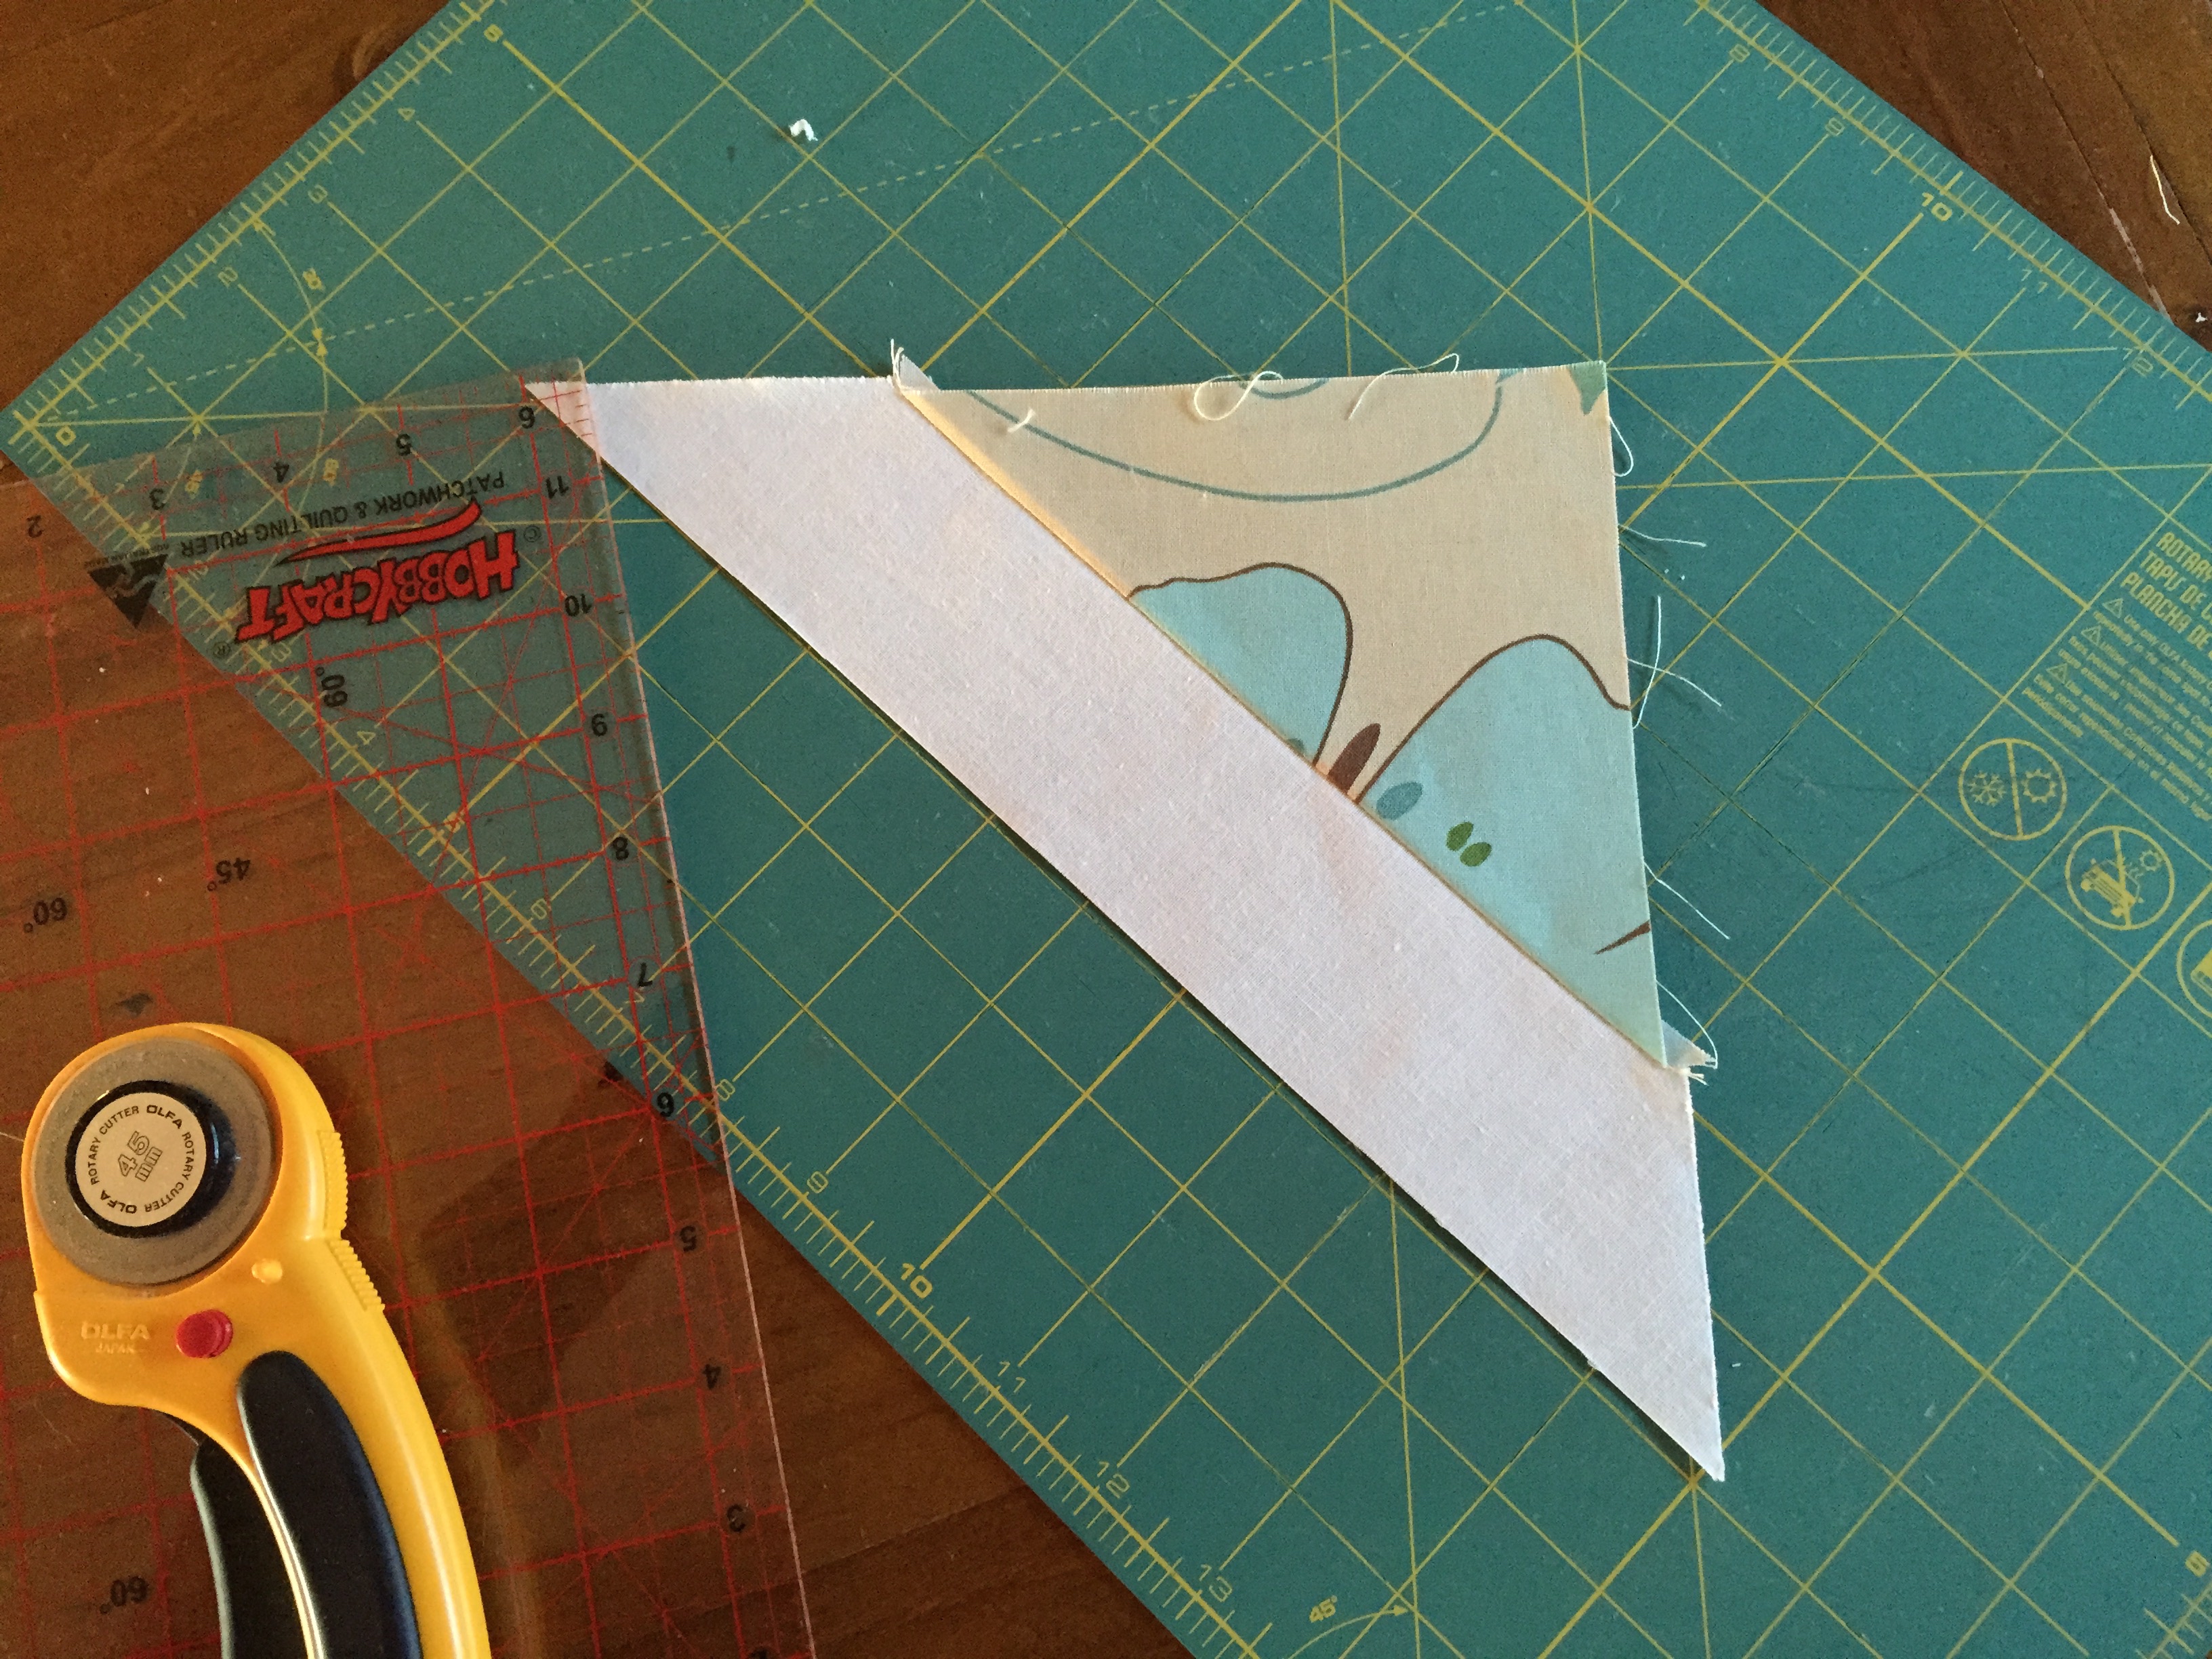
I started the quilt with triangular blocks shaped like this:
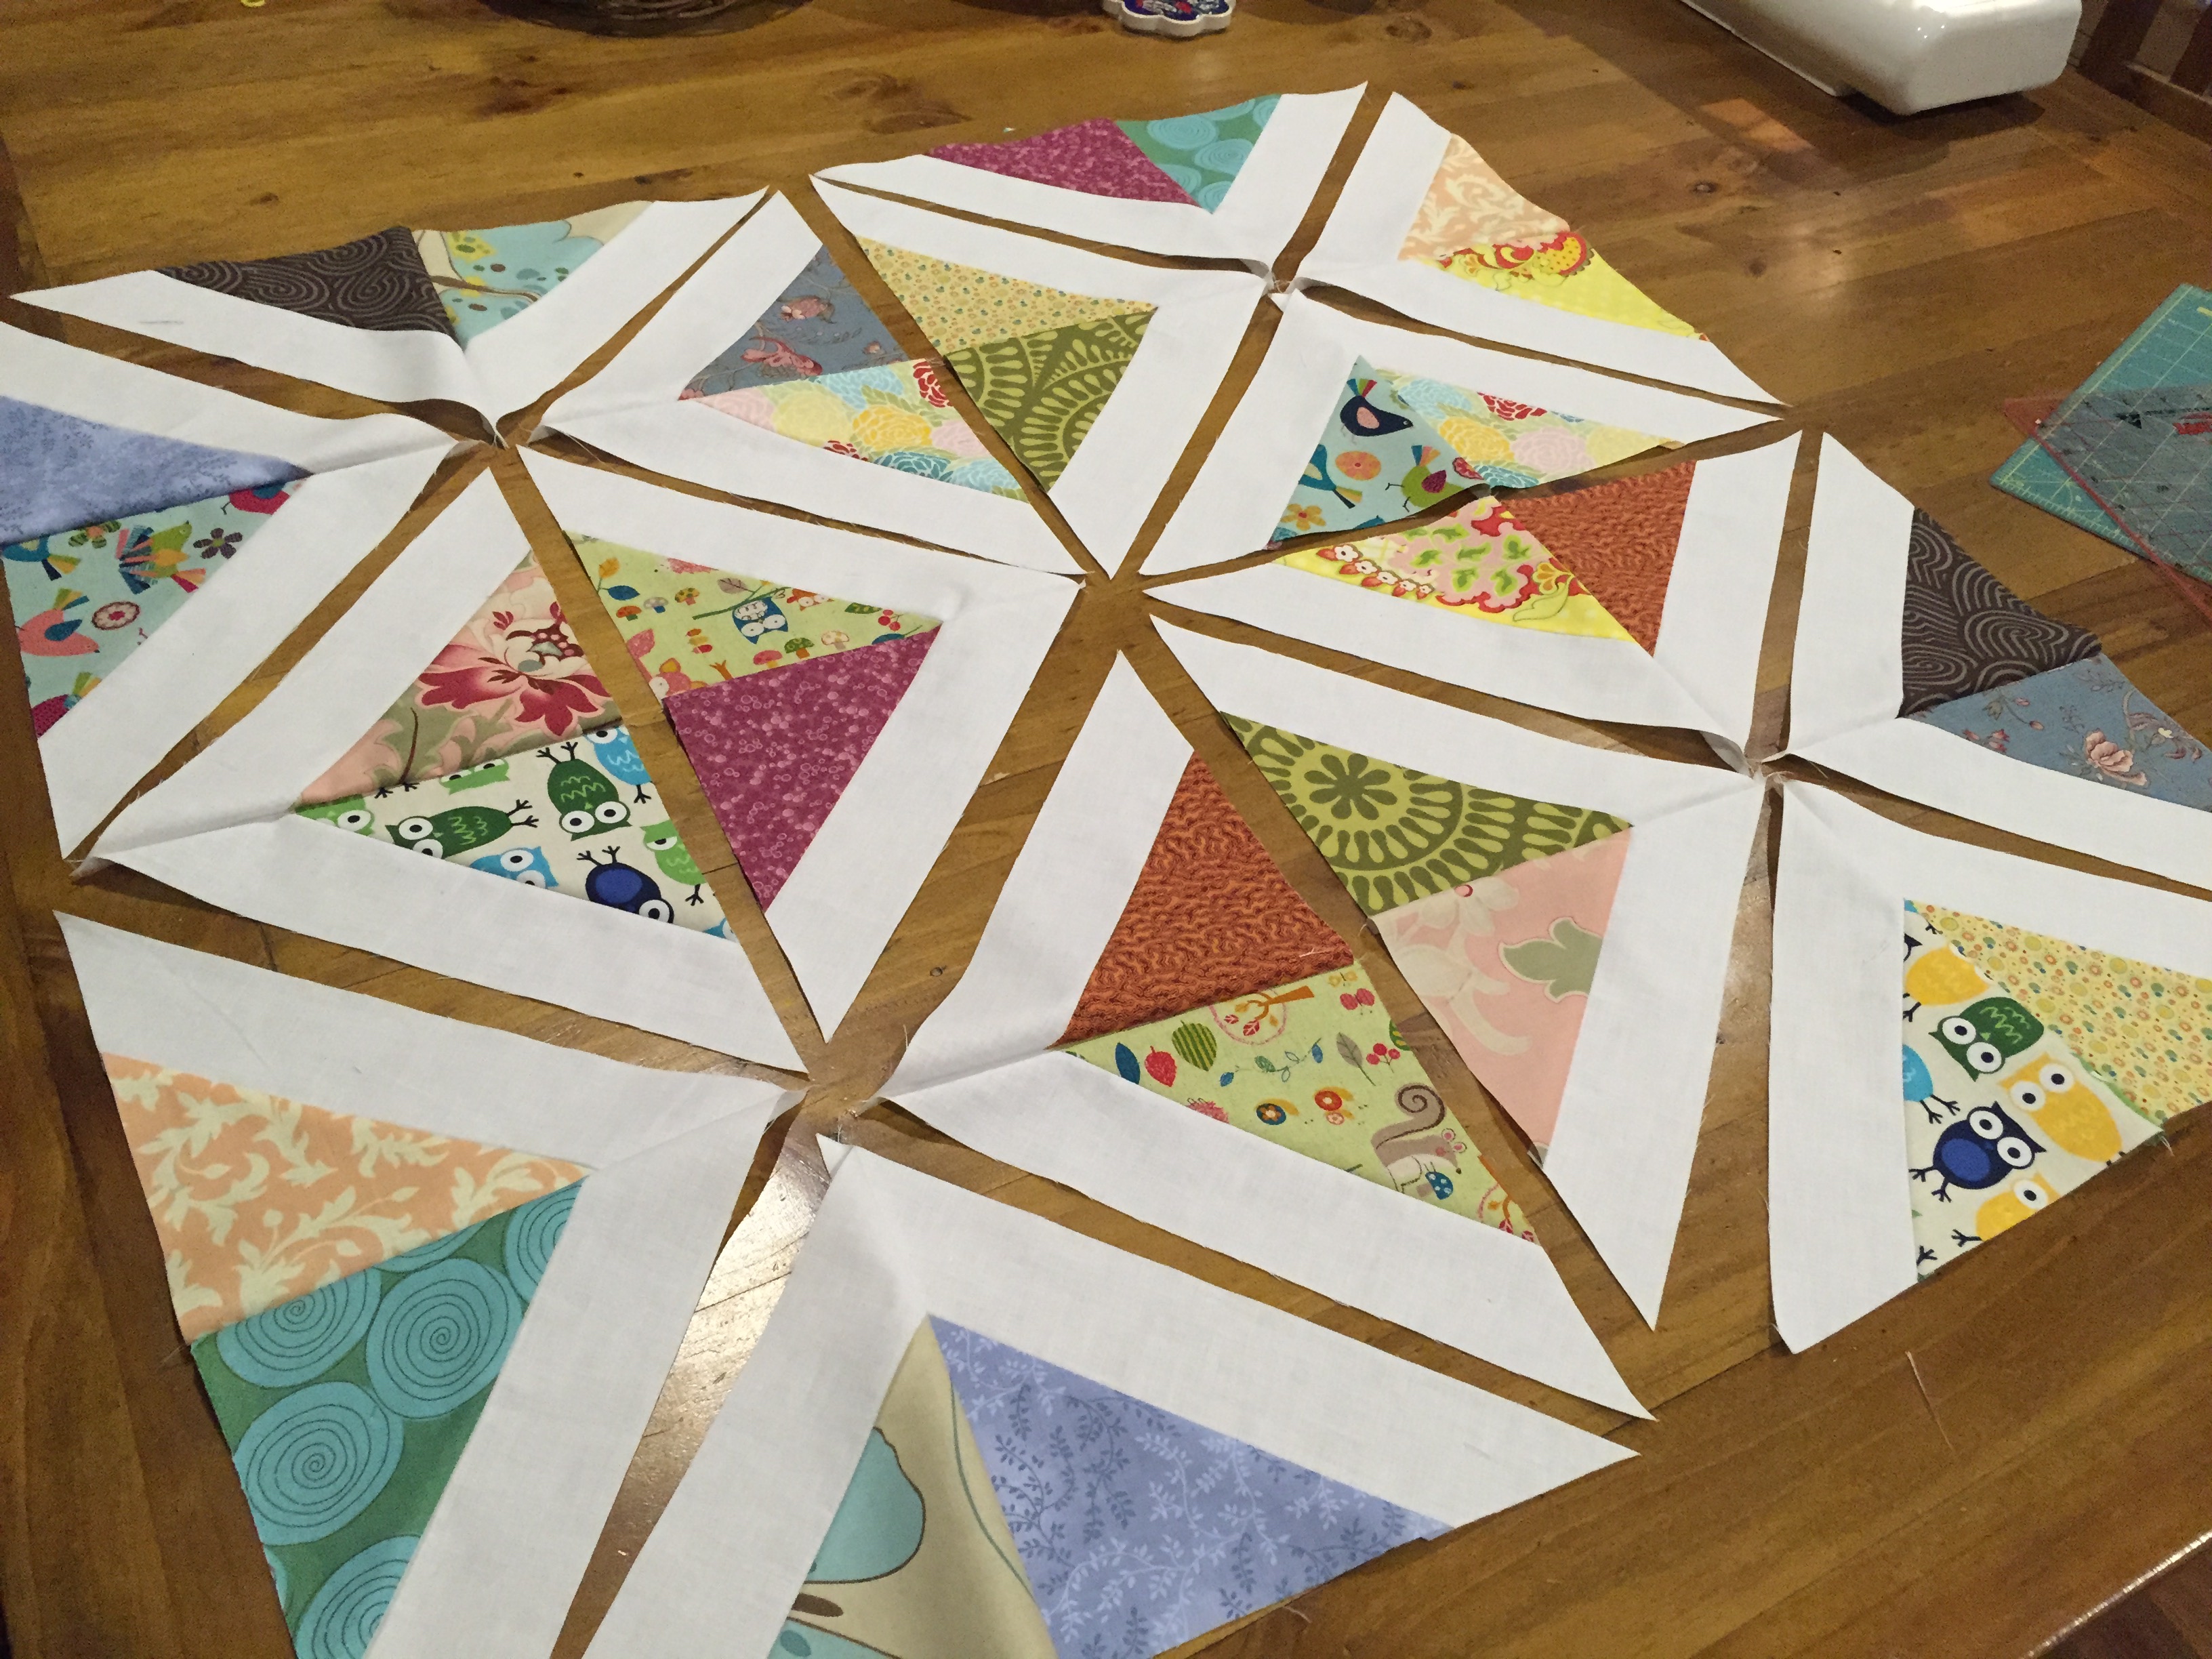
I arranged these into a pleasing arrangement, and worked out where I wanted my sashing to go (between each of the white sashing sections):

When you place your blocks on point like this you have a couple of choices about how to do the sashing.
Method One

This method allows you to put your blocks together by simply joining them up in rows and columns.
I decided not to use this method because:
- It looked fiddly at the corners, especially getting all those points lining up (8 seams converging on a point!).
- It would me take a lot of time to cut and assemble.
- It looked wasteful of fabric, because you have extra seams (using up seam allowance) where each block joins on.
- I wanted a reasonably narrow sashing, which would be tricky to divide in half and have room for seam allowances.
- I didn’t want a seam through the middle of each grey strip.
Method Two

I think that my source inspiration for the quilt used this method, with grey strips inserted into each block (a “block” here being one quarter of the size of my big squares). Blocks are then sewn together in rows and columns.
I decided not to use this method either, because:
- I was concerned I’d have trouble matching up the blocks, especially where each coloured triangle meets up, and where the corners of the grey sashing meet.
- It looked reasonably fiddly to cut and assemble because you need short strips throughout.
Method Three – Mine
My method used longer strips of sashing to join several blocks at once. The block structure is similar to method one, with four triangle pieces arranged with the colours in the centre.
To make the blocks, sew together two triangles at a time:
Then sew together the central square sections into a “block”.
Press your seams open, rather to one side, to avoid bulk where the points meet.
Here’s what your quilt top looks like now:

Now we are ready to put the sashing in. Let’s start with joining the two corner pieces together:

(Totally wish I’d taken a picture of that step! Nice excuse for some colouring in, though 🙂 ).
- Take the left triangle section, and add a strip of sashing down the right hand side (marked A on diagram). Press the seam open flat.
- Then lay the other triangle on top of the grey sashing (right side facing down), lining everything up along the top. Again, sew down towards the corner and press the seam open.
- It’s important to leave a little extra sashing at the corner point — don’t cut it off!
Use the same technique to join up two of the square blocks, making sure you align the top edges of the squares.
Now you have something that looks like this:
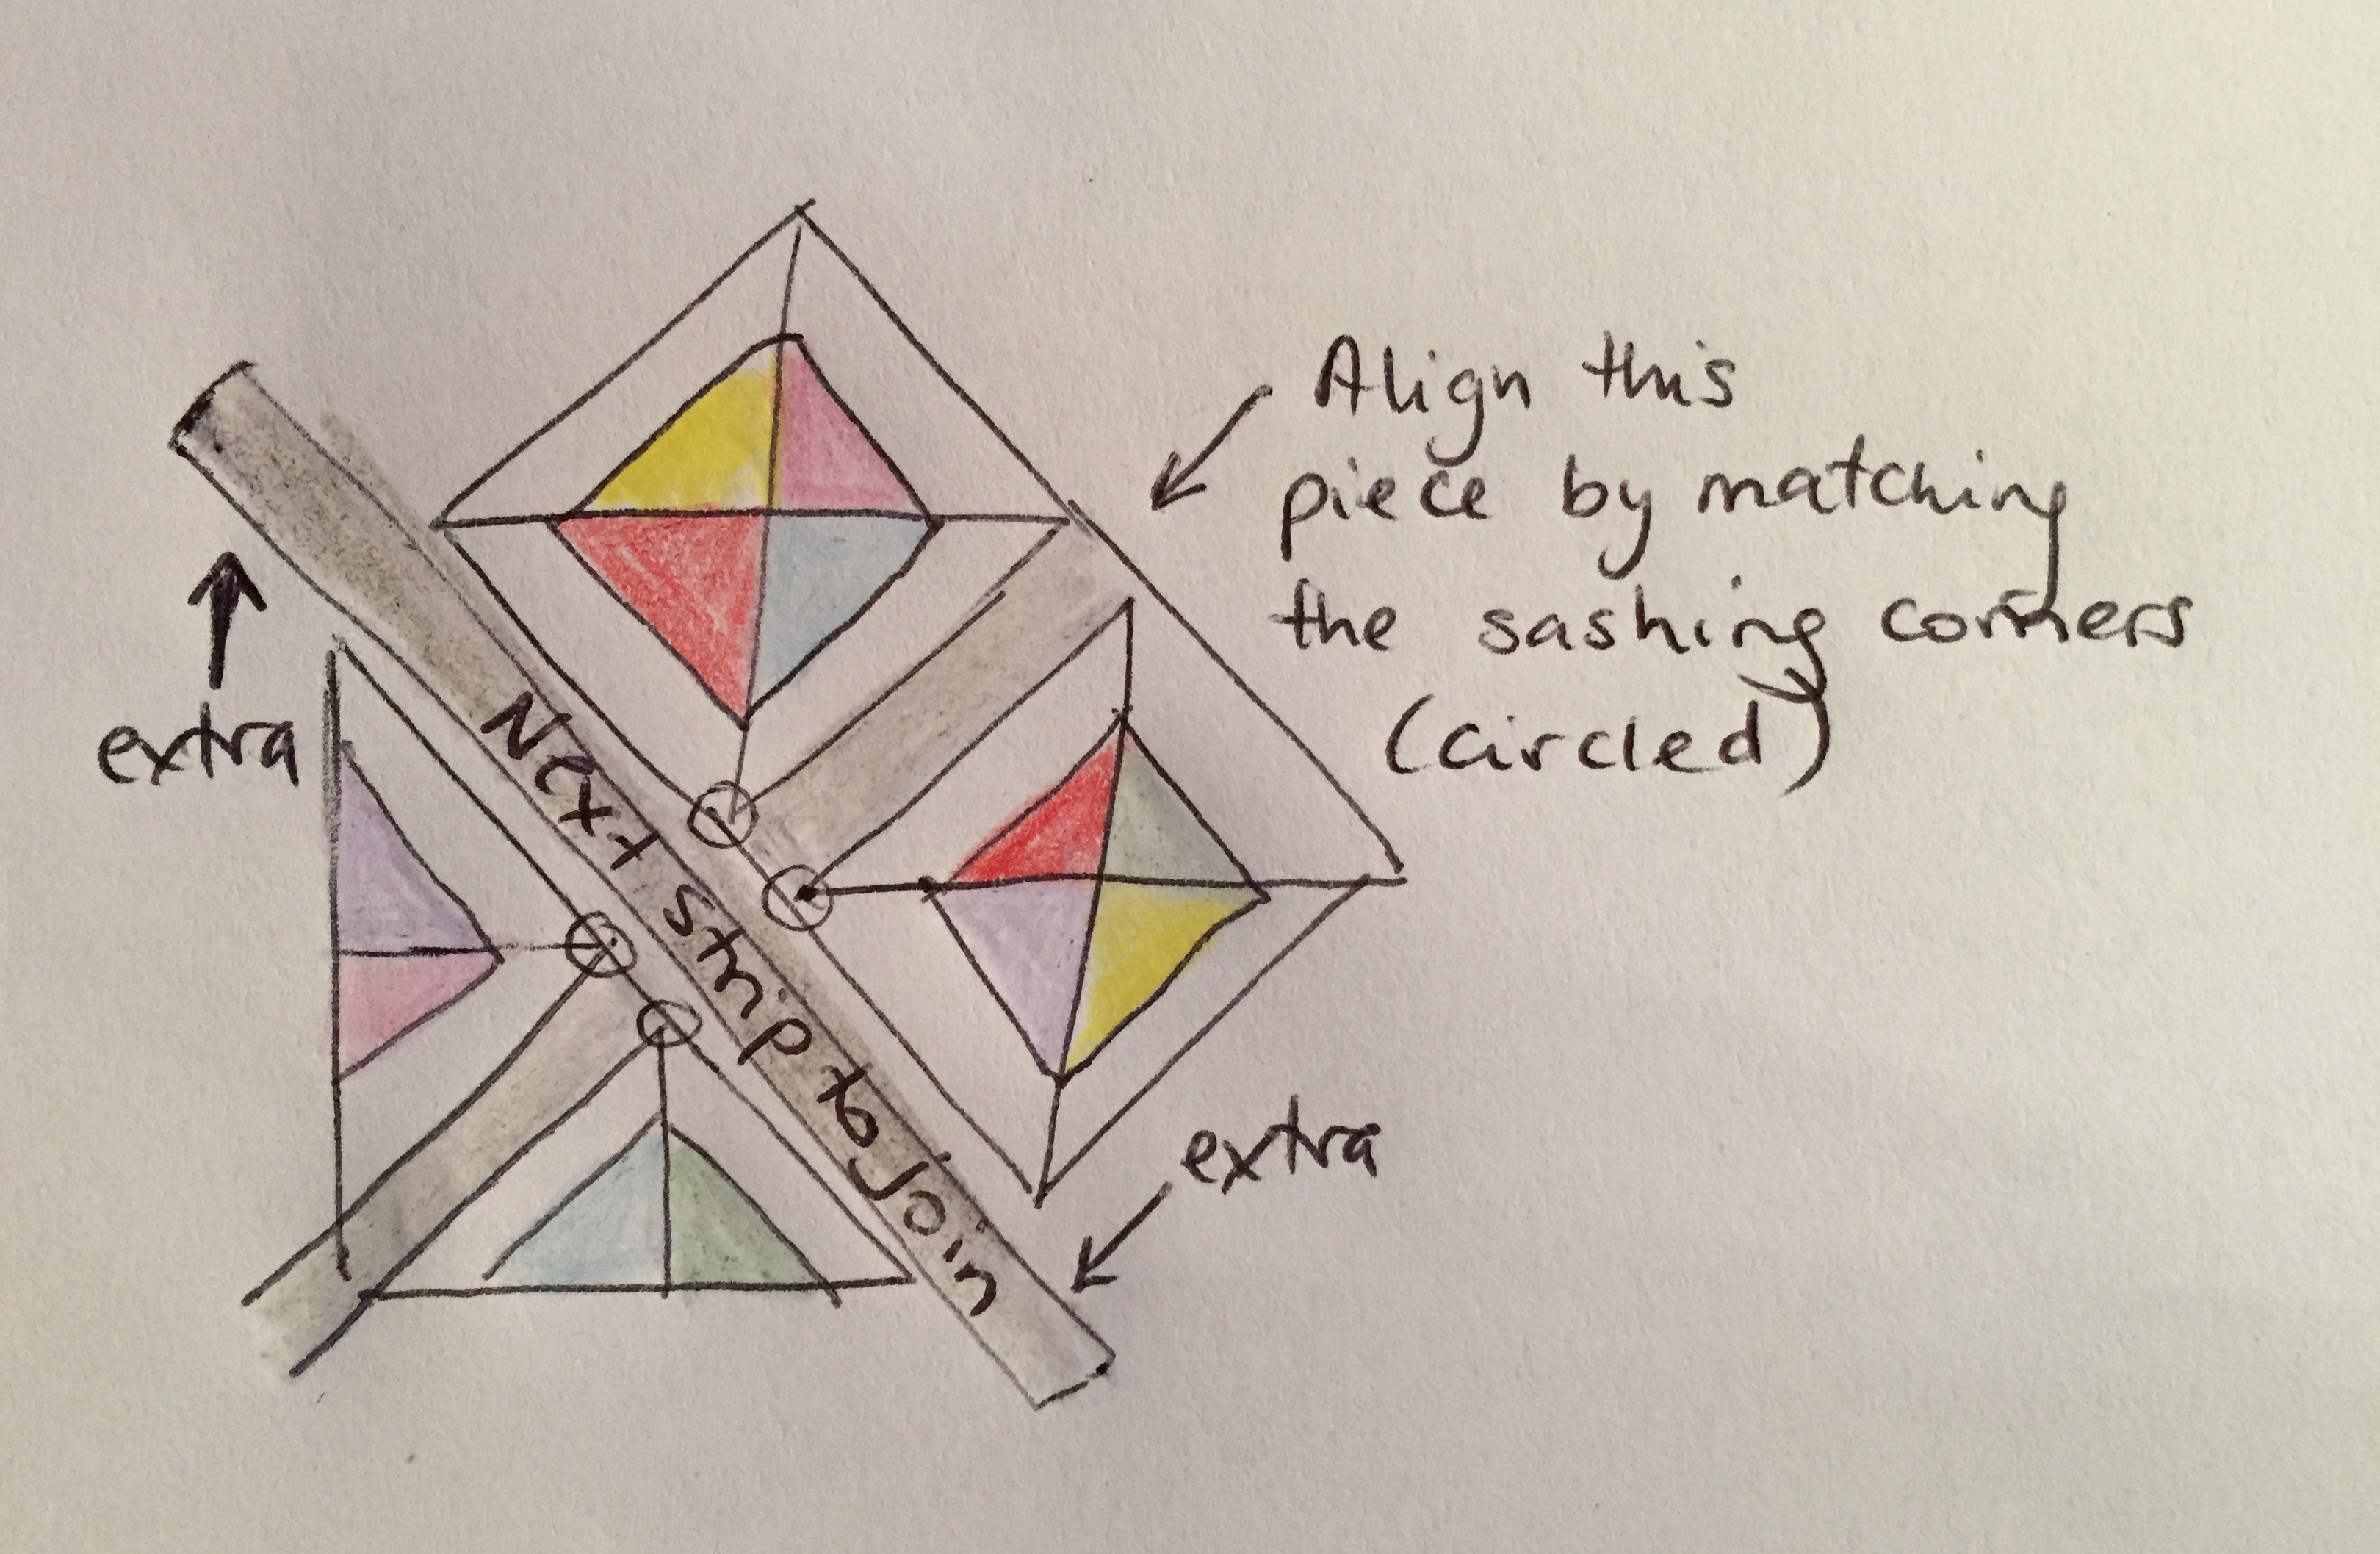
When joining the next strip on to the triangular piece, make sure a bit of sashing hangs off each end of the diagonal (marked as “extra” on the diagram).
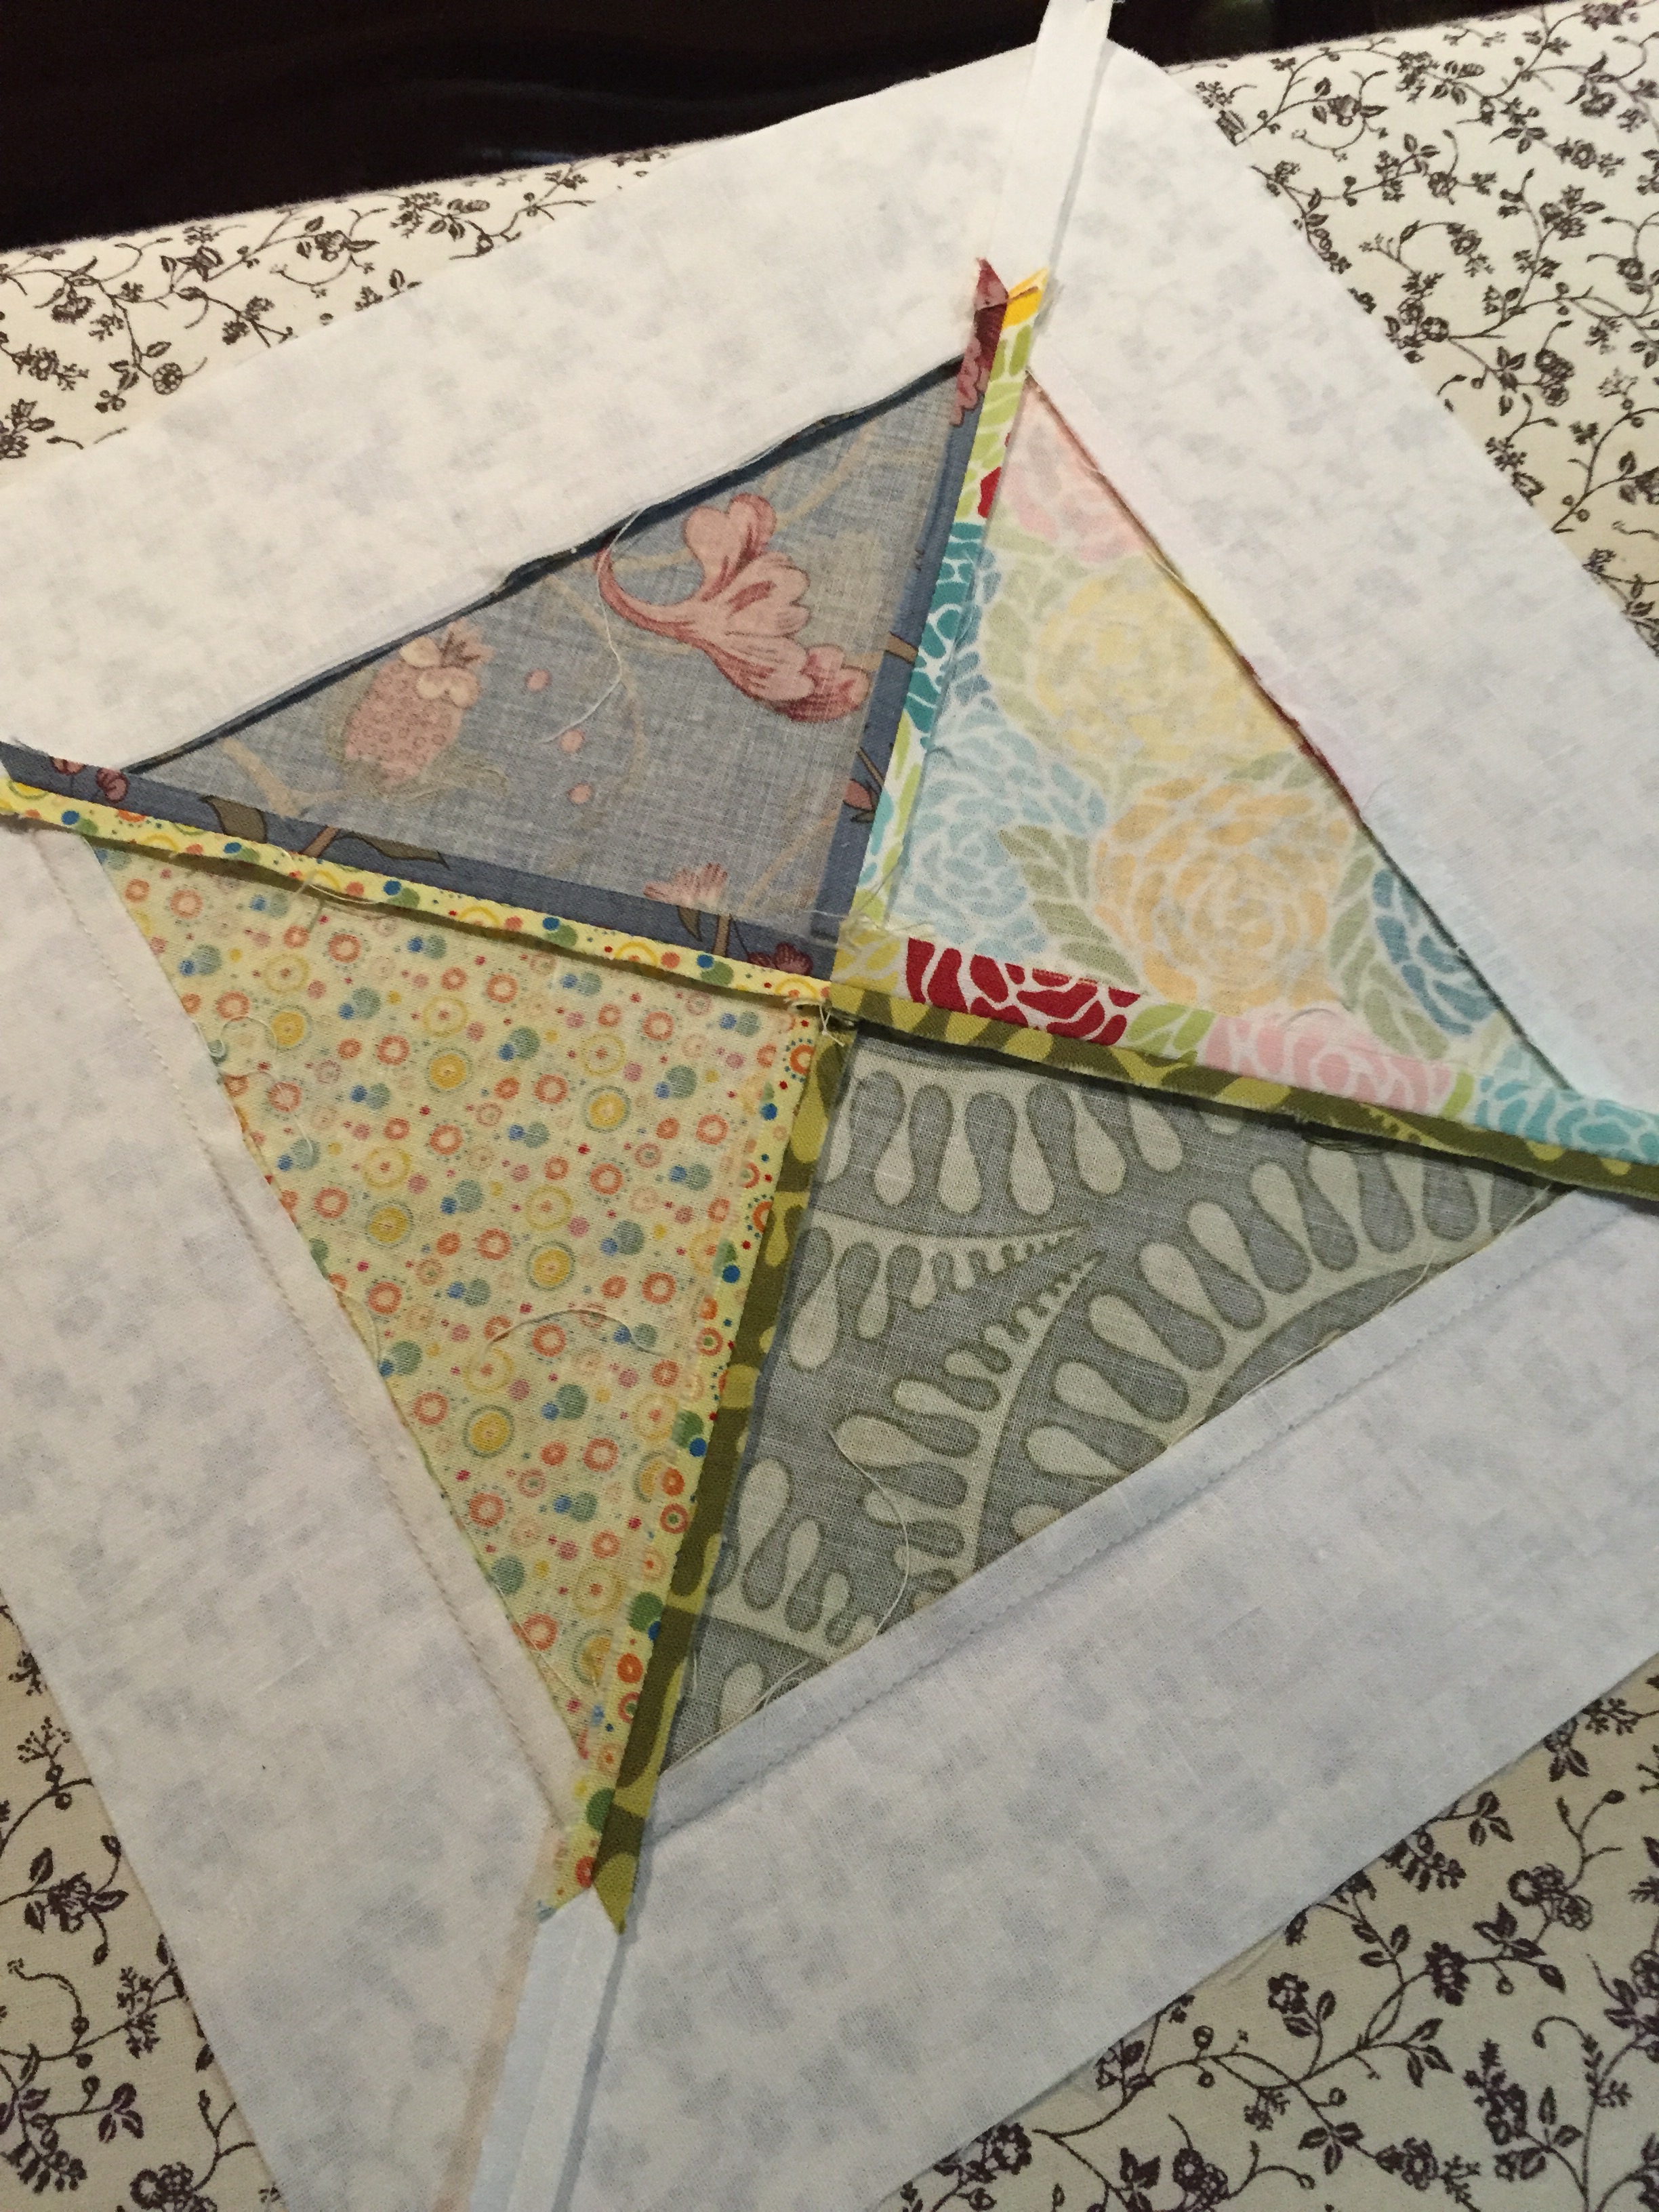
Then join the square block onto the sashing, lining up the blocks so that the grey sashing sections overlap. The following picture shows me “testing” to see if my pieces are lined up:
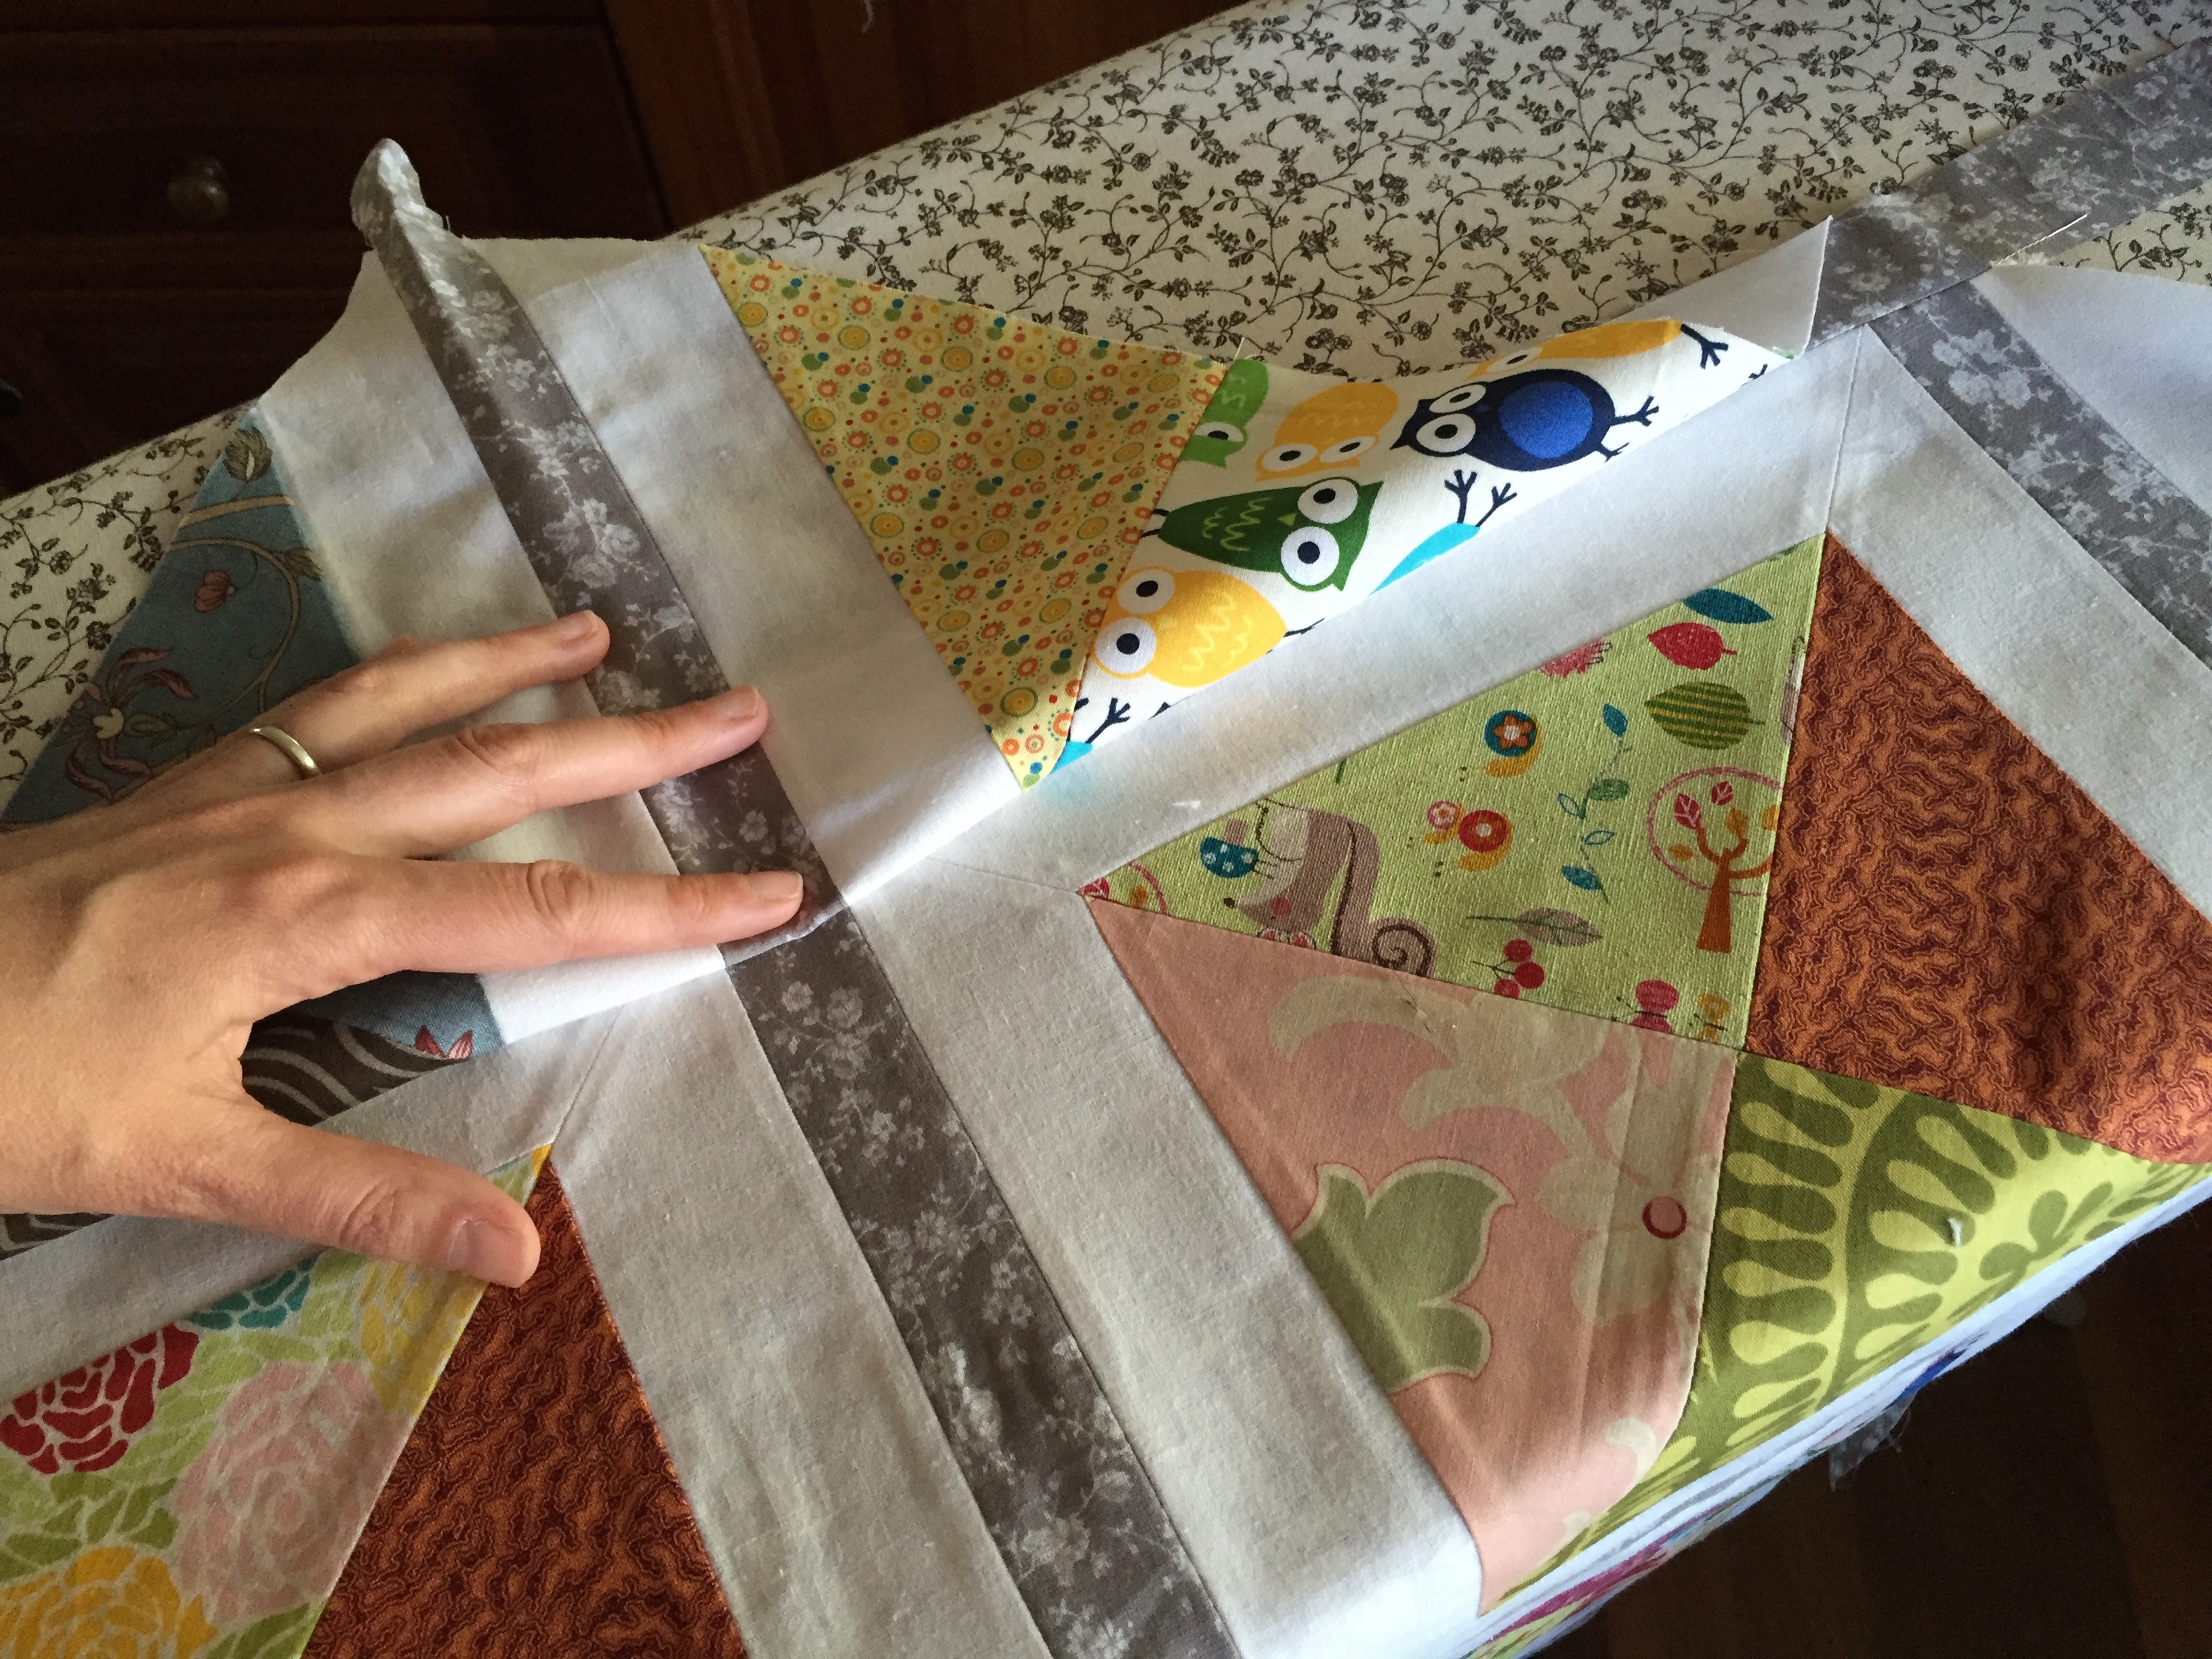
See where I am pinching the fabric? The grey stripe looks nicely lined up. In the photo above I have flipped the triangle piece up so that I can check the alignment. Once I was happy, I flipped it back down in order to sew the seam. Again, press these seams open flat.
Now your quilt top looks like this:

Guess which strip is next? That’s right, the centre piece, joining the square blocks together. Line these up using the grey sashing, rather than the white edges, otherwise the very centre of your piece may be slightly mis-aligned.
This is what the centre will look like after this strip is added:

The centre cross

Back of the cross
The seams are not too bulky, but I found I had to take care when pressing open these seams. The diagonal white seams are on the bias, and are easy to squish the wrong way.
Finally, join the two remaining triangle sections to the body of your quilt top, and you are done!
I trimmed off the edges off the quilt top, but not the corners:
I waited until I had finished quilting before trimming the corners, as I wanted to have some wiggle room if the quilting shrunk the corners in.
A few final notes:
- All the sashing is cut on the straight grain, and so are the white pieces. This meant it was easy to join them together, with minimal stretching.
- The edges of the quilt, though, have coloured triangles cut on the bias grain. This meant that when I was basting around the edges of the quilt, those coloured areas had a tendency to stretch. Be aware of this and secure the edges carefully before you put the binding on, to avoid tucks appearing.
At the end of the week I will show off the finished quilt!
Preparing for Potatoes

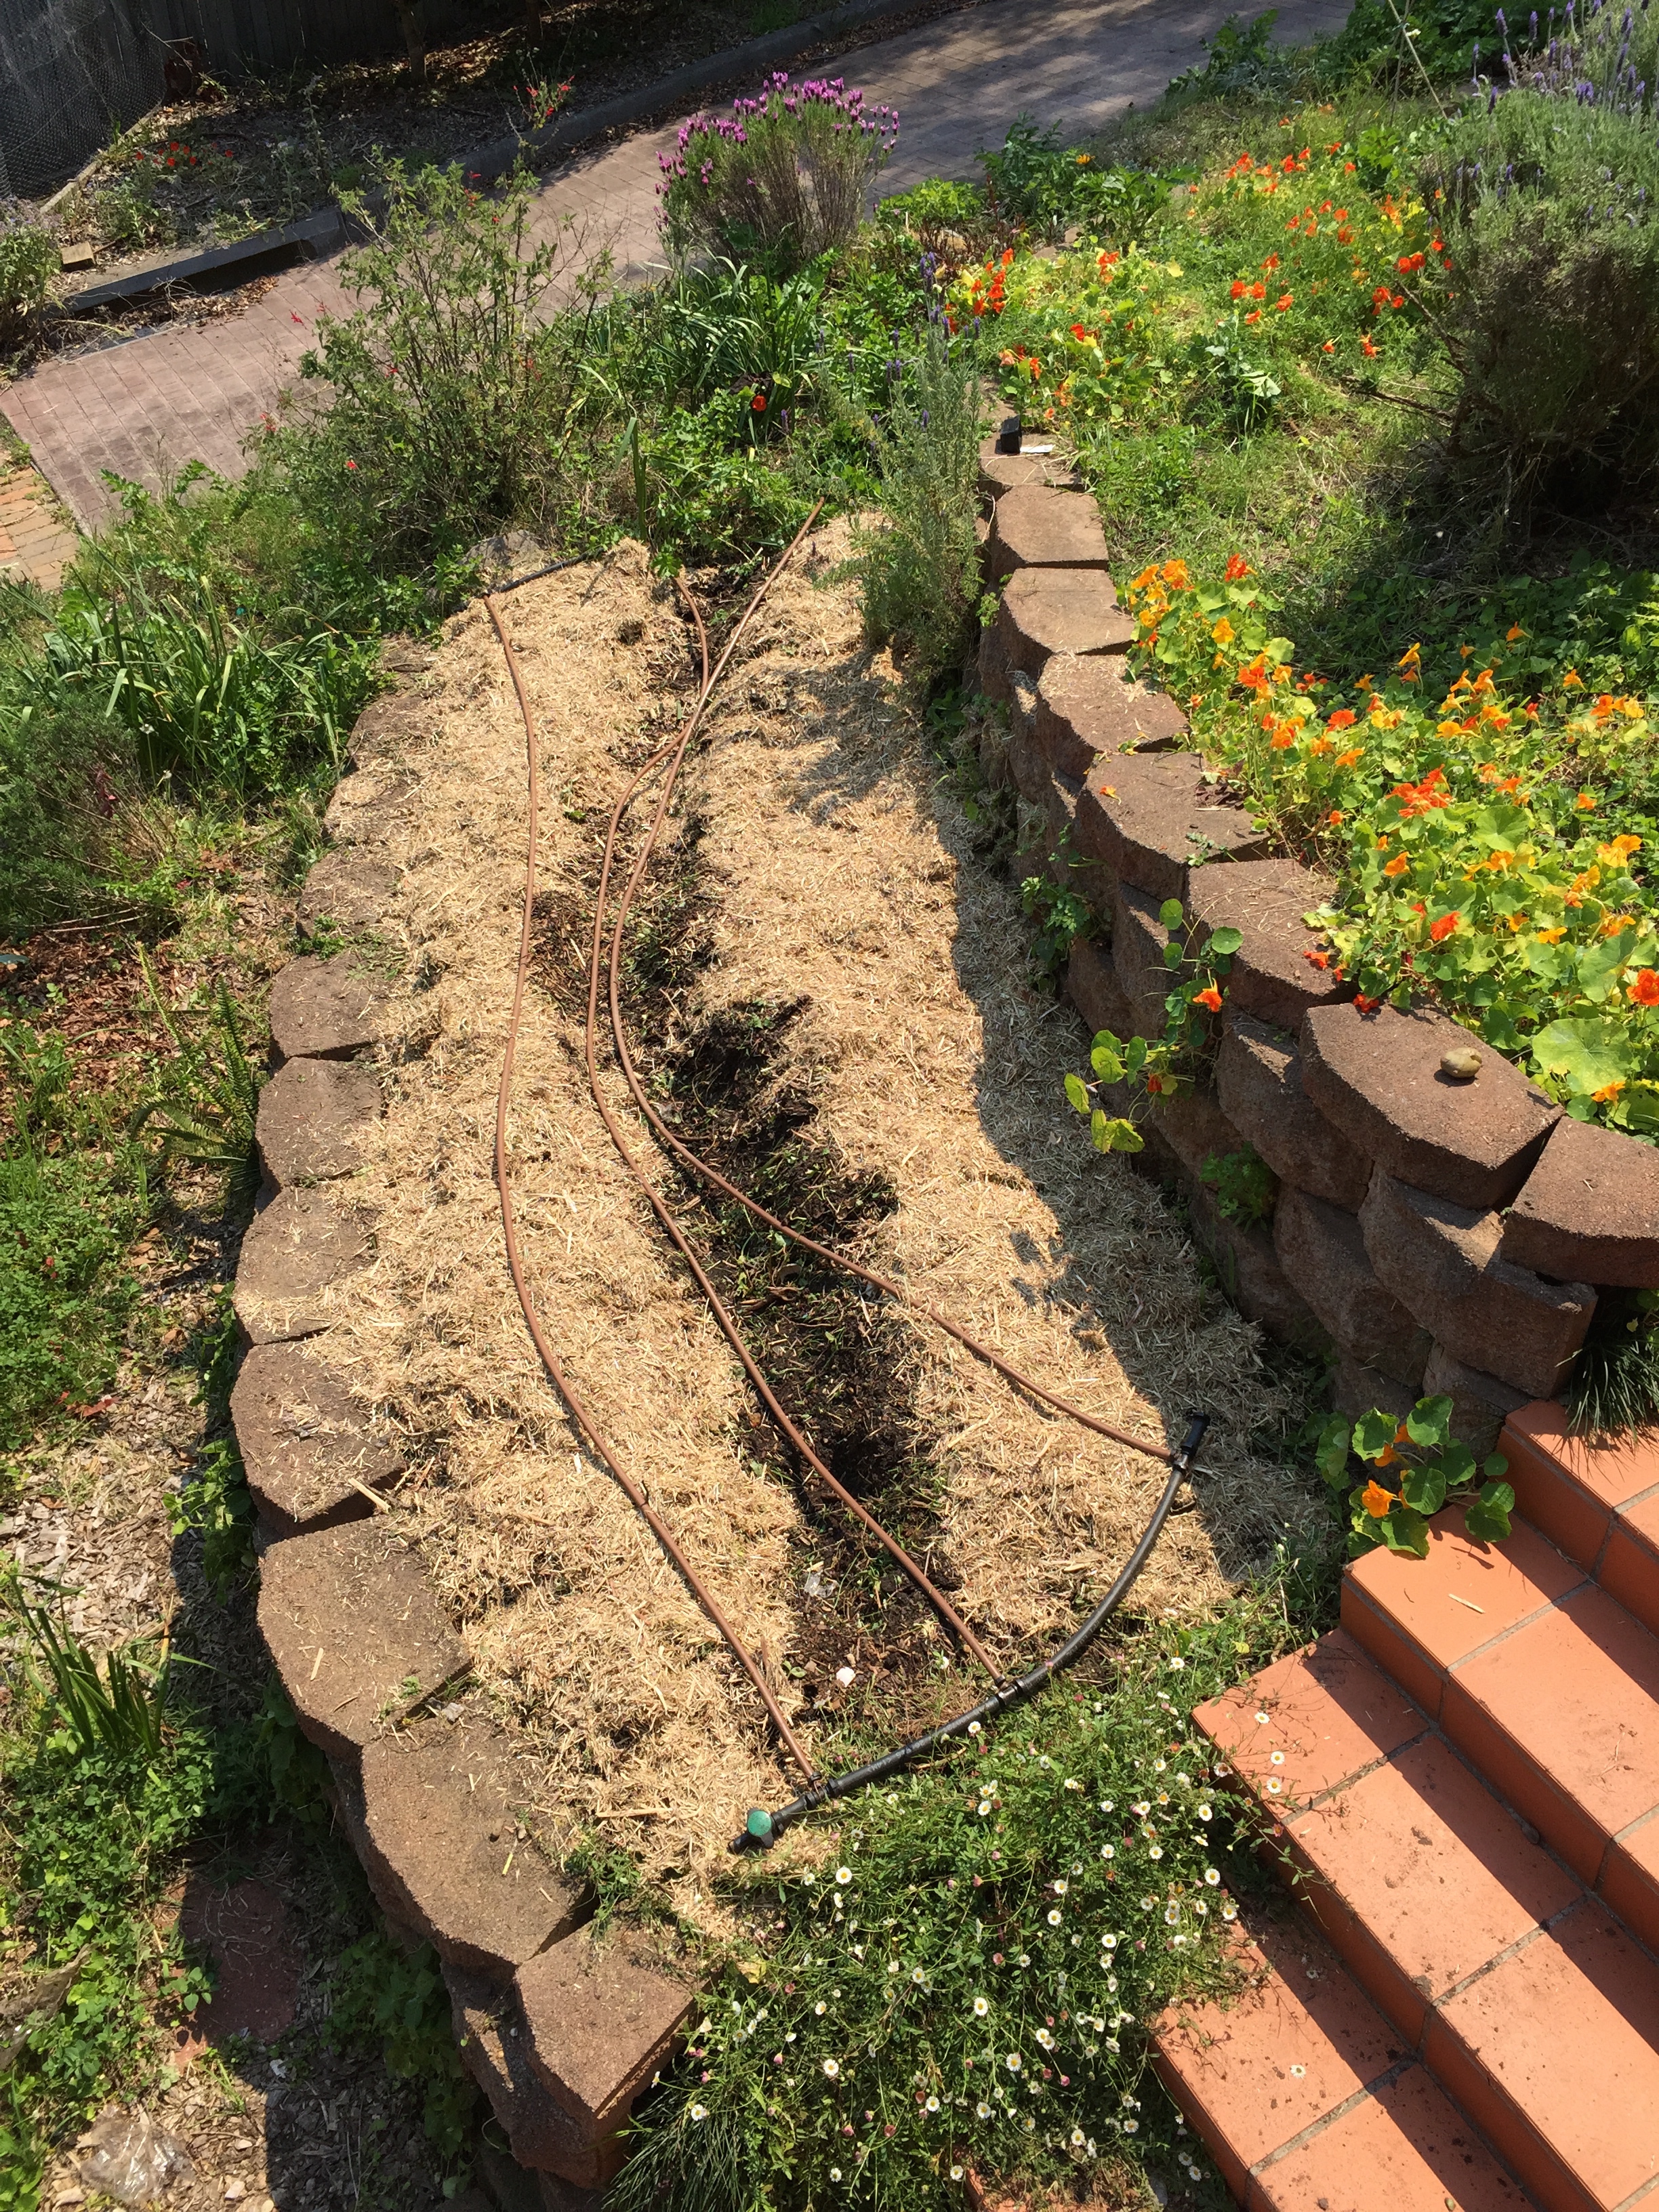
Early in October, we pulled out our garden tools and set to work in our garden, preparing the potato growing bed.
Every year we plant our potatoes in a new patch — to avoid nematodes and viruses that attack the potato family — and this year we are using our crescent shaped terrace bed.
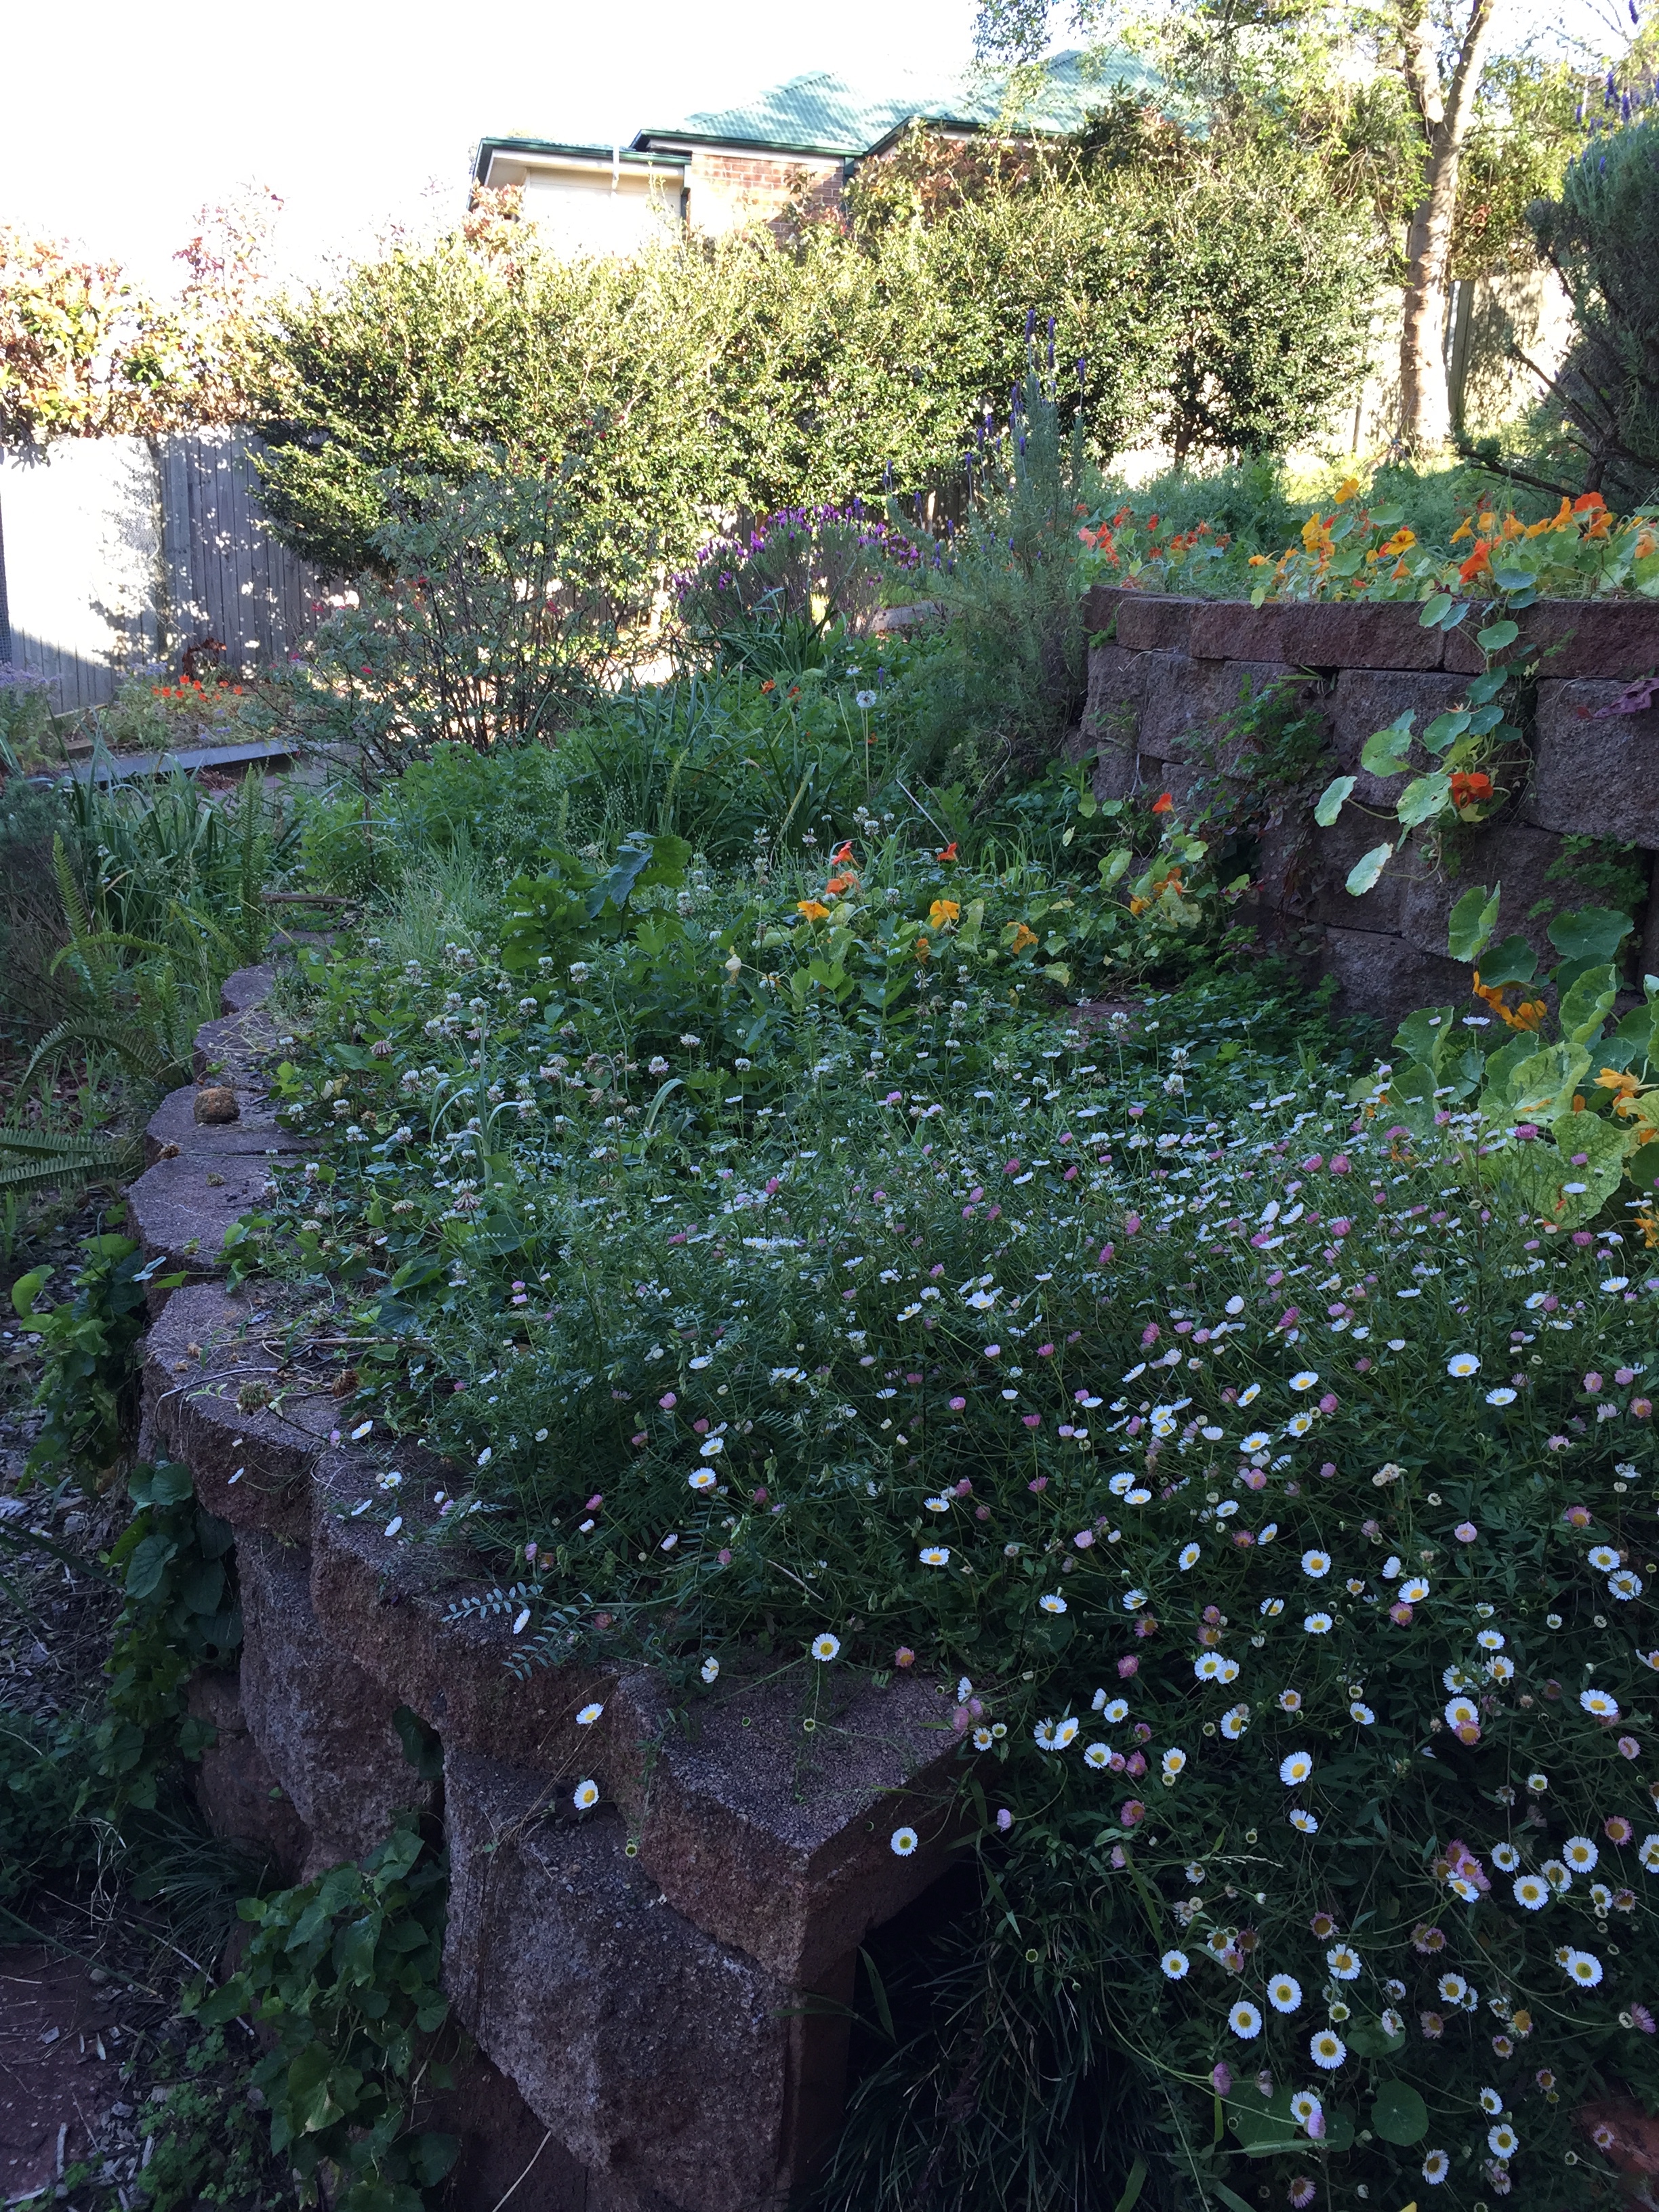
Bit of a mess, though, right?
I salvaged a few baby parsnips and then moved the irrigation hose out of the way, because it was mattock time! I’m pretty hopeless with the spade because I can’t get the blade the cut deep enough (it’s a little blunt, and I’m a wee bit feeble). But the mattock makes short work of the weeds. 🙂

After a bit of hard yakka …

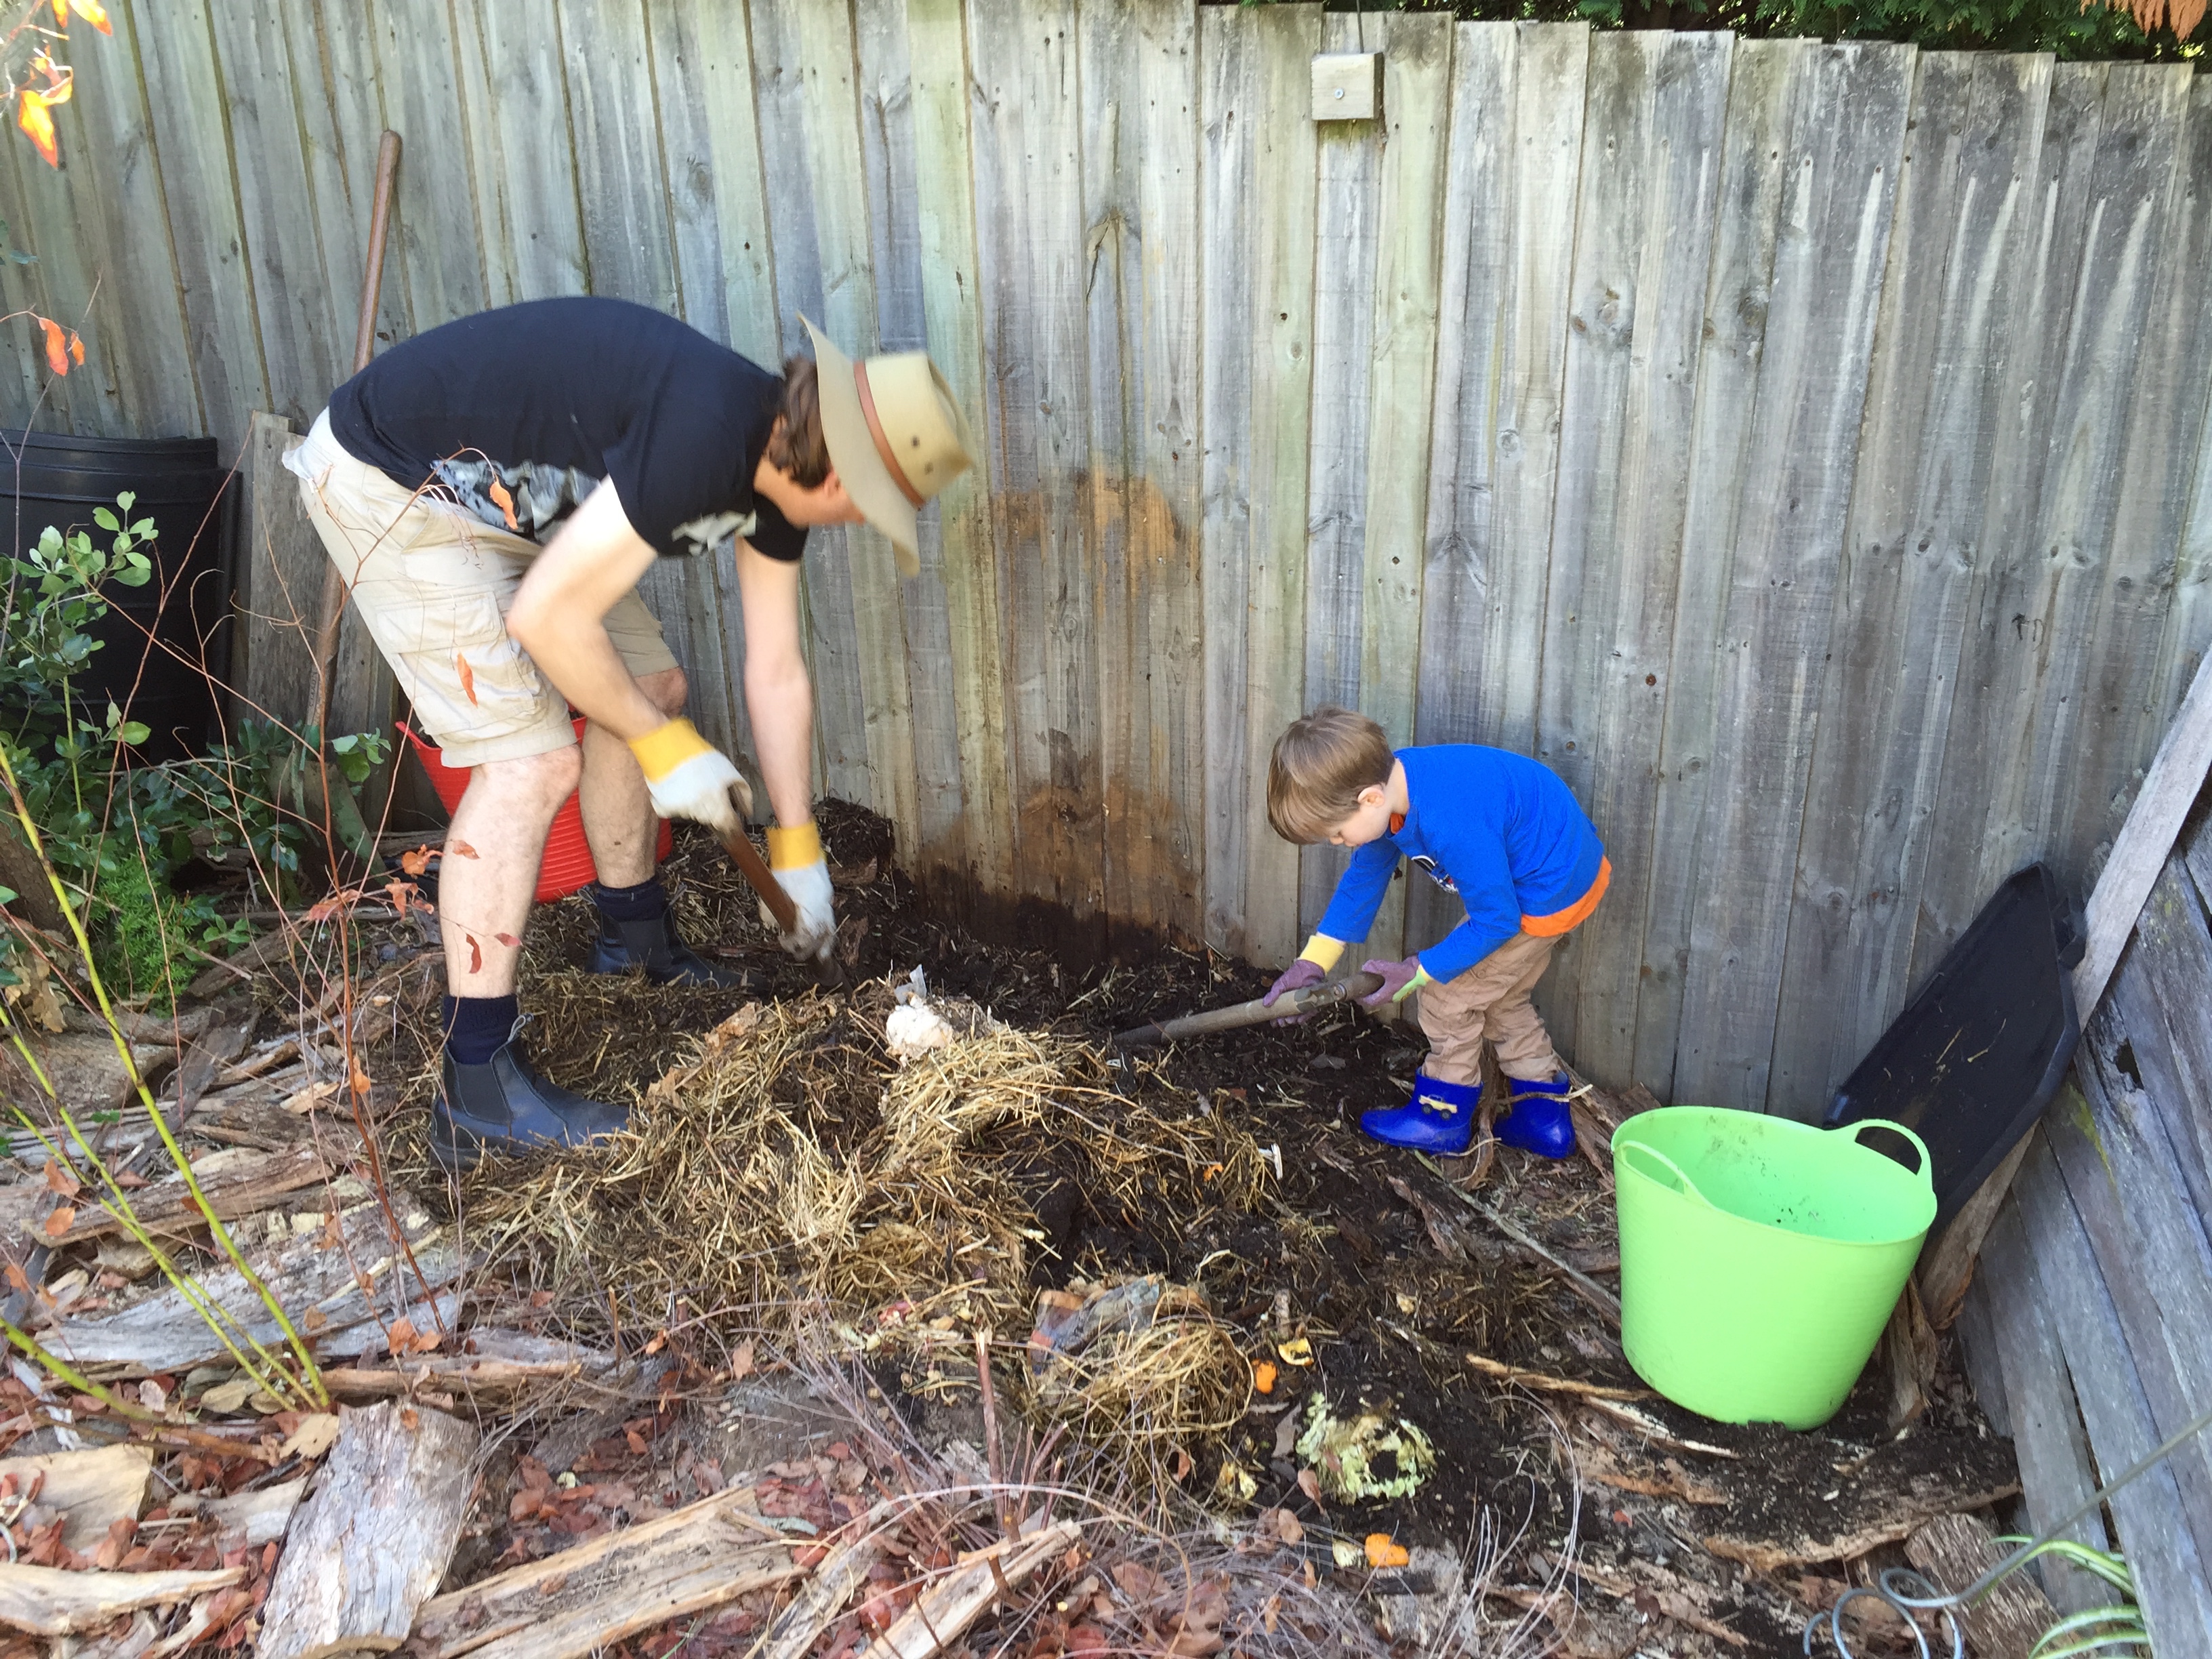
Adding compost to the bed
Stephen added quite a lot of home-made compost, and then the boys dug it over and made a trench:
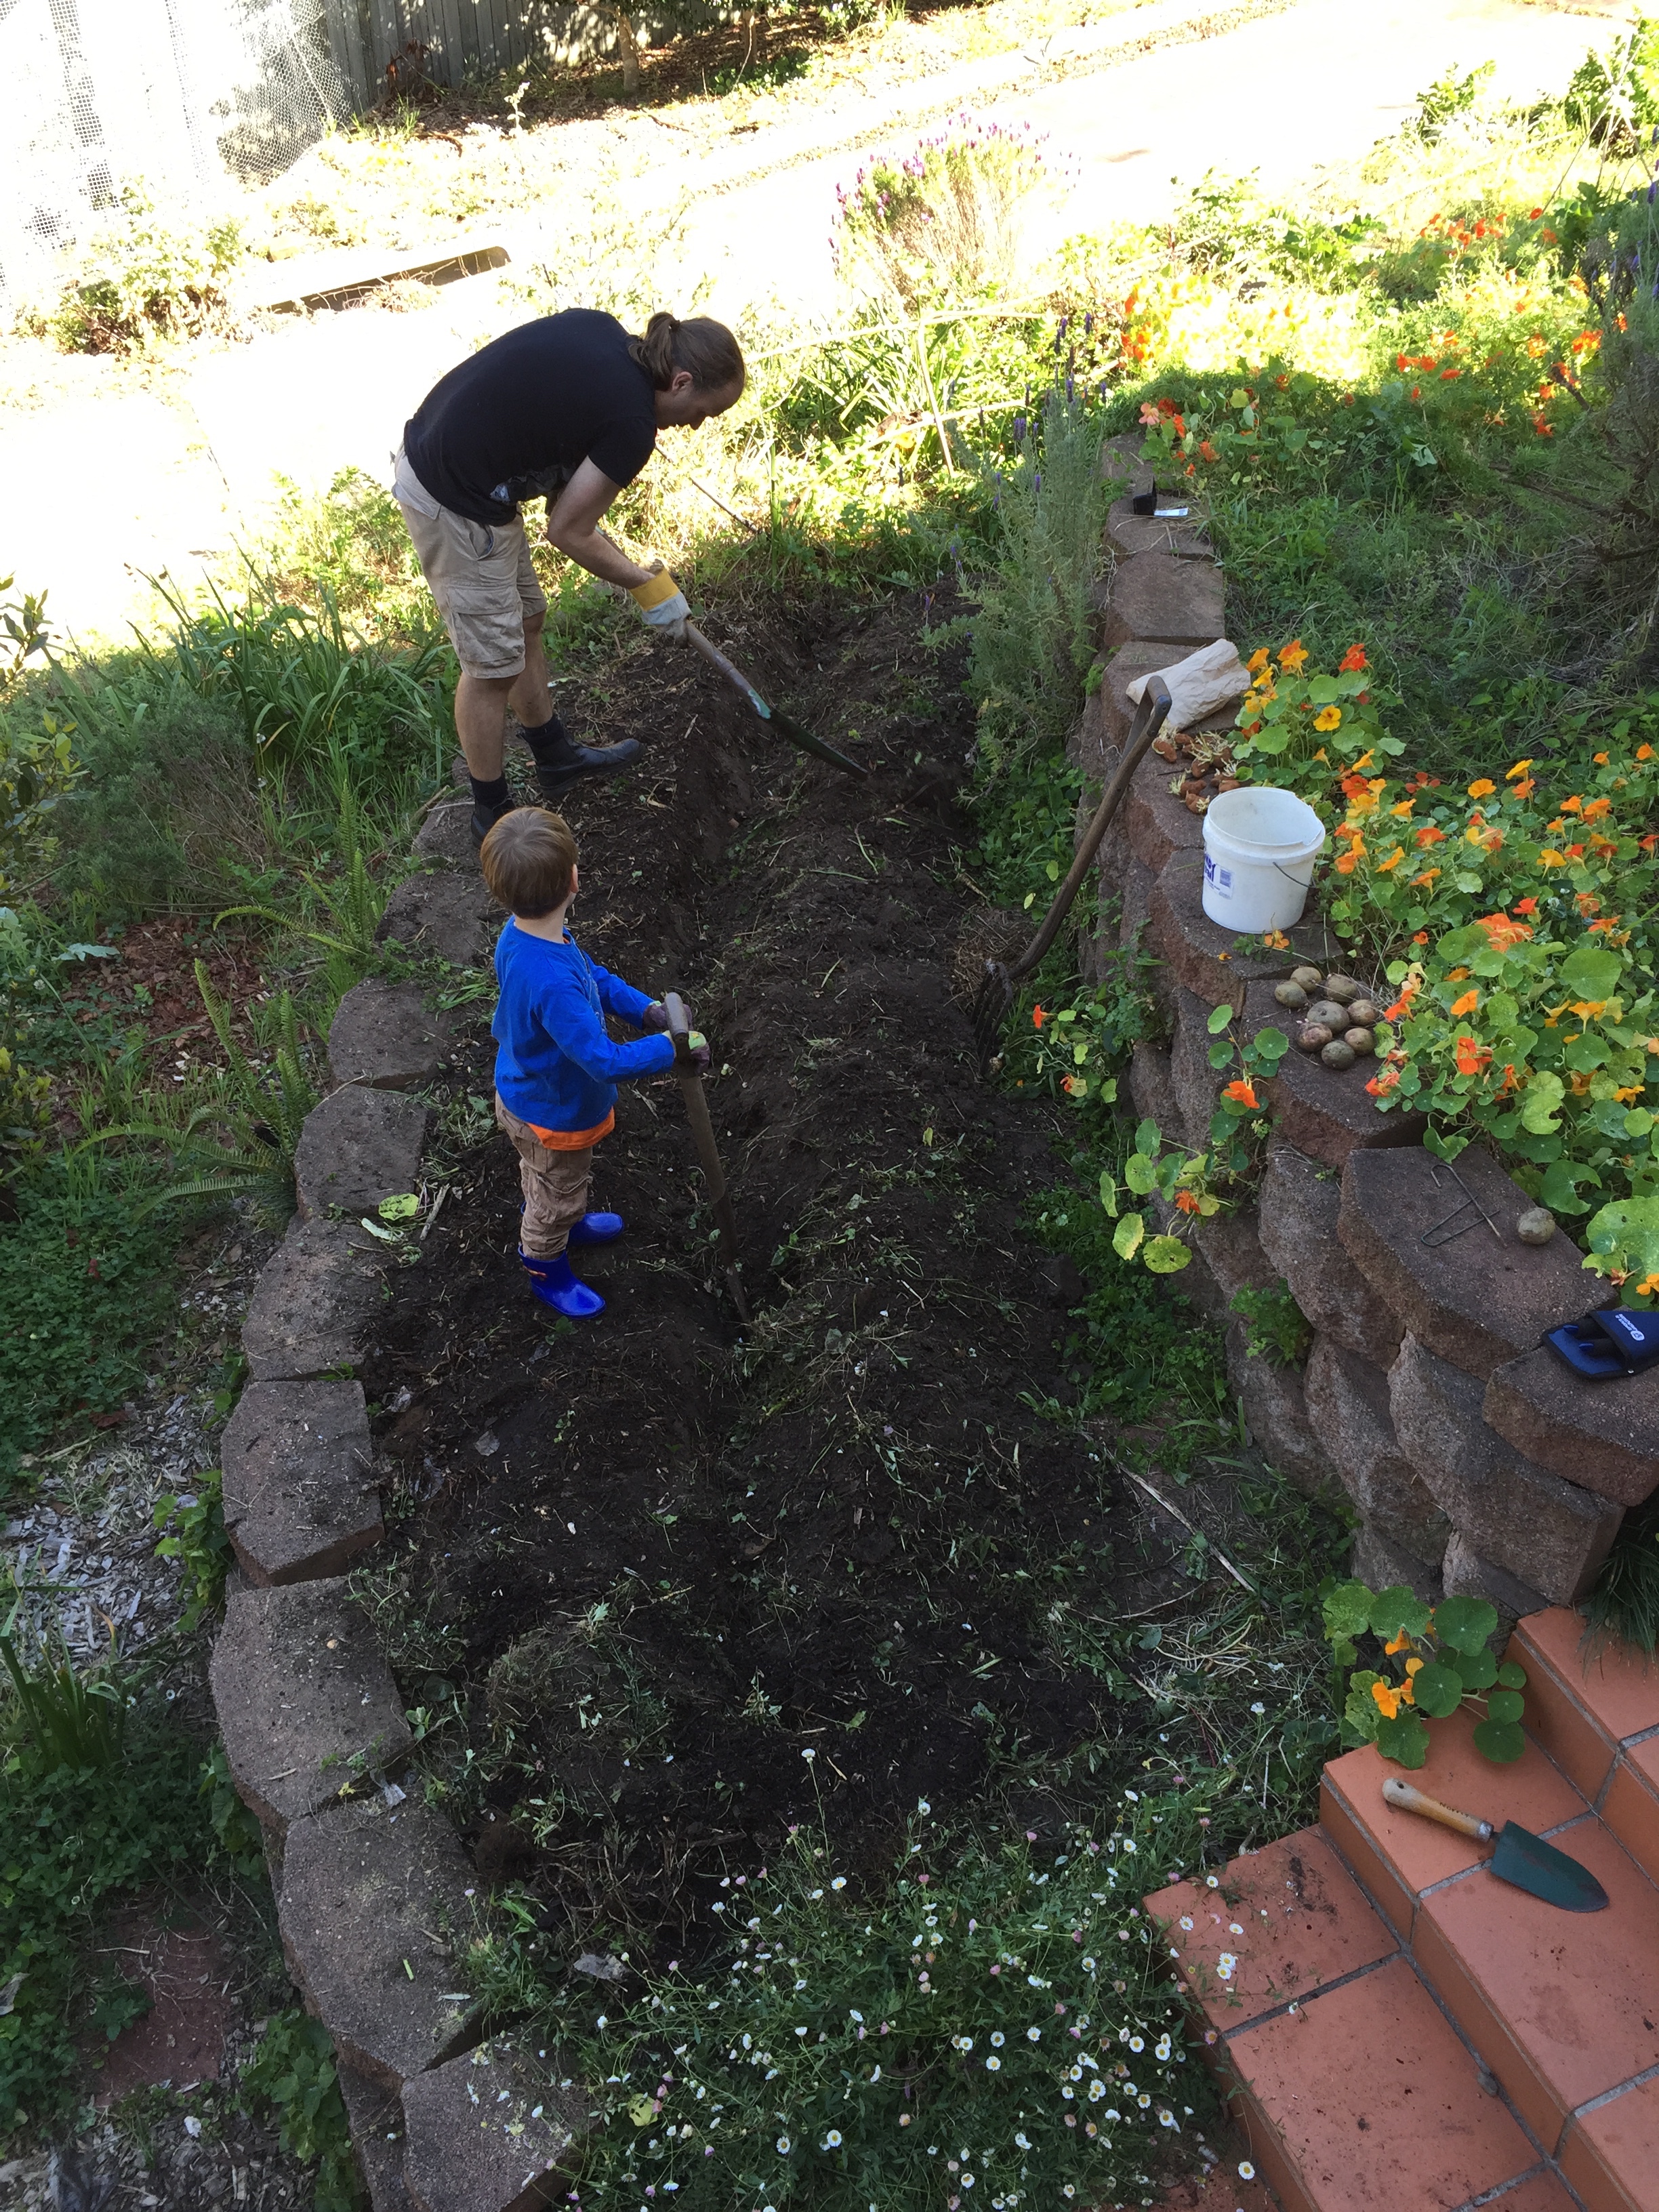
William is a pretty good helper! Here he is, adding compost to the bucket, for Daddy to take over to the garden bed:
Together they planted some potatoes (half are ours saved from last year — possibly King Edward, but we aren’t sure which variety we saved).
Planting potatoes is simple: we let them start shooting from their eyes, then put them along the bottom of the trench. Cover them over with soil, add mulch, and you are done for a few weeks. 🙂
Fast forward two weeks to the end of October, and the potatoes are going nuts!
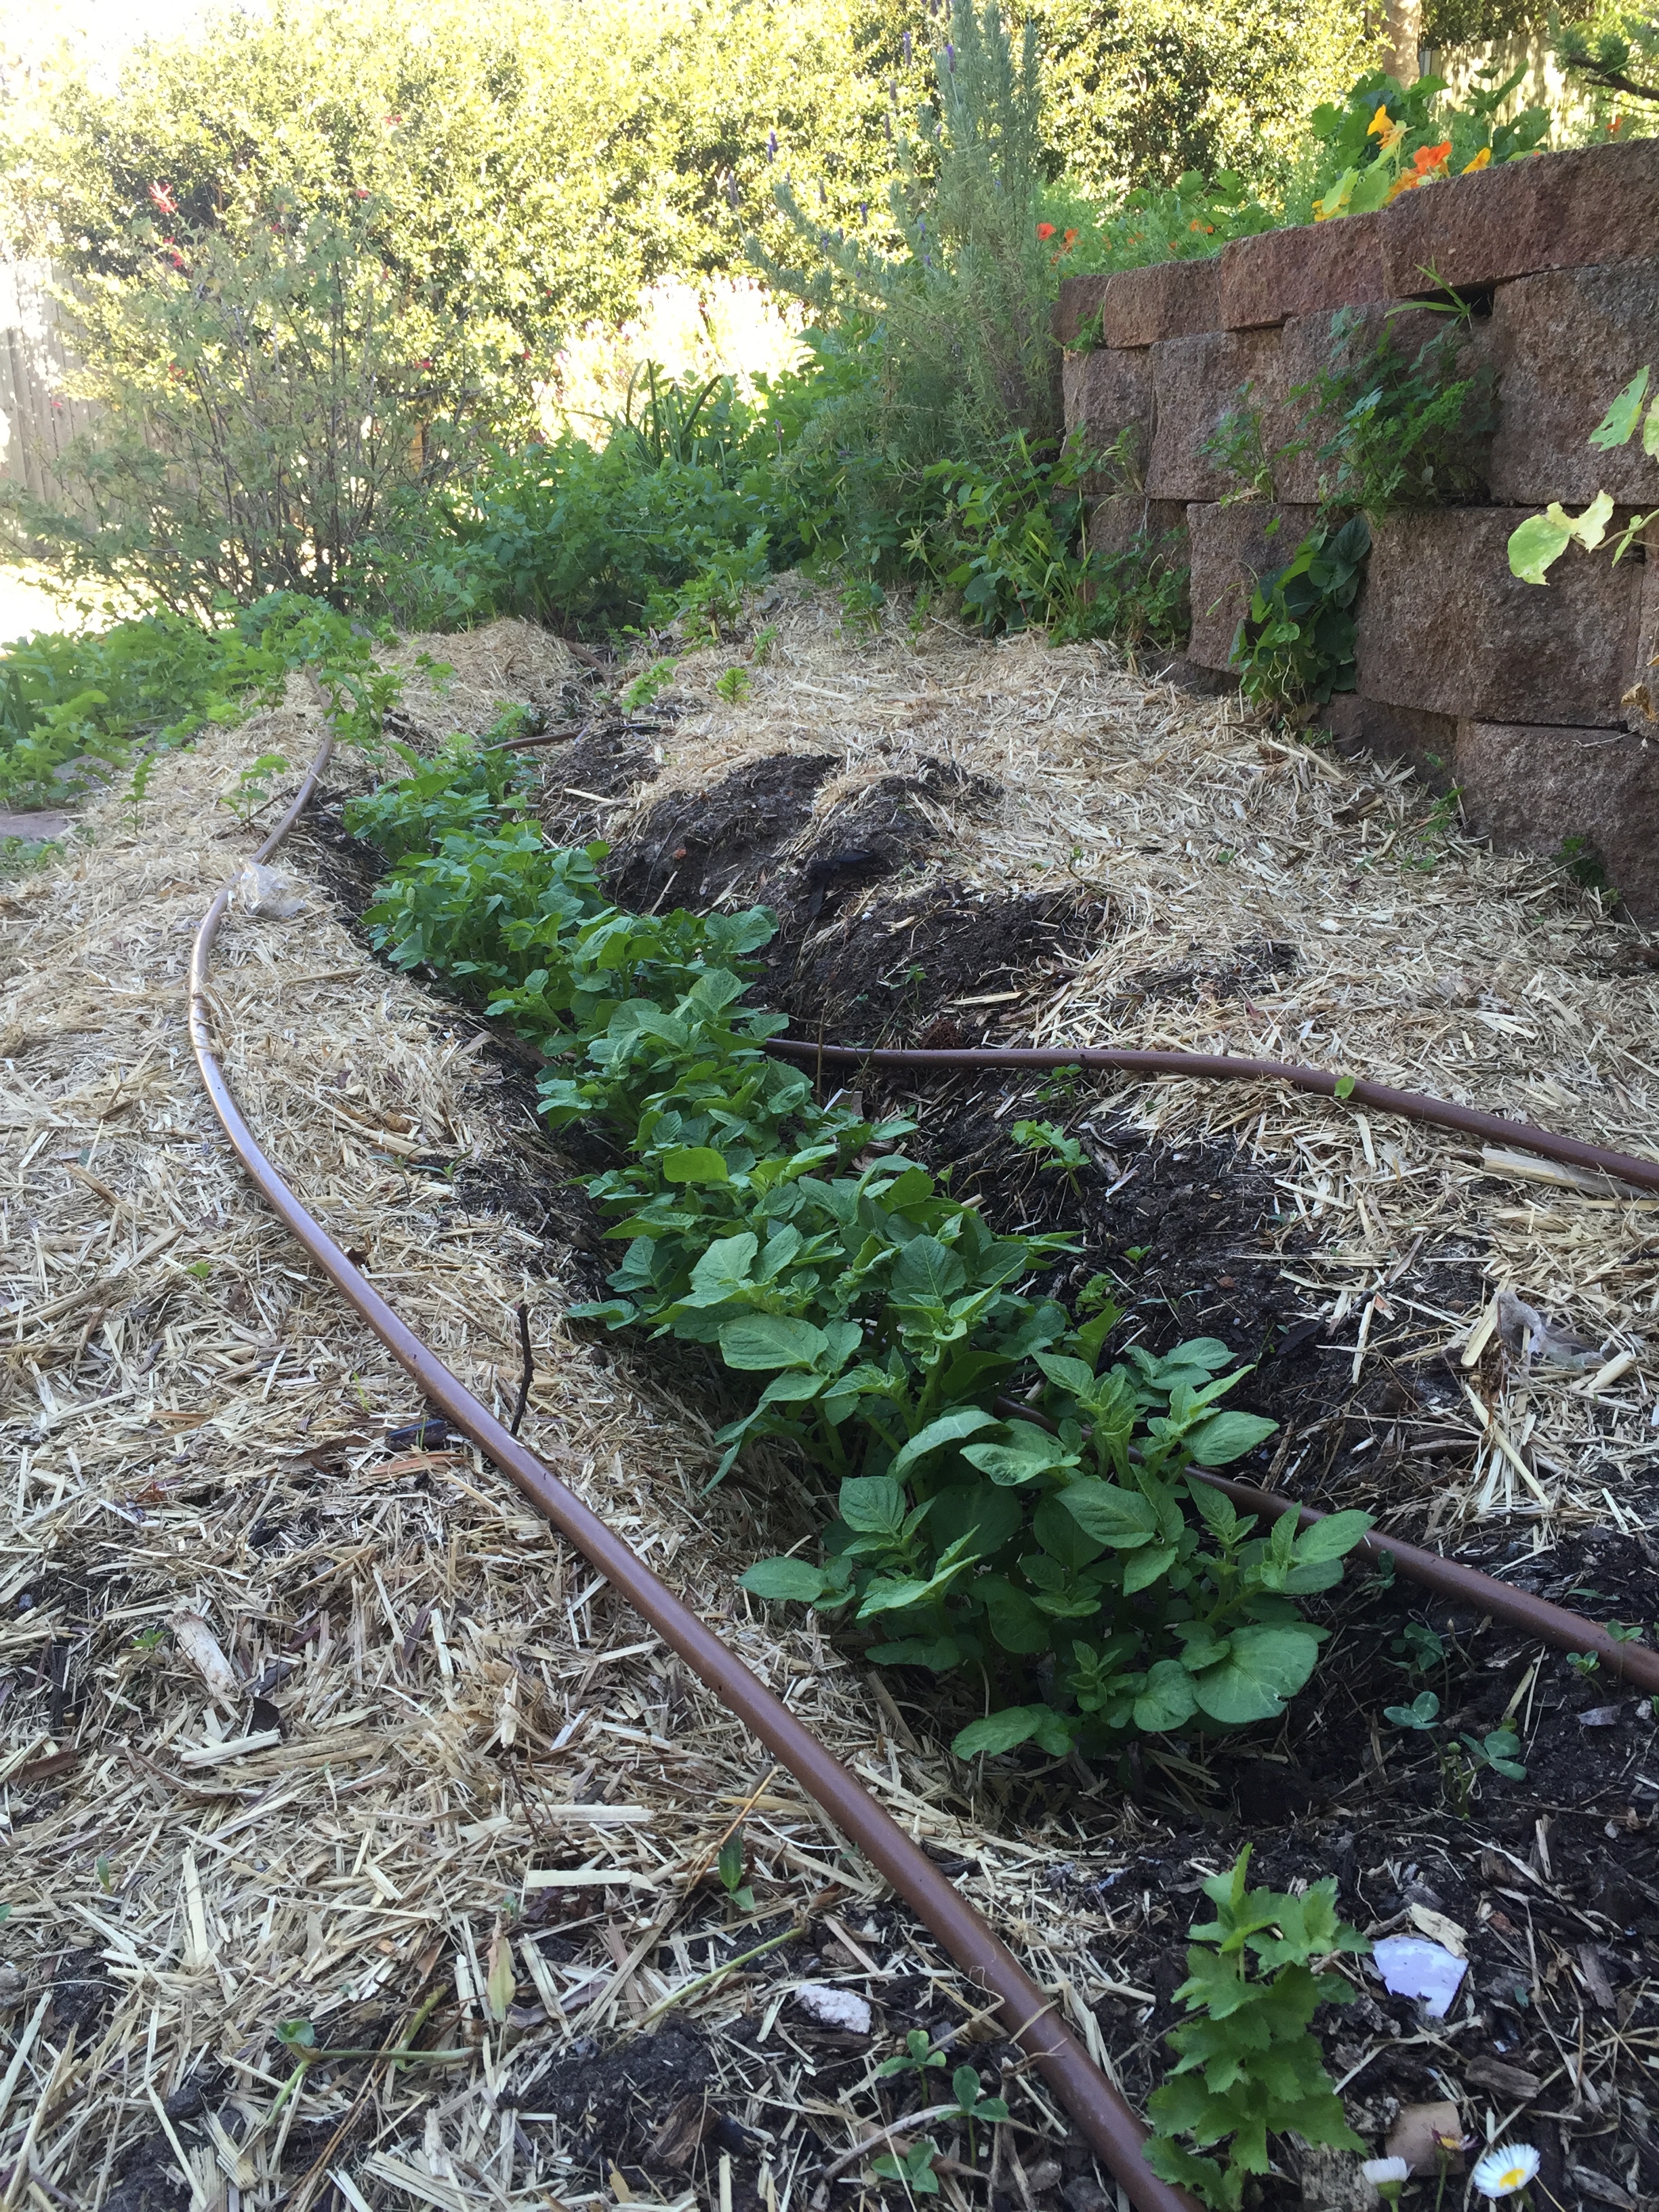
This weekend we mounded them up — covered most of the green parts over with more soil and mulch. We will keep doing this as long as we can, and the potatoes will make tubers all along the stems we’ve covered up.
Apart from that, potatoes pretty much look after themselves. Hopefully by Christmas (or perhaps mid January) we will be digging them up again!
Orchard netting complete!

Remember back when we upgraded the walls of our orchard with a new solid wire wall? Our plan at the time was to secure the top of the orchard with some netting, stretched over hoops.
→ It’s done! ←
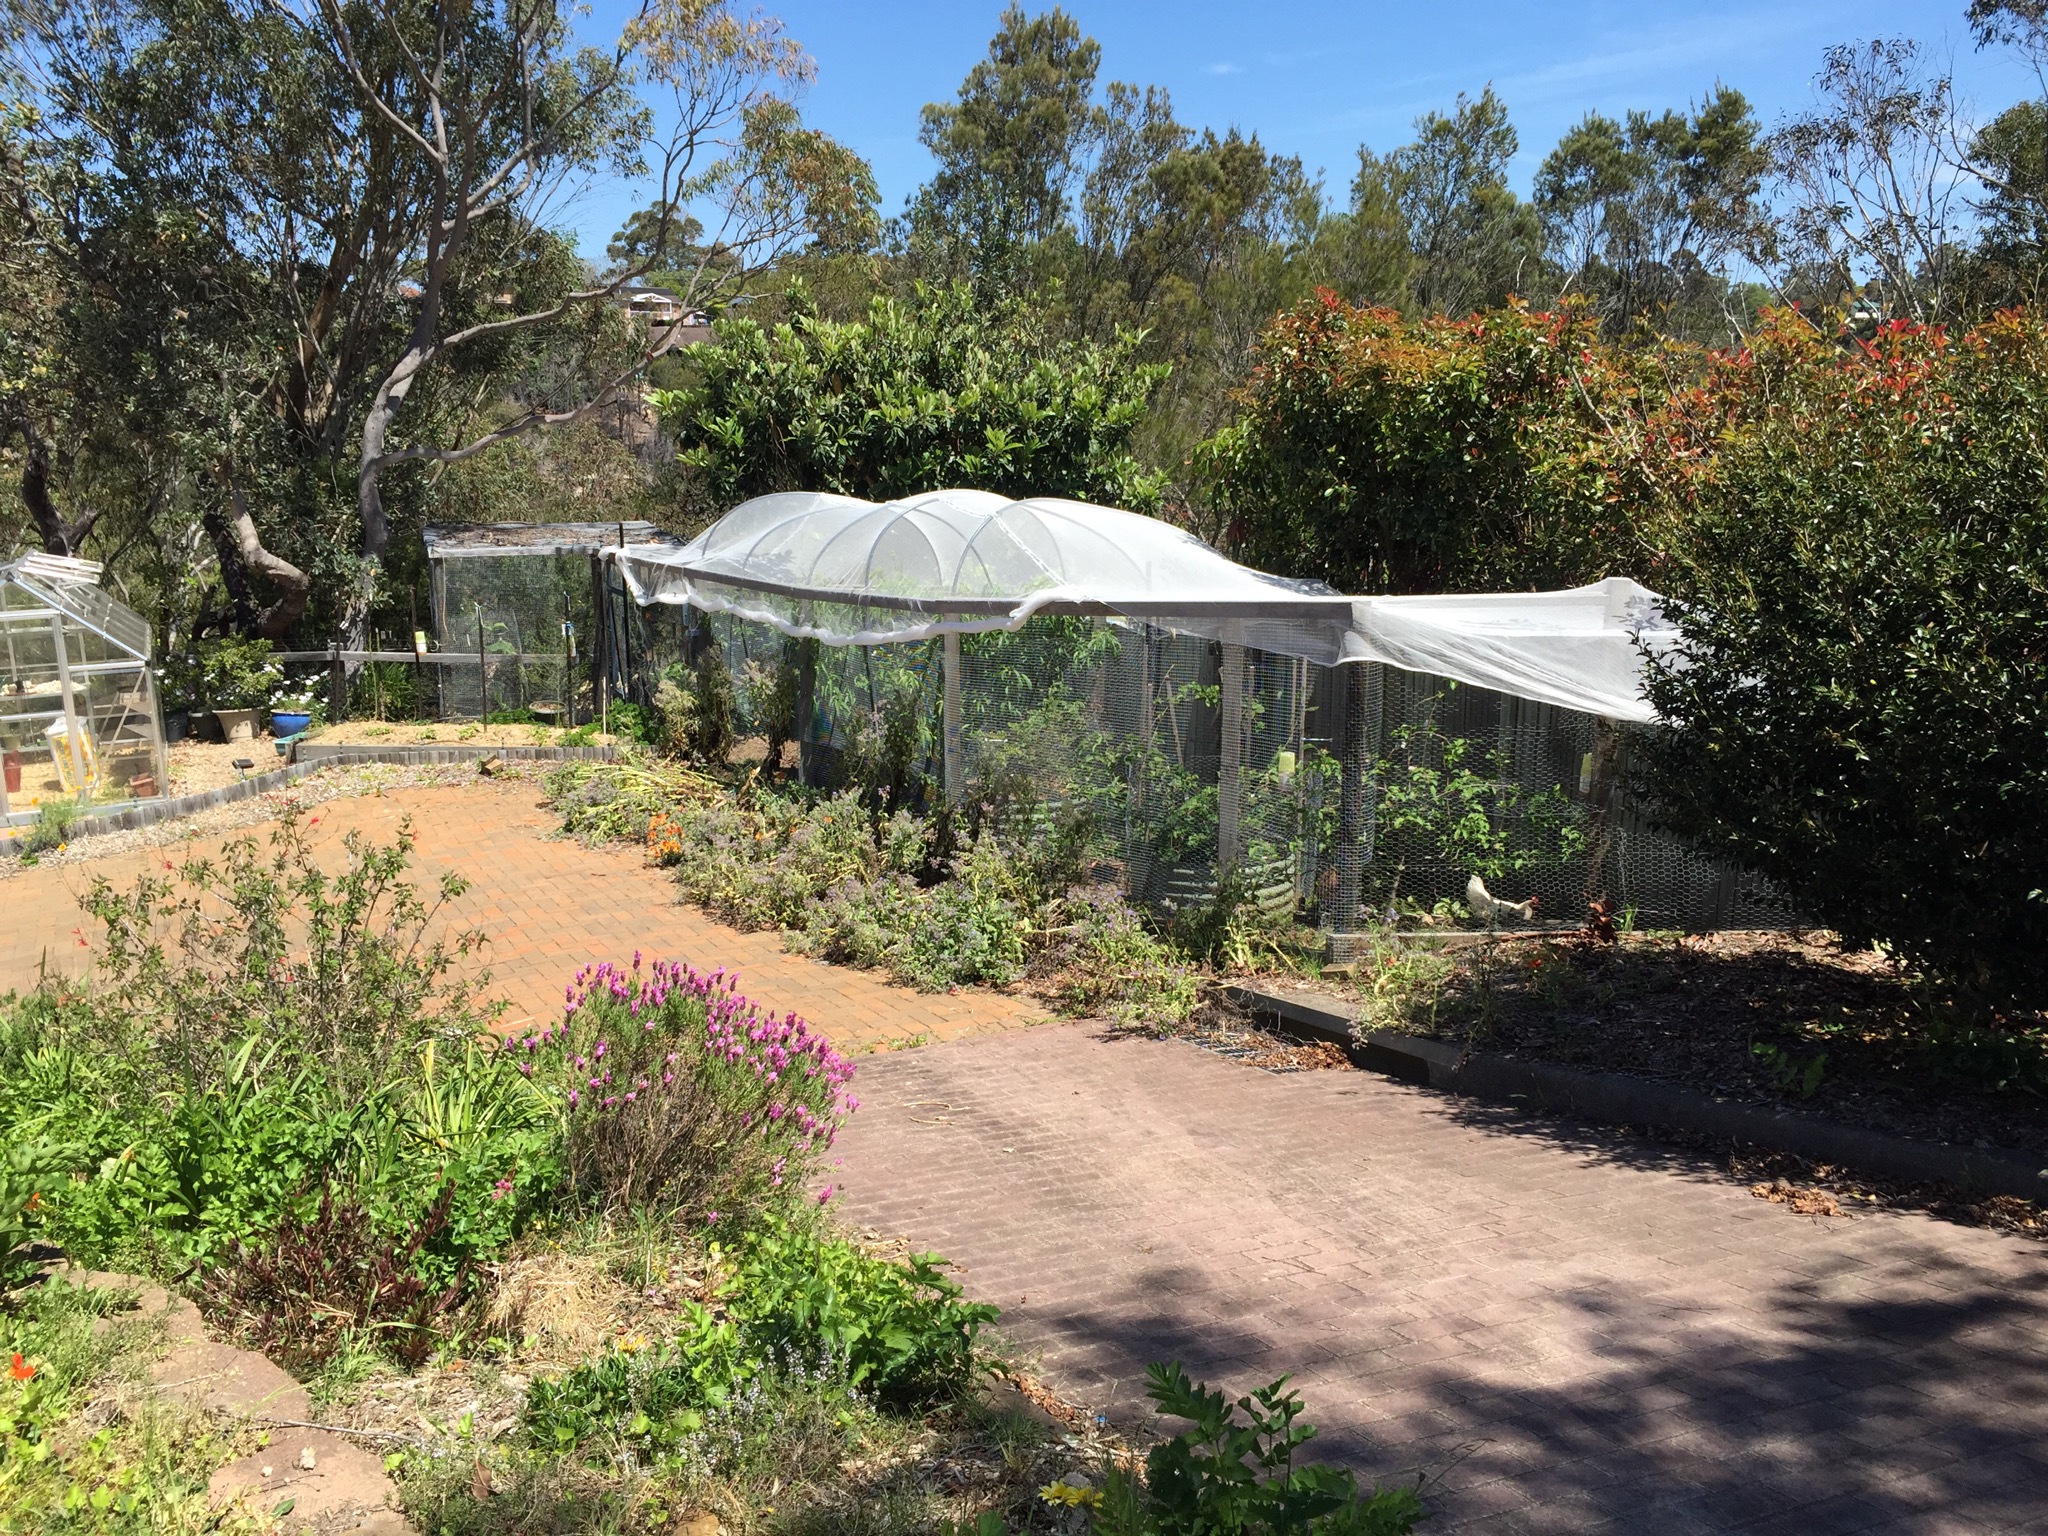
We’ve had the netting since we put up the hoops, but we stalled at the time because we thought that we might need some kind of ridge-pole to support the weight. We umm-ed and ah-ed about this for a few weeks, and then Winter happened. Winter is a great time to let things go a bit, and with shorter evening hours, we just put the whole thing off until Spring.

Apple blossom

Peach blossom

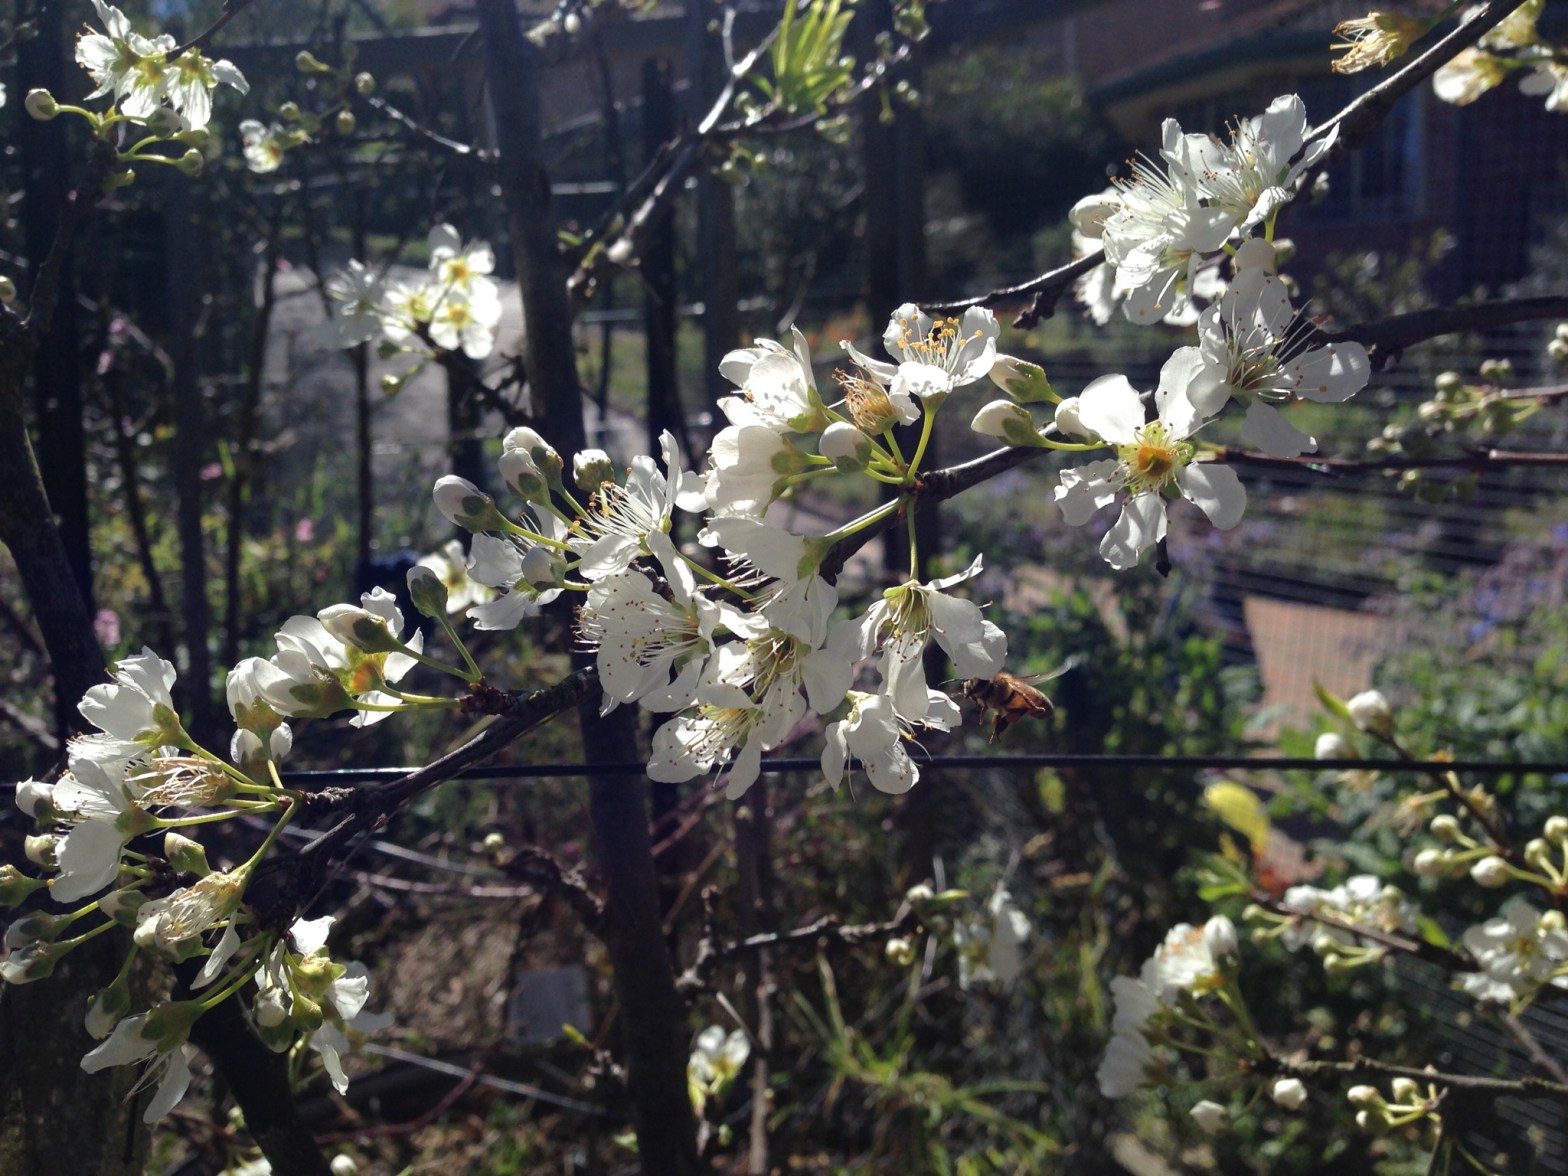
Plum blossom

Flowering Boysenberries
Well, hello Springtime blooms! It wasn’t long after the blossoms started to happen that I realised the Blueberry bushes were already well under way:

Blueberries here, or just weeds?

Here they are! Young fruit.
Blueberries in particular are hugely vulnerable to bird attack. Once we had liberated the blueberry bed from its winter weeds, we realised that it was already past time to get the net up! The hand of necessity was nudging us to just give it a go without a ridge pole:

Under the canopy

There is a seam in the centre (ish)
Win!
We used two nets, 10 metres long by 4 metres wide. At first we tried with just one net, but the hoops must be about 5 metres long, so the net wouldn’t stretch over the tallest hoops.
We sewed the two nets together along the long edge, using garden twine, looping it in and out (took us a couple of hours, actually!). Garden twine was not great for sewing with, just poking with the raw ends, but a small knot in the end of each “thread” was easy to push through the netting.
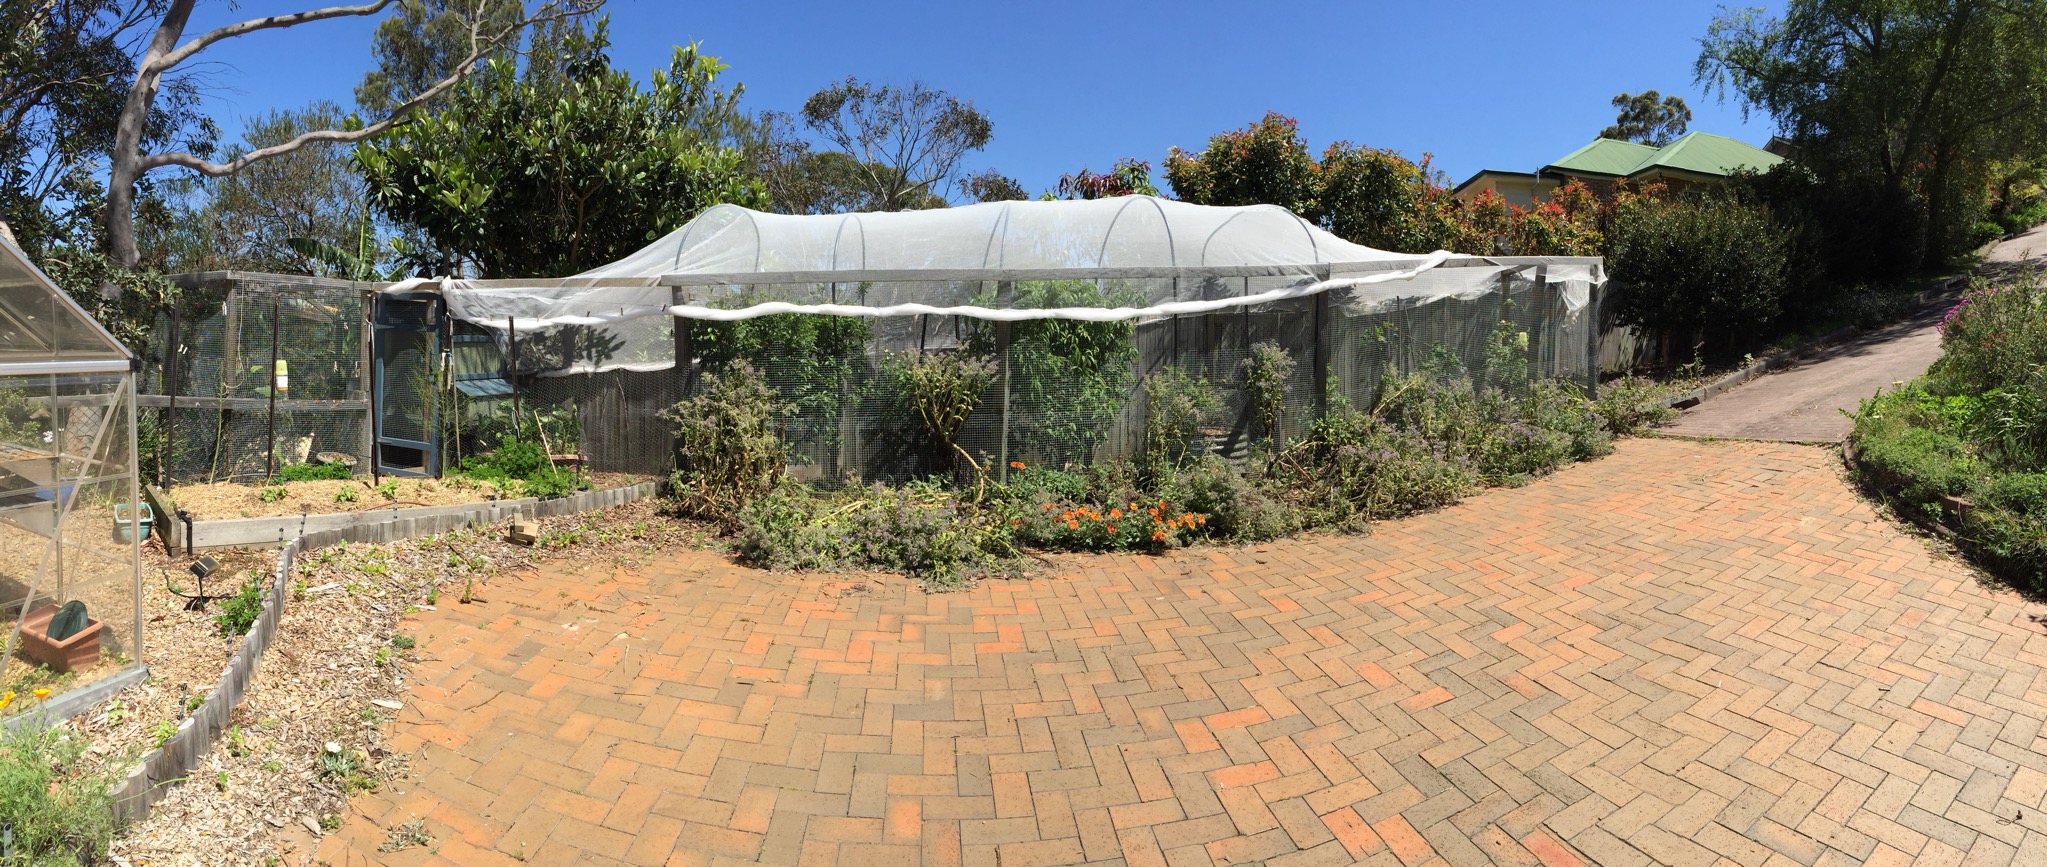
The netting is secured at the edges with wooden clothes pegs. This has stood up to some pretty heavy winds, with only a bit of fiddling. 🙂
Tips for overhead netting
Here are a few tips for dealing with overhead netting, if you are thinking of attempting something like this for yourself:
Make it tall. No, really. If it only clears your head by about a foot it is too low. Trust me on this! Over the season the net will sag down, and you will be pushing that sucker out of your face all the time. And the spiderwebs.
Leave room for plants that climb. This goes especially for climbing types like tomatoes and green beans. Trust me on this. If your veggies climb up onto the roof, they will just pull it down towards the ground, straining the net and popping holes. The vines are destructive, and hard to get out of the netting! What’s more, the fruit forms up on the top, *above* the net, where you can’t harvest it, but the birds can. Fail!
It won’t keep everything out. Rats, particularly, seem undeterred by netting. I think they would eat through it if they couldn’t just easily push their way under, so don’t expect your tasty corn crop to be safe. Trust me on this one, too! *sigh* Ditto snakes. Birds do find smallish holes, and then get very confused trying to get out. Be careful to secure gaps.
Stretch it reasonably tight. Tight enough that a bird or bat flying at night, bumping into your net, will not get a fright and start to tangle up. However, they don’t need to bounce off like a trampoline!
It won’t last forever. Sticks and leaves will fall onto the top, so you probably want to bounce these off every now and then to stop it getting weighed down and snagged. Winds and general wear-and-tear outside mean that it will get holes occasionally. These are easy to scrunch up with a peg, or sew together.
Avoid moving the net. By this, I mean, putting it up and taking it down or shifting it around a lot. Every time you drape it on the ground it tangles and attracts *all of the sticks*. It will also snag easily when you try to drape it back up.
Avoid grass. We used to have a netting “wall” on the orchard. This wall couldn’t be moved at all because the grass (which we had cleared away beforehand) sent runners up the netting. All. The. Time. Be prepared to yank up grass runners and deal with large holes in your net, is you are using it as a semi-permanent wall. That’s why we now use solid wire!
Make the structure solid. If you use a teepee to hold up your net, the wind will blow it over, and tangle your net. A line of wire on top of star pickets? Not sufficient. We’ve tried this, and never again. We’ve got wooden beams now (not amazingly hefty ones, but a solid piece). The pipe arches are terrific, so far, anchored onto the solid orchard walls.
Okay, so what’s the verdict so far?
On day one, we realised we had a slight flaw with our White Bastion of Invulnerability. The chicken coop door needs to stay open during the day, closing the gap in the orchard wall! I discovered this face palm moment when a bird was discovered in the orchard, confused about how to get out. It had to be chased out the open door way!
It has deterred the wretched Brush Turkey, though. *snicker* I saw him yesterday on the lawn, kinda moping. HAHAHA.
It has also deterred the possum(s)! As I pruned the trees in preparation for hoisting the net, I discovered that the top of the plum was being severely nibbled. Now there are brand new un-eaten shoots — a sure sign that no possum is thieving here, any more.
However, it has not deterred the Goanna!

Big gap under fence

In the orchard, slinking through the hay

Goanna on the pink step
He came in this morning under the gap in the fence (it’s almost like we have some kind of burrowing creature in here … like a scratching flock of chickens!)
Fixing that gap is a job for this weekend!
One Lovely Blog Award!
 Here’s a thing out of the blue: Matina from You hand made me {happy} has nominated my blog for the “One Lovely Blog Award”! 🙂
Thank you, Matina! I’m glad my blog is finding an audience, even whilst I am busy, busy and not updating as often as I used to. 🙂
I am feeling more relaxed about chain letter style blog awards, since I last accepted the Liebster Award. This new one is a little more casual, which I like. I get to tell you a bunch of facts about myself, and then (of course) nominate some other blogs which I think you may find interesting. So here we go:
7 Facts about me
- My favourite food is roast potatoes. There was a period in my adult life where I couldn’t eat any food at all (I had a tube to get nutrition). The food I missed most was roast potato. Go figure!
- I enjoy wearing variations on the historical costumes I make, as every day wear. This makes me a little bit eccentric, I think: I’m easy to spot at the supermarket with my long swishy skirts! I frequently get complimented, though, when I’m wearing my black skirt with the red stripe. For some reason, people really love this one, and they tell me so!
- I tend to really focus on tasks. When I’m doing a hobby, I tend to spend all my time on that one thing, until the buzz wears off, and I flit to the next. This results in a lot of Works in Progress! I have to work when the inspiration strikes me. This blog is a great exercise on regularly revisiting a task!
- I’m a dreamer. I spend chunks of my day imagining what I would do to the space beside the fridge, or imagining a new costume to create. Pinterest is an enabler! I think dreaming about things is a sort of pseudo vacation time. And sometimes these dreams are made into reality!
- I don’t like shopping. Especially for shoes, or clothes. Especially with the kids along.
- I don’t have a favourite colour, but I don’t like cream, and purple is not a colour I would have around me very often.
- I’m a computer programmer. It wasn’t until my first year of university that I discovered this; before that I was going to be a rocket scientist, and before that a surgeon. In the distant past, I was going to be a ballerina.
There you go, that was a bit of an eclectic mix. 🙂
Here are some blogs I think you might enjoy. These blogs aren’t necessarily small blogs, but I think sharing some good reading is in the spirit of this award. If you are nominated, please don’t feel obliged to “pass it on”! It’s enough for me to let you know that I read and recommend your blog! 🙂
- Mended Wheels – a little bit of this and that, from an author who feels so very real.
- Life in the Orchard – a look at life in an orchard, from another mum with young kids, doing it simply. 🙂
- Ants to Sugar – a quilting blog with a sense of colour that I really love. Beautiful to visit!
- Morgan Donner’s Sewing Party – truly delicious costuming, and very well described.
- Katafalk – another really wonderful, detailed, historical recreation blog. This work is so excellent!
- The Greening of Gavin – Gavin had a green epiphany and is really enthusiastic about his journey to a greener life. 🙂
Well, that’s it from me today! I’m planning to show you guys some progress on the orchard project we worked on earlier this year. Stay tuned! 🙂
Local Spring Flora

Hello all!
Yesterday I took my neighbour’s dog for a walk, as they have gone away for a couple of days. A few steps past my driveway I started to notice that a huge array of native flora is out and blooming. And some non-natives, too. 🙂
Here’s a glimpse at what my neighbourhood is looking like this week:

This looks like a bottlebrush to me. Wonderful bright red!

I think this is a kind of legume (pea?) I’ve seen a lot of this sort of delicate flower on bush walks.

Of course, the non-native Azalea is flowering profusely at the moment.

A lovely orange – red grevillea bloom.

I’m not sure if this is a Dietes, or if it is native. It does very well around here.

Oops! I spotted a Doctor Who monster, too. 😀

This is Ti Tree (I think). Looks like a creeper is trying to invade this one!

Another beautiful bottlebrush – in pale yellow.

Of course, I *love* the Kangaroo Paw, and the tall Red-Green variety here works really well at this letterbox.

Here are a collection of native shrubs. Looking fantastic on the front slope.

Here’s another Grevillea, similar to the orange-red one. It’s more yellow-pink, though.

This orange Grevillea has a tendency to be curled up. Very beautiful!

And of course, the Banksia Man. He’s a classic Australian children’s storybook character. They are everywhere!
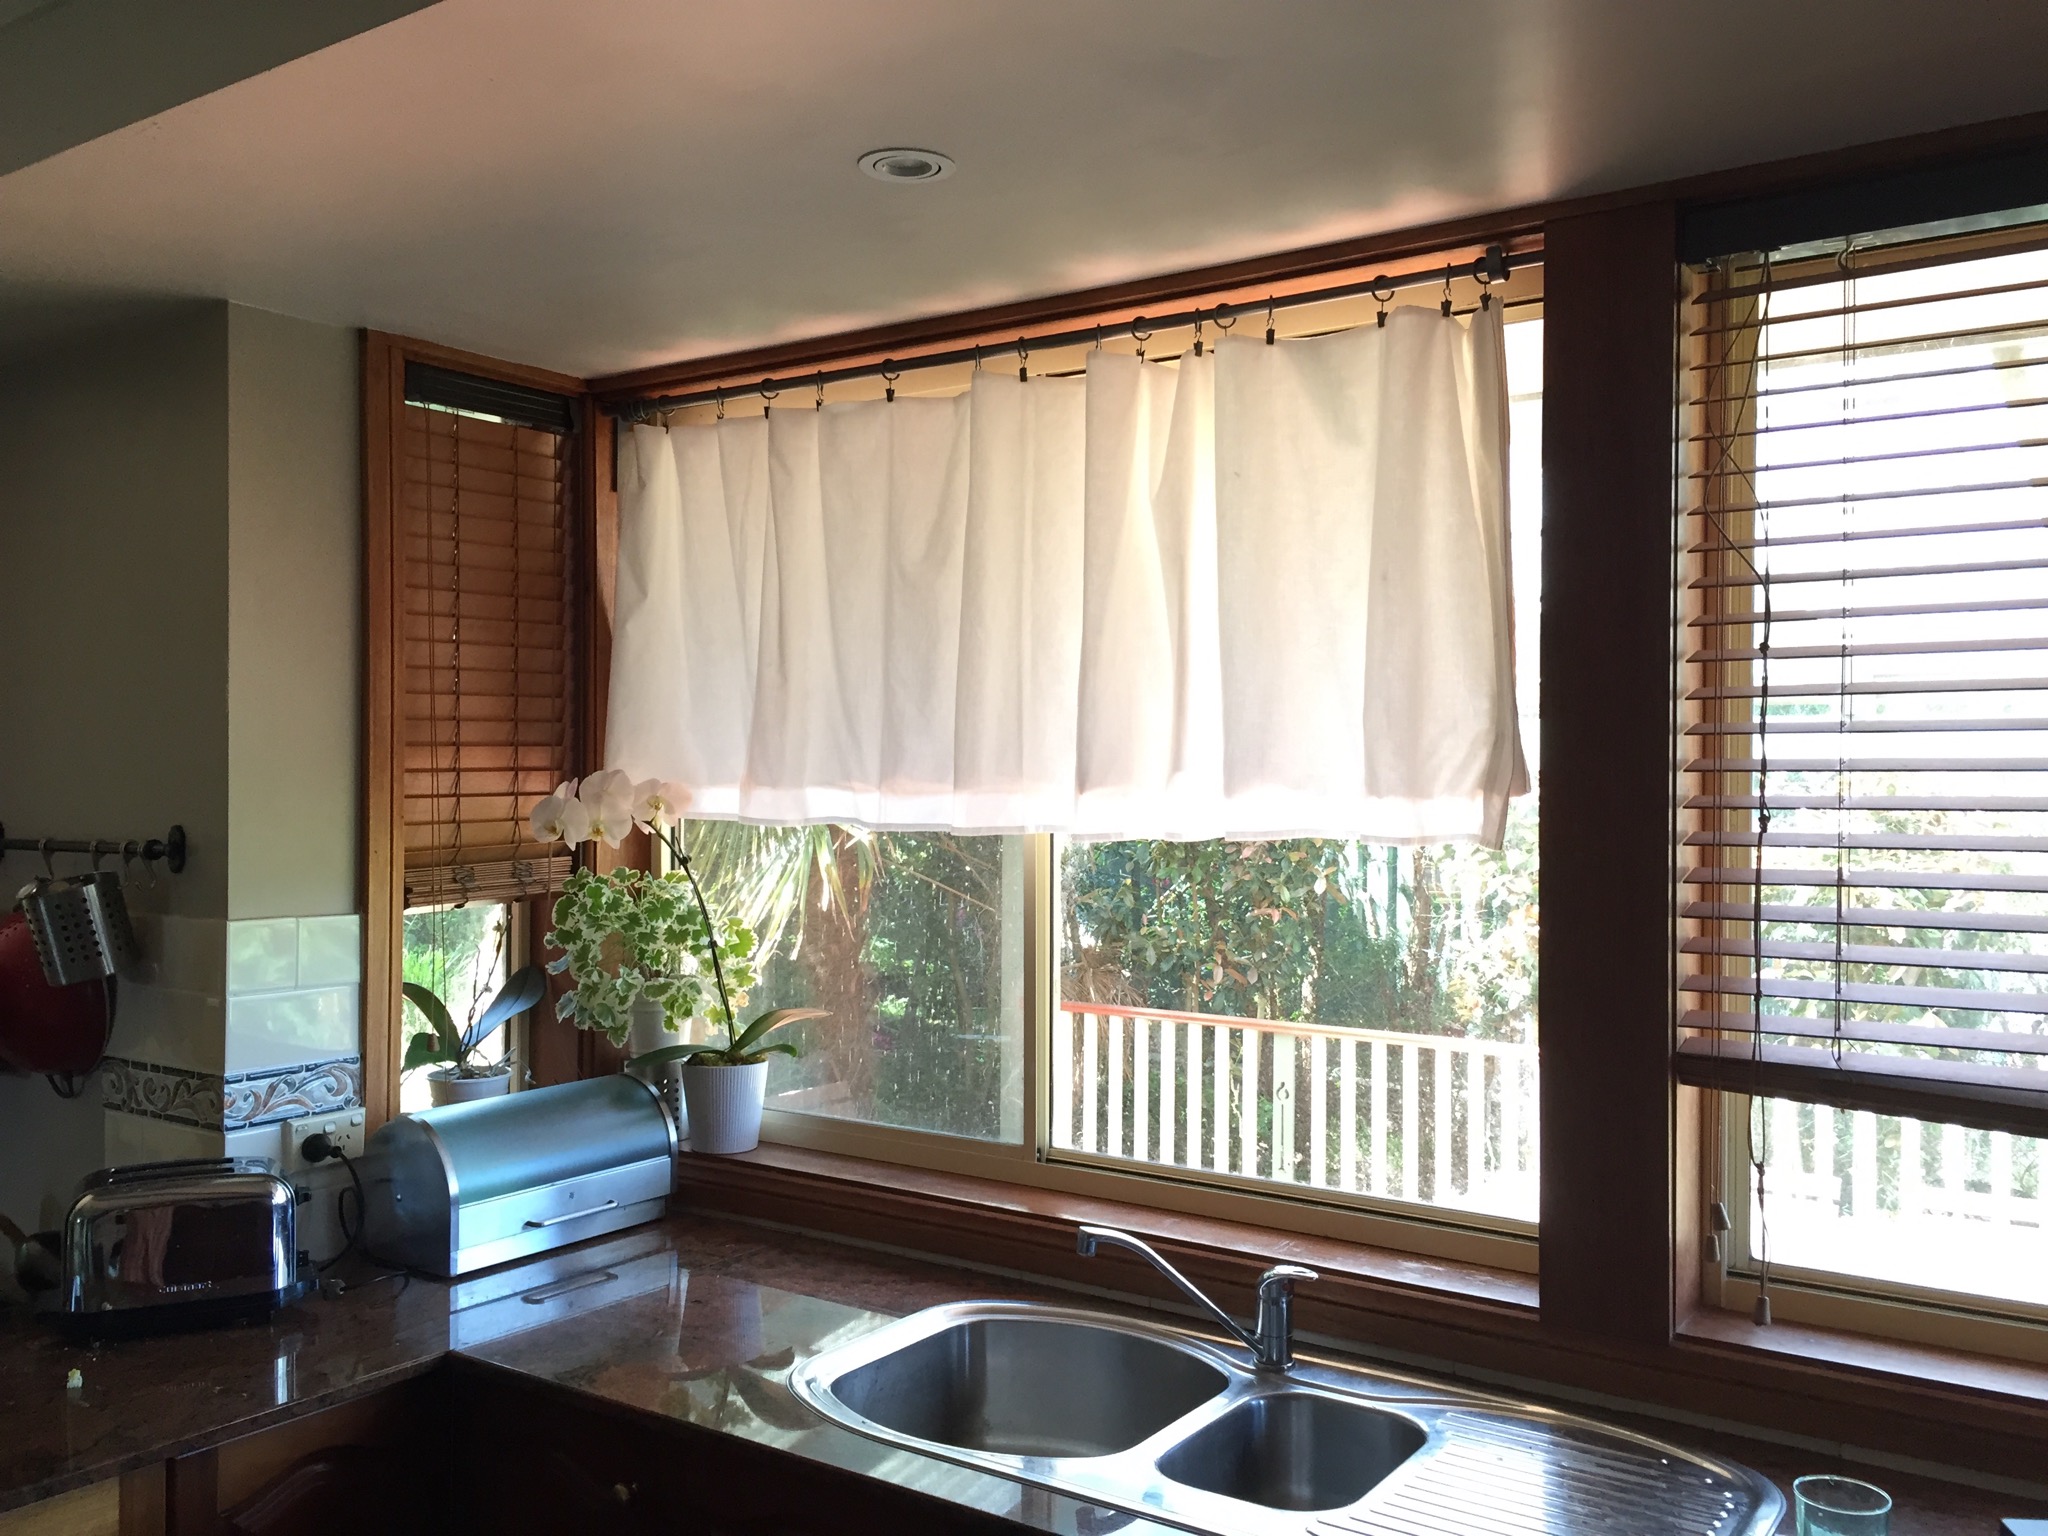
New kitchen curtains — no sewing required!
Yeah, I know — sometimes I surprise even myself! Who knew that when I woke up this morning intending to put together some new kitchen curtains, that I wouldn’t need to even get out a pair of scissors? And yet … that’s just what I did. 😀
Because I feel like doing everything upside down tonight, let me jump straight to the before / after:

Before …

… and after!
Noink!
Our kitchen is quite a dark space, which we’ve been attempting to lighten up with a bit of paint, and by removing a large overhanging cabinet from above the stove. I’ve always wanted to do away with these old wooden blinds, though, and their time had come.
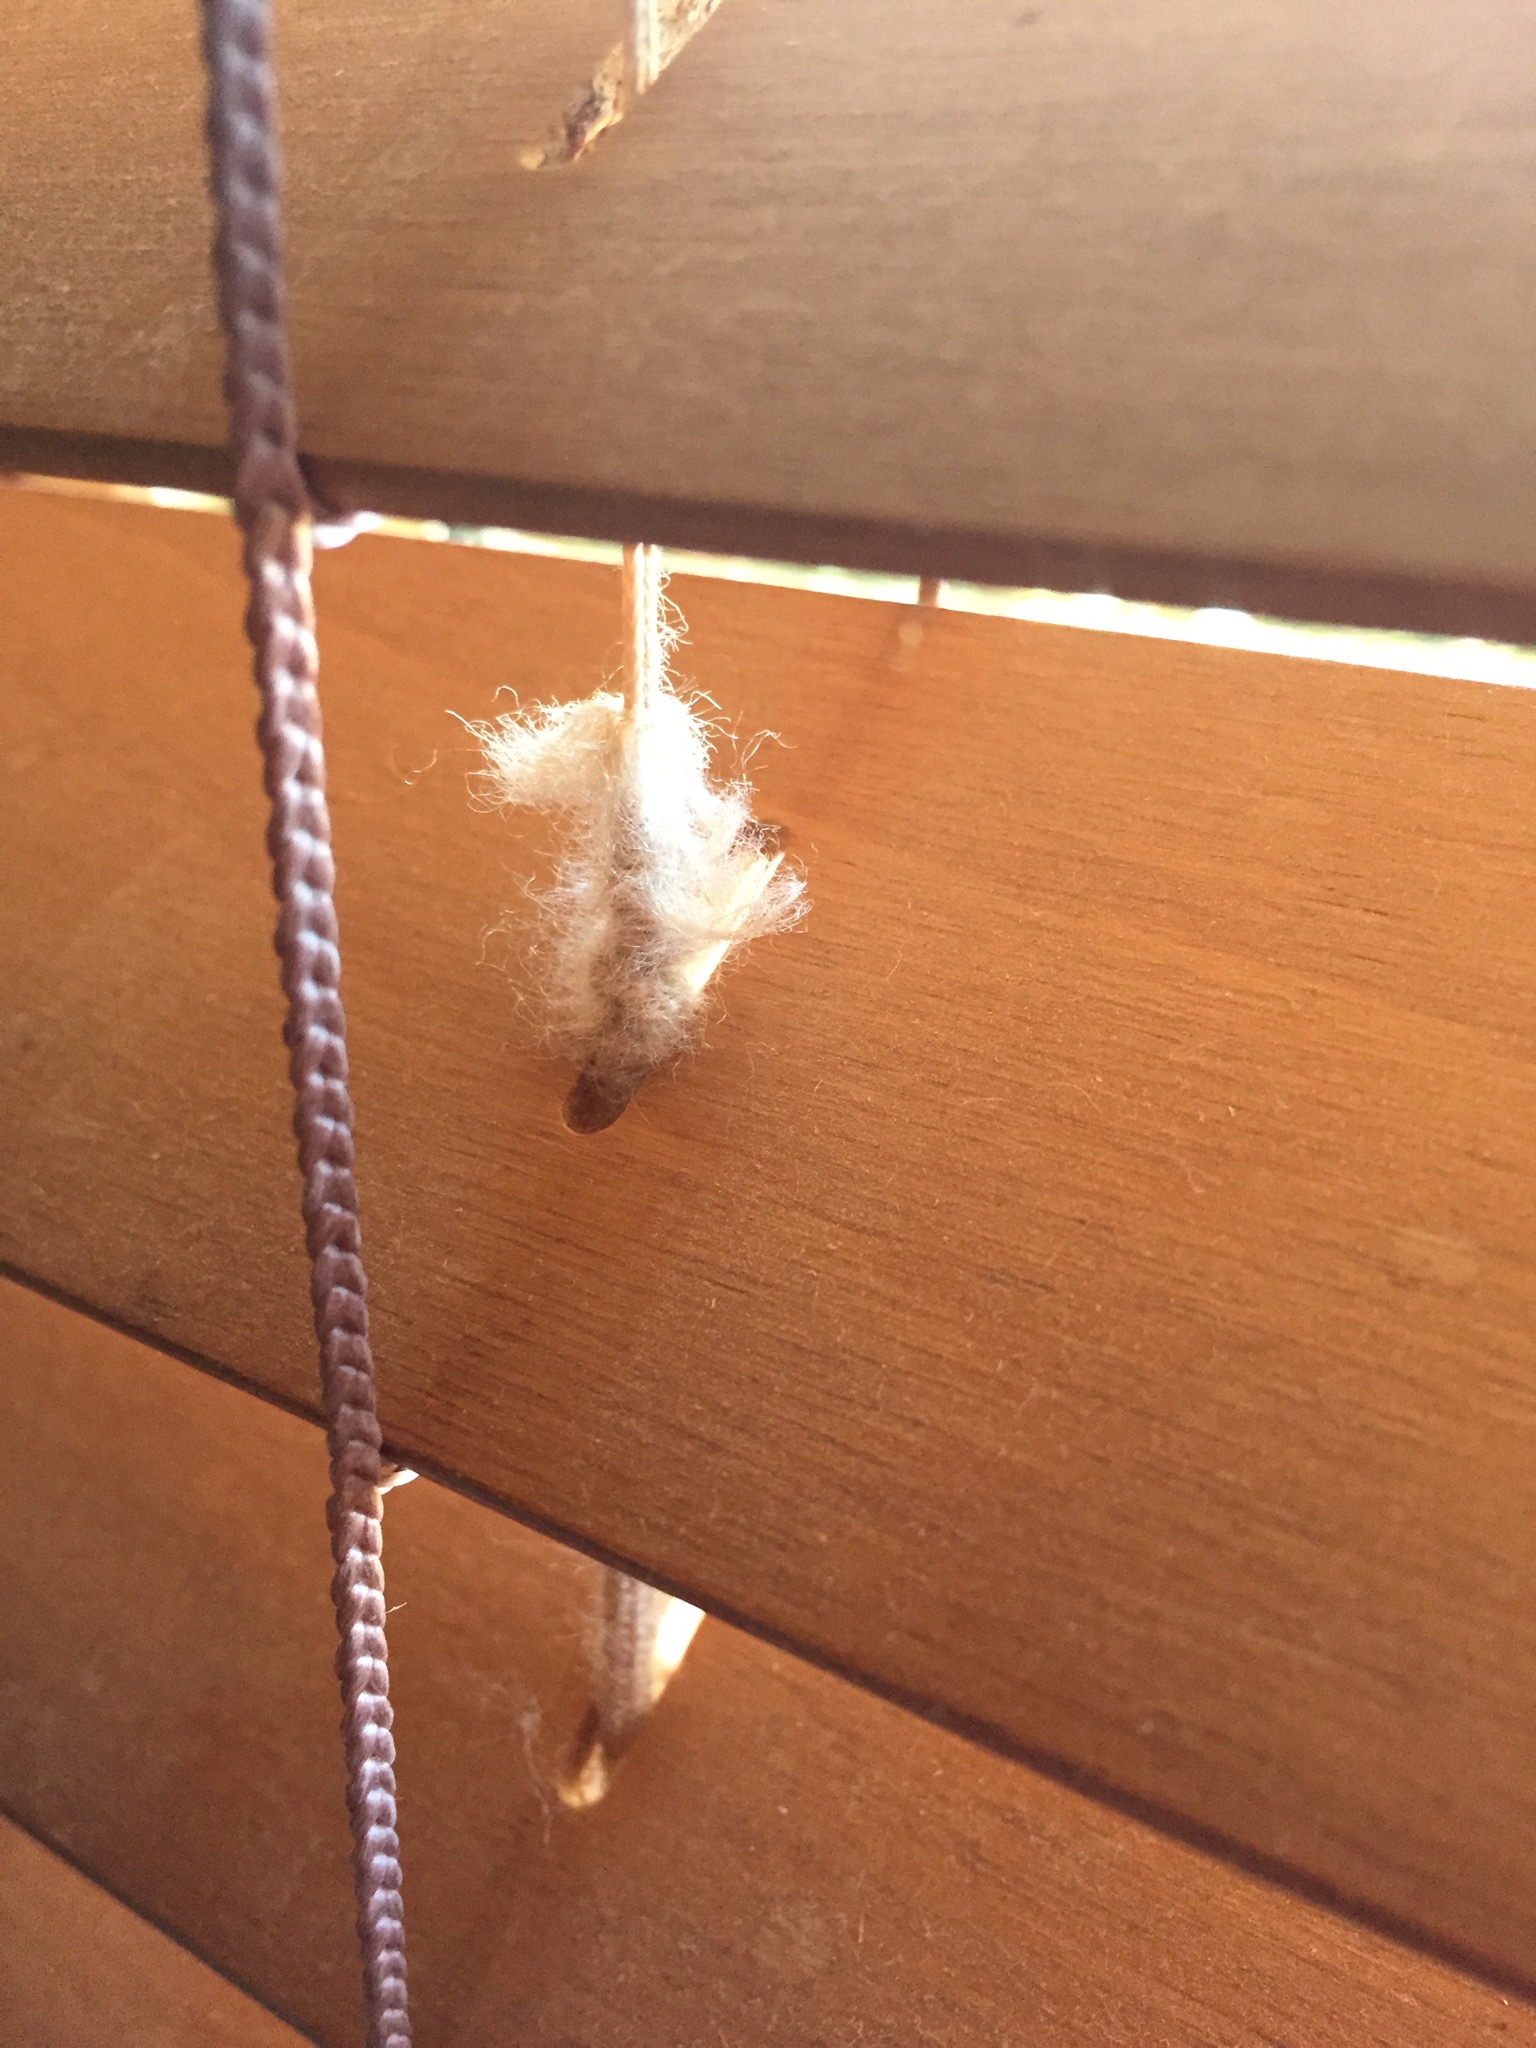
These blinds were pretty rough when we moved in, with the varnish worn away and a few chips here and there. But the fraying of the pull-cord meant that the blind couldn’t be closed or opened any more. Time to get them down and do something, *anything*, instead!
I purchased some curtain rails and fixings from Ikea, which I only mention because I have now entered the ranks of the Ikea Hacker. (Drumroll, please!)
In order to mount the brackets into our odd sink window space I needed to rotate the hook part 90 degrees. This is not at all the intended purpose of these mountings, so they didn’t want to stay put with just the screw provided. I slipped a bit of non-stick rug underlay (“Stopp”, it’s called) in between to stop the hook from wiggling in place. Worked a treat!
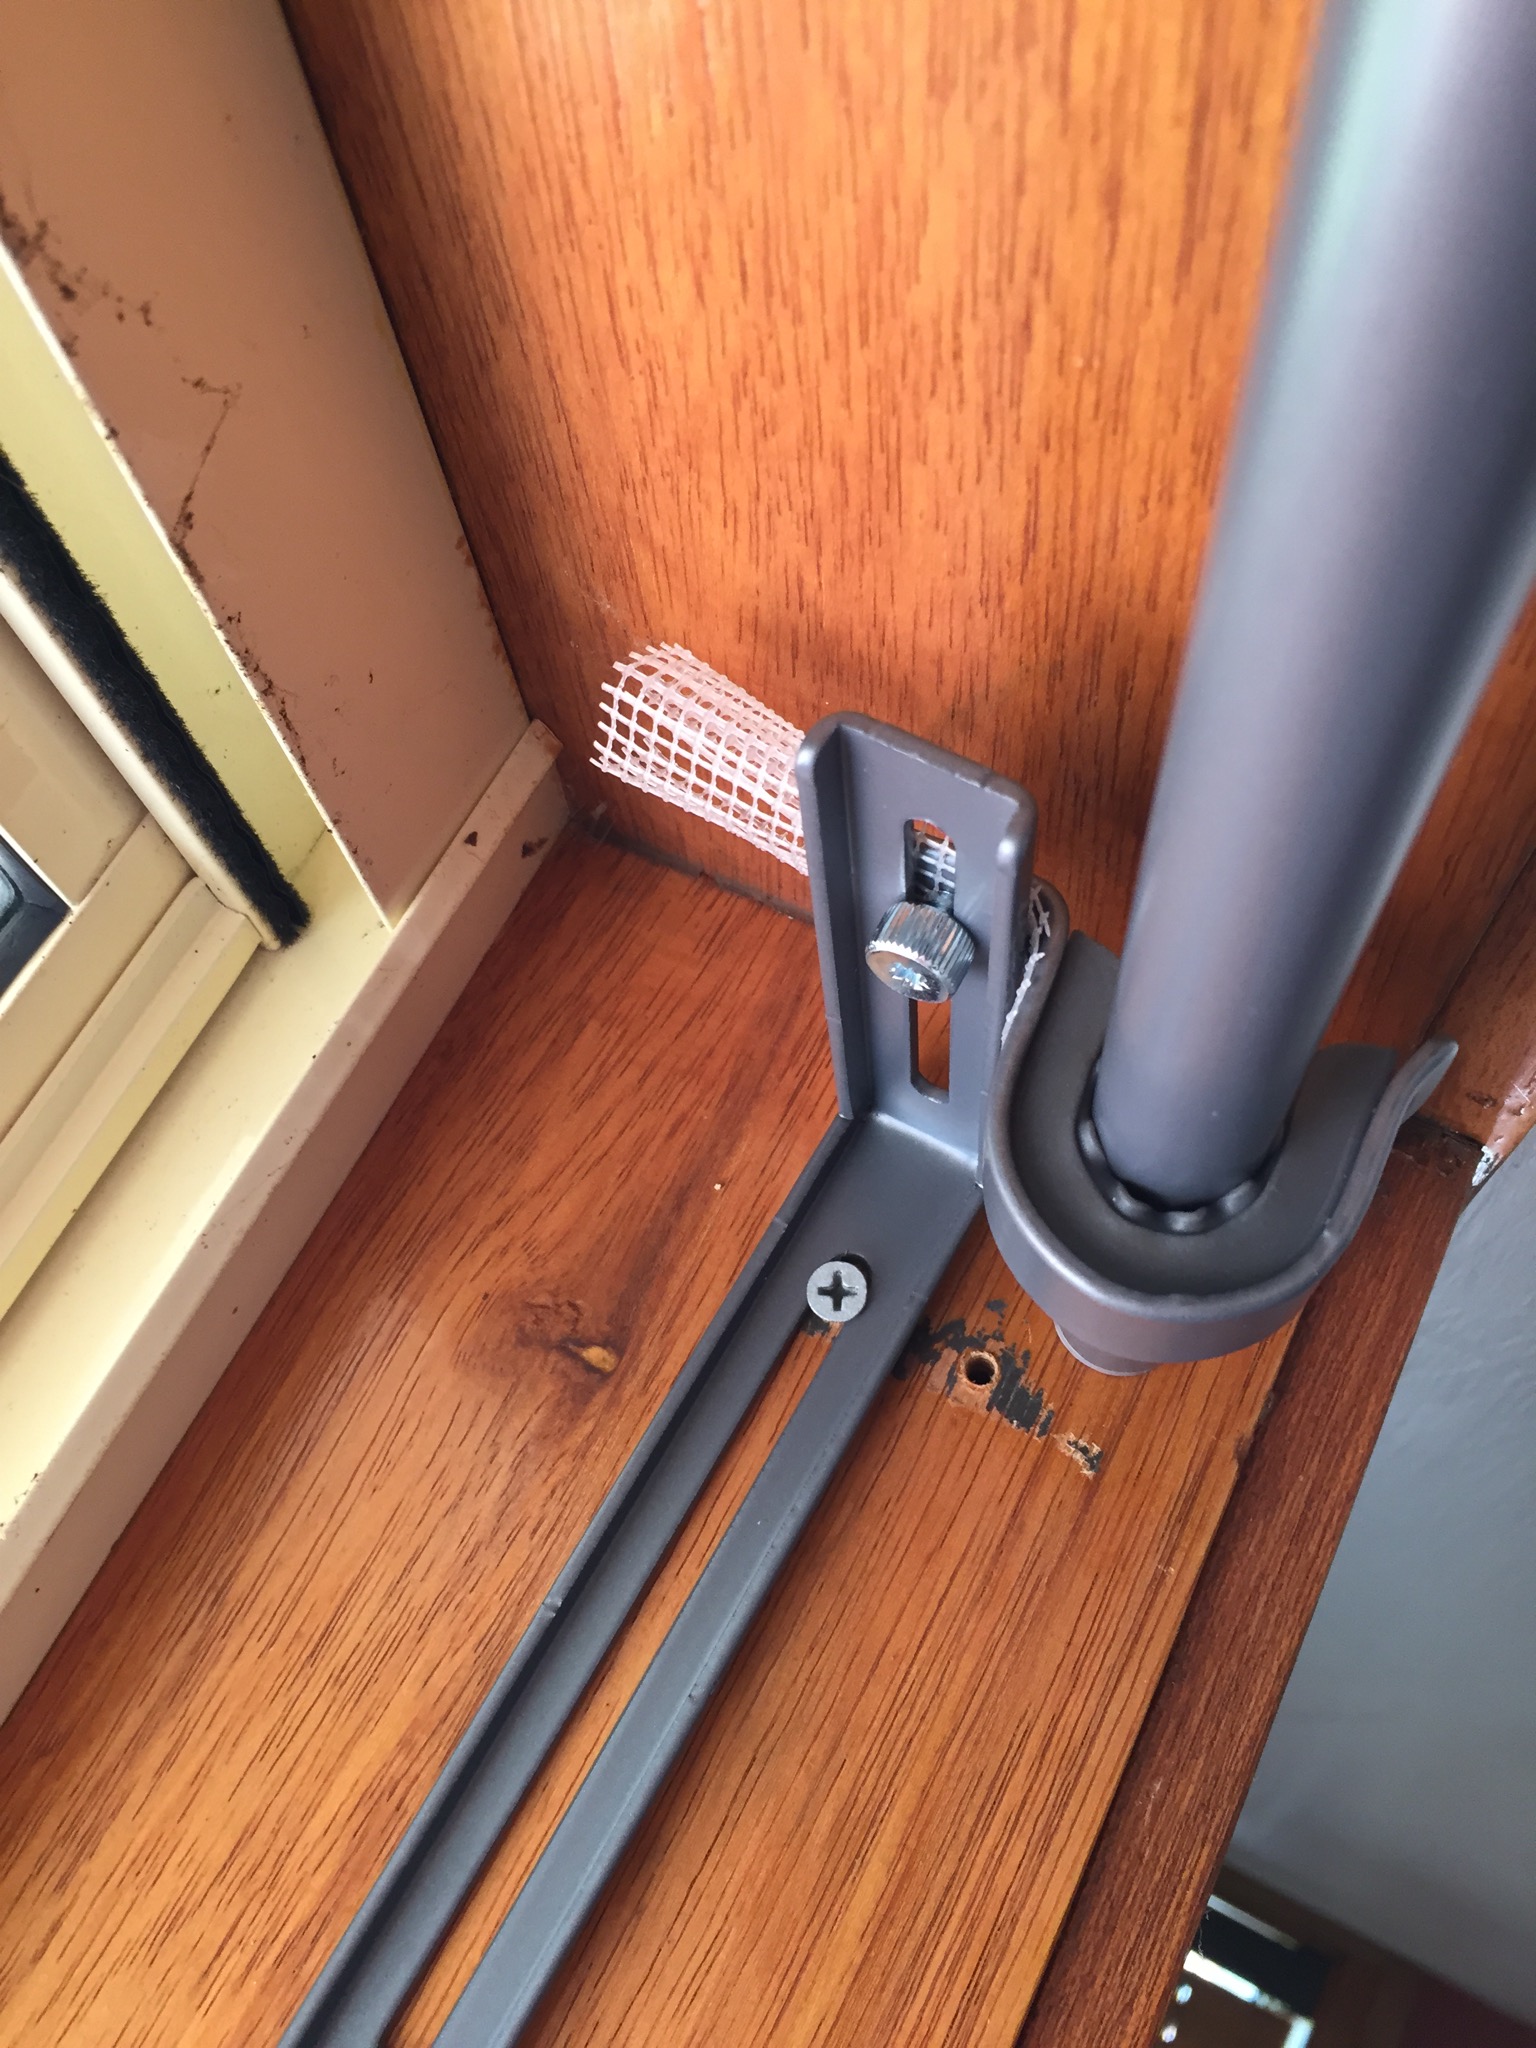
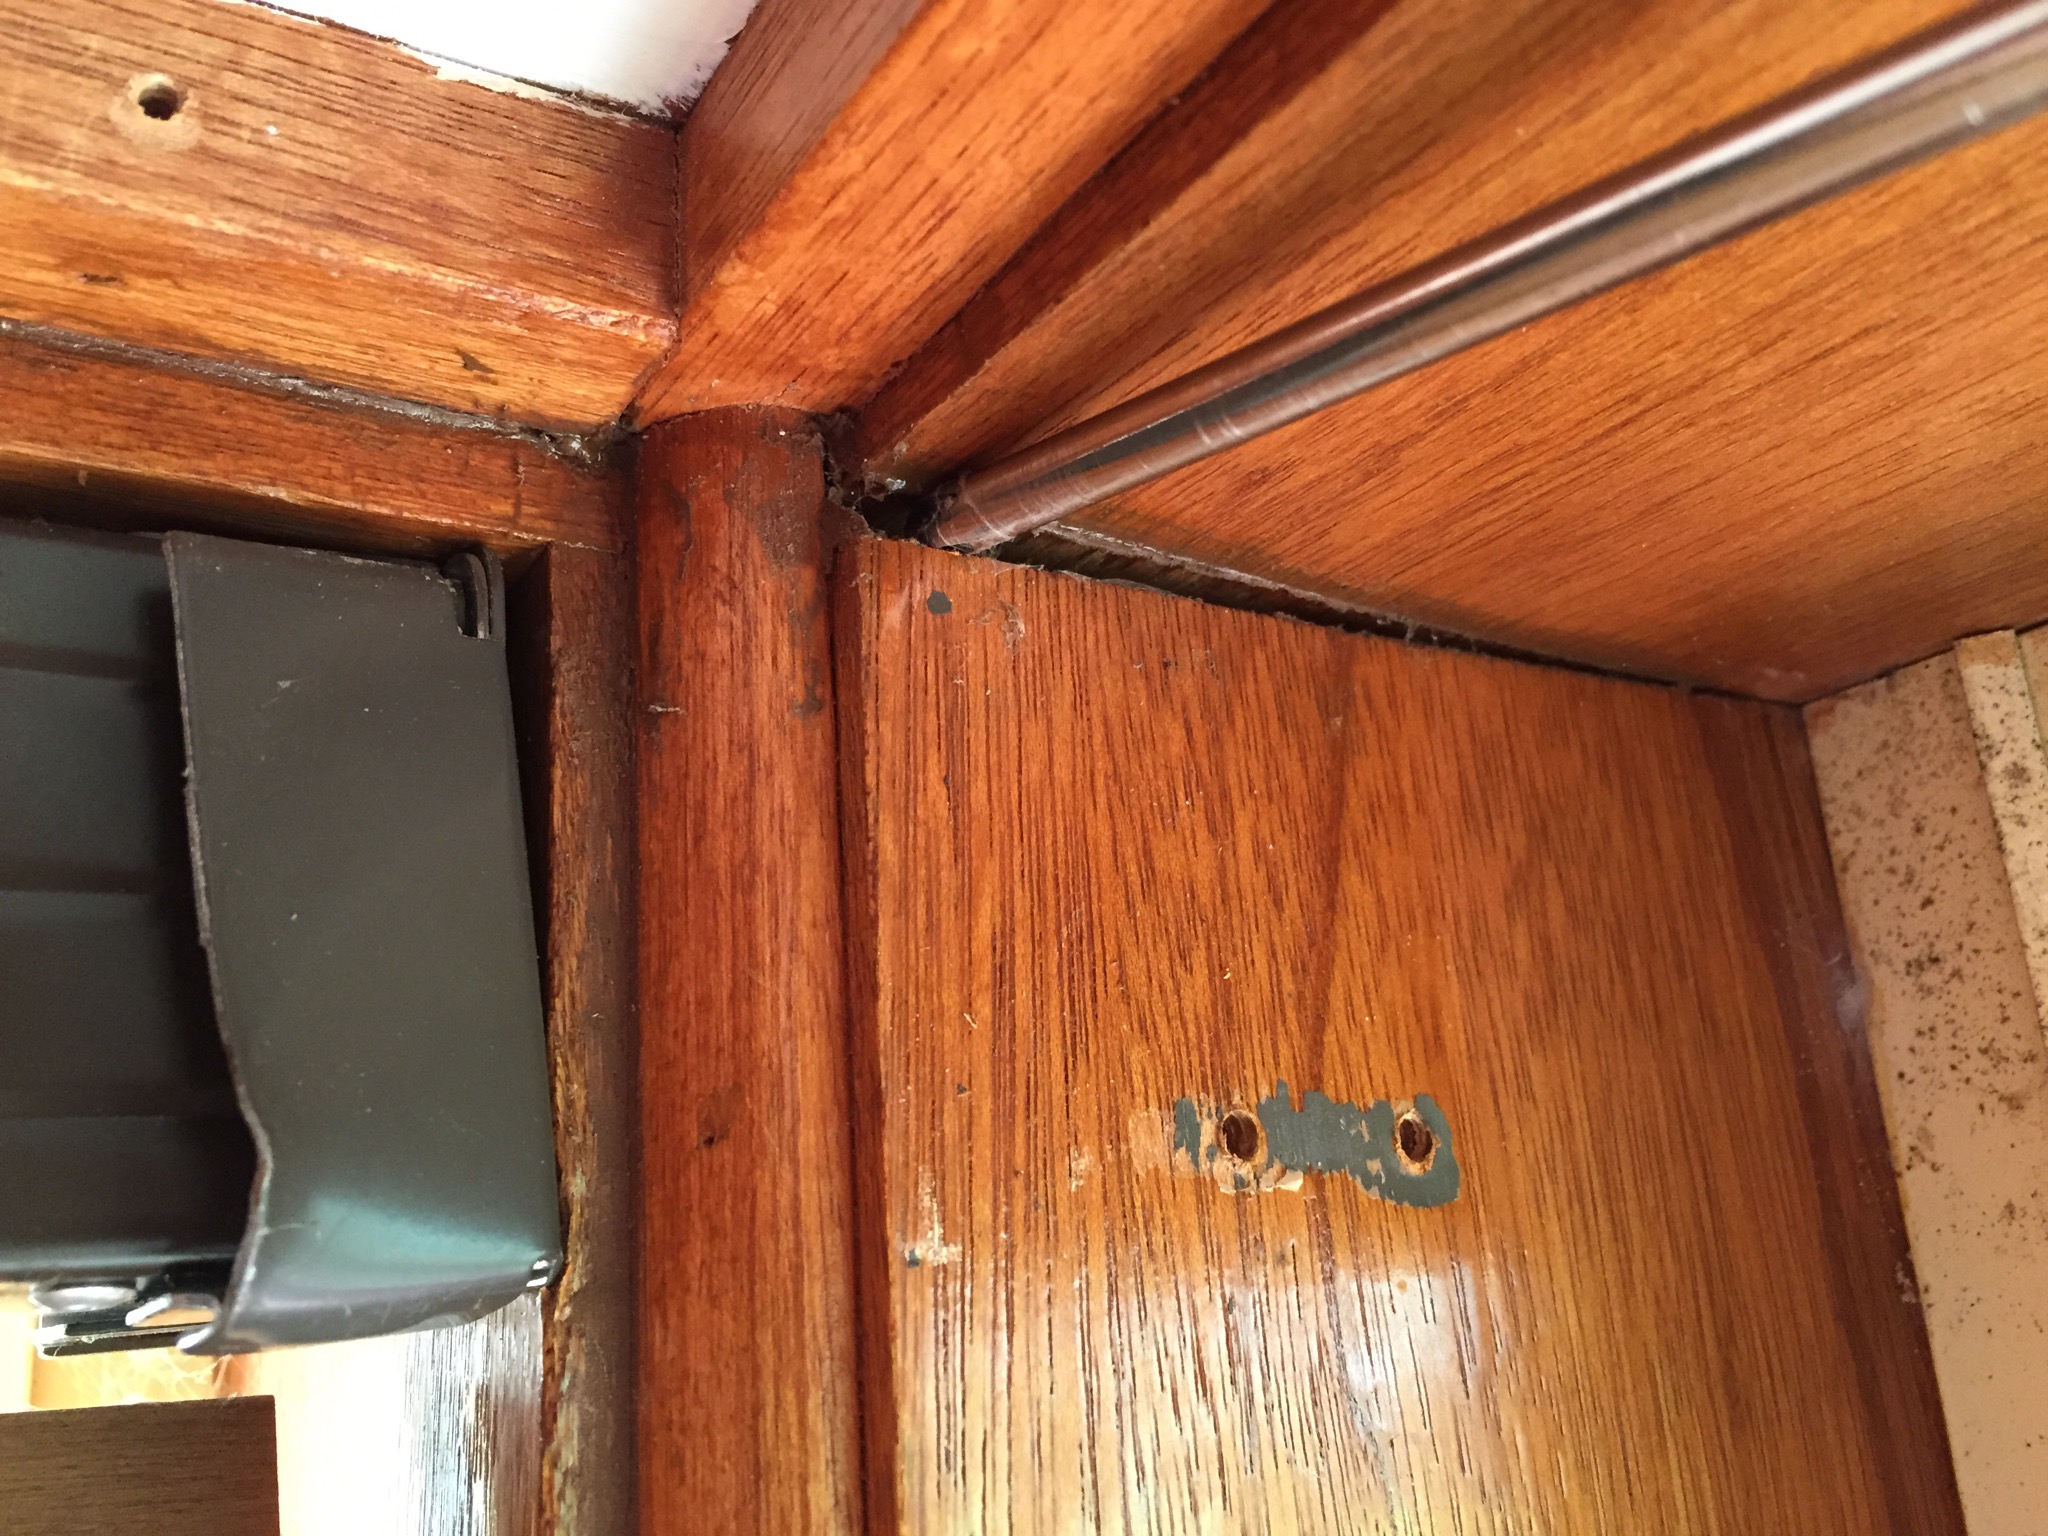
I was able to put one of the mounting screws into the hole left by the previous hardware, so I didn’t even need to get my drill out. Nice! (Oh, and check out what I found when I removed the old hardware! That’s a Phillip’s head screwdriver poking into that gap!)
By the way, here’s a neat tip for when you are working above a sink: cover each drain hole so that if you happen to drop a screw, it doesn’t disappear down the gurgler!

Once I had the brackets in place I decided to test fit a simple curtain to make sure I had the height / depth correct. Enter the budget white sheet:

Curtains closed …

… and opened.
I folded a single bed sheet so that it would drape the height of the window when clipped up by those cute little alligator clips. Then I clipped the fold every ten cm or so, and slipped the rings onto the rail. This method of hanging the curtain was everything I hoped it would be: easy to put up and take down for cleaning! And no chance of the hooks slipping off the rings, which is something that happens elsewhere in the house, and which I hate!
But the result was kind of “meh”. It was okay, and I felt it did the job, but it just didn’t feel right.
I wondered whether making the curtain shorter would help?
So much better! To do this version I simply folded the lower section of the curtain up and caught it into the existing clips. To “replicate this look” (haha) all you need to do is fold a single bed sheet into thirds (roughly) and clip it up onto a curtain rod. Easy, huh?
The height might need a bit of adjusting, but it was immediately obvious that this made my window area more functional (I can still use the sill, for example). I decided that this arrangement would be great for Springtime / Summer, because we don’t need the warmth from a full curtain, but we do need to cut the harsh Australian sun that comes in during the morning.
I figure that I will swap this curtain out for a “Window Quilt” come next winter. Plenty of time to plan for that, right? I’ll start next Autumn. 😛
Next I went looking for the other sheet in my cheap sheet set. I’ve been using these sheets as a seasonal tablecloth (to disguise the green ping pong tables I use when we have guests at Christmas). So I chose really, really cheap sheets, intended for getting red wines stains, and only slightly better than a truly disposable plastic sheet. If I put these on a bed, I think an elbow would make a hole in the first twenty seconds!
Uh oh, where the heck is that sheet? I looked everywhere I thought it could be, but alas: Earwax.
Having pulled down the old blind, it was time to get creative:

Flour sacks, up close

Here’s a wider view. Oh look! There’s where the mess is hiding 🙂
I’ve had my eye on these flour sacks for ages — they are the packaging left over from the bulk flour I buy. They are so useful! I had to empty out my potato bag and my felt craft scraps to get enough bags to string across the window, and boy, do they need a wash.
Again — this seemed okay. It had promise — maybe if I unpicked the sides of the sacks and sewed them up properly, giving myself extra length in the process? I did a bunch of surfing on Pinterest (because that’s how I roll 😉 ) and figured I would just have to try it and see.
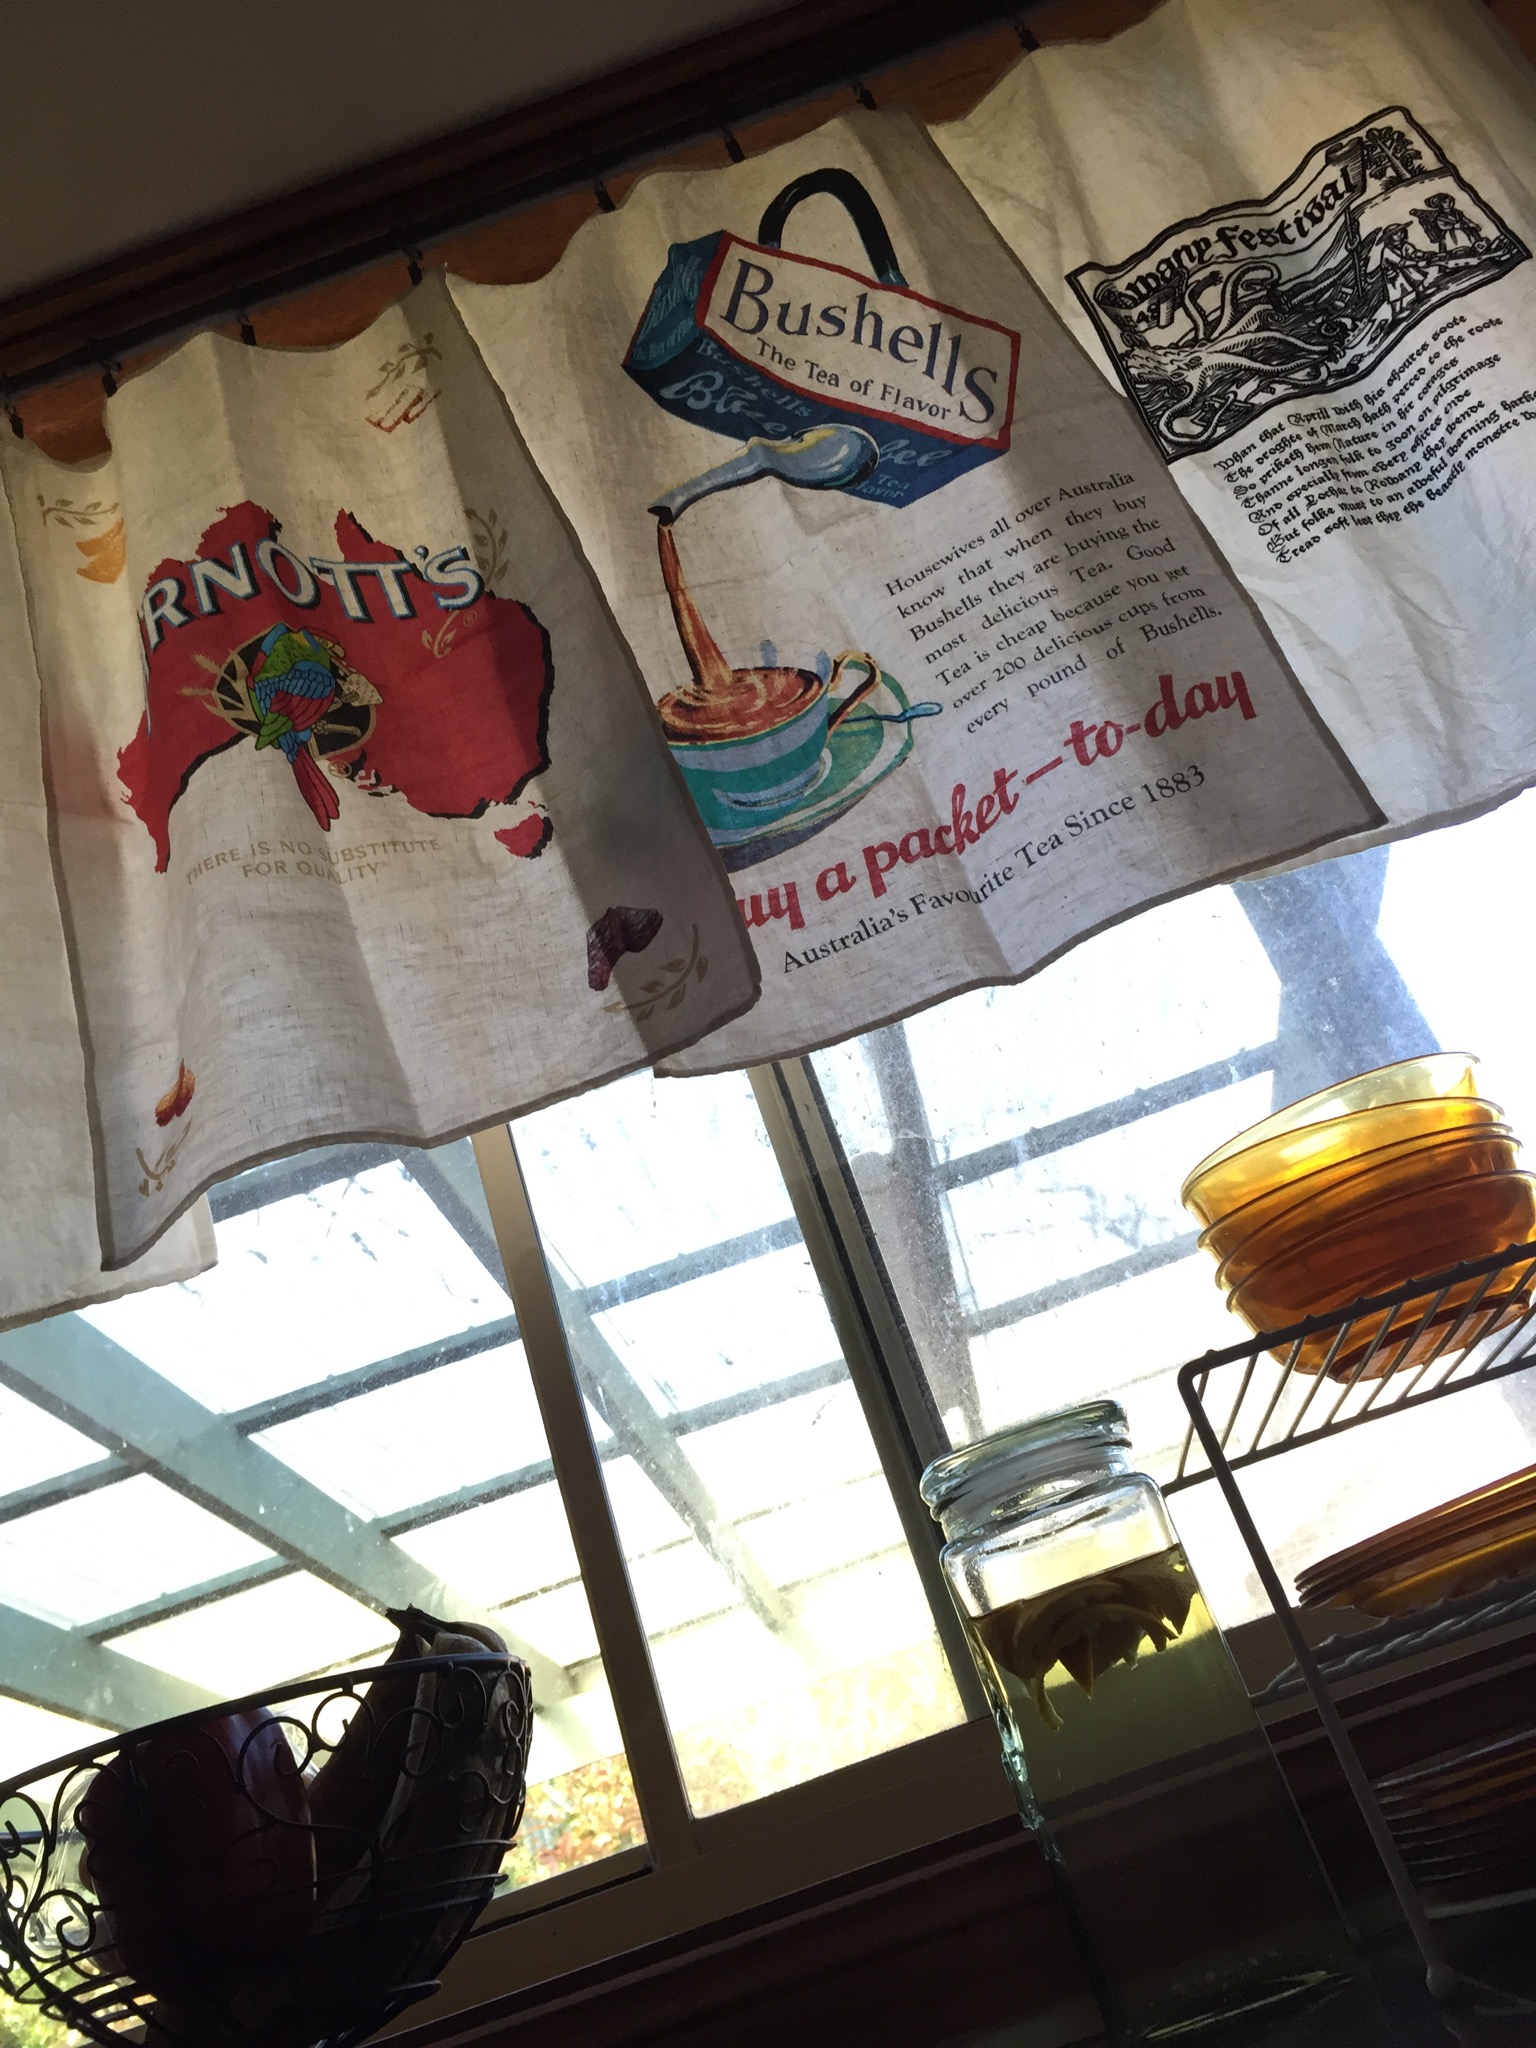
And then, brainwave! What about the wonderful tea towels I received last Christmas, with the vintage Australian brands? Awesome!
They match my vintage Australian brand red tin I have sitting on the counter. They are white (not cream — I really, really don’t like cream) and match the colours in the kitchen that I want (red / white / dark grey, with splashes of other colours). They even match the length of the other curtain quite nicely.
Win!

So up they went, with a couple of tea towels designed for Rowany Festival by one of my good friends, Lou. I’m going to have to convince her to do next year’s tea towel in red, white and charcoal so I can replace the white sheet on the other side with another set of towels!
The last towel on the end is actually wet from the washing machine because I use these towels in my normal rotation. What’s the point of having tea towels that are purely “for keeps”? 🙂 I figured it would dry just as well up there in the Spring breeze as out on the clothesline. I still have plenty of other tea towels left for regular use.
Have you noticed how much mess there isn’t in all these photos? Nothing like a good spring clean to keep the counter tidy (for today, anyway!)

So what do you think? The tea towels have been growing on me all afternoon. This kitchen is starting to make me happy. 🙂
Big reveal: woven tea towels!
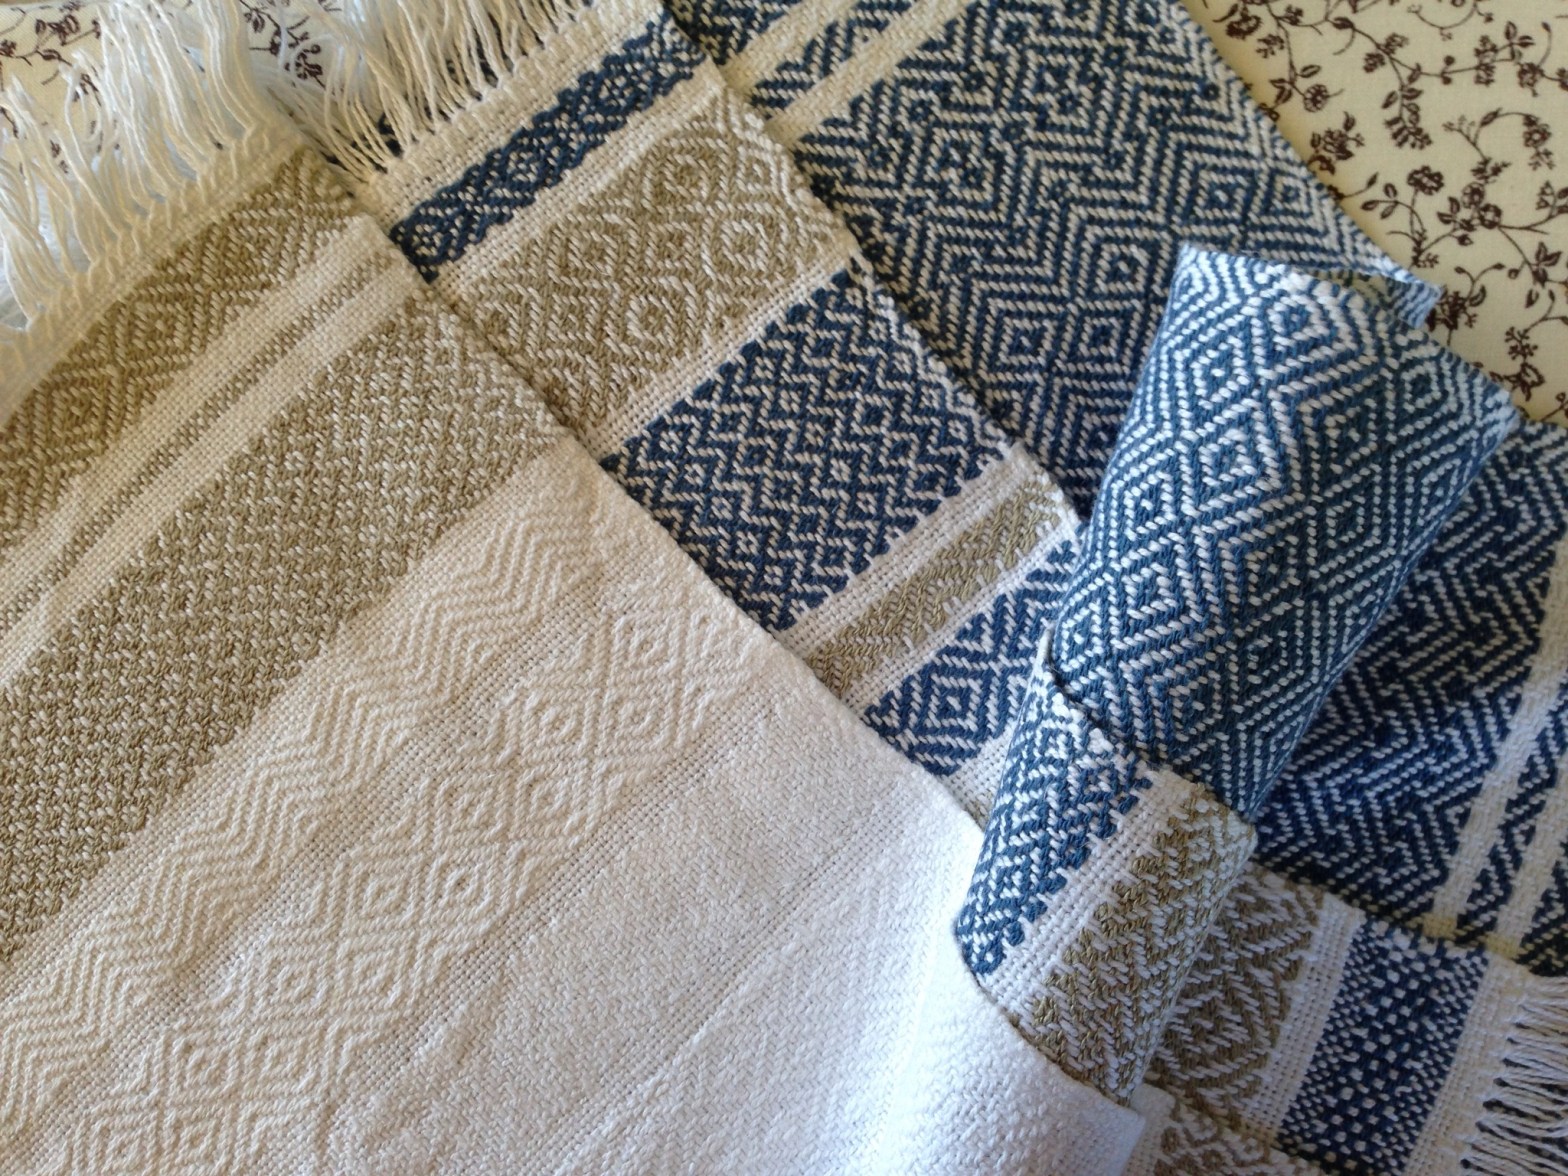
I’m excited to finally be able to reveal what I’ve been working away on over the last few months: a set of woven tea towels for my Mum’s birthday!


Folded nicely, ready for a gift
These turned out so well. 🙂 Not much like the original sample concept I tried back in January … but since then I managed to borrow a table top 4-shaft loom which made these little beauties possible.
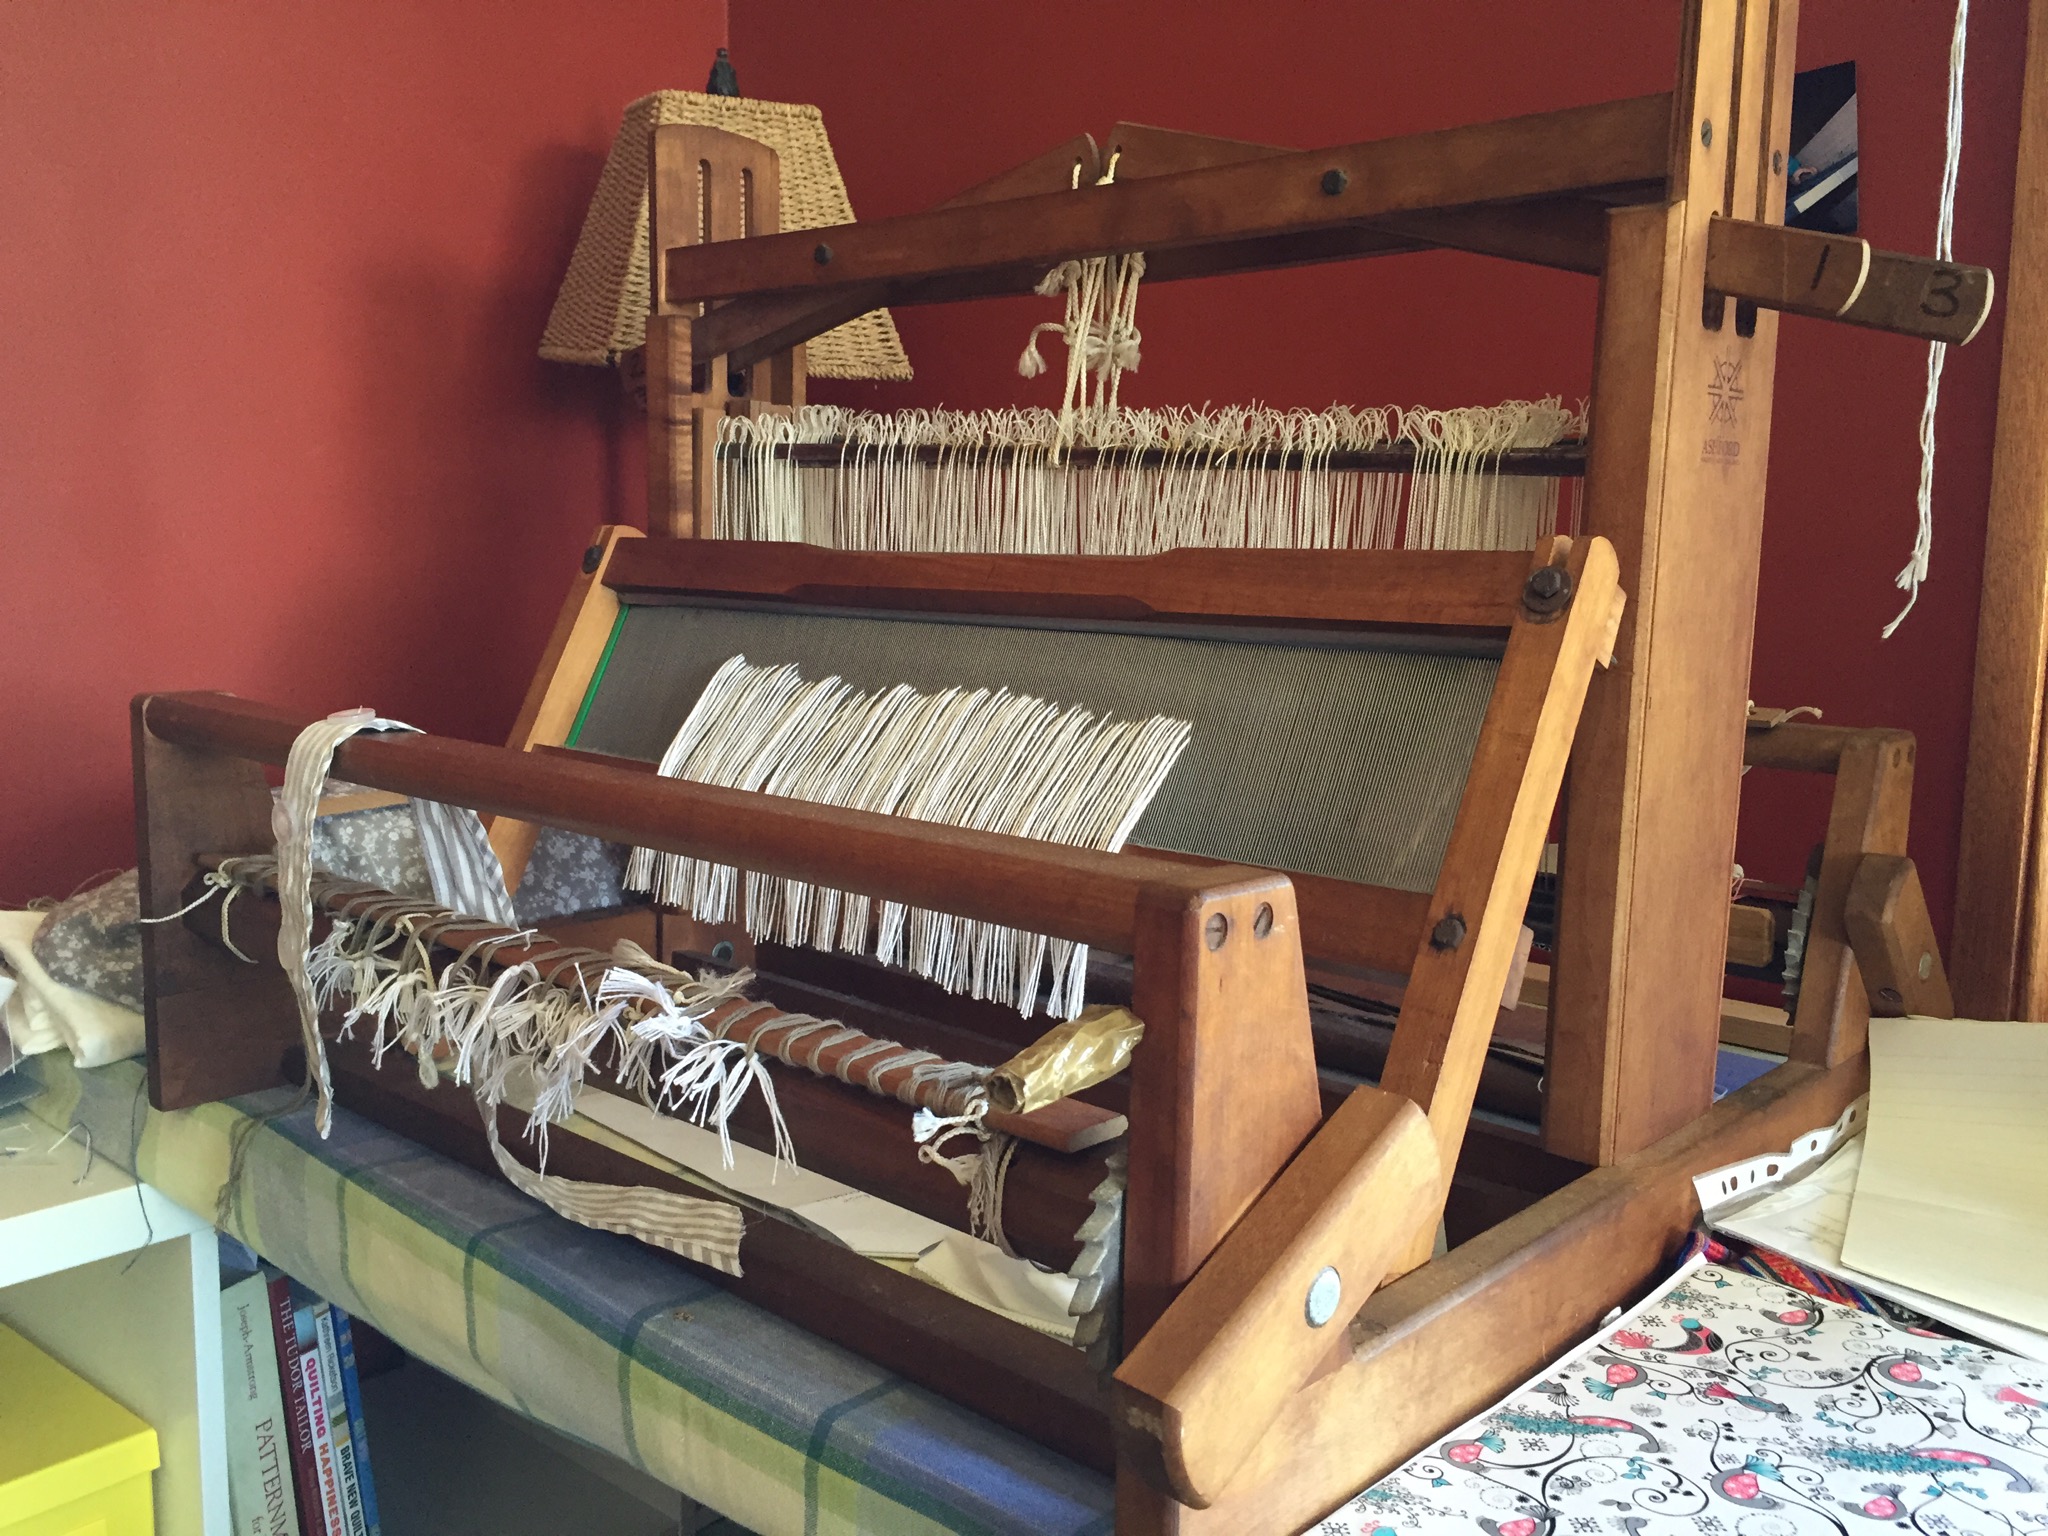
I wound the warp in plain white cottolin (a blend of linen and cotton):
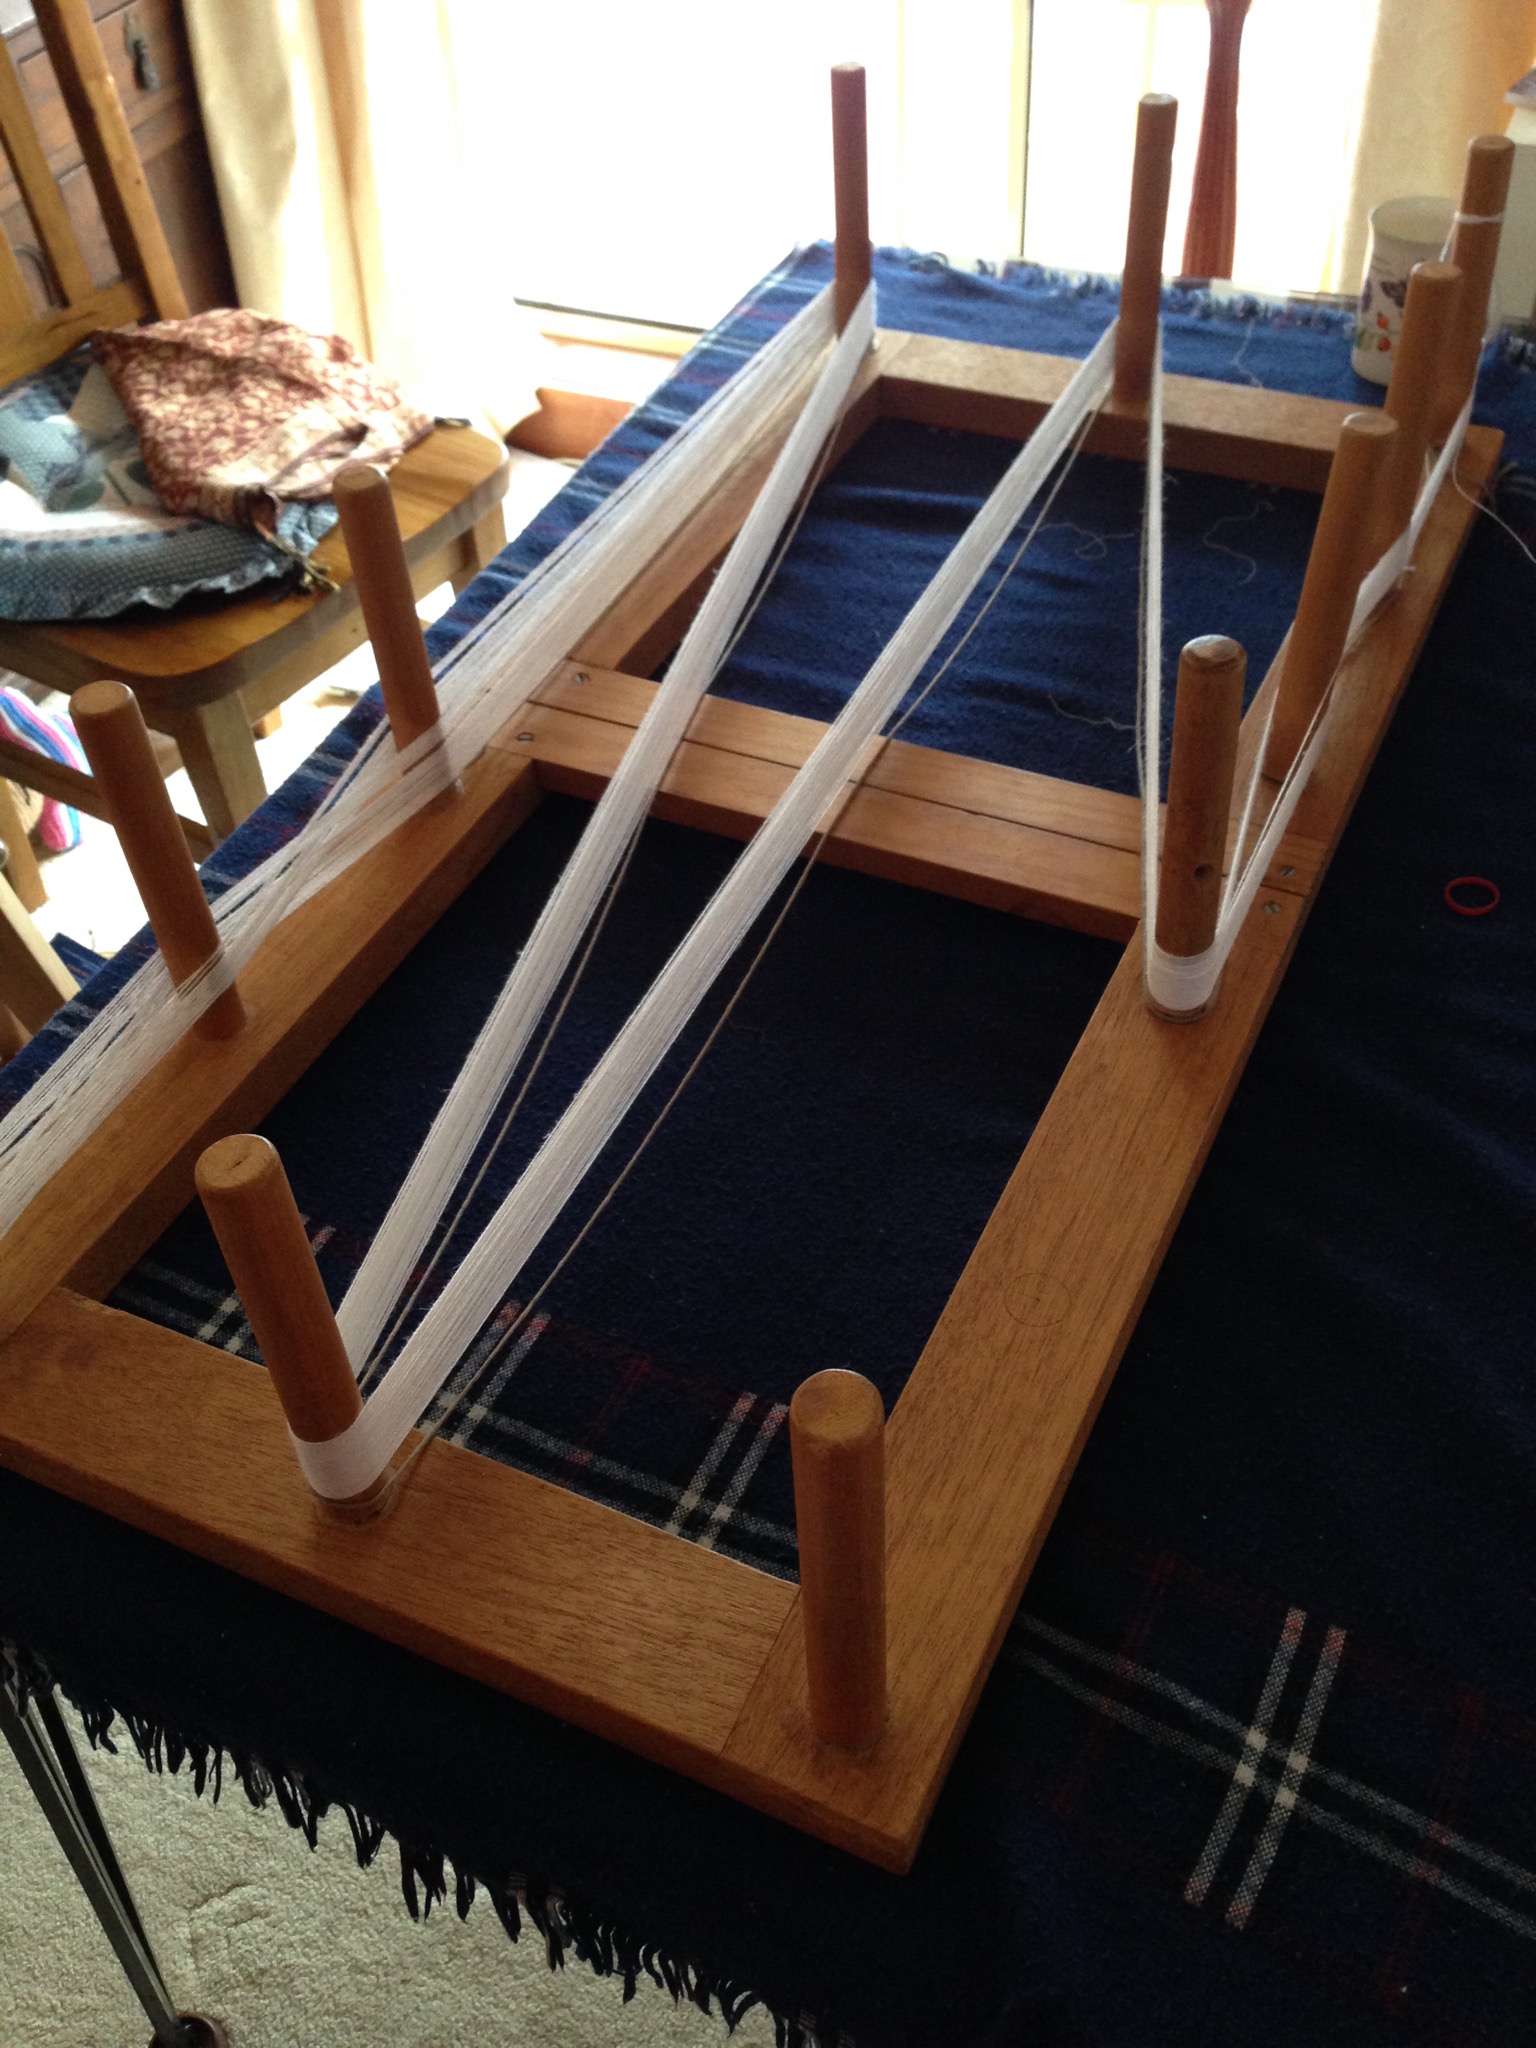
These long threads go onto the loom, winding onto the back beam:
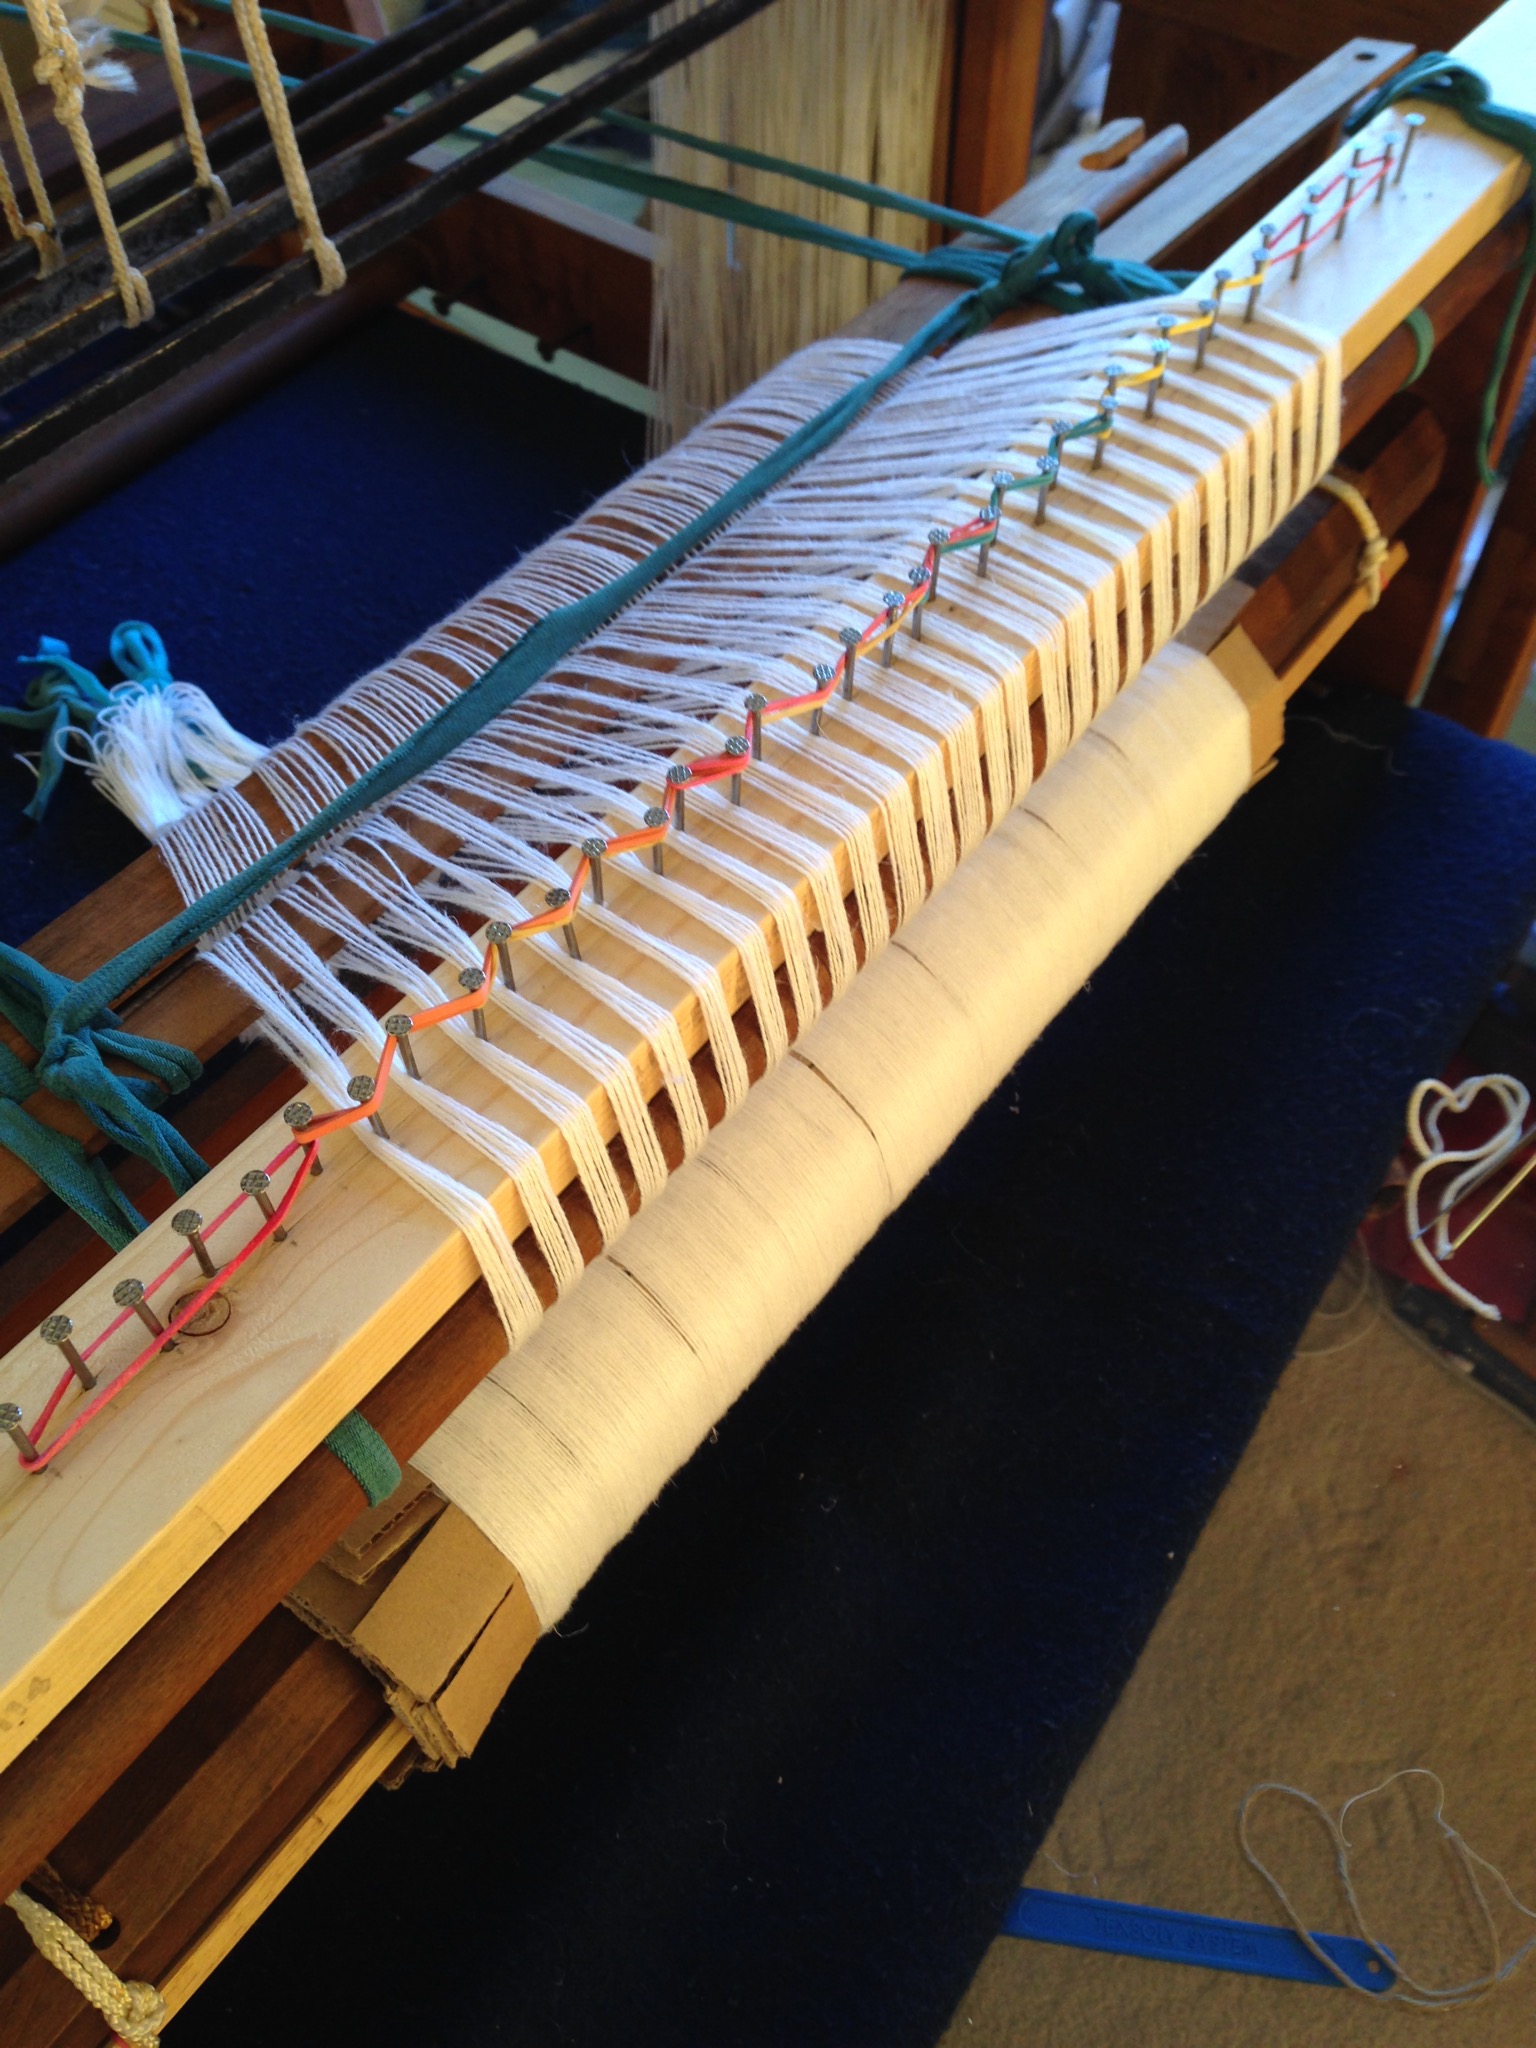
I made the raddle myself out of a bit of spare timber, and some nails. It’s a bit shonky, but it did the trick!
Once the warp is wound on, each of those threads needs to be individually threaded through the heddles (the white vertical strings). When I pull the levers, different sets of heddles go up, making different patterns on the surface of the cloth.
Once the heddles are done, it’s time to sley the reed (cue husband giggling insanely — he think all these weaving terms are just made up!). That means pulling each thread through the metal slots, and tying up in groups to the front beam. In the photo above, I’ve started to weave using a bit of spare wool, and you can see that the first threads are starting to spread out evenly across the width of the cloth.
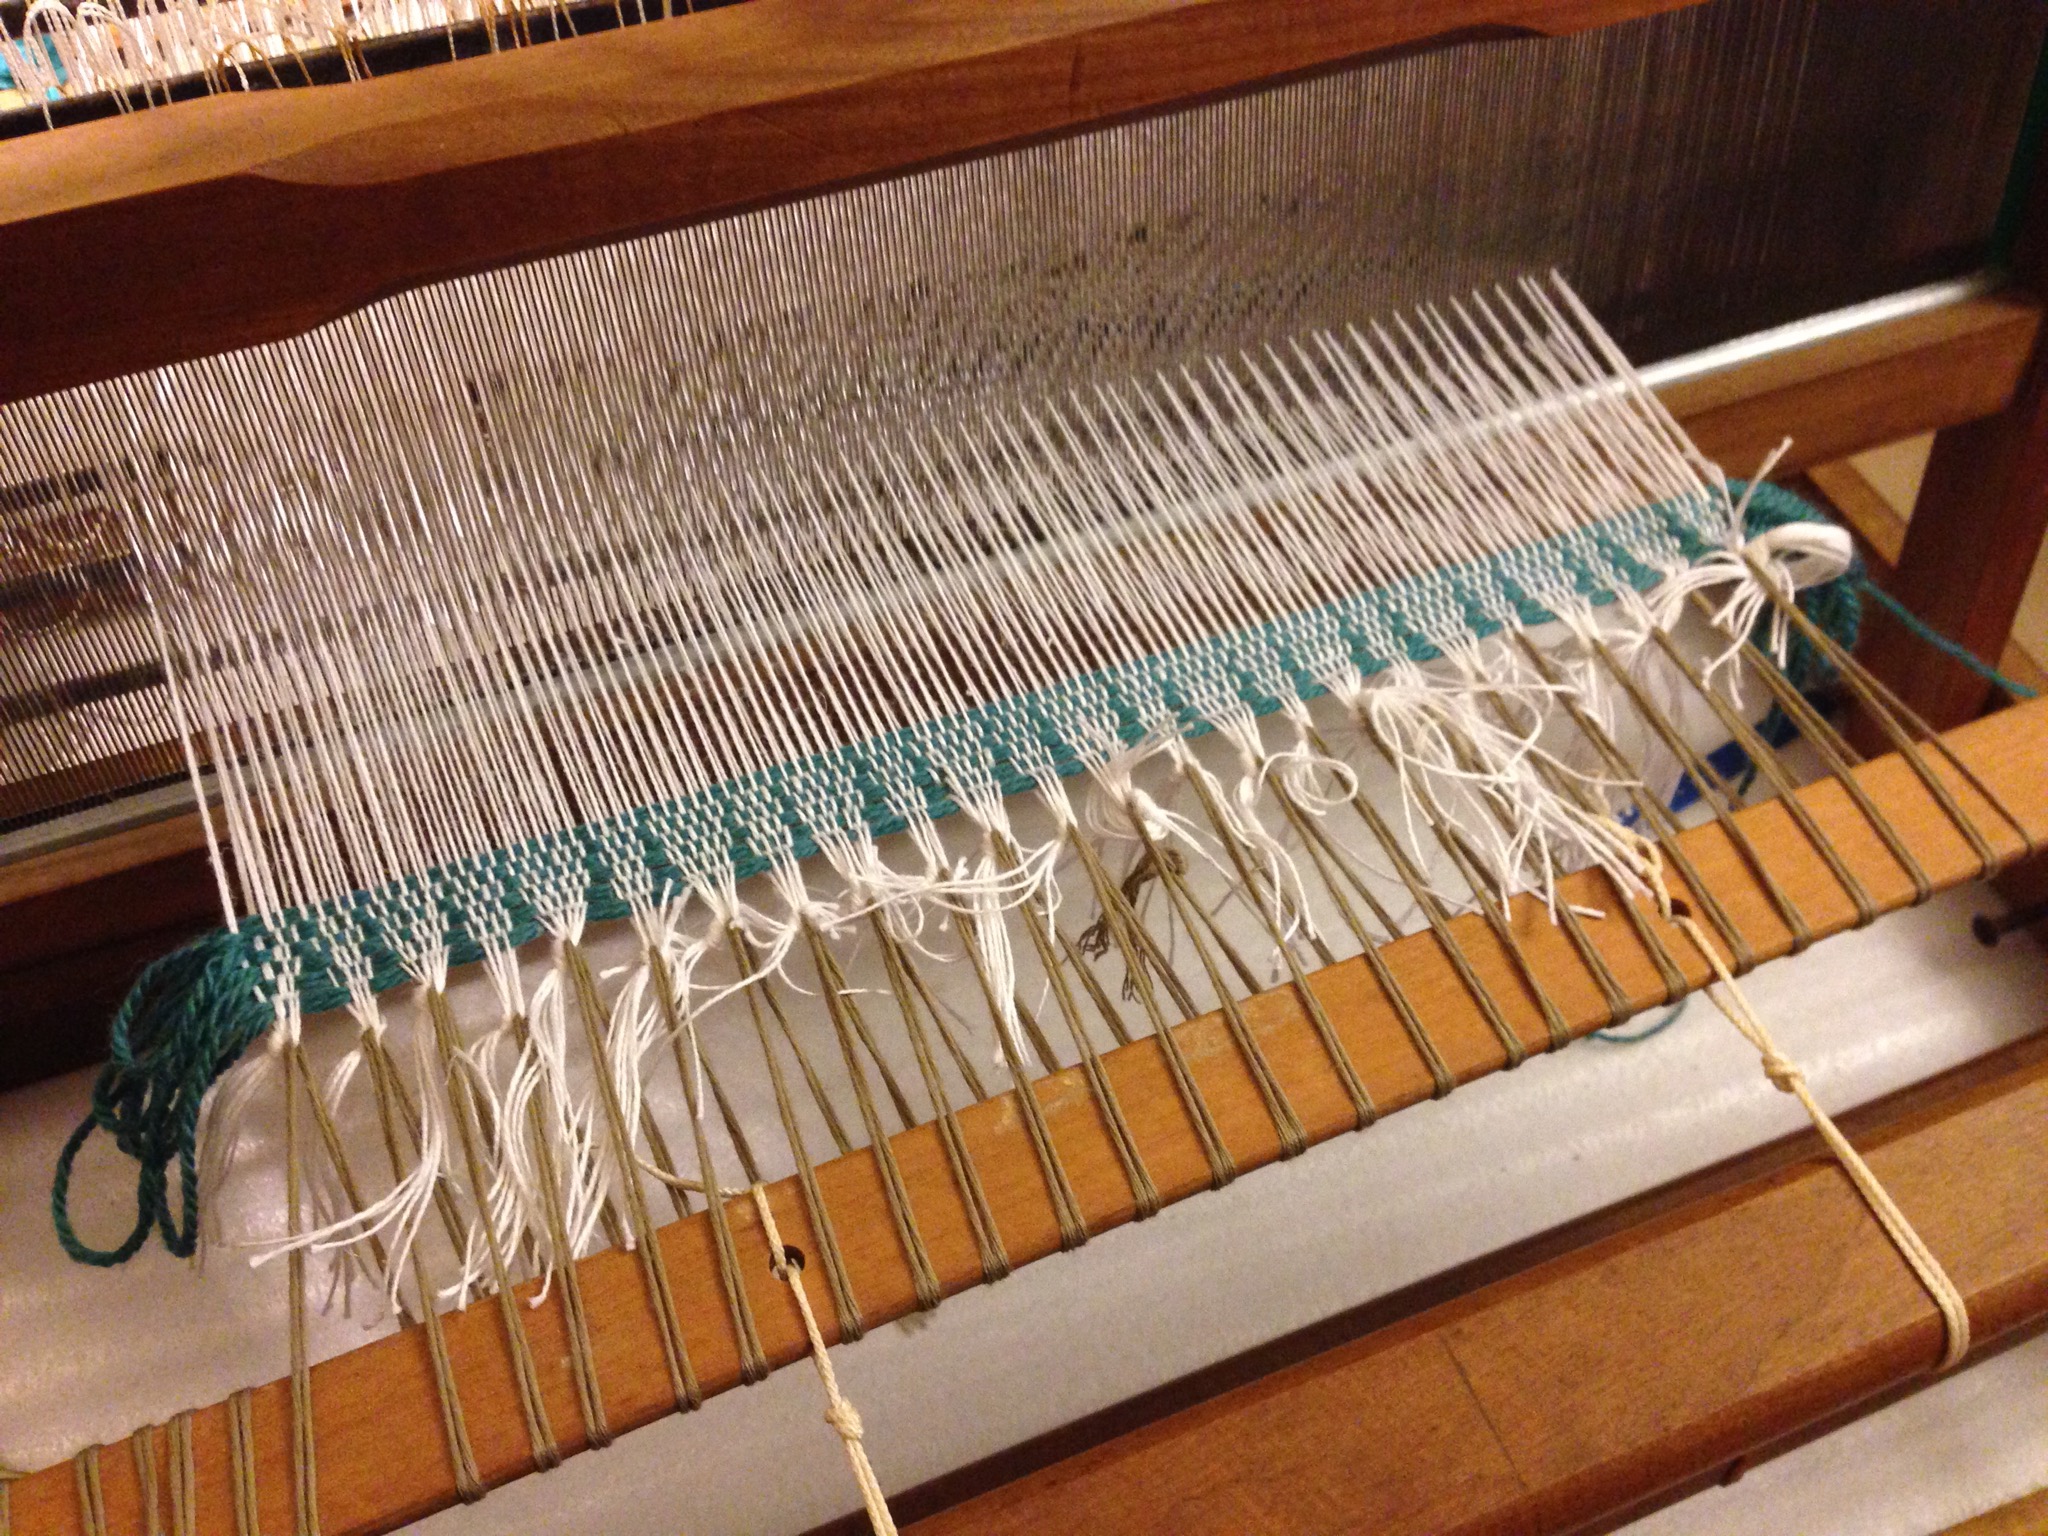
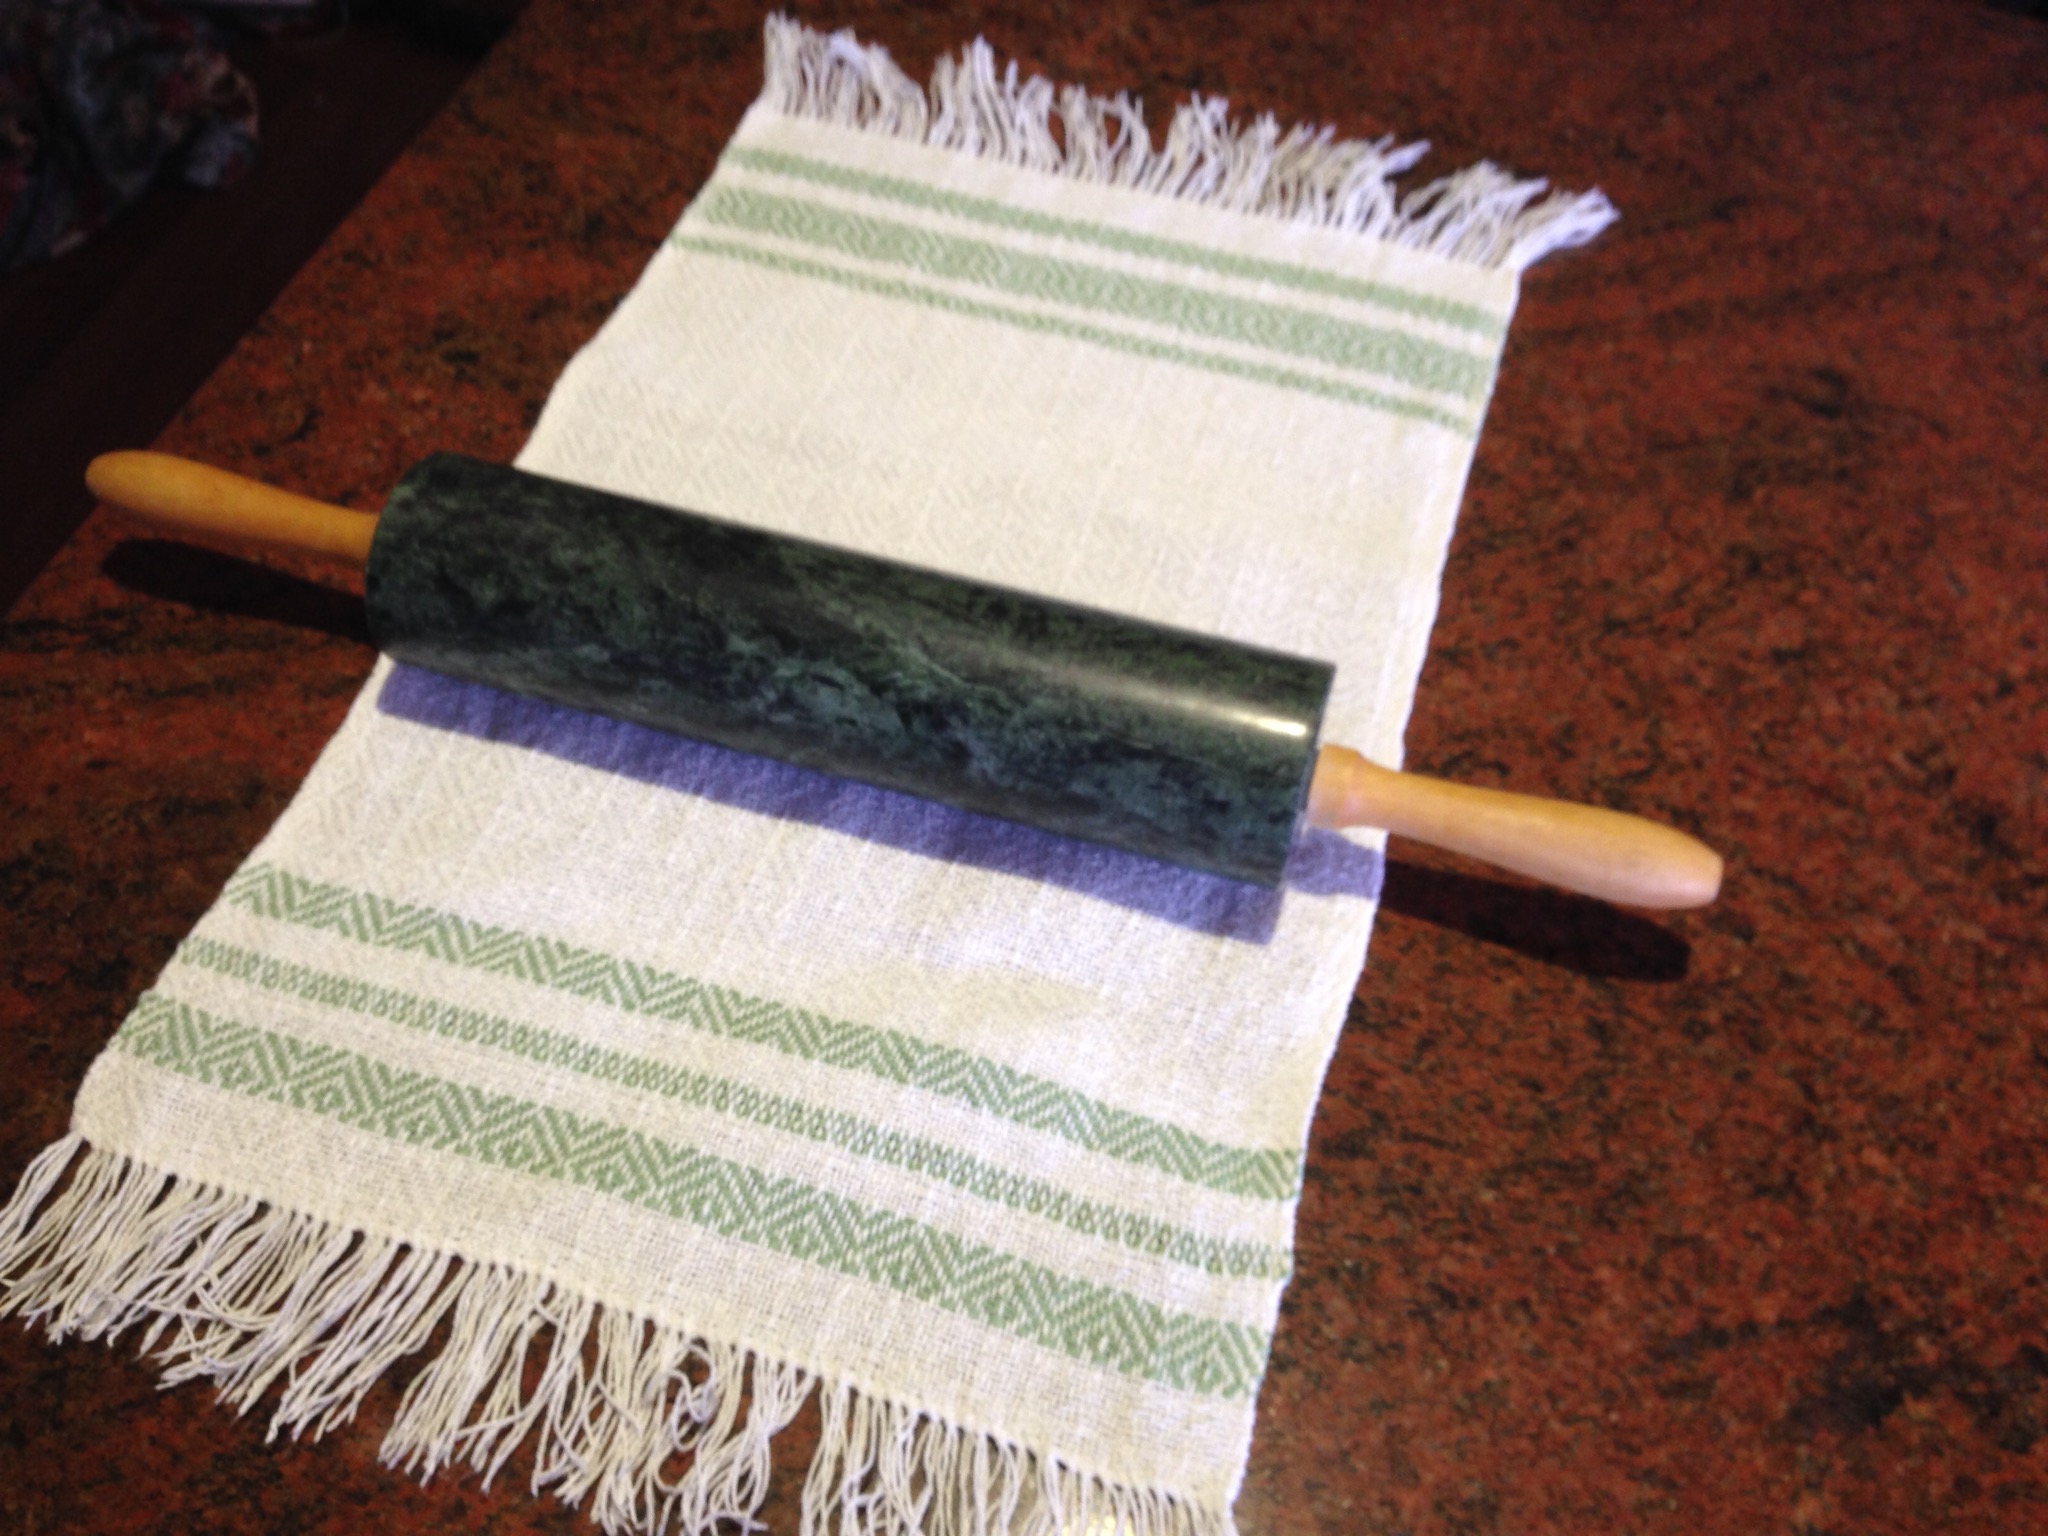
As for the tea towels themselves, first I wove a sample in green, cut it off the loom and wet finished it:

On the loom, the pattern is taking shape.

Off the loom, the pattern has relaxed a little

After finishing, the sample pattern is much clearer, and the threads are soft and shiny
This worked really well, so I then moved on to the colours I wanted for my Mum. Each of the patterns is based on a “Birds Eye” threading, which is a type of twill. It’s easy to make a lot of different diagonal and diamond shapes by varying which of the four shafts I lift up every time I pass the weft thread.

This blue cloth is wound around the front beam

The blue towel, finished. I made a little variation at each end of the towel. I call the top bit “moroccan perfume bottle” 🙂

This towel I made patterns with white-on-white, as well as working some natural linen in as a contrast.

The striped towel, off the loom but before wet finishing.

Each towel is edged with hem stitching that I did whilst the towel was still on the loom.
I wet finished these in the washing machine so that the threads would shrink together and lock into place. Then I rolled them with a rolling pin (yes, really!) to soften the fibres and give them a bit of shine.
I found that with each of my tea towels I had to cut them off the loom and adjust the tension of the warp before weaving the next towel. Here is an example of where the tension started to get a little uneven across the width of the towel:

See how the thicker pattern section looks a little puckered? It flattened out after shrinking down, but I think that meant I didn’t get the warp evenly tensioned when I wound it onto the back beam.
The last tea towel I felt much more in my comfort zone, so I tried out an unbalanced twill pattern or two:
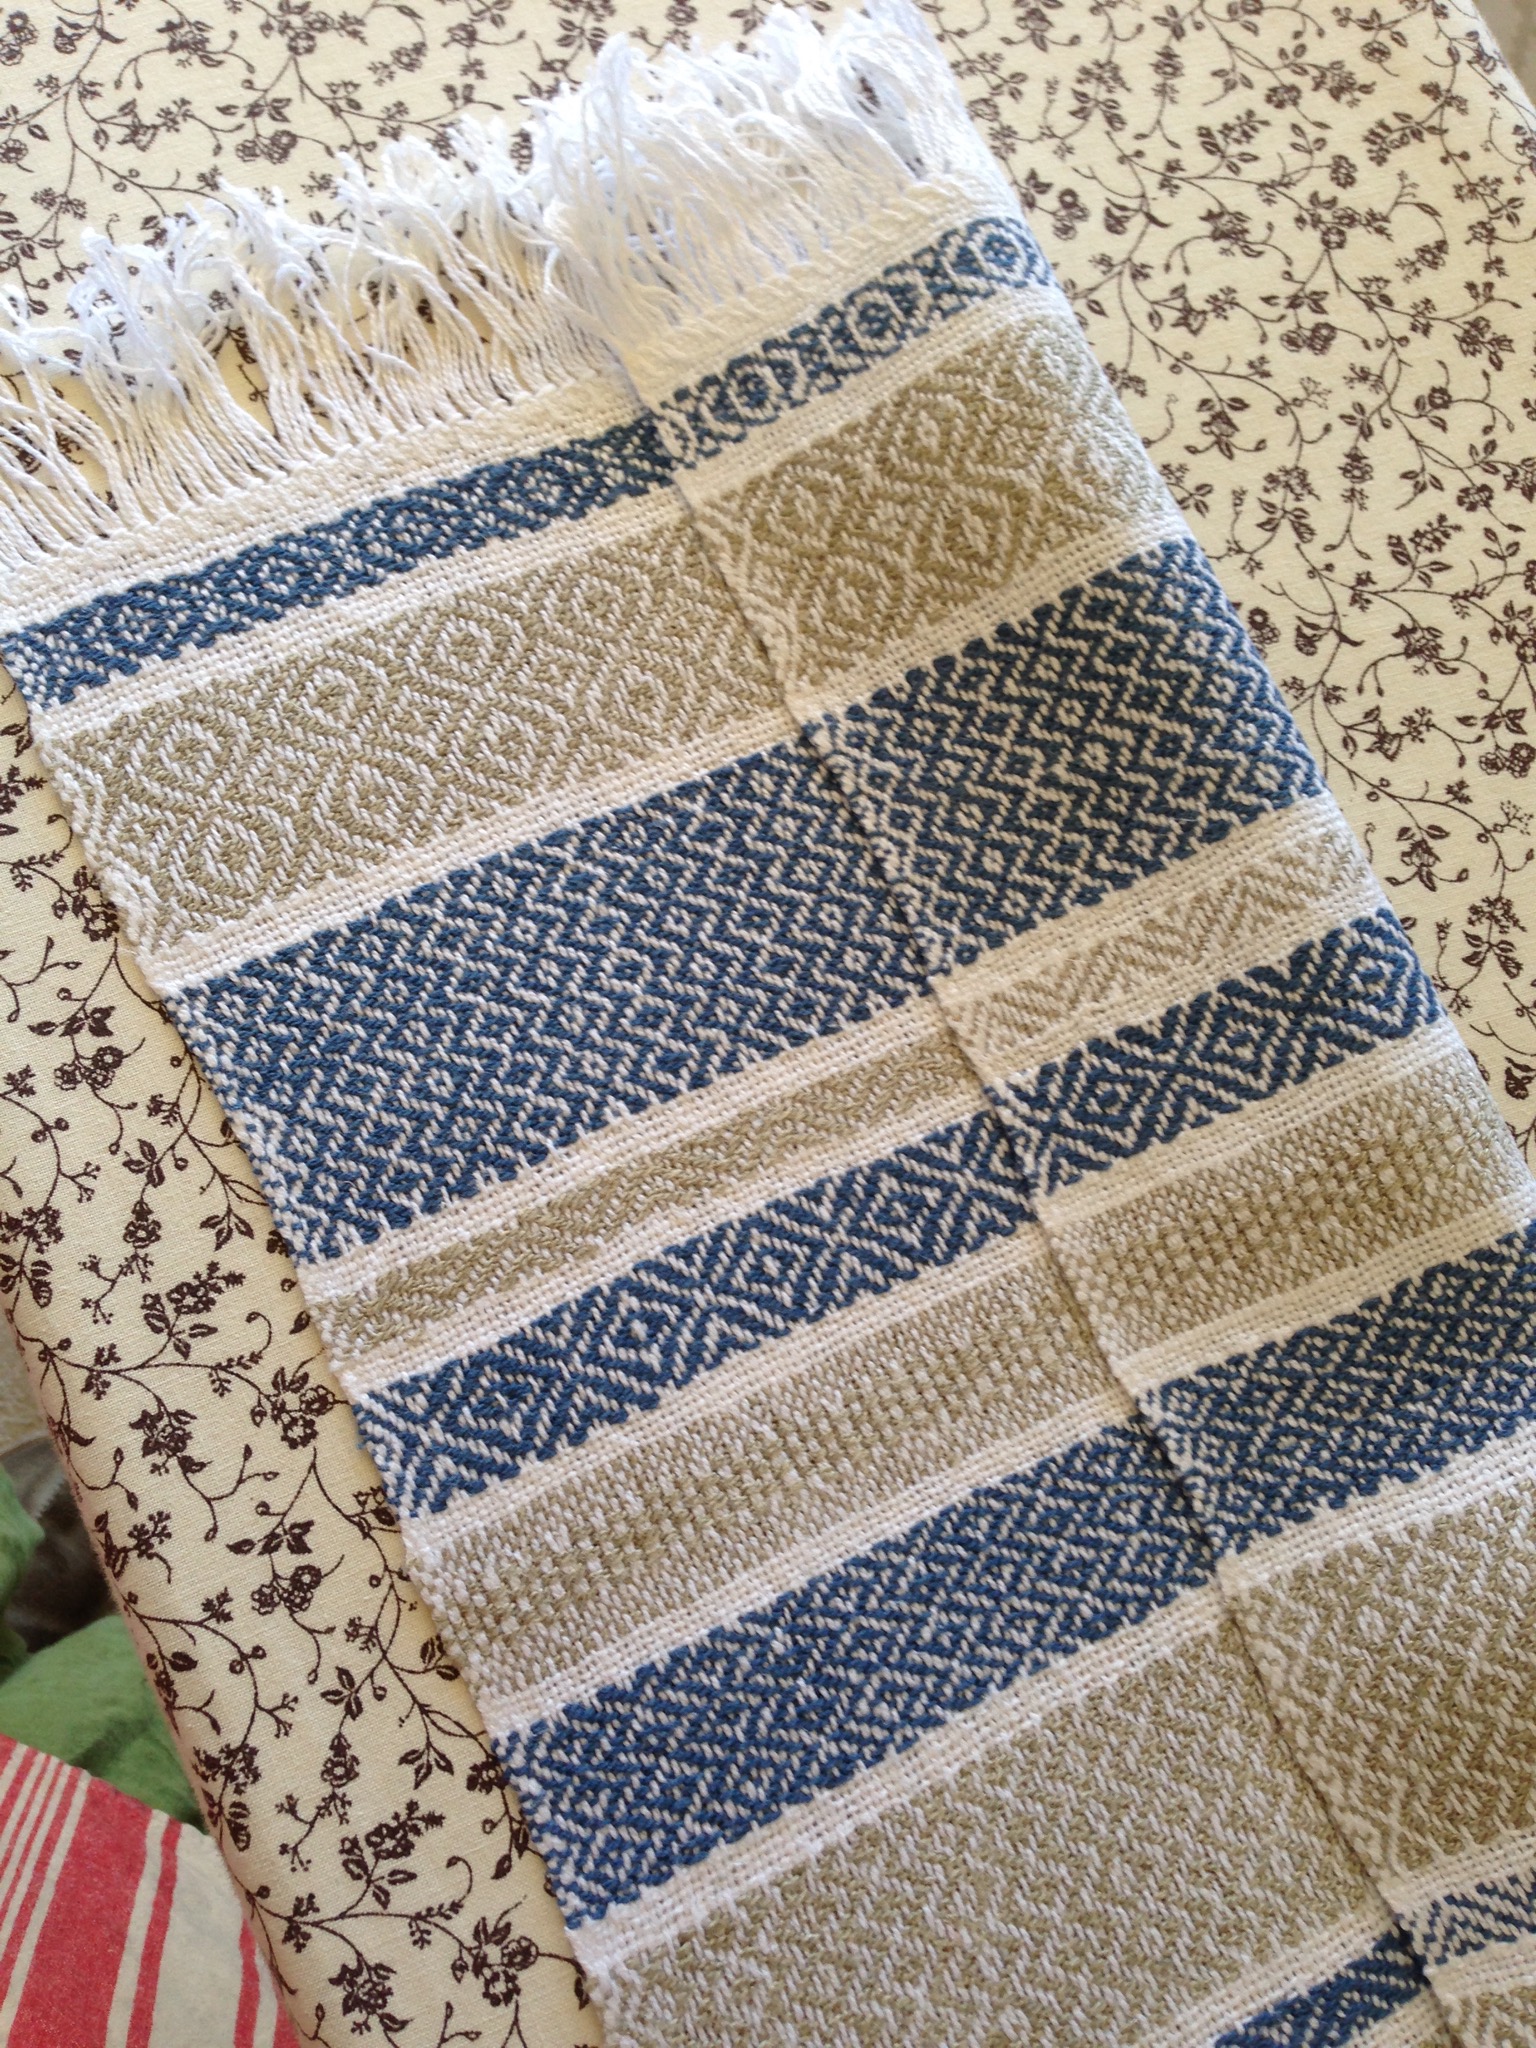
Two of the pattern strips look different on the front to how they look on the back. Can you spot them? Clue: they are blue!
I really love how these turned out. They feel lovely in the hand (although my Mum is going to frame them!). I wonder what I shall do with the leftover bit of warp? For now the loom is idle, as I look after sick kiddies and catch up on some work.
I knew I would enjoy weaving: and I’m hooked!
Spring Garden Gallery
Spring is here! The garden is starting to wake up. 🙂

Plum Blossoms

Naturalised Borage is forming a large edge to our orchard and driveway.

Cricket is a big girl, now.

Peach blossoms

The path is grown wild with delightful coreopsis

Beside our coop we have an area we call “The Wilderness”. Flowering now with African Daisies

The broad beans are podding up nicely

Will considers the mulched tomato bed (to be). He’s eating a carrot, not an ice block. 🙂
