Hello folks, it’s been a busy few months since I last posted an update, as I’ve been very busy: mostly weaving as part of my new business: Jessica Norris Handwoven. I’m now officially a hand weaver by profession!
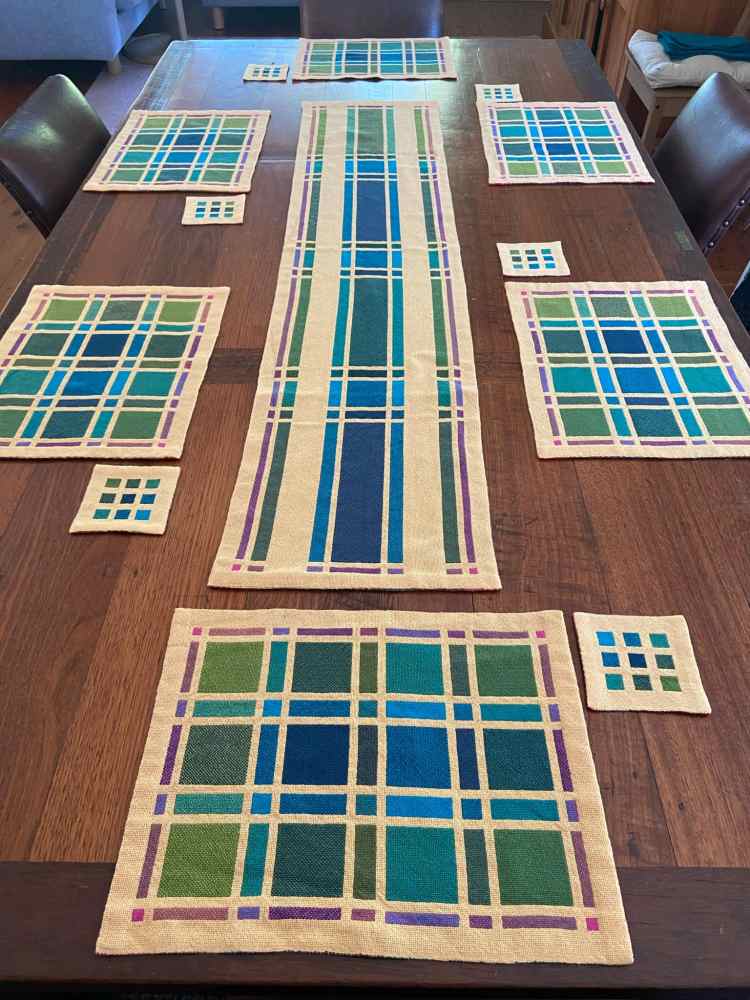
I spent the whole of January on a commission to weave a six-place dining setting including placemats, coasters and napkins, plus three coordinating table runners.
My client was very happy with the result!
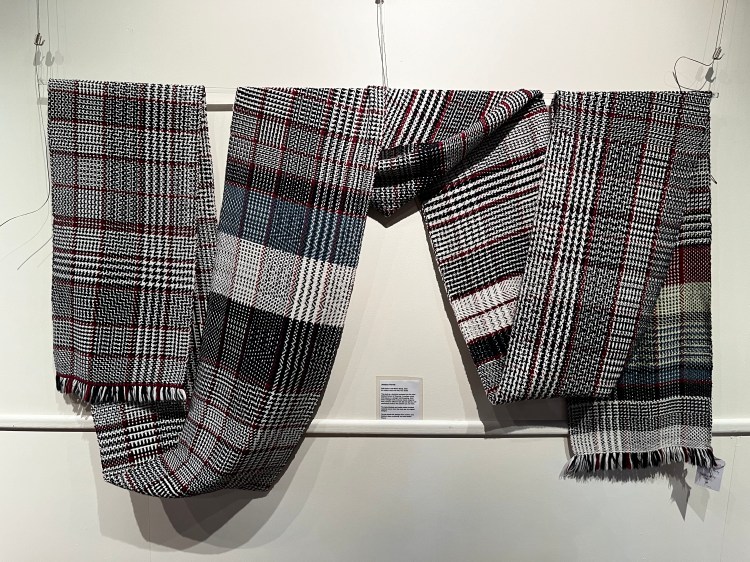
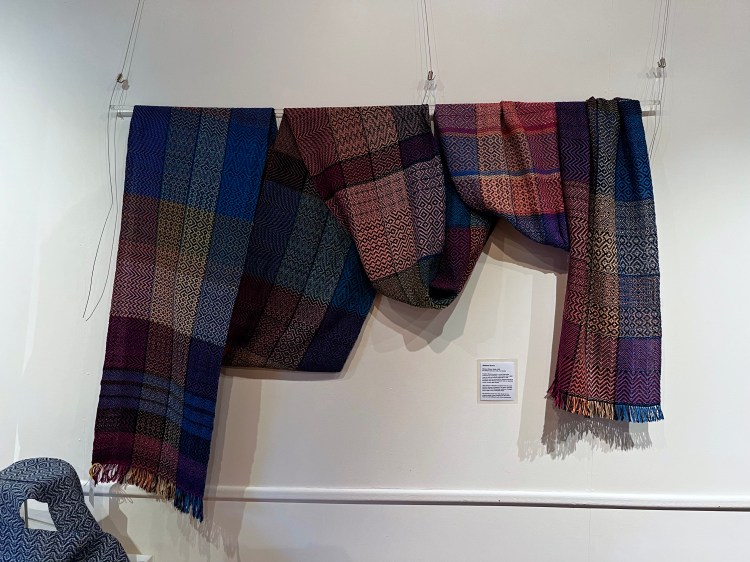
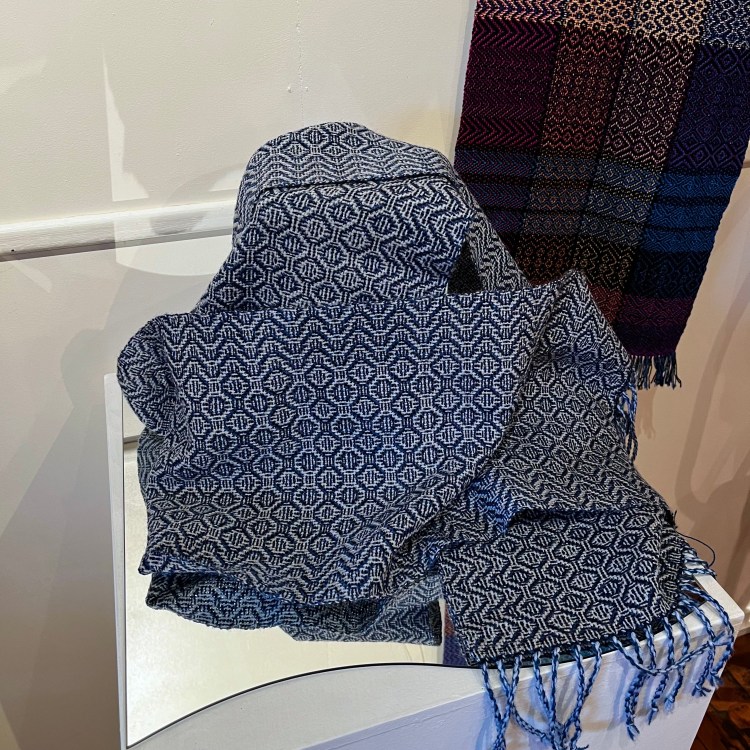
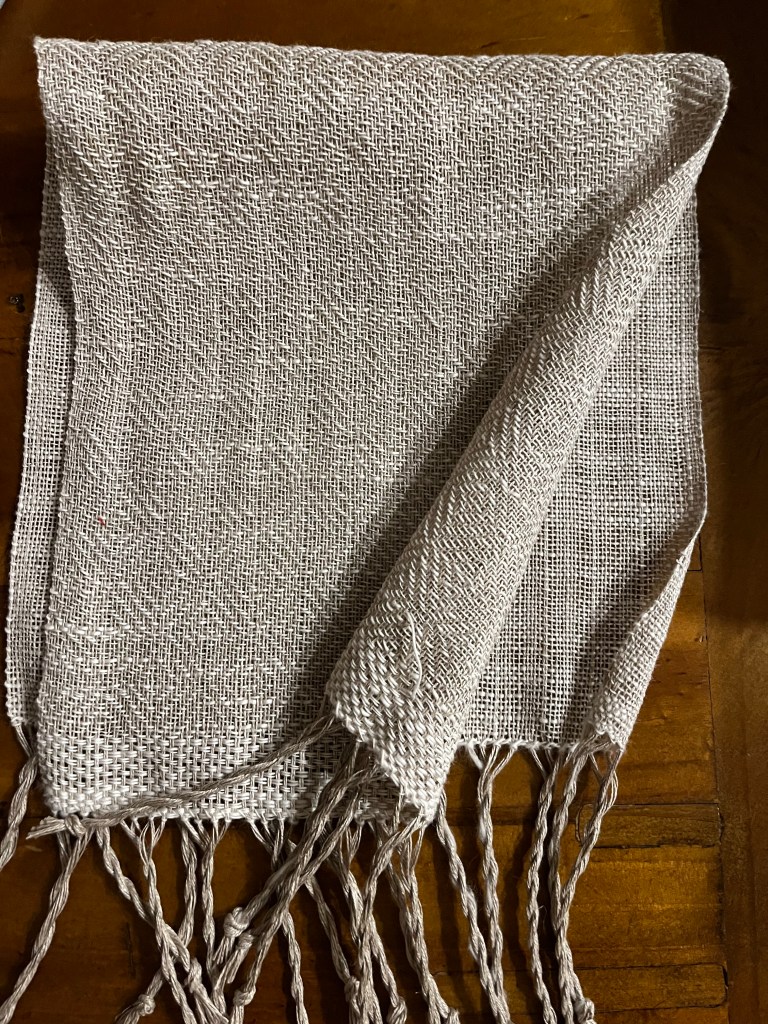
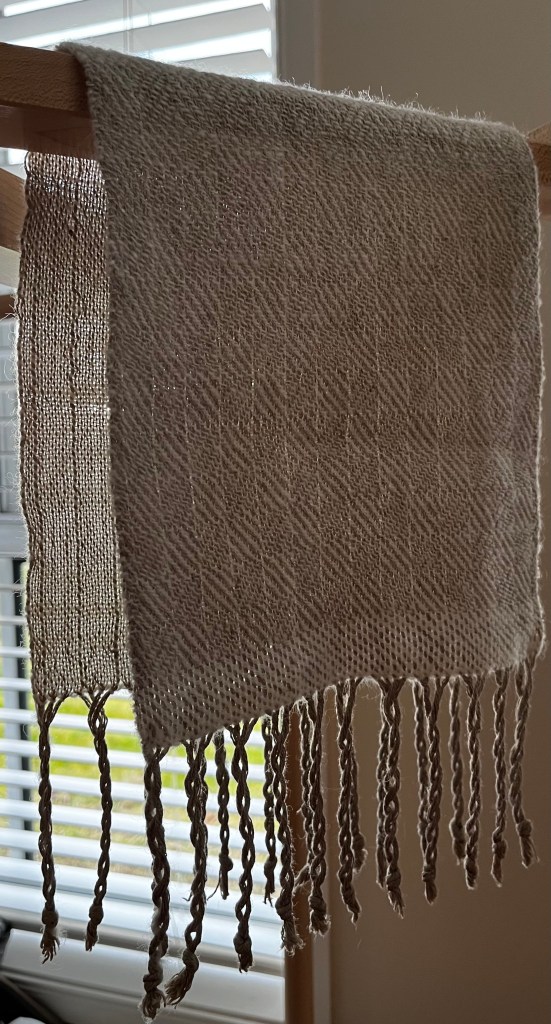
Then in February I caught the Deflected Double Weave bug and dived deep into exploring this weave structure.
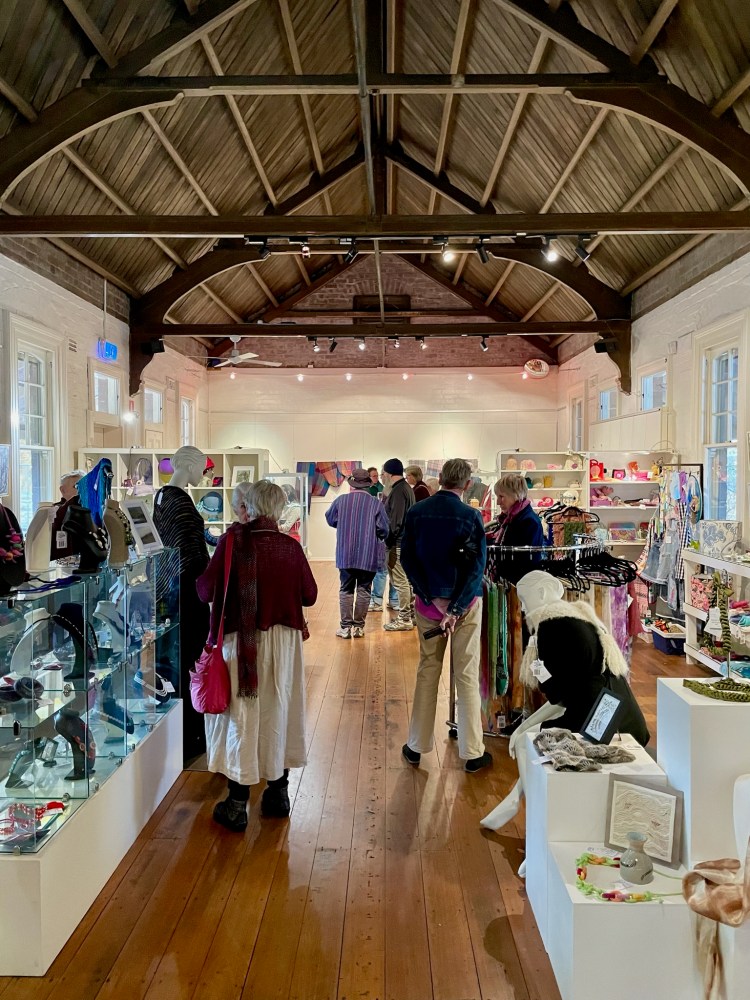
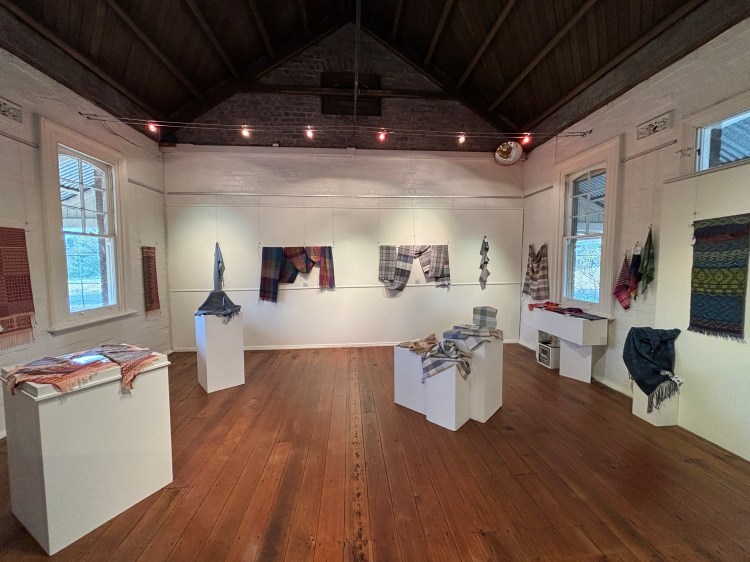
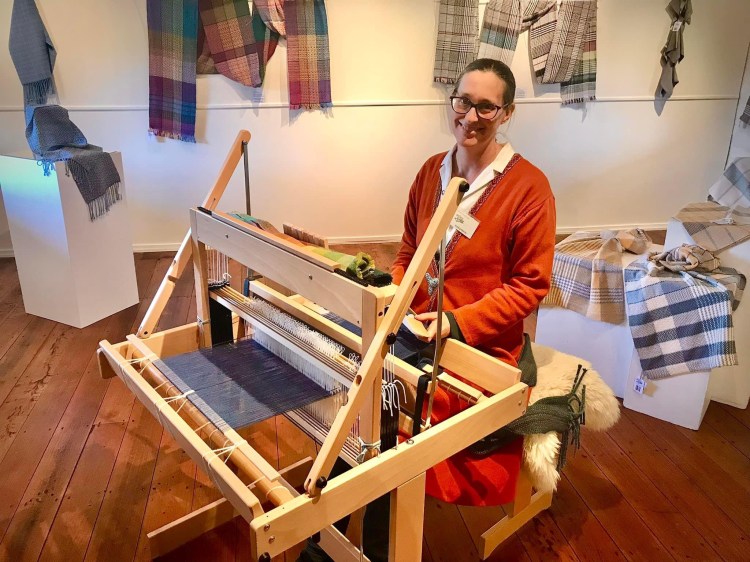
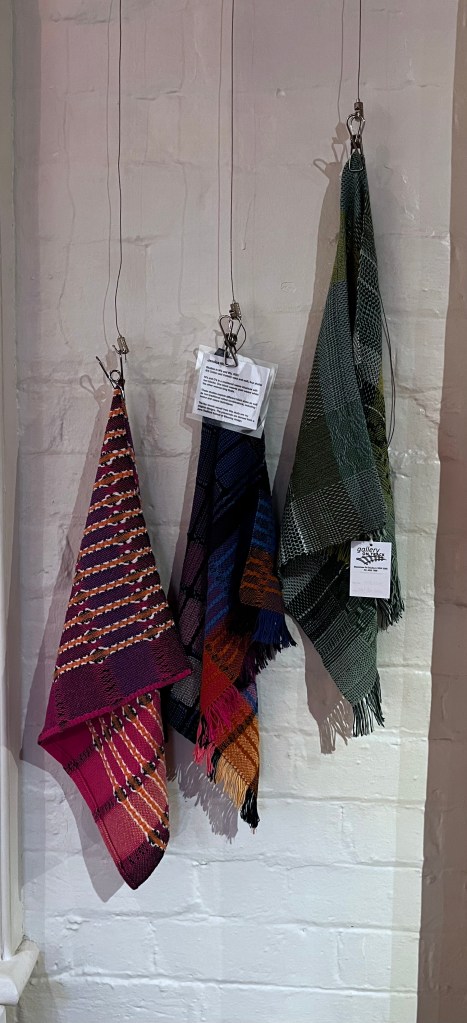
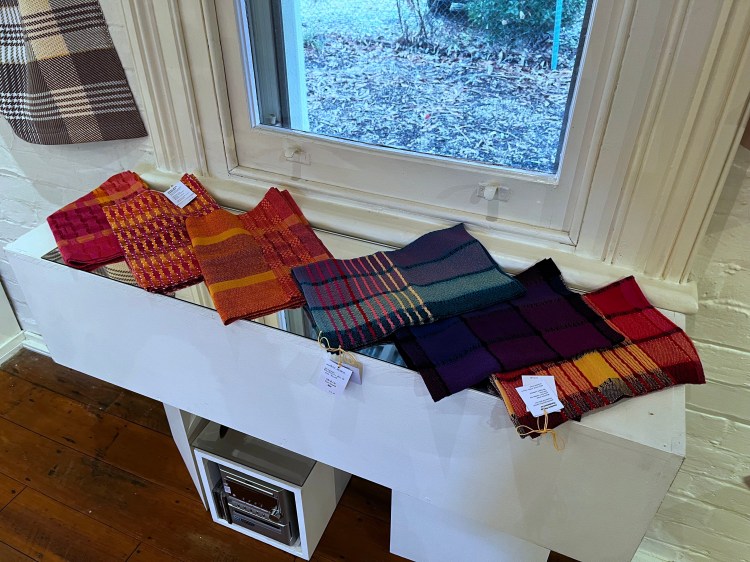
I’ve since woven wall hangings and scarves for the upcoming “50 Golden Years” exhibition, to be held this weekend in Goulburn.
This exhibition is celebrating the 50th anniversary of the Goulburn Handweavers and Spinners group, which is a major achievement and should be a special show.
If you are in town, come visit us!
May 10 and 11, 2 Montague St, Goulburn
In March I began working with Harrisville Shetland wool to create thick blankets and shawls, just in time for Autumn and Winter (although we haven’t yet had a frost! Very late this year).
This blanket hasn’t left my side since, it’s so squishy and warm!
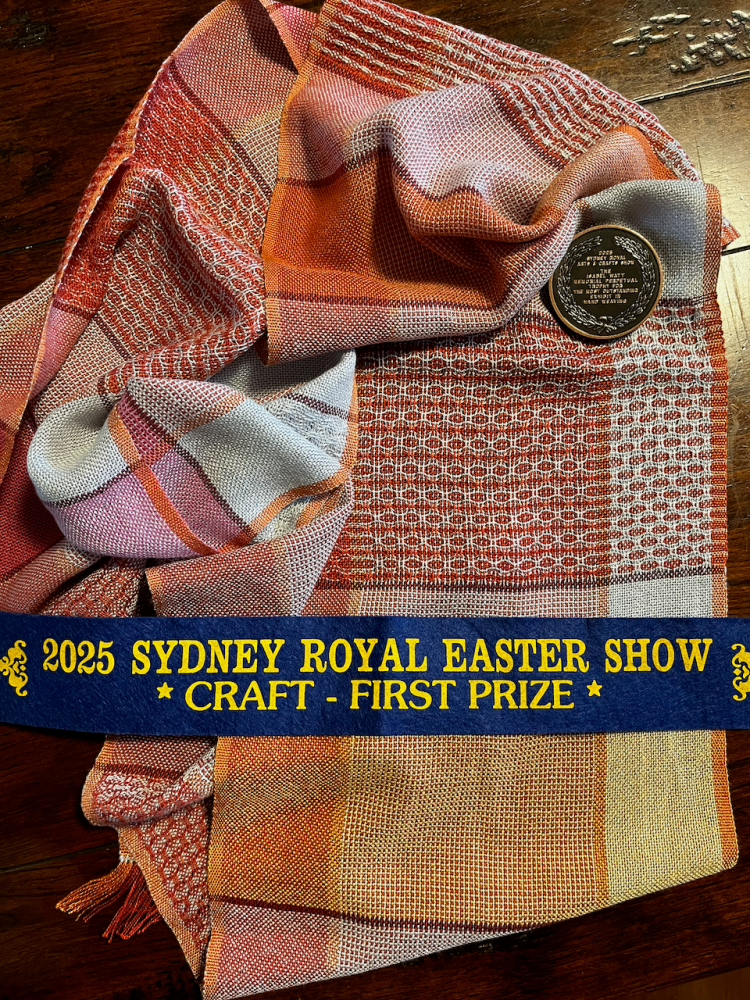
But the real excitement this year has been my success at the Sydney Royal Easter Show.
I sent in one of my bamboo scarves, woven in Huck Lace: and it won a First place!
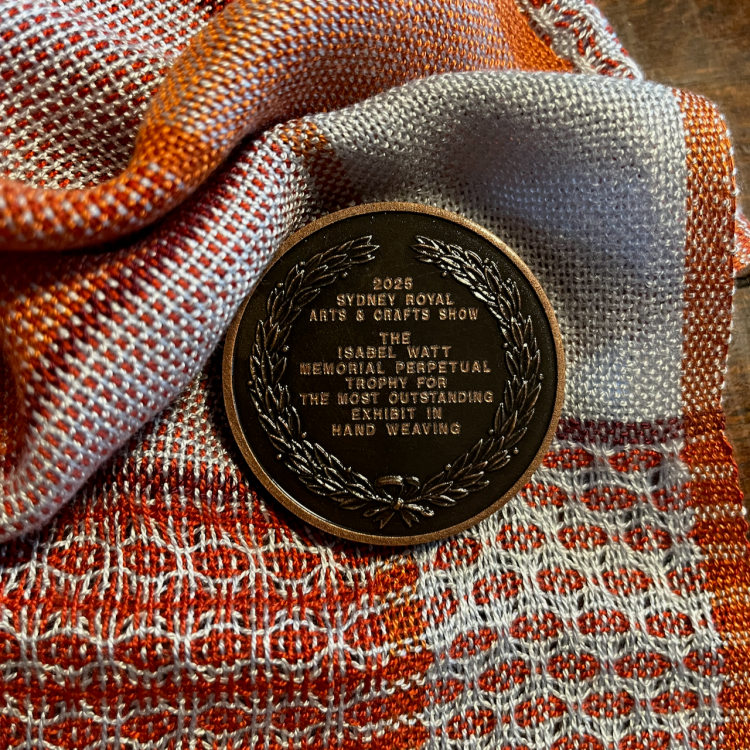
Better yet, I received the highest accolade for Hand Weaving at the show: the Isabel Watt Memorial Perpetual Trophy for the Most Outstanding Exhibit in design and execution in Hand Weaving Classes.
What an honour!
This prize has a perpetual trophy that is kept at the Showgrounds. It’s apparently a miniature loom!
I was very pleased to receive my own medallion as a keepsake for winning this prize.
Just to put the icing on the cake: this scarf also won the “Best hand in Hand Weaving” prize, which is awarded to the exhibit with the best drape.
I’m so very pleased with this achievement!
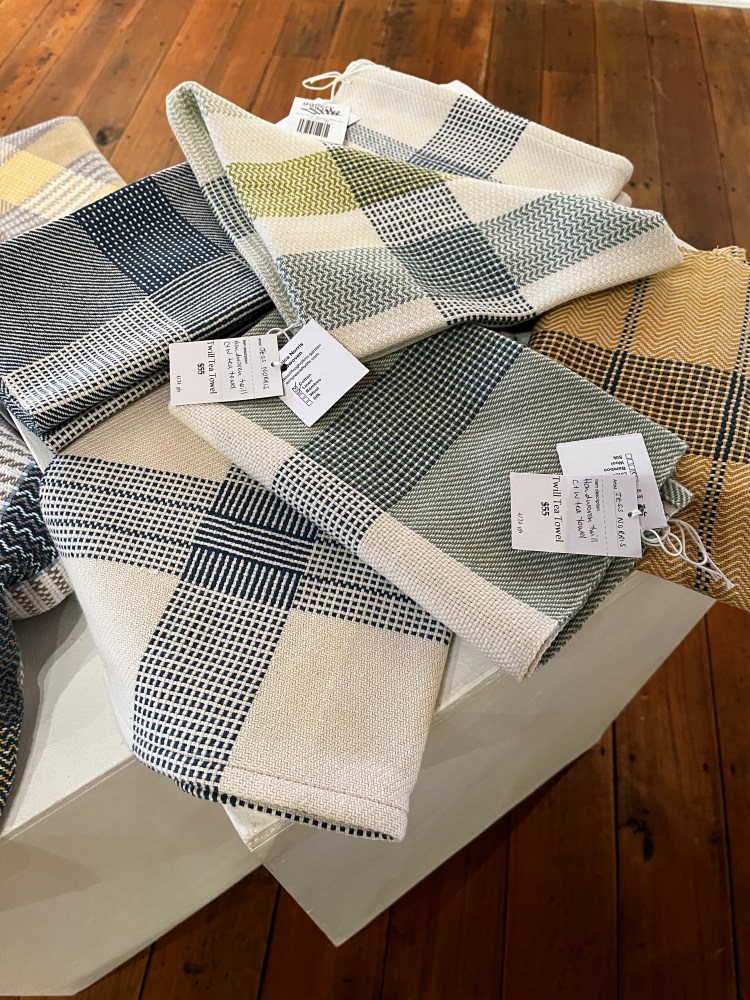
What’s next? Well, I’m building up my stock of tea towels and handwoven items for my website and to sell at upcoming markets. It’s a challenge for me to guess what people might like to buy. If you have suggestions, or would like to commission something special, let me know!
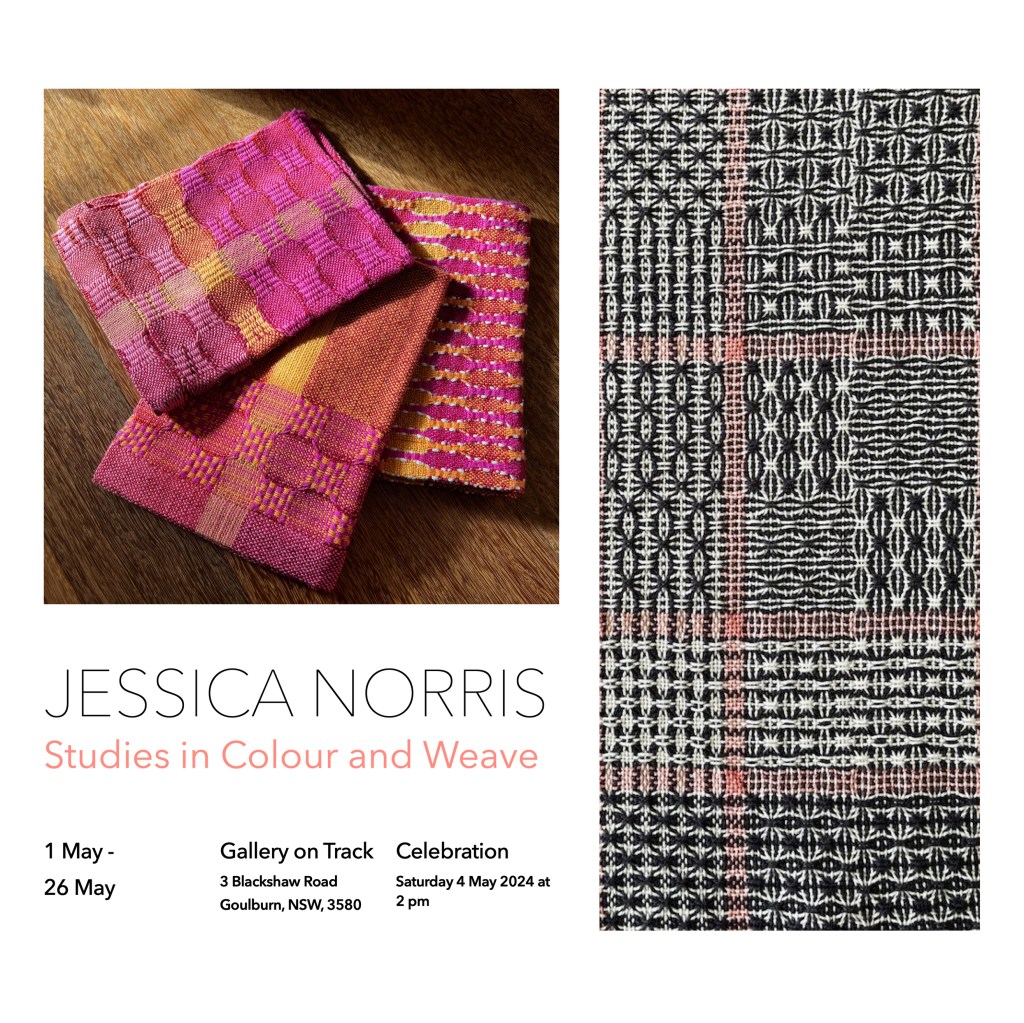
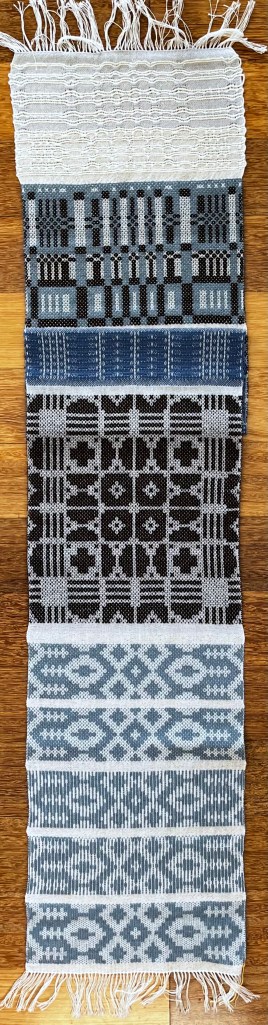
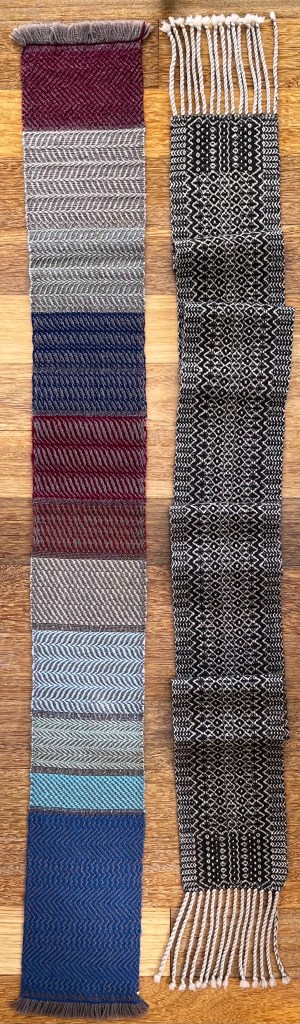
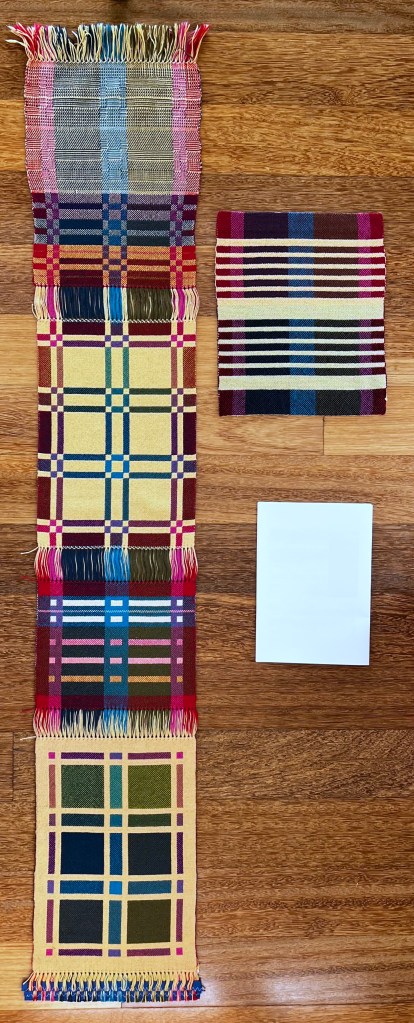
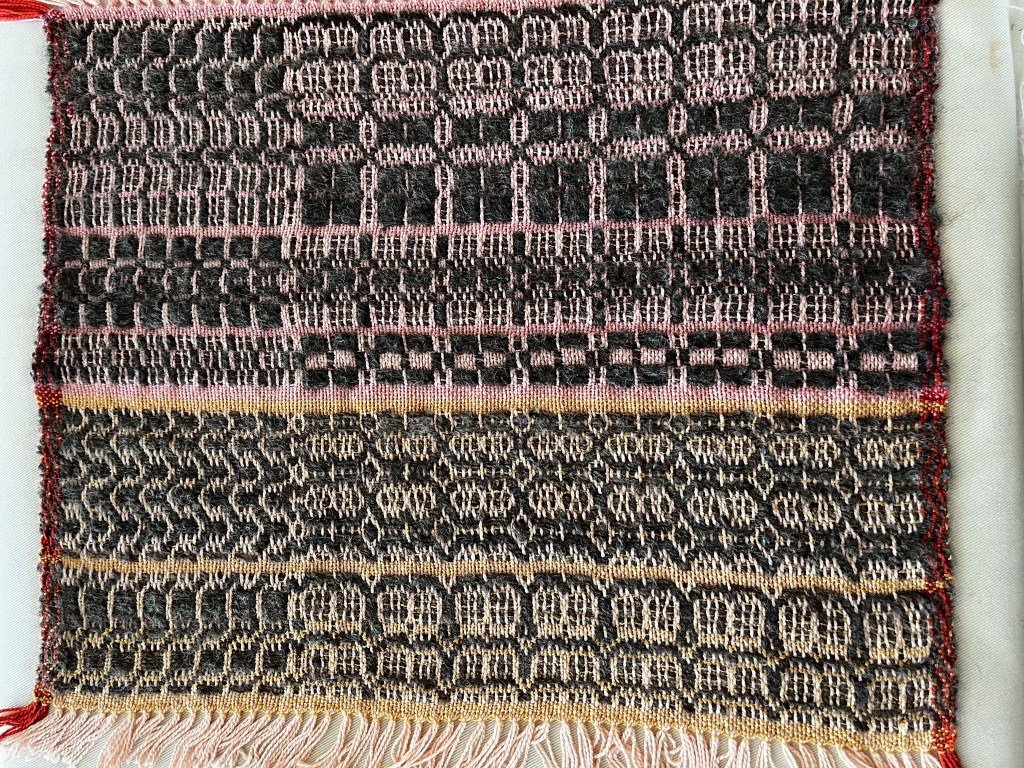
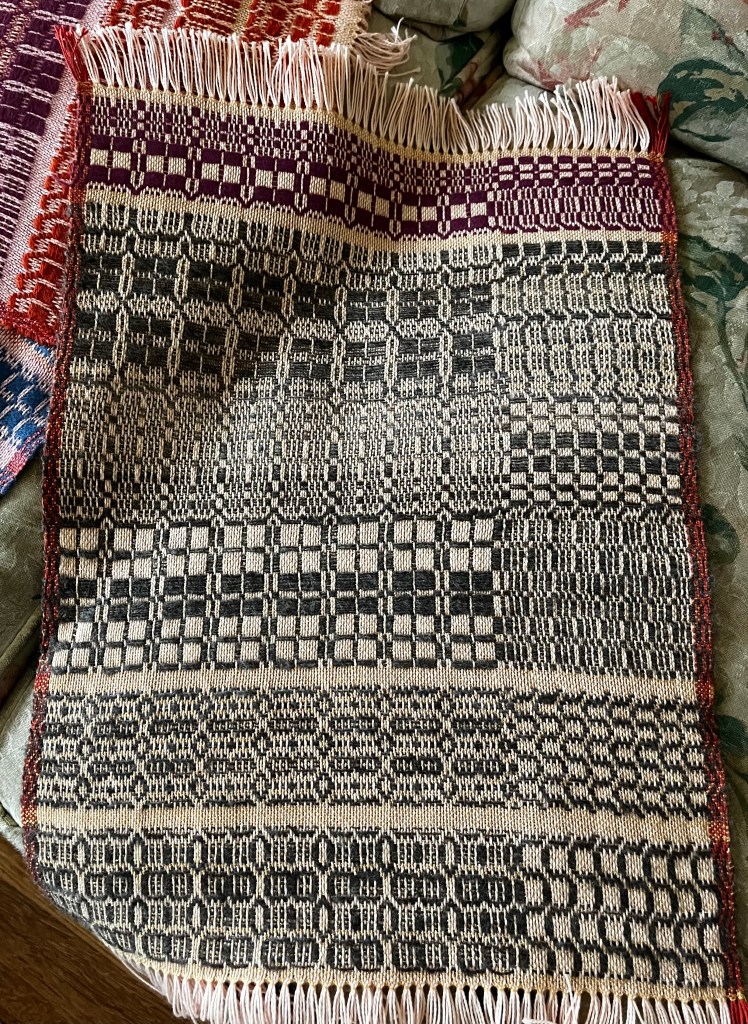
Weaving has kept me very busy of late: in May I had an exhibition of my work entitled “Studies in Colour and Weave” and more recently I’ve submitted work for the Handweavers and Spinners Guild of NSW‘ Intermediate Certificate of Weaving.
That’s a lot!
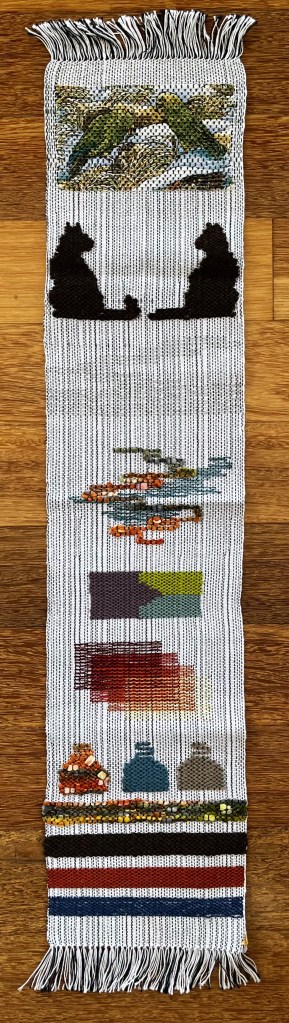
Studies in Colour and Weave
I had the privilege of displaying my work at the Gallery on Track in Goulburn during the month of May.
I was delighted that so many of my friends and family were able to travel to this exhibition: it was a huge success!
Most of the pieces in the exhibition were woven using Colour and Weave techniques, where sequences of light and dark threads are layered onto weave structures like Twill and Lace in order to produce amazing patterns.
I also had a few pieces that were “Studies”. Most of my pieces have involved sampling to get the right combination of yarns and colours in order to execute the final work.
Our gallery space
My exhibition
Huck Colour and Weave. Study (right) and tea towels (left)
I demonstrated at various times inside the exhibition
Studies in M’s and O’s
Tea towels and Placemats using M’s and O’s
Twill Colour and Weave Study piece
Twill Colour and Weave baby blankets
Twill Colour and Weave tea towels
Everyone loved the Shadow Weave Study
Shadow Weave Scarf
I still have the three baby blankets for sale at the Gallery: these are the only items that remain!
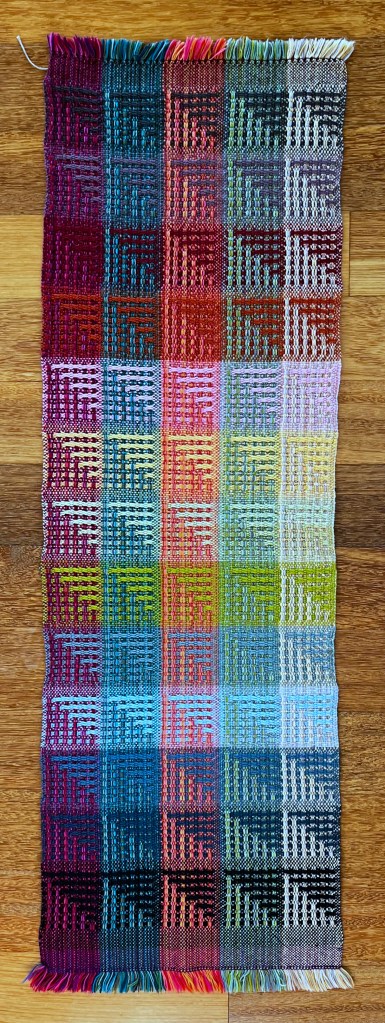
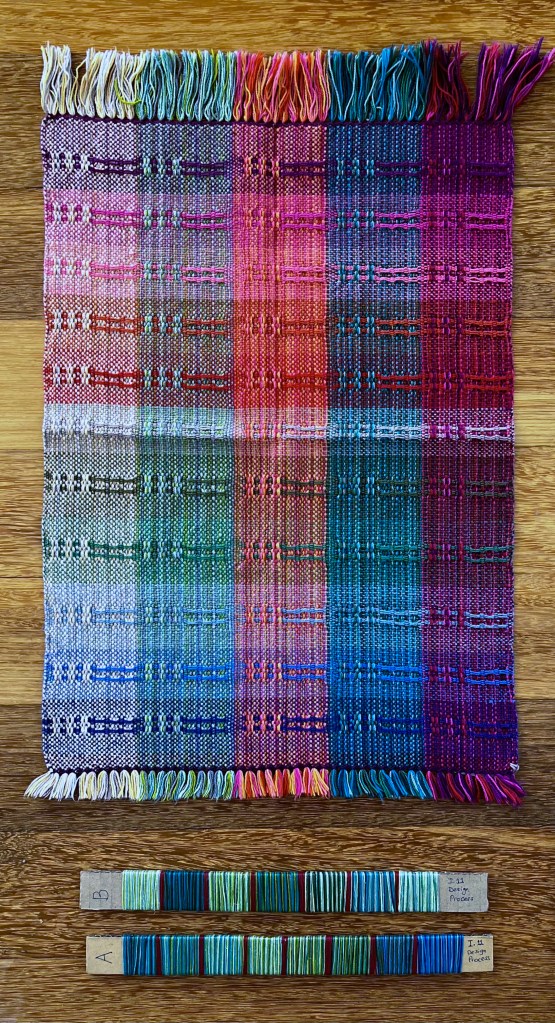
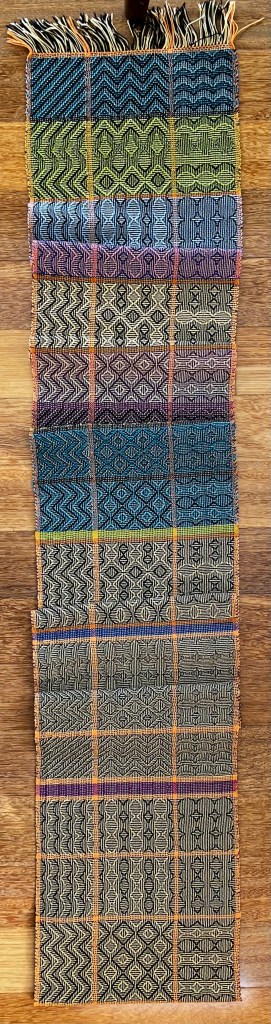
Intermediate Certificate of Weaving
The Handweavers and Spinners Guild of NSW has just released a brand new Certificate of Weaving, with Foundation and Intermediate levels now available for people to enrol.
The Foundation level focuses on 4-shaft weaving and a whole swathe of techniques (colour gamps, plain weave, twill, lace, etc.).
I’ve registered at the Intermediate level which encourages students to explore 8-shaft weaving, expanding on the techniques in the Foundation level.
These are the pieces that I’m submitting for assessment (plus a theory assignment on designing using weaving software).
Variegation experiment #1
Variegation experiment #2
Variegation experiment #3
Summer & Winter
Block Twill
Undulating Twill
Crepe
Theo Moorman Sampler
Shadow Weave (Powell, 8 shaft)
Block Double Weave
8-shaft Twill Gamp
8-shaft Huck Lace
I will have to wait a few weeks to find out whether I passed or not, but my experience has been broadly very positive. If you are thinking of doing the certificate and want to talk to someone who has been working through the material, get in touch!
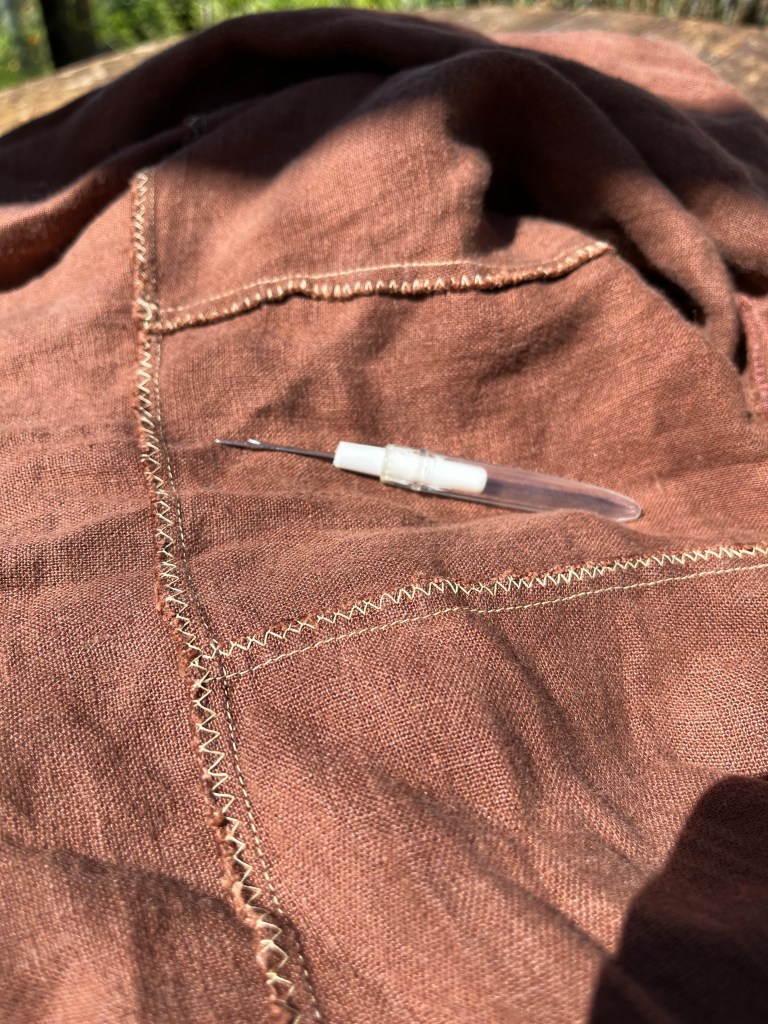
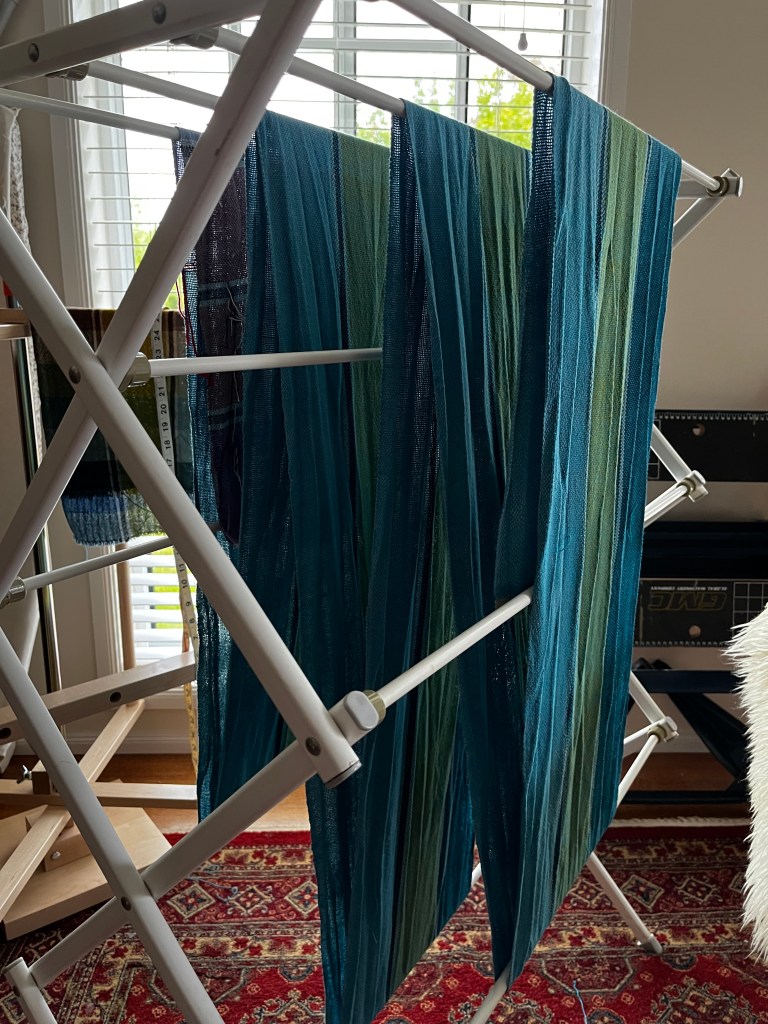
Autumn is here! It’s time to prepare for Rowany Festival, and this year that means adjusting a pair of old Thorsbjerg pants.
Background
I made these pants a long time ago, based on a pair of extant trousers found in a Danish bog called Thorsbjerg Mose. I think I must have used this article by Shelagh Lewins to construct the pants.
I made some design choices back then that I wouldn’t make now: it’s easy to go too far down the “make it exactly like the original” rabbit hole and make something that’s not much fun to wear.
Here’s what I didn’t like about my pants:
The pants are too loose around the butt and waist and are thus unpleasant to wear. Nobody likes wearing super baggy pants.
The waist band is a simple draw string, which is a pain in general, but especially when using a portaloo. It’s even worse when you have a bunch of knee-length skirts to get out of the way!
If I had my time again, I’d let go of an “ideal” reconstruction and remember that these pants are always covered to the knees with at least one tunic. The waistband, crotch and seat of the pants is never on display.
These areas don’t need to be medieval unless the wearer wants it to be.
Far more important is the comfort of the wearer, and an elasticated waist would be a more practical option for camping with portaloos.
The adjustments
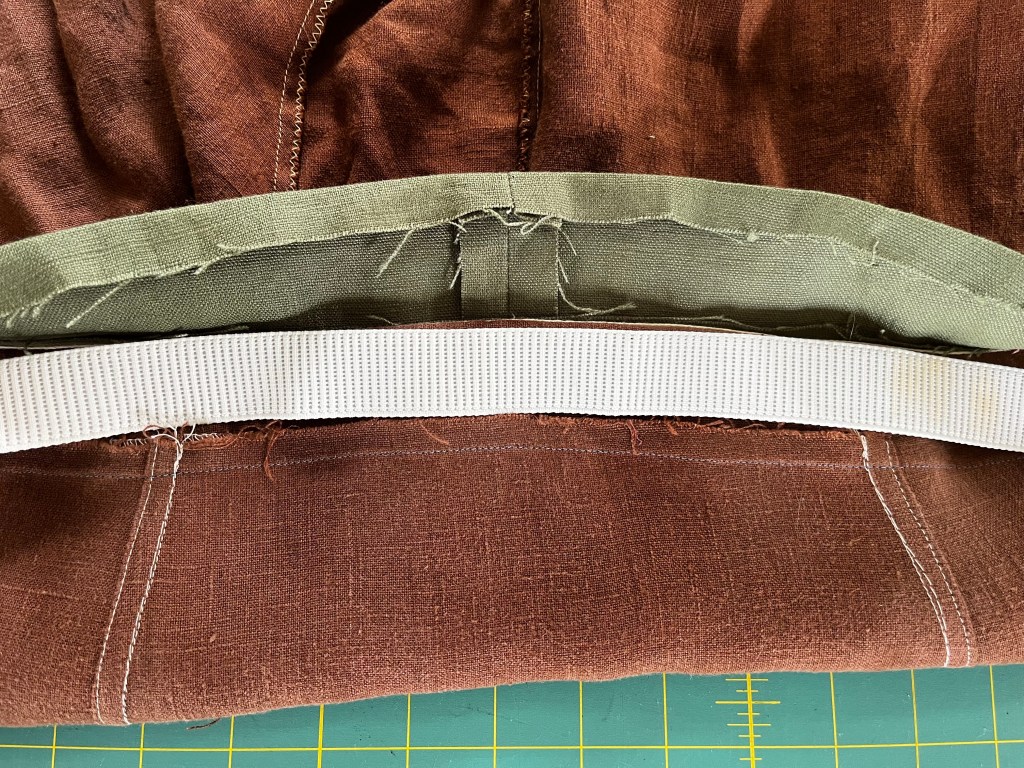
First of all, what on earth was I thinking when I made this waistband? (Answer: probably I was faithfully reconstructing the extant pants.)
This is a single layer of linen, attached with zig-zag stitch on the good side of the garment, with belt loops for a drawstring.
To say nothing of the hideous seam binding in multiple colours, chucked on the top.
This waistband needs replacing, as it’s basically a hot mess.
I had a strong suspicion that this draw-string waistband was making the “too baggy” effect much worse, as all the excess fabric was bunching in the front.
This pair of pants probably dates to after I stopped using my overlocker (serger) but before I started finishing my seams with flat-felled edges.
Flat-felled seams are now my favourite choice, and would be perfect in this situation.
Since I need to reduce the size of the “seat” of the pants, I’ll have extra fabric to finish the seams neatly.
This is the adjusted “seat” area of the Thorsbjerg trousers. I’ve used basting stitches so I can check the fit.
I’ve taken in the sides of the panel dramatically, which has also narrowed the waist circumference.
Note: the trapezoidal panel is meant to be wider at the bottom end.
Don’t insert it the wrong way around, or you definitely won’t be able to sit down! (Ask me how I know.)
The seat area is now neatly finished on the inside with flat-felled seams. This is a much stronger seam than before!
I used a sewing machine with a random thread colour, but I don’t mind: these pants are worn under a knee-length tunic, and will never be seen.
To fix the waist band, I decided to create a casing for elastic.
First I removed the band from the pants, and took off the belt loops.
When making an adjustment like this, it’s really helpful to press all the pieces as flat as you can, especially the seams that were unpicked.
This is when I discovered I’d originally cut a curved band!
To make a casing, I would need to piece together a matching lining.
Since I had no more brown linen, I used a fragment of thicker green linen to create the lining.
Rather than unpick the seam binding from the original, I just left it in place and joined the two pieces together with edge-stitching.
I found some waist elastic in my stash, but it wasn’t quite long enough to fit the pants comfortably.
At this point I had a brain wave and decided to re-purpose the old draw string (actually a knitted band pulled from an old dressing gown).
I cut the black tie in half and attached the ends to the elastic piece with a stretch zig-zag stitch.
Then I tucked the elastic up into the waist band and pinned the lining in place.
This avoids later having to insert the elastic into the finished casing, which in my mind is a major win. Hooray!
To attach the lining I top-stitched front of the waist band, taking care not to catch the tie or elastic that was pinned inside.
You could stitch-in-the-ditch for a less visible machine stitching. Again, I don’t mind this showing as the waist band will never be visible.
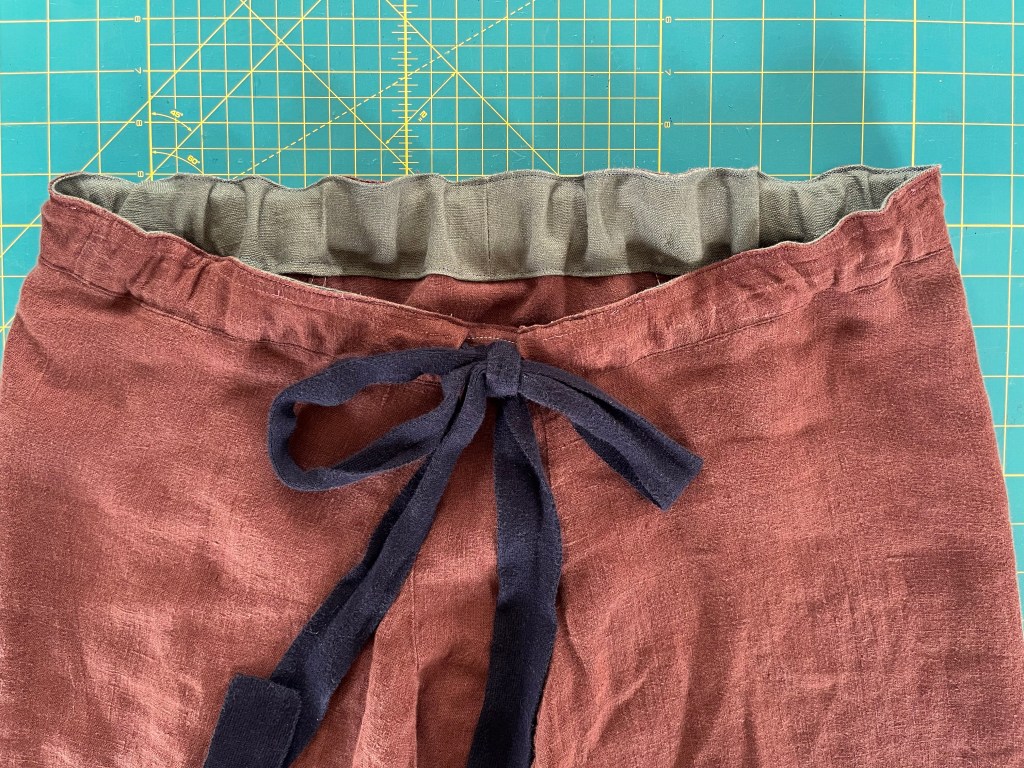
Here is the finished waist band: so much neater than before!
The ties here never need to be undone because the hidden elastic stretches when you pull the pants down. Very practical.
It’s looks exactly like a pair of medieval draw string pants!
I don’t mind at all that I’ve deviated from the design on the extant pants. This is much more comfortable and practical, and I will remember this lesson for next time: think about practically as well as historical accuracy!
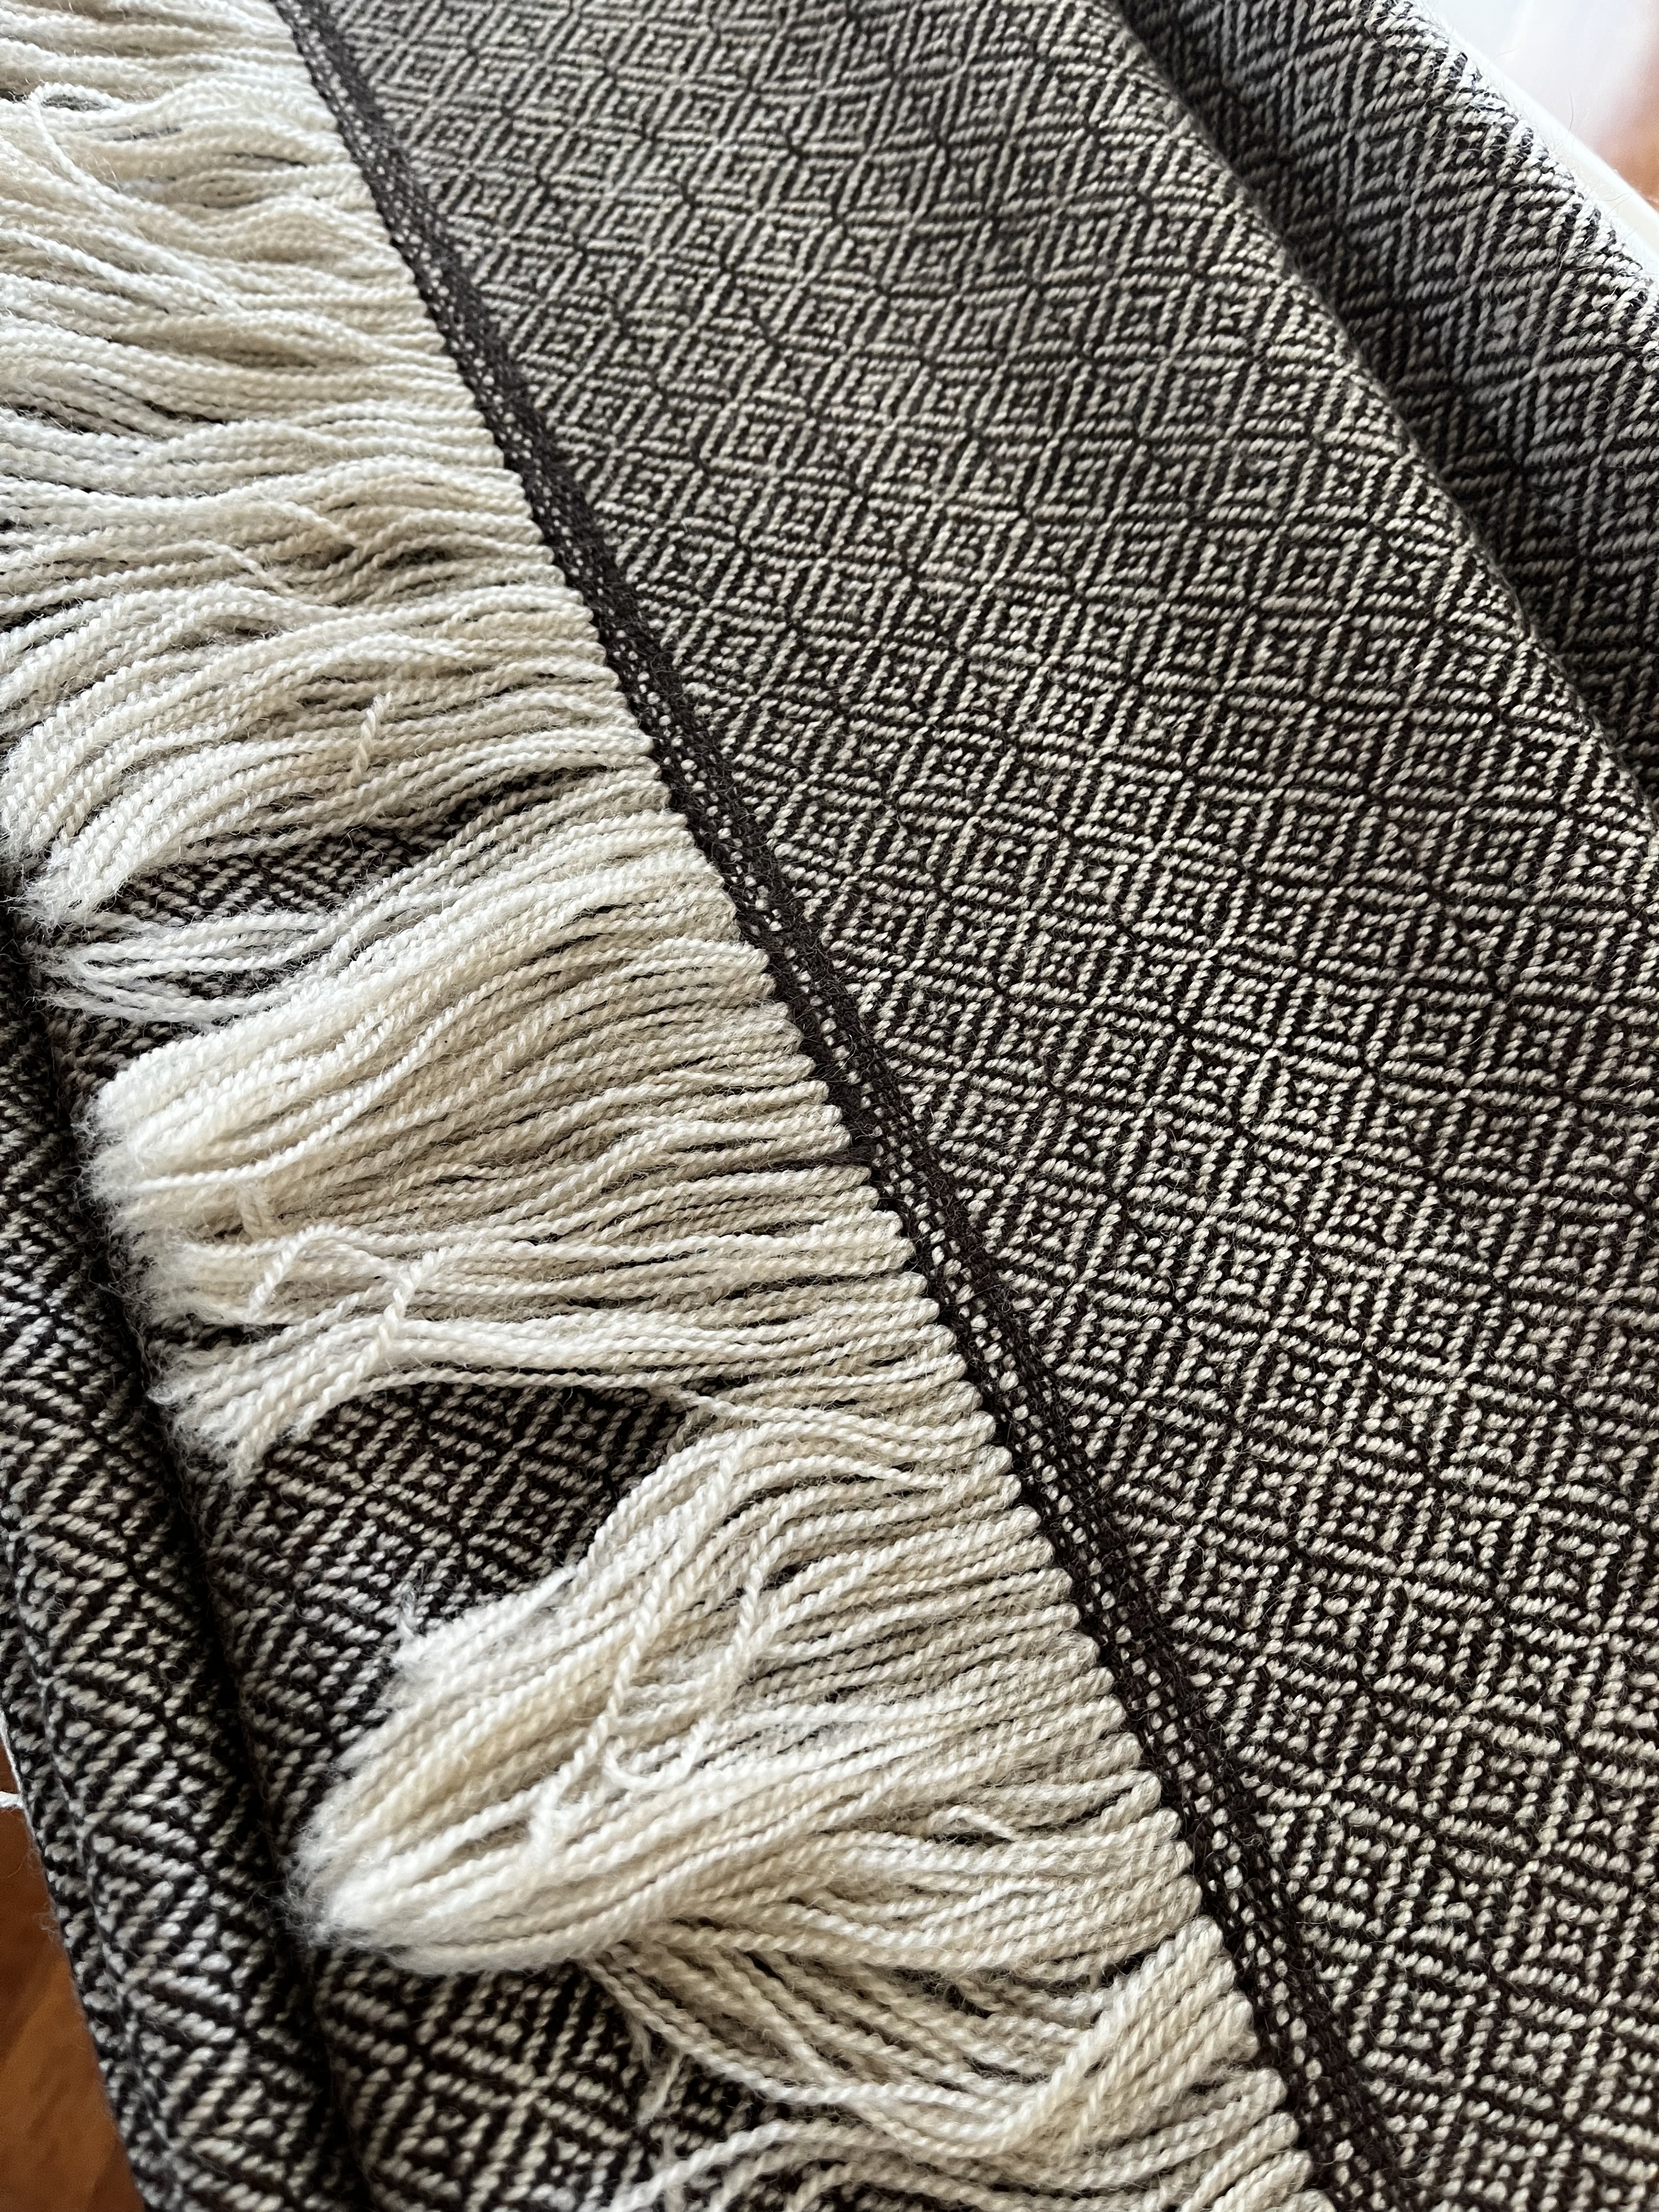
I’m no stranger to viking reenactment, having made several apron dresses way back in 2017. These were made of linen, and have been excellent for camping in garb, or just for everyday wear at home (minus the giant brooches).
I’ve wanted to weave my own apron dress fabric for some time, especially since it’s very difficult to get wool fabric in Australia that is suitable for reproductions. Now I’ve finally done it!
Background / about the apron dress
There are a large number of archaeological finds that include textile remains associated with the viking age, and women’s clothing in particular. Most of these remains are tiny fragments, often preserved against metal objects, such as oval brooches. There have been some larger fragments of cloth found, notably at Haithabu harbour (Hägg 1984, p. 38 via Thunem), and there has been plenty of debate about how these fragments formed part of the original clothing.
Since we don’t have any large pieces of garments, or much in the way of seams, we have to speculate about what a Viking apron dress was really constructed.
If you want to read a wonderfully detailed article about the apron dress that analyses the physical evidence as well as art sources, I highly recommend Hilde Thunem’s “Viking Women: Aprondress“. Thor Ewing’s book, “Viking Clothing” is also an excellent resource.
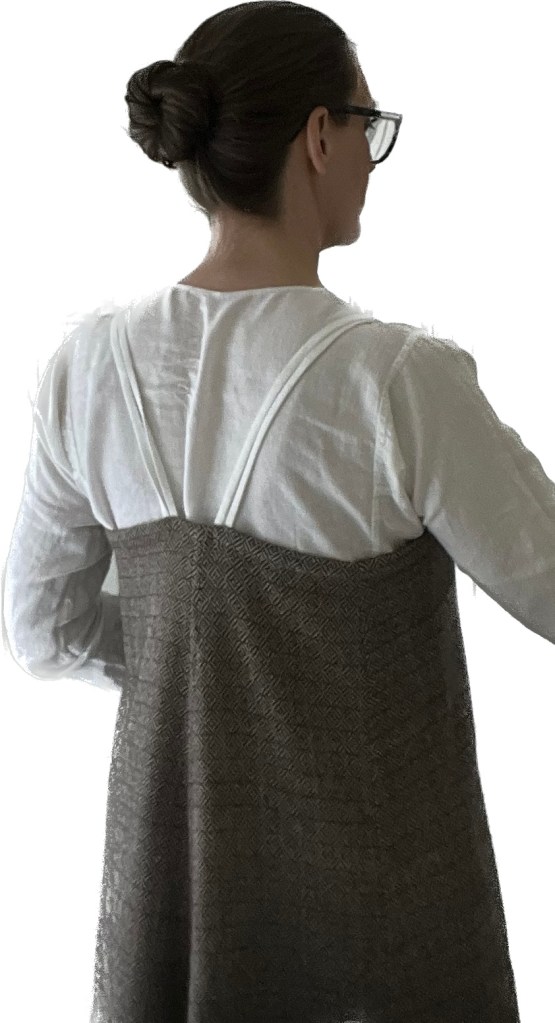
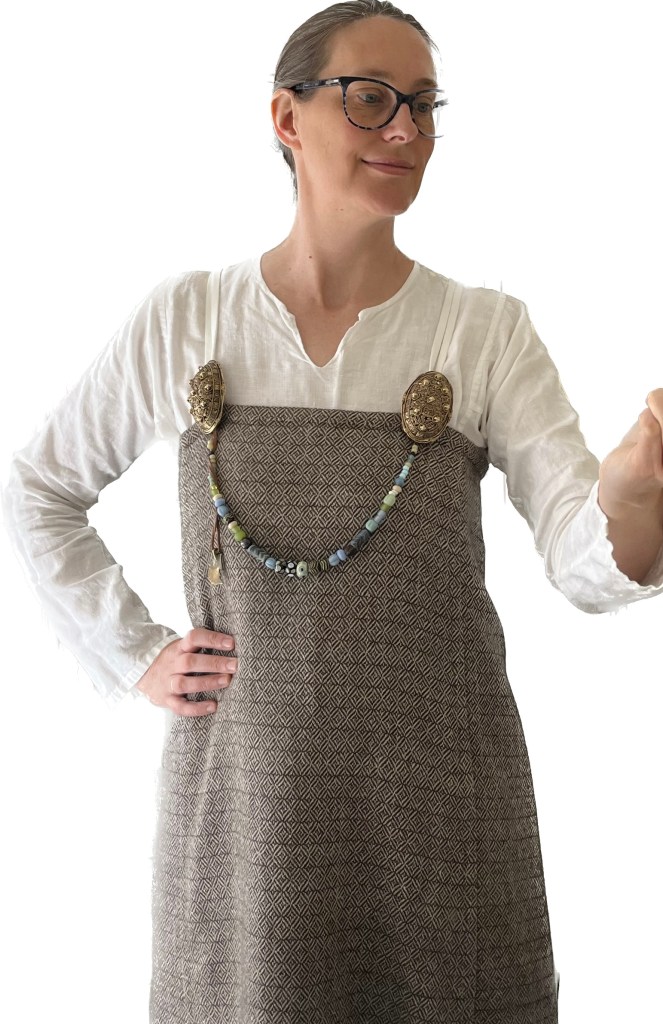
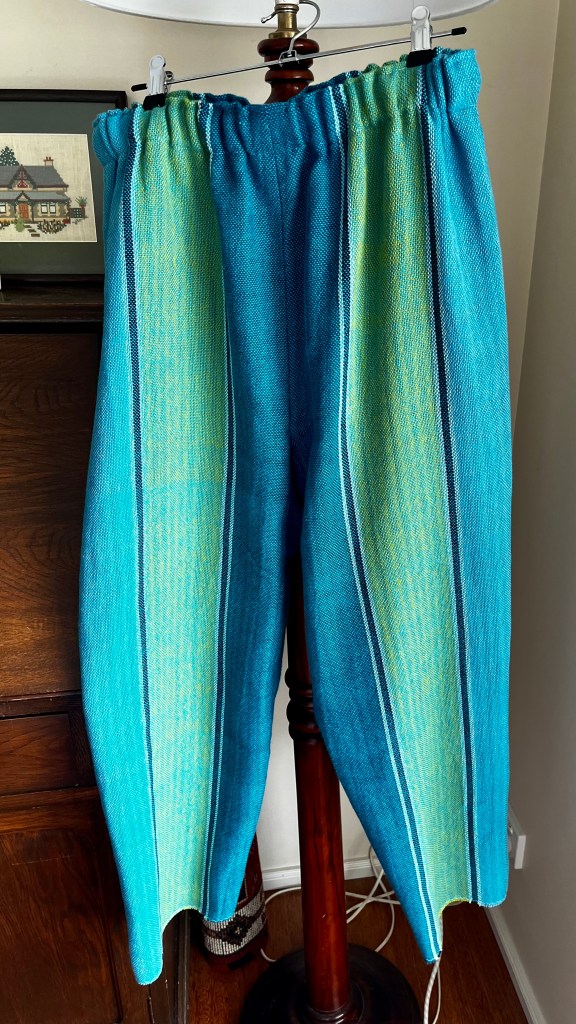
I’ve chosen to create an apron dress that is closed around the body, fitted at the very top, and sweeping gently to a wider hem at the bottom. The dress is suspended above the bust by linen straps that are fastened in the front with oval brooches.
Yarn possibilities
Both linen and wool are possible yarn candidates for apron dresses. Hägg used the layers of cloth inside the oval brooches and the location above or below the body to identify both linen and wool fragments as being likely to form the apron dress (Ewing, p. 29).
The loops of the dress were most often made of linen, but could also be wool. The majority of the finds have brooches with multiple loops either at the top or bottom of the pin (Hägg 1974, p. 103-105). It’s quite feasible that more than one apron dress could be worn stacked on top of each other.
Since I wanted a warmer dress for winter wear (and windy night time camping), I chose to use wool for my dress. But what kind of wool, and where to source it?
Types of weave
I wanted to reproduce cloth that could reasonably have been woven in the Viking era: this means choosing a suitable weave structure as well as finding wool that resemblers the fibre from the extant fragments as closely as possible.
The first task—choosing the weave structure—is relatively easy compared to the second. Thor Ewing shows a breakdown of all the fragments found (at the time of writing) according to their weave structure: plain weave (a.k.a. “tabby”), plain twills, and reversing twills (Ewing, p. 141).
He also states that typical woollen textiles are either “fine wool twills with Z-spun yarn” or “heavy woollens with a woven pile”. The latter is likely used for cloaks, rugs or coverlets, rather than the apron dress (Ewing, p. 145).
Of the twills, the most common structure is 2/2 twill, but 2/1 twill is also found (later period textiles only) (Ewing, p.143).
I elected to weave 2/2 twill.
Finding a suitable woollen yarn
The woollen twill fragments found at Birka were the finest of their type from the Viking age. They commonly have thread counts between 20 and 46 threads per cm (50 to 115 epi) in the warp, and from 9-16 per cm (22 to 40 ppi) (Ewing, p.144).
They were also exclusively singles yarn (meaning they were either Z- or S-spun and not plied together). How on earth could I source yarn like this?
I believe the only way to get tightly spun fine singles yarn is to spin it myself. Realistically, I don’t yet have the skill to attempt this, and even if I did, it would take a lot of yarn (and therefore time) to make enough for a complete apron dress.
So I needed to fall back on a 2-ply yarn. I am able to source a high quality 28/2 Merino yarn from Venne that could give me an approximate sett of 28-32 epi, but it costs $382 (AUD) per 1kg cone, and this is just a bit steep for me to use for my first woven woollen project!
The more affordable option available to me comes from Bendigo Woollen Mills: Classic 2 ply, $40.50 (AUD) per 500g cone. Their website doesn’t list the Nm value, but it samples at about 18-24 epi, making it similar to 8/2 cotton.
I figured that if I wove at 20 epi (which gave me a lovely drape in balanced 2/2 twill) I would be getting close enough to the fineness achieved at Birka, and is suitable for cloth woven at other locations throughout the Viking world.
Sampling for colour and pattern
Having chosen my source for wool, I wanted to sample a variety of colours that would have been possible to achieve from dyes available to the Vikings. Penelope Walton Rogers has analysed Viking period textiles (Ewing, p.154) and discovered that they were dyed with:
Blue (woad) which forms a large proportion of dyed textiles
Purple (lichen)
Red (madder and bedstraw)
Yellow (mystery compound “yellow-X”)
Walnut shells used for dyeing were also found at Hereby and the Oseburg burial, making it possible to dye shades of Brown (Ewing, p.155).
Wool from coloured sheep was also used, undyed. Shades of brown and grey would be possibilities here.
I chose to sample yarns in Almond (simulating undyed sheep wool), Raffia and Java (shades of brown), Chilli (an orange-red), Cranberry (a blue-toned red) and two shades of blue: Aztec and Midnight Blue.
This colour gamp is woven in balanced broken diamond twill.
I also tried a Chocolate coloured weft (a blend of Possum and Merino) that I acquired from my local craft gallery. This was not suitable for warp, but I was able to use it as weft.
Vikings were not particularly matchy-matchy when it comes to colour, but I am! I auditioned my samples against the linen apron dress and jewellery to see how I liked the various colours. The blues and browns were clear winners in my eyes!
Finally, a note on the pattern itself. I chose a broken diamond twill, as it appears to be the most common twill found on woollen fragments that might relate to the apron dress (Thunem). Herringbone twill (broken twill that doesn’t reverse to make a diamond) was typical for Viking leg wraps (Ewing p. 95).
Designing the apron dress
With suitable cloth samples in hand, I then set to designing the apron dress.
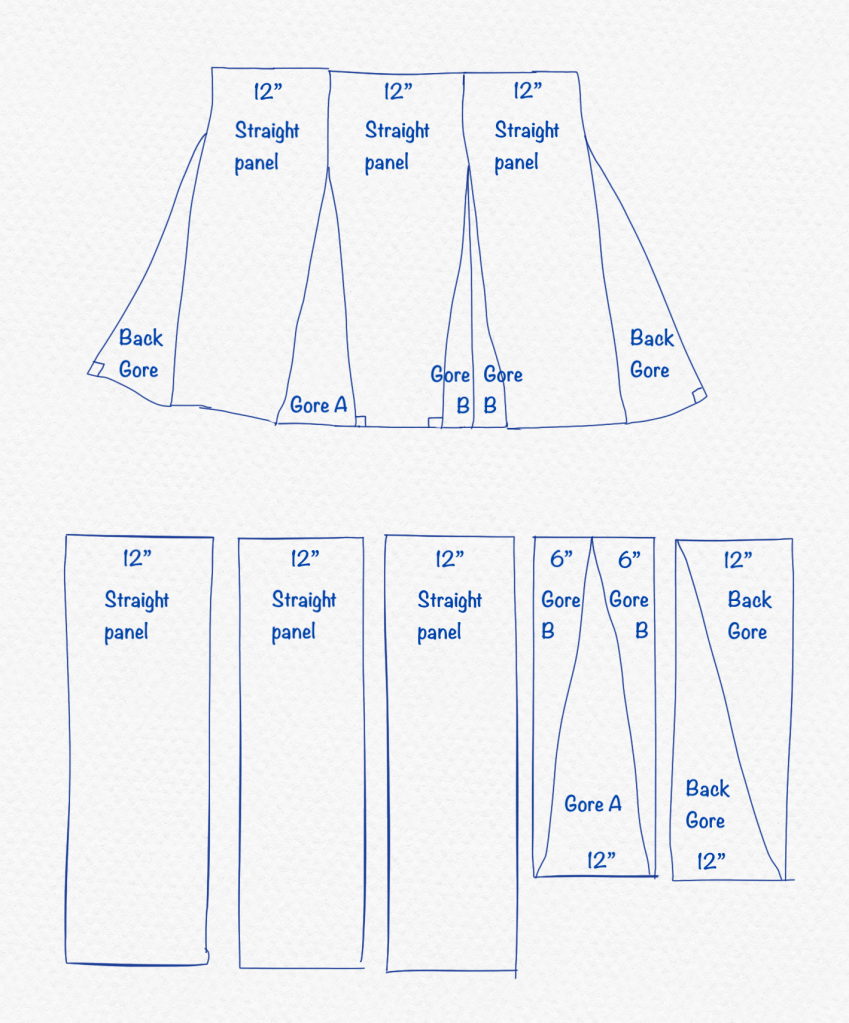
I sat down with a pen and paper and drew several cutting layouts based on different fabric widths (after shrinking and fulling). I wanted to create a garment that included a panel shaped like the one recovered from Haithabu harbour, if possible.
I also wanted pattern pieces that wouldn’t need to be flipped (leaving the wrong side of the fabric facing out). I knew that the patterned fabric would not have a “right side up” to deal with so I could rotate 180° without problems.
Version #1
Width: 13 inches
Length: 180 inches (4 panels).
✅ Includes Haithabu piece (*)
🤔 Lower hem ~76″ (just okay)
❌ Nine seams
Version #2
Width: 14 inches
Length: ~200 inches (3 regular panels and 2 shorter panels).
❌ No Haithabu piece
❌ Lower hem ~72″ (too narrow)
❌ Eight seams
Version #3
Width: 24 inches
Length: 135 inches (3 panels).
✅ Includes Haithabu piece (*)
✅ Lower hem ~84″
✅ Five seams
Version #4
Width: 36 inches, consistent with Grágás vadmál (Østergaard, p. 63 and Ewing p. 146).
Length: 90 inches (2 panels).
✅ Includes Haithabu piece (*)
✅ Lower hem ~102″
✅ Six seams
Versions #1 and #2 seemed vulnerable to being woven a little too narrow (shrinkage is not an exact science!) and the narrow gores would be gobbled up in all the necessary seam allowance. They also had too many seams for me to finish by hand.
Versions #3 and #4 are both good options. I leaned at first towards Version #4 because this width was likely woven during the Viking age (on a warp-weighted loom), however I ended up going with Version #3 because:
The wider width would use my entire loom weaving area, larger than I’ve ever attempted before. I was nervous going full width!
Wider on the loom means more ends to thread, which adds extra time whilst preparing the warp for weaving. I would rather weave for longer, than thread for longer (within reason).
Both options were similar in terms of hand-sewing (number of seams). Version #4 has a larger hem, which takes longer to hand-sew. I didn’t think I needed the larger hem.
Weaving
Having chosen a cutting layout (Version #3 above), I was then able to calculate how much yarn to purchase for my project. One must allow extra for shrinkage, as well as draw-in and take-up on the loom.
I have a spreadsheet to help me do this! I estimated I would need 0.9 cones of yarn for the warp, which was a little close for comfort. Instead, I bought two cones for the warp so that I’d have plenty of spare yarn, and so I could wind my warp faster using two ends in my hand.
I wound a 4.5 metre warp with 570 ends, then threaded eight shafts as though for turned twill (i.e. two alternating blocks of twill using shafts 1-4 and 5-8).
With this tie-up, shafts 1-4 weave twill in one direction, and shafts 5-8 weave the other, completely offset.
Each twill block contains 8 threads, so the diamond contains a total of 16 picks per repeat.
A lovely side effect for using this method is that I can get perfect plain weave on this threading, by tying up odd shafts vs. evens!
My selvedges were a single thread of warp yarn, left floating at the edges, with weights added at the back beam.
I sleyed a 10 dent reed at 20 epi, giving me a width in the reed of 28 ¼ inches.
Once the weaving was underway, I was comfortably beating at 18 ppi (so, a balanced weave, but slightly fewer picks per inch than 50/50).
The diamonds are slightly elongated in the warp direction (and Viking textiles would have exaggerated this even more, having fewer weft threads per cm than warp).
The weft is the chocolate-coloured Possum/Merino blend.
The weaving progressed in a fairly steady rhythm, however I constantly had problems with my right-hand floating selvedge. This thread un-plied itself every 20 cm or so. Each singles yarn didn’t have enough twist to sustain warp tension, so the thread would break.
This drove me nuts, having to repair the thread throughout the weaving!
I persevered, however, and finished the weaving as I started: with a simple header and hemstitching.
Finishing the cloth
Once cut-off the loom, I wet-finished (fulled) the cloth in warm water and dishwashing liquid by squeezing vigorously for two minutes. I then rinsed in the same temperature water until there were no more suds.
I draped the cloth on a clothes-airer to dry in front of our slow-combustion heater, until the cloth was only slightly damp. Then I pressed the cloth firmly with a cool-warm iron, on both sides of the fabric.
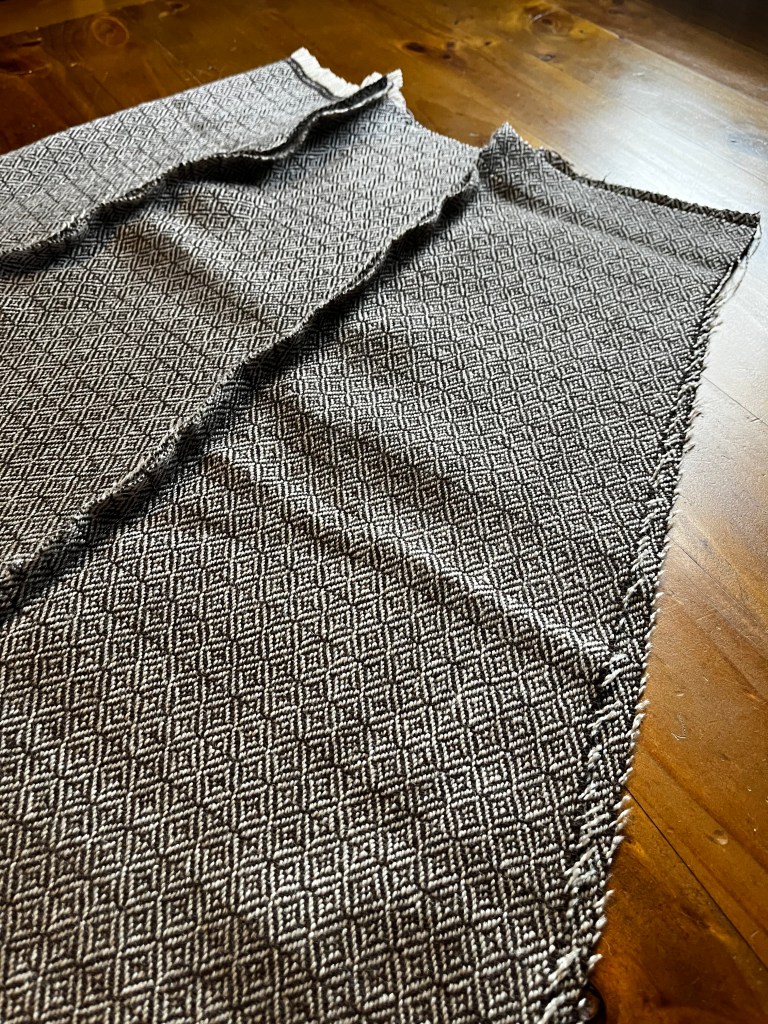
The resulting cloth has a thread count in the warp of 10 threads per cm, and 8 threads per cm in the weft. This is in the ballpark for woollen twills in Viking Scandinavia (Ewing p. 143), although not as fine as the fragments from Birka.
The finished cloth width was 23 inches (a little narrower than I wanted) and the finished length was 136 inches (slightly longer than I’d planned).
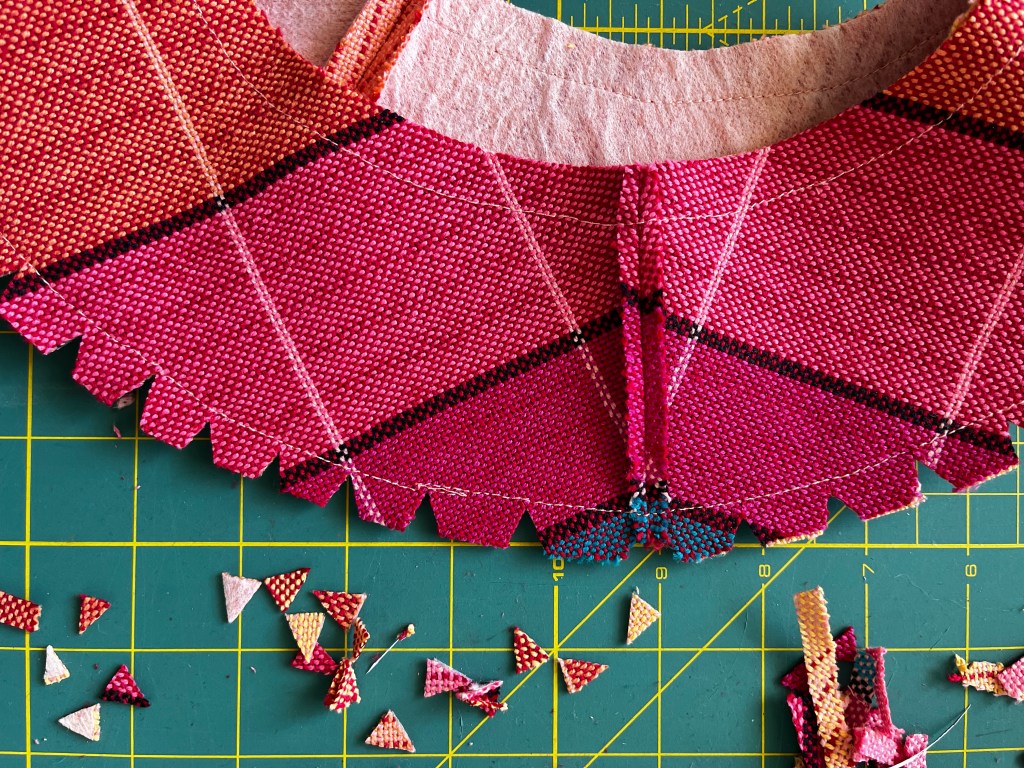
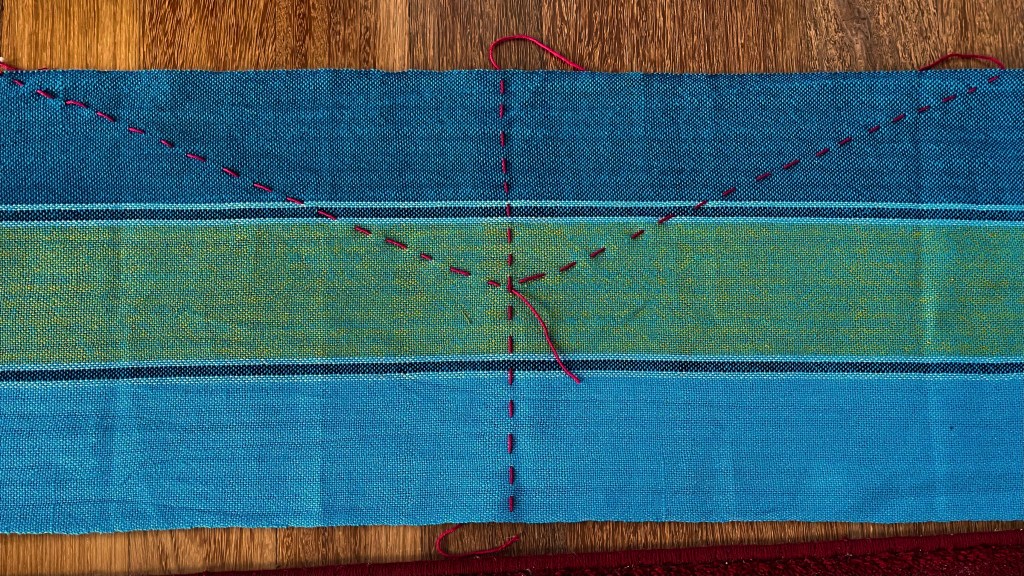
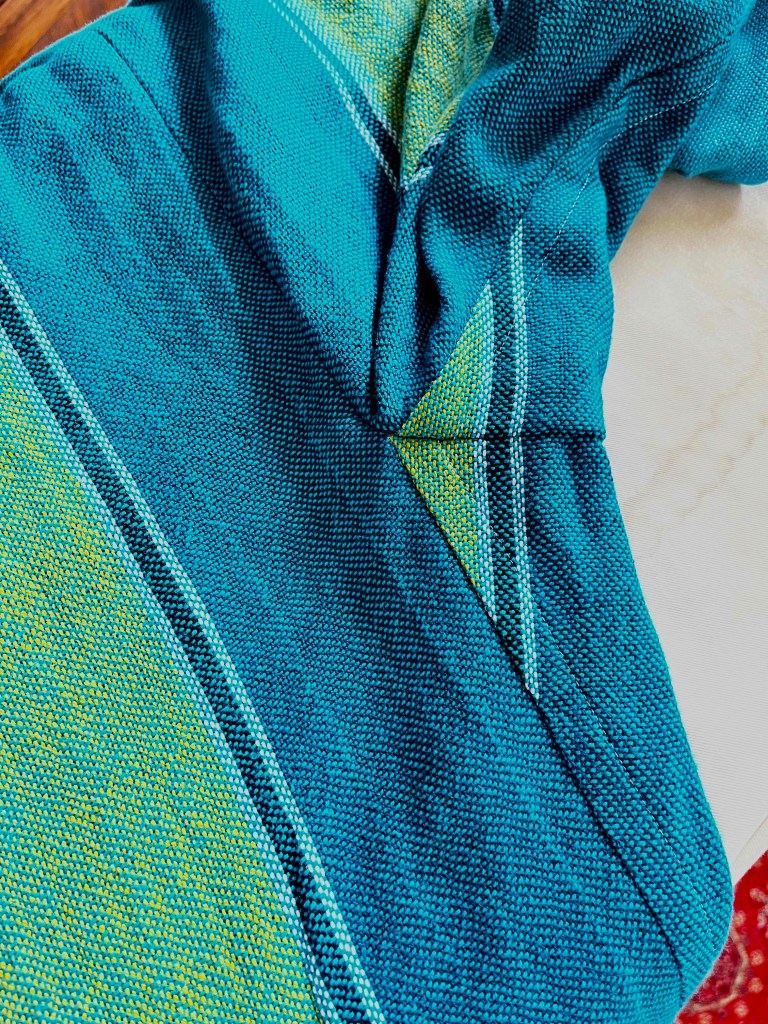
Cutting and Sewing
I cut the cloth into three equal panels, each 45 ½ inches long. I chose the best panel to be the front piece, and cut diagonals away to create a long trapezoid. The triangle pieces I have kept aside in case I need to patch the cloth at a later date.
The remaining panels were cut diagonally, with a short straight section at the end of each diagonal. These pieces are all shaped like the fragment found at Haithabu.
Sewing was fairly simple: I placed a selvedge edge against a cut edge for each seam around the body, then used my sewing machine to join them, since this stitching wouln’t be visible.
Then I felled the selvedge down over the cut edge and overcast by hand, using the wool from the warp.
The back seam joins two cut diagonal edges, so I needed to fold over the edge before flat-felling. The fabric was prone to fray when cut off-grain.
The top hem is double-folded and sewn by hand with a herringbone stitch, again sewn with woollen warp thread.
This allows some stretch in the weft direction, making it easier to pull the garment over the shoulders without snapping threads.
This was quite time consuming, but I think is worth it. On the front, this shows as a single row of straight stitches.
The bottom hem was also double-folded, but I used an overcast stitch instead of herringbone.
Straps
I chose to use simple fabric loops in bleached white linen (matching the fabric from the underdress) for my straps, as well as for the loops on the front of the apron dress. This matches the great majority of loops found inside oval brooches:
The smokkr was fastened to the brooches with loops made from folding a strip of cloth and stitching over the edges. Loop fragments are found in 105 graves in Birka. The majority of the loops were made from linen.
Hägg 1974, p. 54 via Thunem
I cut long strips of fabric 1 ¼ inches wide, then joined them on the bias to make one (seemingly infinite!) strip. This I folded like bias binding: the edges to the centre, and then folded in half.
I used a ladder stitch to sew the edges together along the entire length (in cotton 20/2 yarn). This took me days and I had to stop frequently to avoid causing injuries in my hands.
Eventually I had enough length for the loops: two short ones in the front, and two 18 inch loops for the back. These go over my shoulders and are seated at the centre back of the dress.
Making the long shoulder straps was time-consuming, and required me to have long strips of linen fabric on hand.
I can’t help wondering whether the long straps were really constructed this way over the shoulder. Perhaps they were tablet woven, with loop ends on the ends? Perhaps a wider strap that might be more comfortable?
I can only speculate. We don’t have any evidence of where the back straps attached, and whether they were linen loops the whole way over the shoulder. We only have evidence of the loop hooking into the top of the oval brooch.
Final thoughts
Overall, I’m really pleased with my new apron dress. The wool is soft, surprisingly lustrous, squishy and warm.
It hangs nicely from the brooches and back straps, and has lovely drape.
It looks marvellous with my viking bling!
Would I do anything differently?
Yes, probably I would do something creative with the shoulder straps to avoid making really long hand-sewn lengths of linen. Next time I might try tablet-weaving with wool, and use short linen loops only at the end of the strap, where they hook onto the oval brooch. I would like to compare how time-consuming this would be, compared to hand-sewing fabric straps.
The other thing I would change is that right-hand selvedge thread which drove me crazy by snapping all the time. I would use a sturdier wool thread for the floating selvedge, something that has more twist built into the singles. Perhaps I might spin such a thread, since it would only be for two warp ends!
I would like to try weaving with the more expensive, finer yarn from Venne in the warp, paired with a bulkier yarn (like the Bendigo 2 ply) in the weft, to more closely match the extant thread counts with the finer weaves.
What did I learn?
This is my first wide project woven with a woollen warp. I have certainly grown in confidence weaving with wool!
I learned how to draw out extra weft yarn after catching the shuttle, to avoid pulling the edges in on the next throw. I wove with a swooping arm action (quite energetic, actually) which pulled thread off the bobbin long enough to pass across the wider warp.
I also learned how to better control draw-in on a wide warp by letting the weft loop at the sides until the draw-in stabilised to a comfortable amount. Once I’d got the hang of this and used a larger weft arc I was able to weave comfortably.
Finally, I practiced (repeatedly) how to repair a broken warp thread. I think I can call this lesson done, now!
Bibliography
Ewing, Thor. Viking Clothing. (The History Press, 2009).
Østergård, Else. Woven into the Earth, 2nd Edition. (Aarhus University Press, 2009, E-book production Narayana Press).
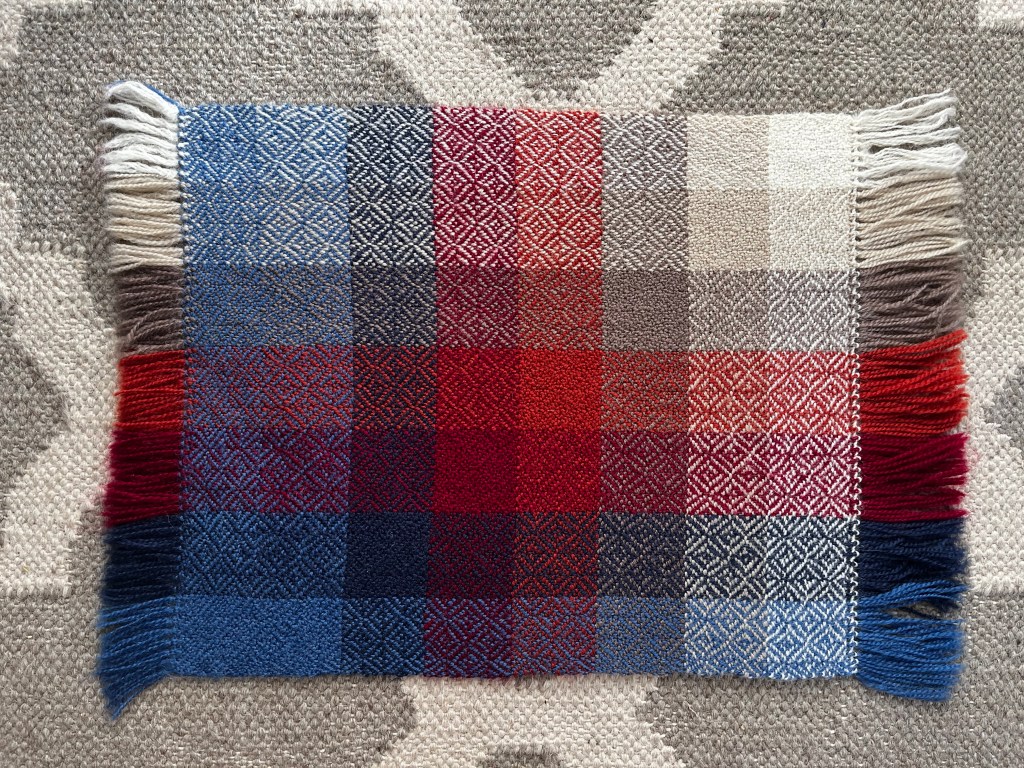
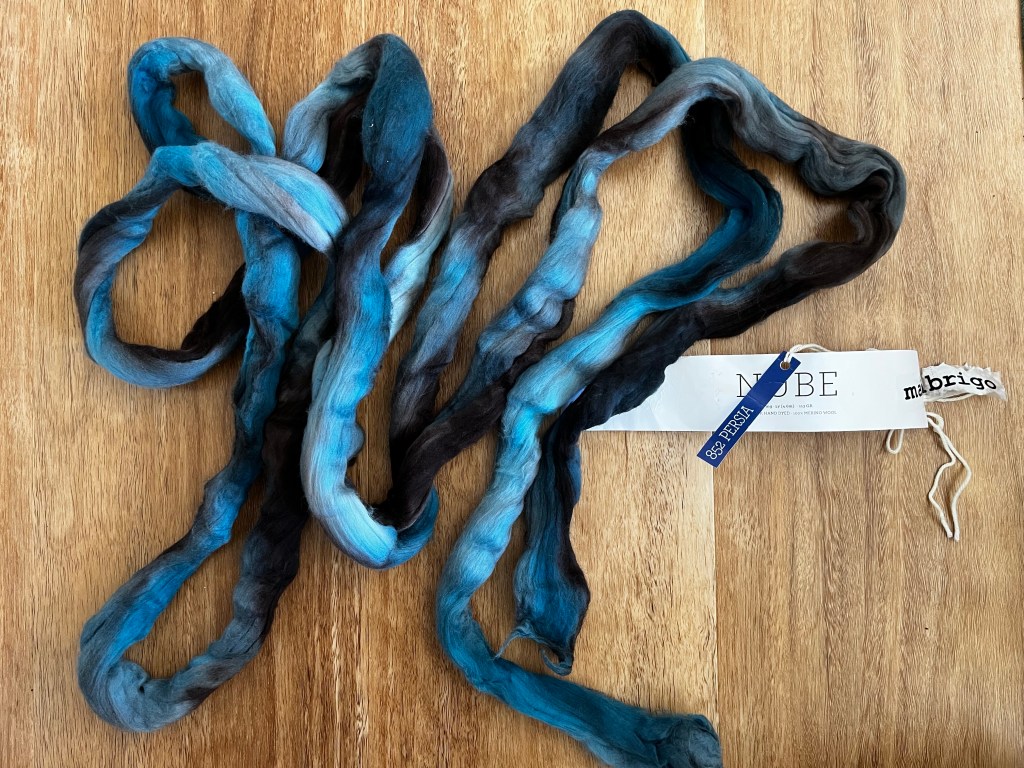
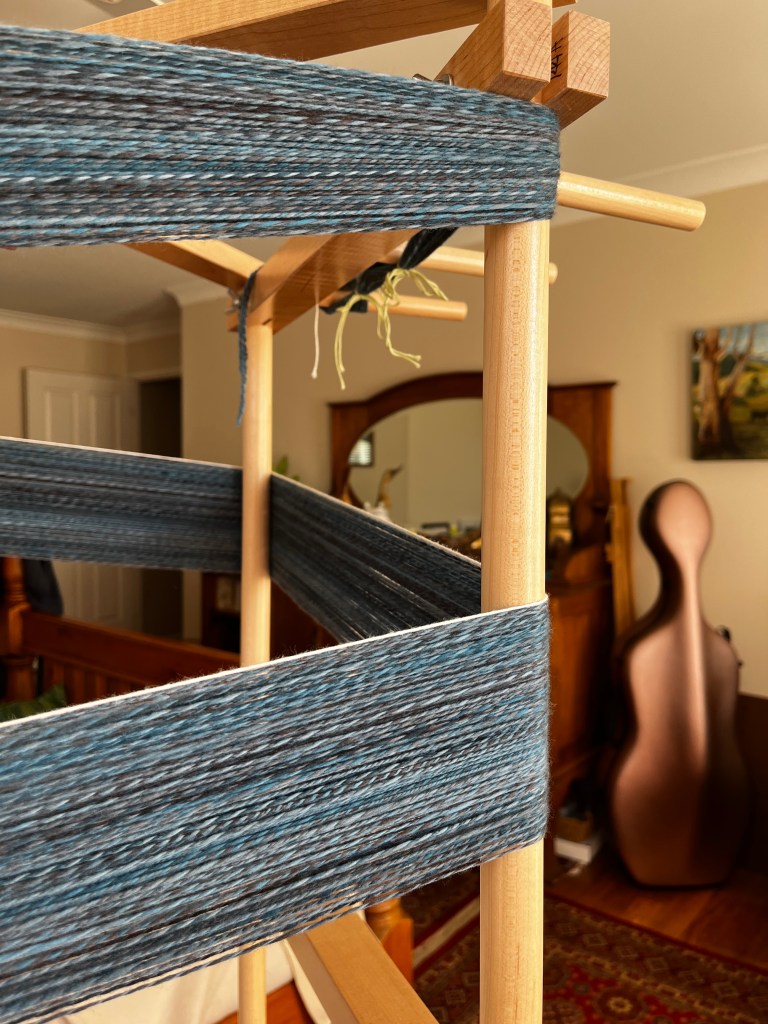
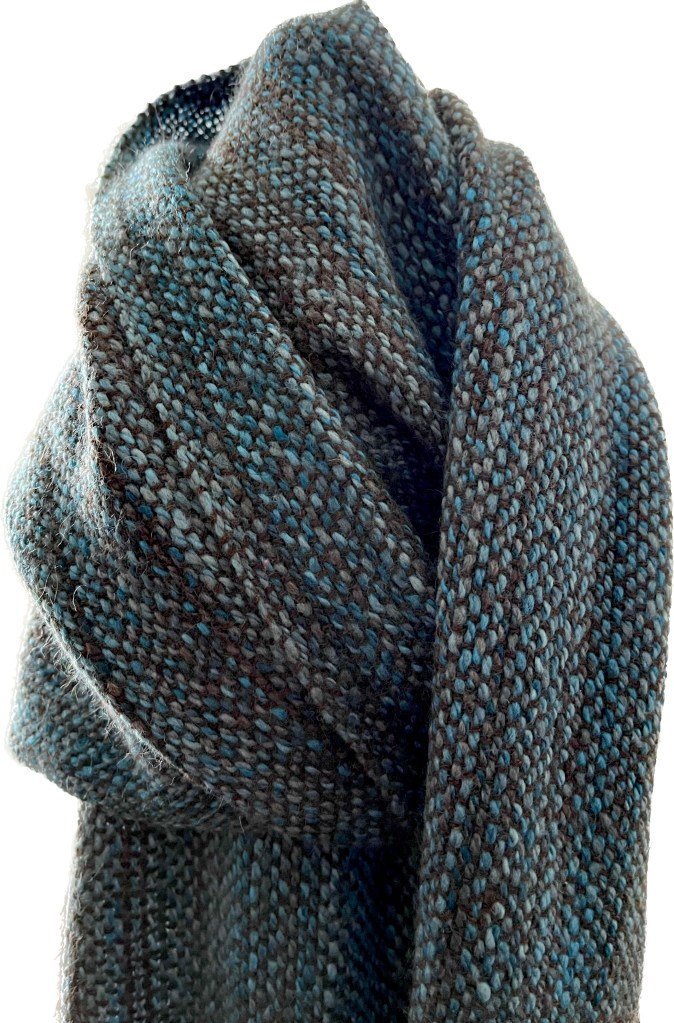
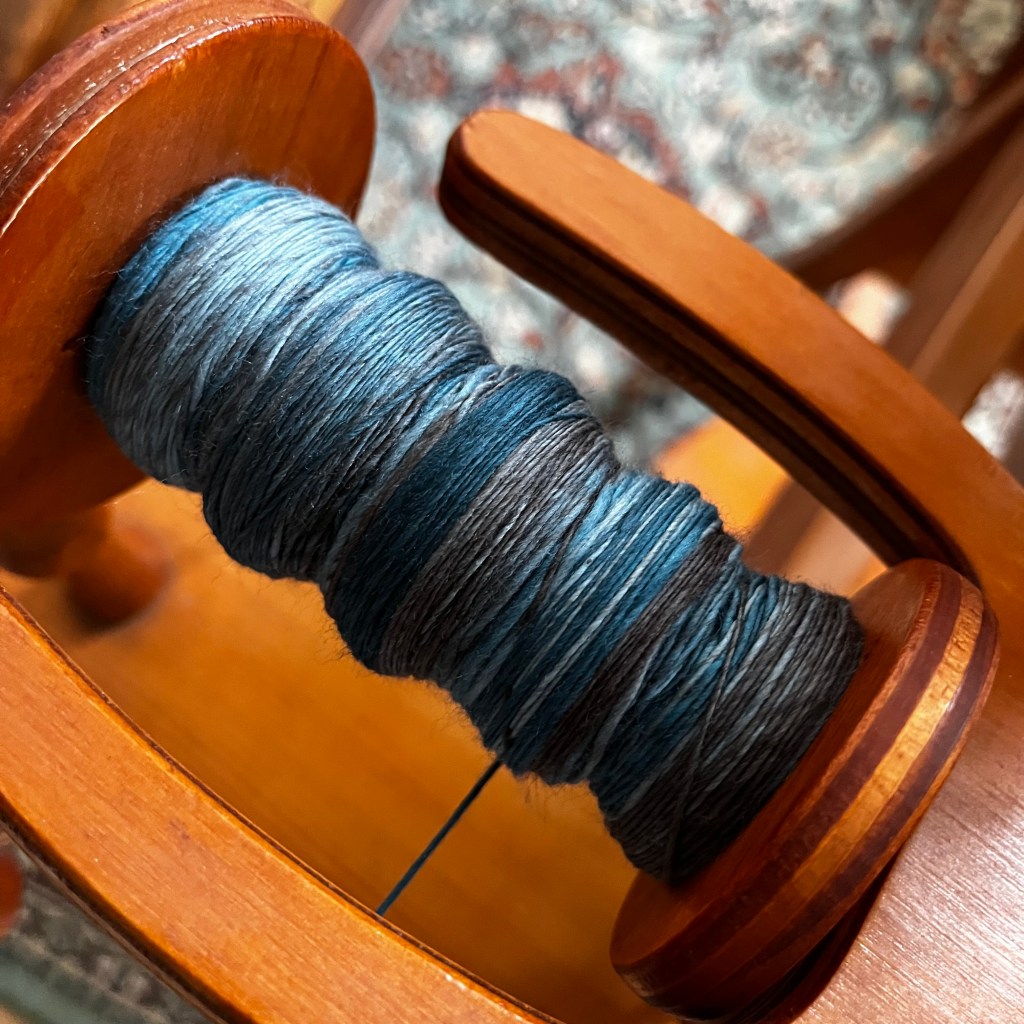
This roving is Nube from malabrigo in the Persia colour way (moody blues, teals, greys and black).
So fractal: what’s that? It’s a way to mix colours in a 2-ply yarn so that one ply has fast colour repeats, and the other has slow.
The resulting yarn sometimes shows a solid block of one colour (when the repeats match up) and more often shows a barber pole mix of colours.
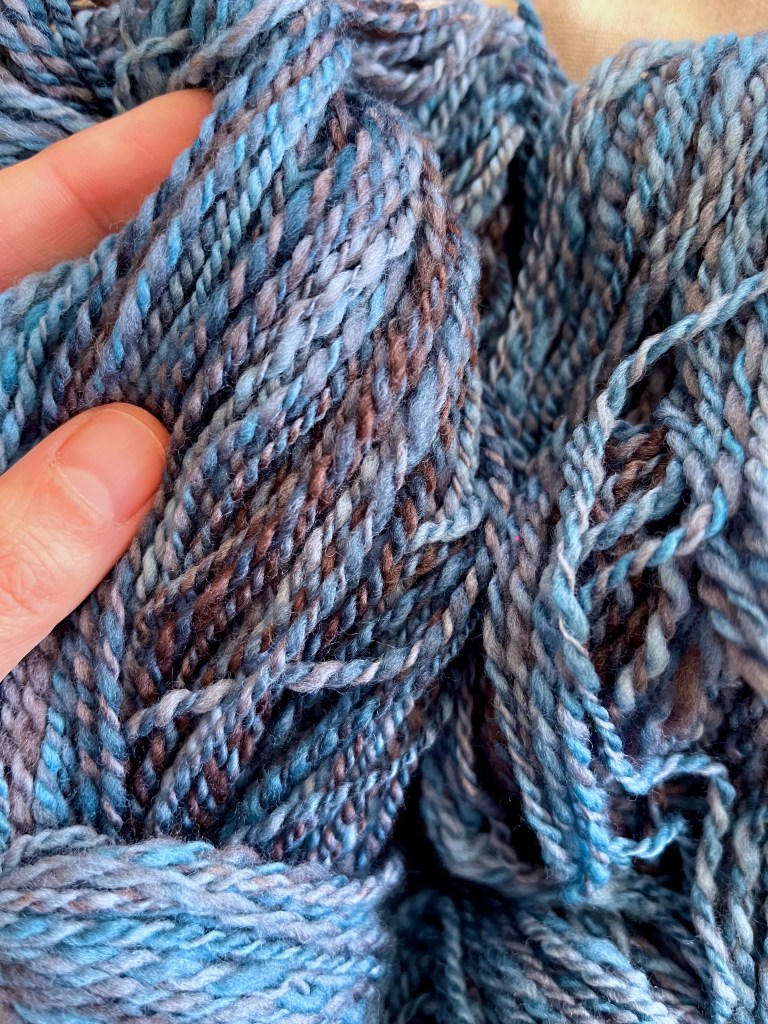
This is a close-up of my finished yarn, showing colour mixes of blues, greys and browns that were present in the original dyed top.
But hey, I’m skipping rather ahead here! How does it work?
First, I separated the dyed top into two pieces, lengthwise. These two rovings are still fairly thick, and have the same sequence of colour repeats as the original.
If I were to spin each of these into singles, then ply them together, I’d get a solid-colour yarn that changes colour periodically.
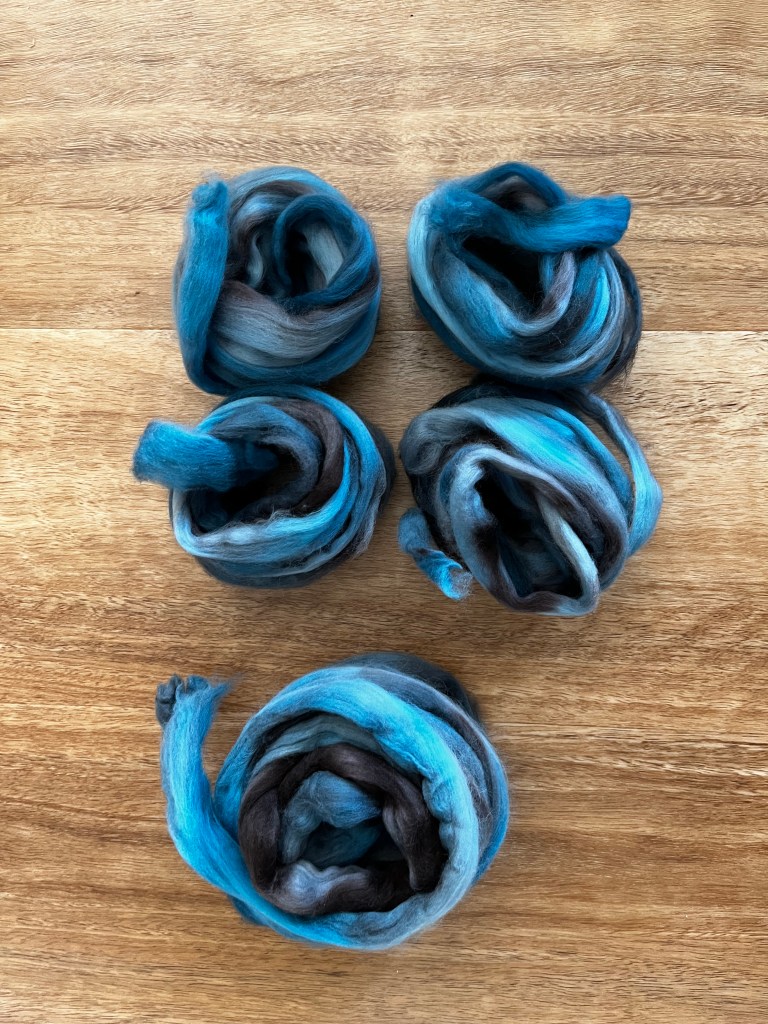
Instead, I set one of the rovings aside, and split the other one in two pieces again to make two thinner rovings. Each of these I split in two, one final time.
Now I had one thick roving, and four identical thin rovings, each of which had the same colour repeat as the original.
This is why the technique is called “fractal”: because splitting in half each time is a repeating pattern, just like a river forking into streams, or a tree branching from the trunk to the twigs.
When you spin the thick roving onto a bobbin, you get a singles yarn with long colour repeats.
When you spin each thin roving, you get short colour repeats. I spun these sequentially onto a second bobbin, always starting with the same blue end each time. This bobbin has four times as many colour repeats as the first bobbin.
When you ply the two singles yarns together, the short and long colour repeats overlap in interesting (and delightful) ways.
I ended up with two skeins of yarn, each weighing about 50 grams and measuring just over 200 metres long.
One skein seemed to be more blue, the other looked a little more grey.
Scrummy!
Having set the yarn (by soaking it and then snapping it a few times whilst damp), I was then faced with the puzzle of how to weave with it.
Could it be warp?
I performed two tests on my yarn:
Strength: I took 15 cm of yarn between two hands and pulled firmly to see if it would break under tension. My yarn didn’t come apart at all, which was a success. If the yarn breaks with a “snap” then this is also a success. If the yarn breaks by gently separating the fibres or sliding apart, this would be a definite no for use as warp.
Abrasion: I scraped my fingernail repeatedly along the yarn, whilst holding it under mild tension. This was also a success because I didn’t see any pilling or fibres fluffing out of the yarn, and the yarn wasn’t damaged.
With both tests successful, I could use my yarn as warp: yay!
Preparing to weave
The most immediate concern when planning a weaving project is to decide how many ends per inch (epi) to use. This is dependant on both the warp yarn (my fractal), the chosen weft (yet to be determined), and the desired weave structure (plain weave).
I used a simple yarn gauge to make a best guess.
My gauge is a piece of wood with a one inch wide groove cut into it. I placed strands of my fractal yarn inside the groove.
Note that I didn’t stretch the yarn or add extra twist, I just laid them on top.
In between each strand of fractal yarn I laid a strand of potential weft (in this case, 2-ply wool from Bendigo Woollen Mills) to account for the over-under nature of plain weave.
I then counted the number of warp yarns inside the groove: eight, so my first sample would be at 8 epi.
The next step in planning a project is to decide how wide to make the piece, and therefore how many ends will be required.
At this point, a whole bunch of arithmetic comes into play, as well as some guesswork. I actually have an insanely complicated spreadsheet to help me with this. It takes into account:
Yarn shrinkage for weft and warp (hand woven items always shrink when they are first washed).
Estimated draw-in and take-up (extra width and length is needed for different weave structures).
How much loom loss I have (the same every time I weave because warp needs to pass through the heddles at the back and is used to tie on at the front).
Whether I want fringes or woven hems (I used the loom loss to make fringes).
How many metres (or inches) or yarn I can get from a single cone (or skein) of yarn (so I don’t run out)!
Long story short, for my warp I planned on 3.6 metres of length, using 104 ends.
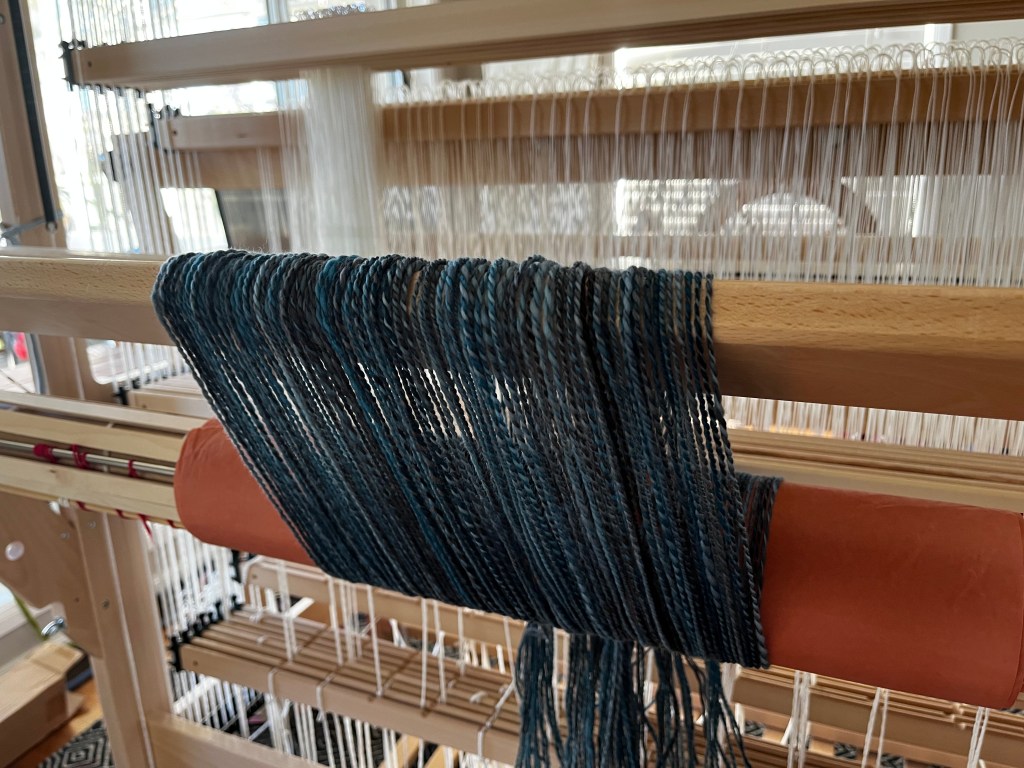
To make it easy to wind a warp, I transferred each skein of fractal yarn back onto a bobbin.
I used a rather firm and even tension as I wound, so that they would reel off smoothly.
Winding the warp with two threads in my hand meant I could spread the colour difference on each skein across the width of the scarf.
(Bonus: it’s much faster to wind a warp with two threads in the hand, than one!)
My vertical warping mill holding 100 endsThe warp, after beaming onto the loom……and finally tied on!
In the end I was only able to get 100 warp ends from my fractal yarn (not bad from my guesstimations, huh?). I had a small amount from one bobbin left over at the end (maybe 4 metres?) and a small amount from the first bobbin that had a knot at the start. I will keep this yarn in case I need to repair the scarf down the track.
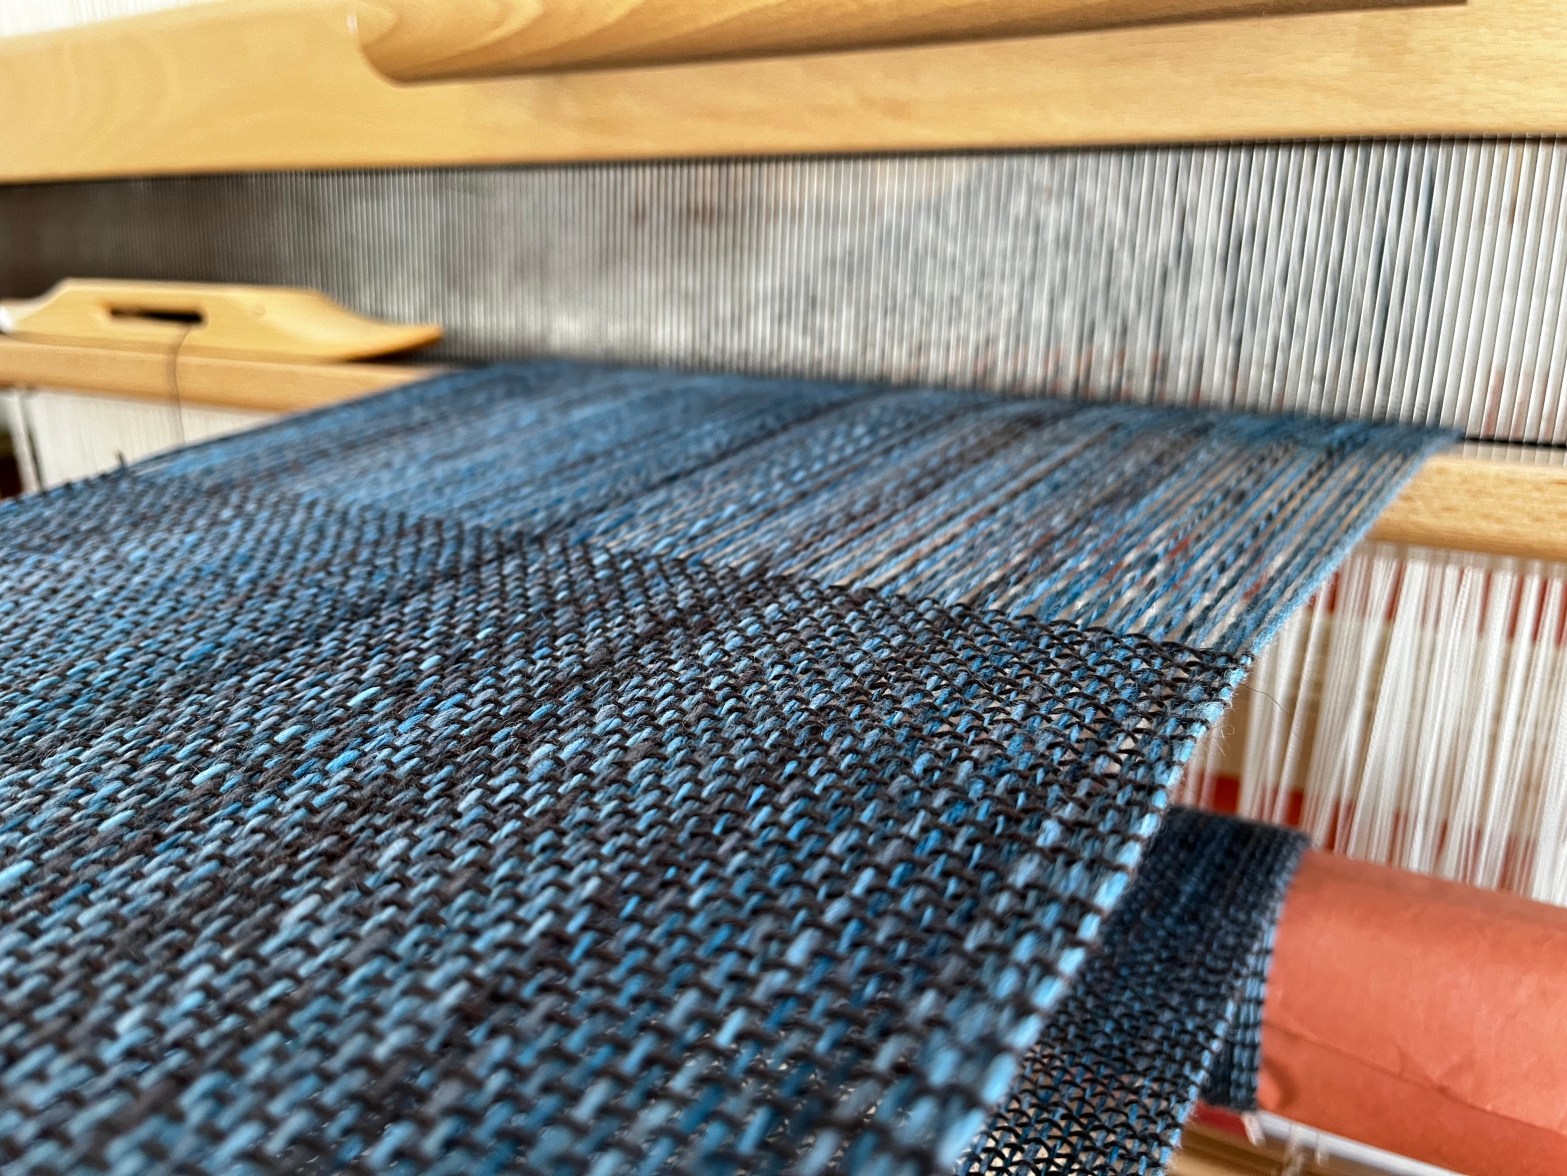
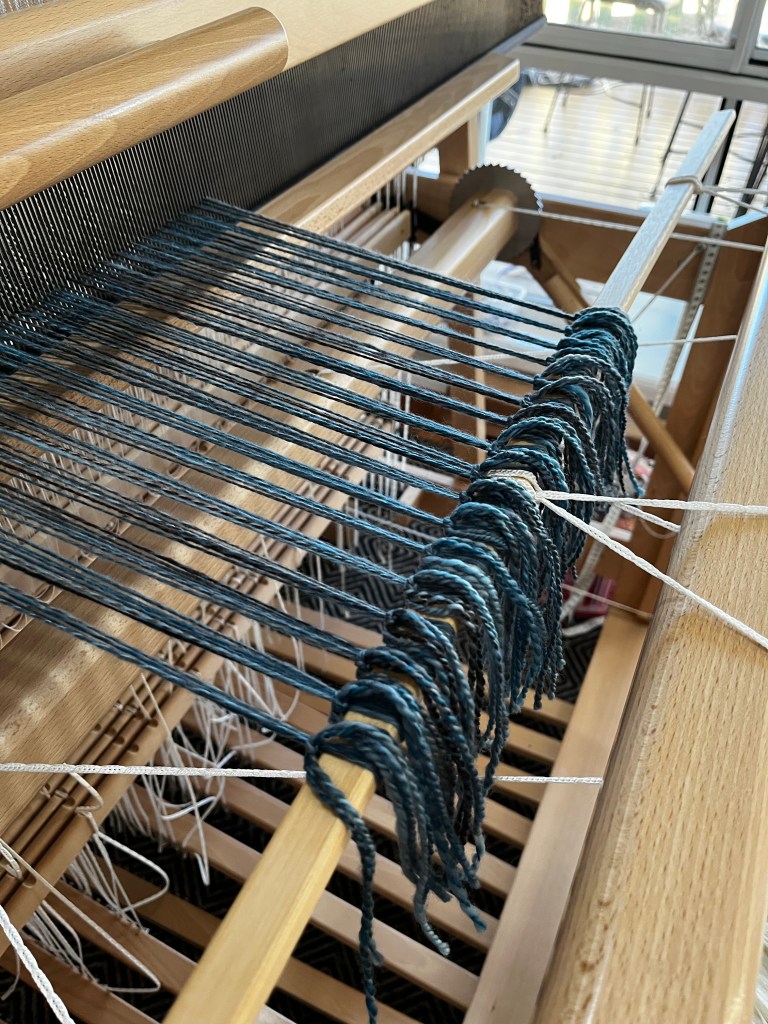
Weaving the scarf
My weaving plan included enough warp to make a sample or two before weaving the bulk as a scarf. I figured there was a strong chance I’d need to adjust the epi to get the right feel to the cloth after washing the sample.
I was nervous about adding too much tension to the warp, as I’ve never woven with hand spun in the warp and I wasn’t sure my if my yarn would fail, despite my testing for suitability.
The yarn itself was incredibly bouncy (I could stretch it a long way and it would spring back).
Under loom tension the sett look ridiculously open: each thread became narrow and the twist angle stretched out. There was a lot of space between each thread!
I’m thankful I put a lot of twist into the singles because the left selvedge yarn actually began to un-ply, but it held out until the end!
My first sample used three different wefts:
Navy blue (Bendigo 2 ply), beaten in firmly at 14 picks per inch (ppi),
Grey (Bendigo 2 ply) beaten at 8 ppi (balanced),
Dark brown (Merino / Possum blend) beaten at 8 ppi.
I washed the sample, and spent three minutes fulling the cloth (agitating with soap and hot water).
The yarn shrunk, bloomed, and relaxed into the space I had left on the loom. I think the feel of the sample at 8 epi was just right.
Nailed it!
I liked the look and feel of the dark brown weft the best, so I wove off the remainder of the warp (99 inches!) as a scarf.
I twisted the fringes, wet finished for two and a half minutes (I wanted a little less shrinkage than the sample), and once it was dry, gave it a press.
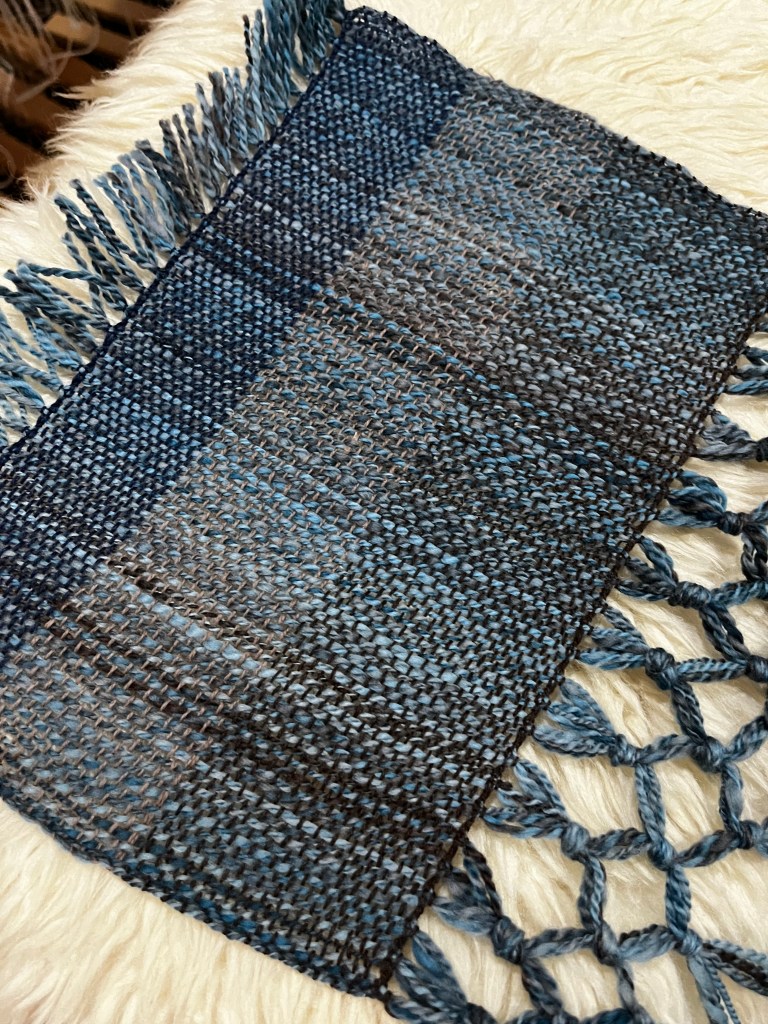
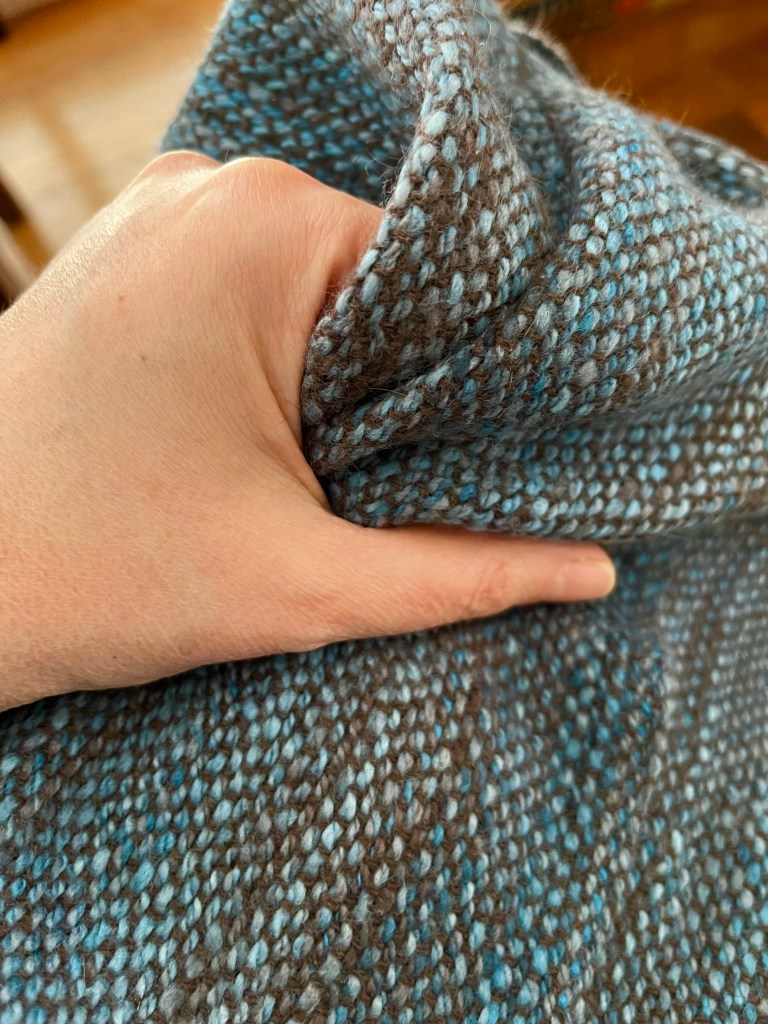
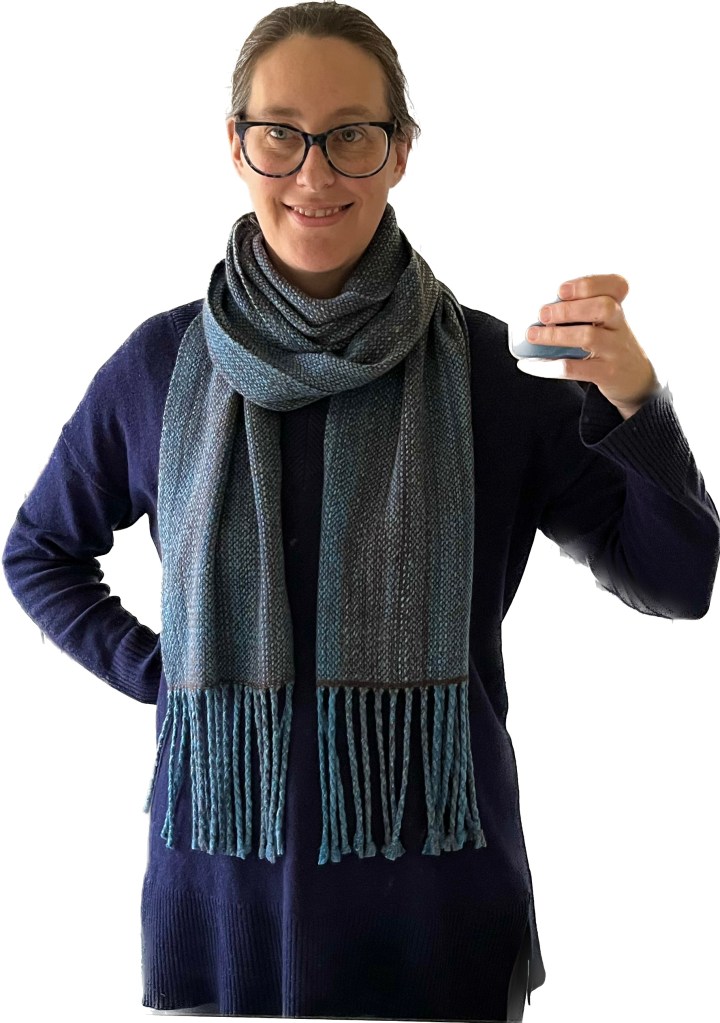
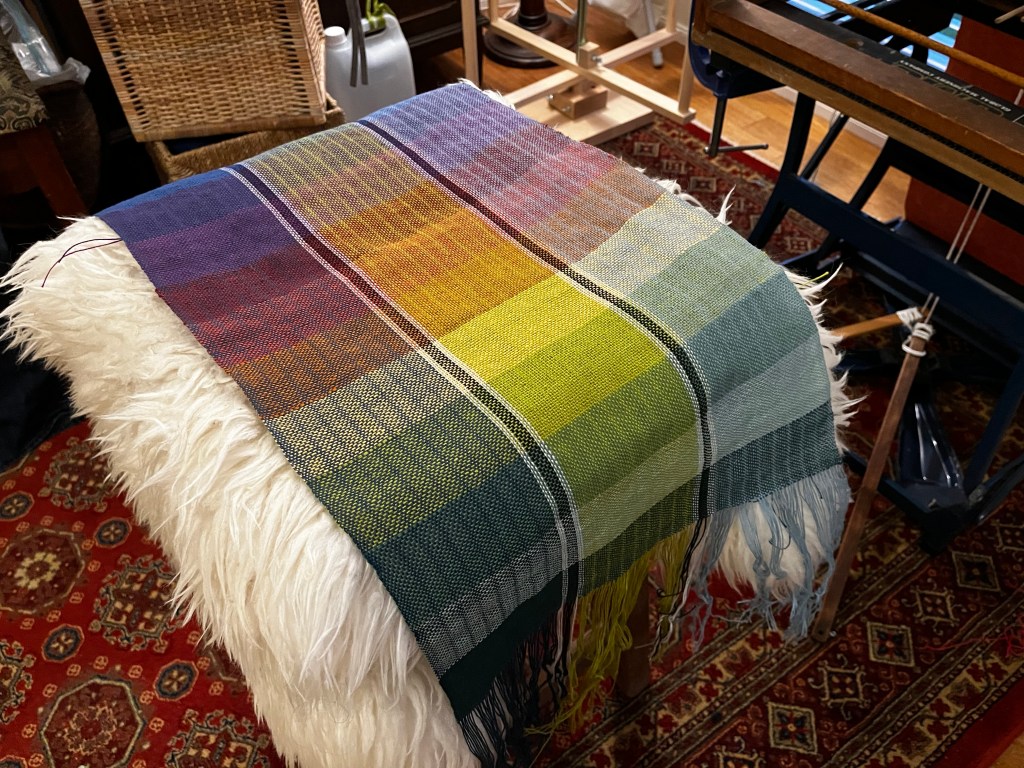
And here’s the finished scarf!
Delicious drapeEnough length to wrap three times!Surprising lustre on the yarnSeriously squishy in the hand
Now that it’s complete, I’m finding it hard to believe that I made it. It seems too good to be true!
The finished scarf is 9 ¼ inches wide, 90 inches long, and has 10 threads per inch in both warp and weft (balanced). The scarf has a luscious drape; it’s soft and squishy in the hand, and is light but very warm.
I am beyond delighted with my hand spun, hand woven scarf!
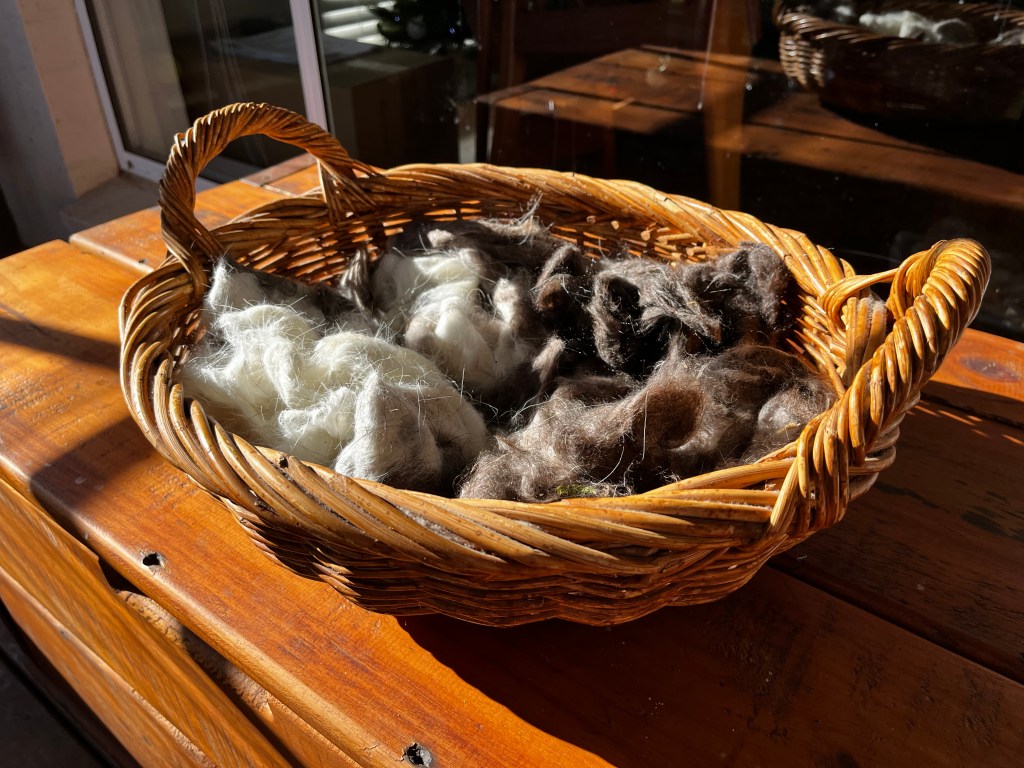
At the start of the year I had a visit from my friend, Tina, who is an experienced weaver and spinner. We hadn’t seen each other in person for years so it was really fantastic to catch up with her.
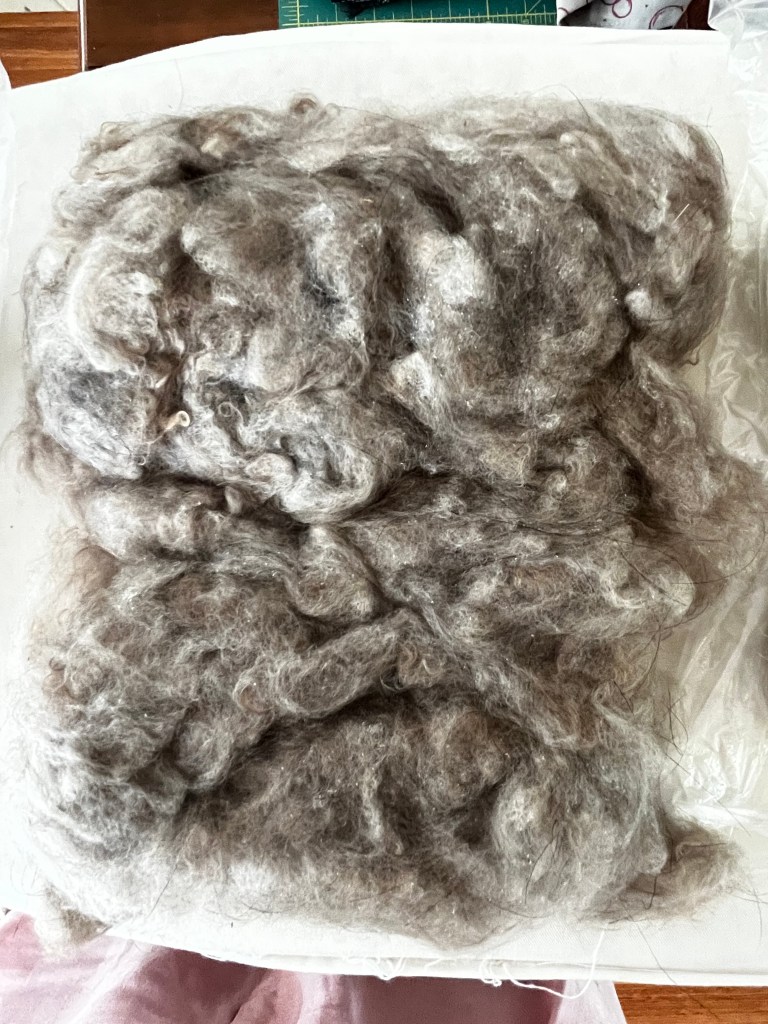
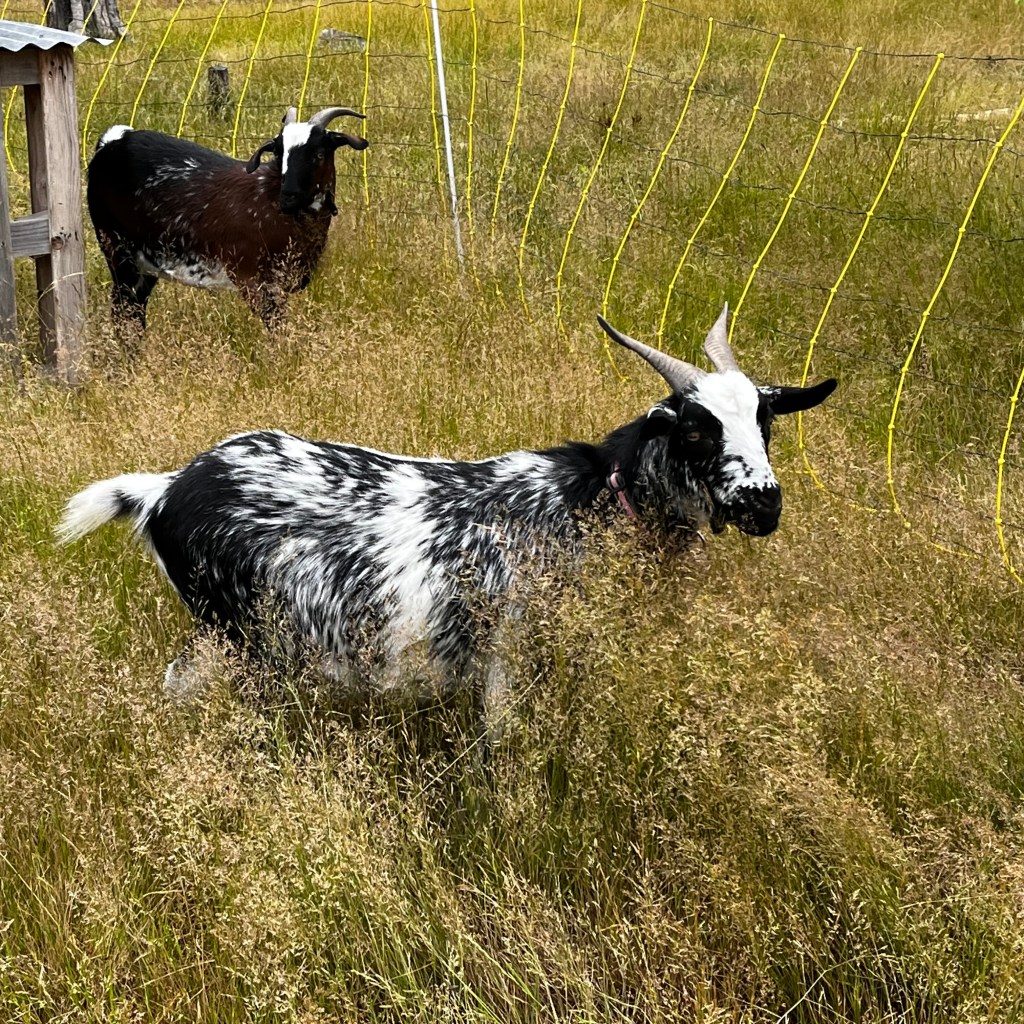
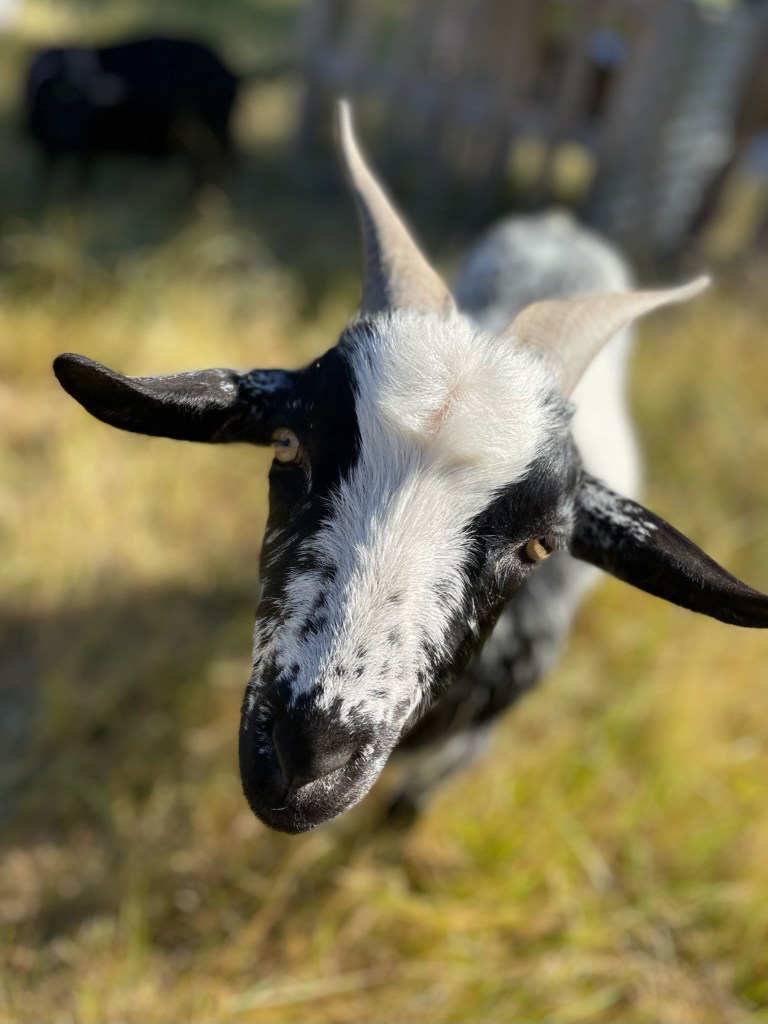
We had an amazing time using my goat’s fleece for spinning!
I combed this fibre from my six goats at the end of last winter, when they shed their winter undercoat.
I used a dog comb (a miniature rake with swivelling tines)!
Bit by bit, day after day, I took a little more fluff and stuffed it into plastic bags in case I could one day use it.
At the time I knew nothing about spinning or preparing fleece or fibre, but you don’t know if it will work until you try it!
I soaked the fluff in soapy water to scour away any dirt, and dried it on our back verandah.
Tina showed me how to prepare the fibre for spinning: lots and lots of picking out the long guard hairs!
The long white and black guard hairs are from the goat’s outer coat. Depending on a bunch of factors that I don’t yet fully understand, you get more (or less) of the guard hairs alongside the fluffy cloud of cashmere. These will be scratchy and coarse if they are spun into the yarn, so we spent a whole afternoon removing them.
By hand.
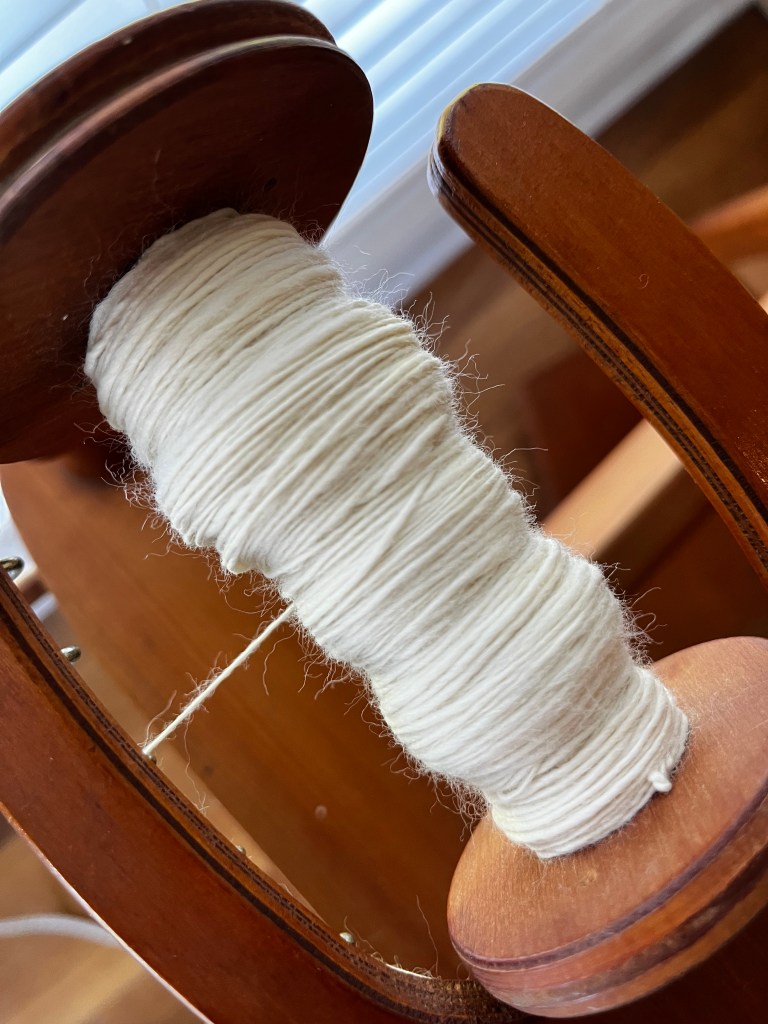
We then carded the fibre and made rolags to be spun the next day.
Turns out cashmere is very tricky to spin because the fibres are so short, and they don’t have any crimp (like sheep’s wool does).
I left Tina to spin the tricky stuff whilst I tackled some commercially prepared merino top.
Tina gave me a bunch of great spinning tips so I could get started learning to spin.
It turns out I can do this!
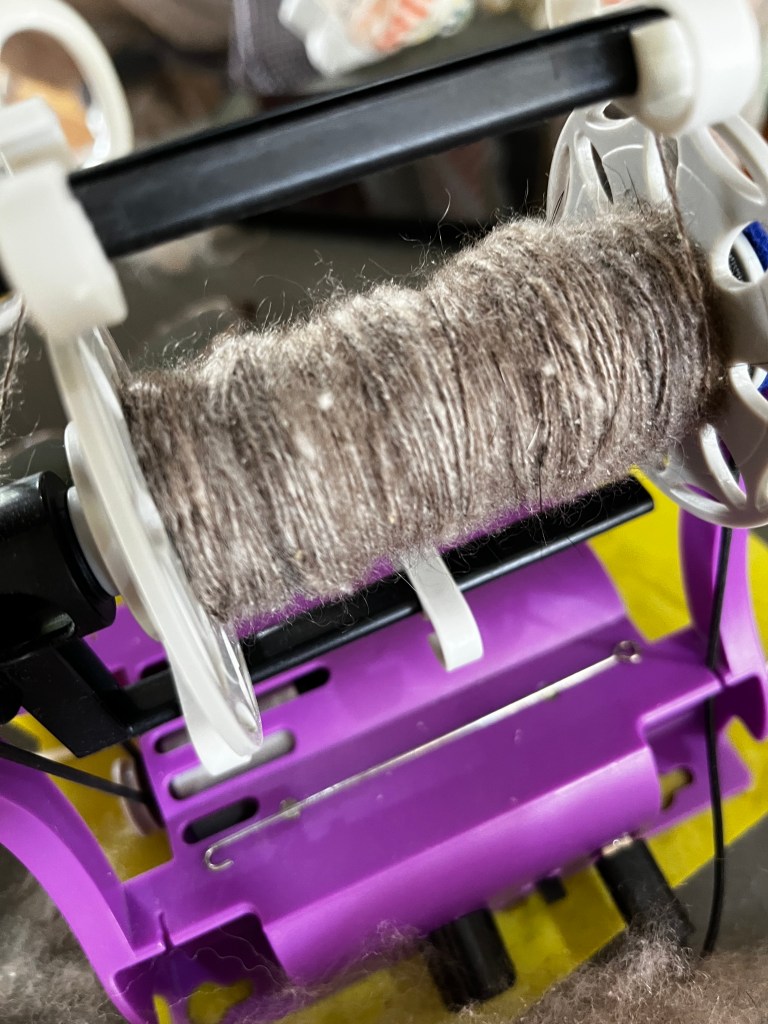
Meanwhile, Tina spun up the cashmere on her portable e-spinner, to get a feel for the yarn.
This is what she got after our spinning session on the second day.
Amazing, huh? 😍
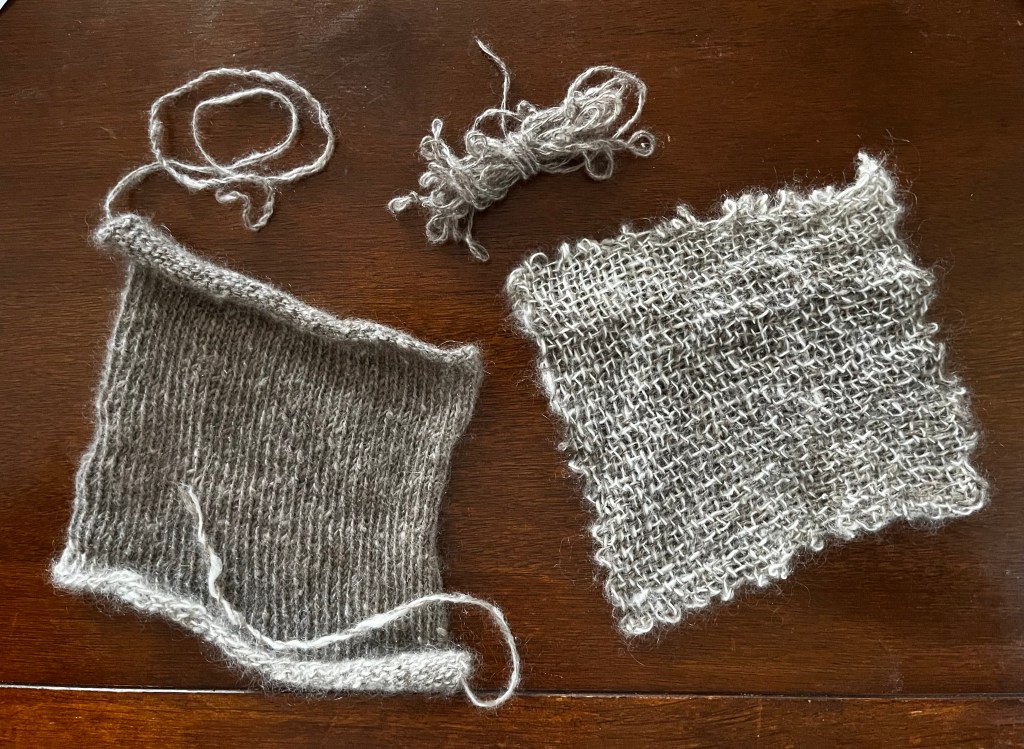
I am blown away by Tina’s skills. She took my goat fibre home, continued to spin with it, and then made these samples!
On the left is a knitted swatch which is soooooo soft.
On the right is a pin-loom woven square. The variegation is from white fibres plying with grey.
Wow, wow, wow!
By the end of January, I’d decided to join my local Spinners and Weavers group, located in Goulburn. There are so many experienced spinners in this group, and I’ve already learned so much from them!
Each week I take my spinning wheel down to chat and spin together with other like-minded folks. There are a few weavers there, too, and it’s great to show each other our projects.
I was even able to participate in their exhibition (held every other year) in which I showed a bunch of the weaving I’ve managed so far (mostly associated with the online weaving course I’m doing, but also including the pyjama pants I wrote about previously).
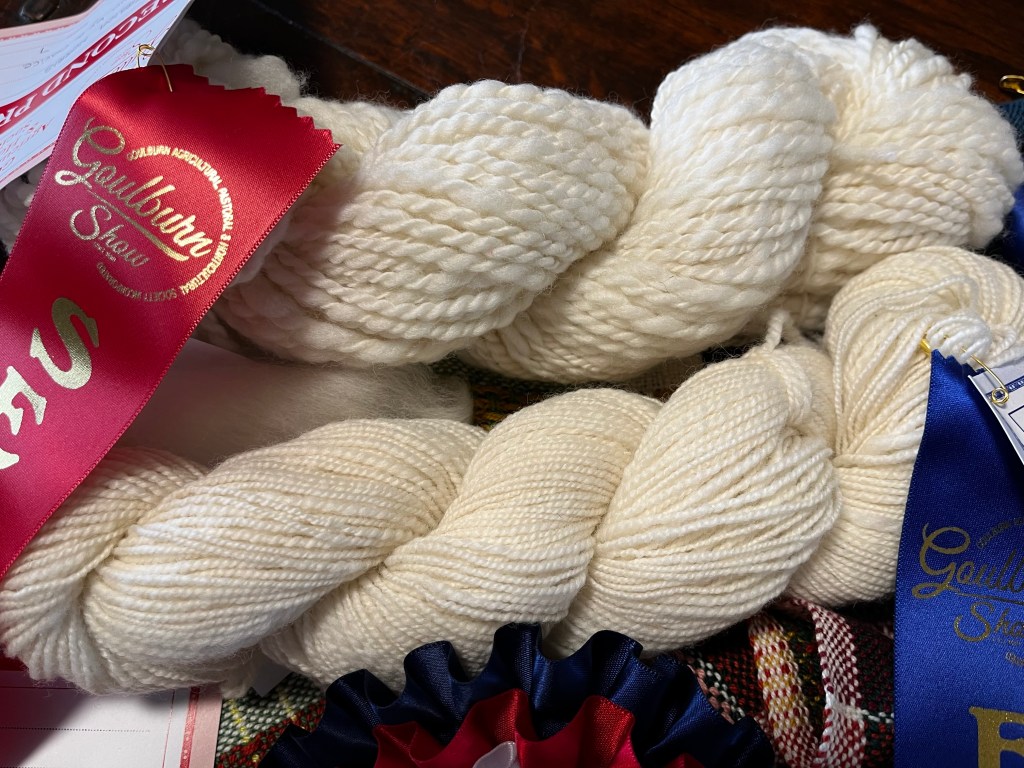
Only a week earlier I had great success at the Goulburn Show, after I entered my spinning and weaving into the Novice categories.
I must admit that I was the only entrant in the spinning section, but I’m still blown away by my two hanks of hand spun, and the ribbons I won. Squeeeeee!
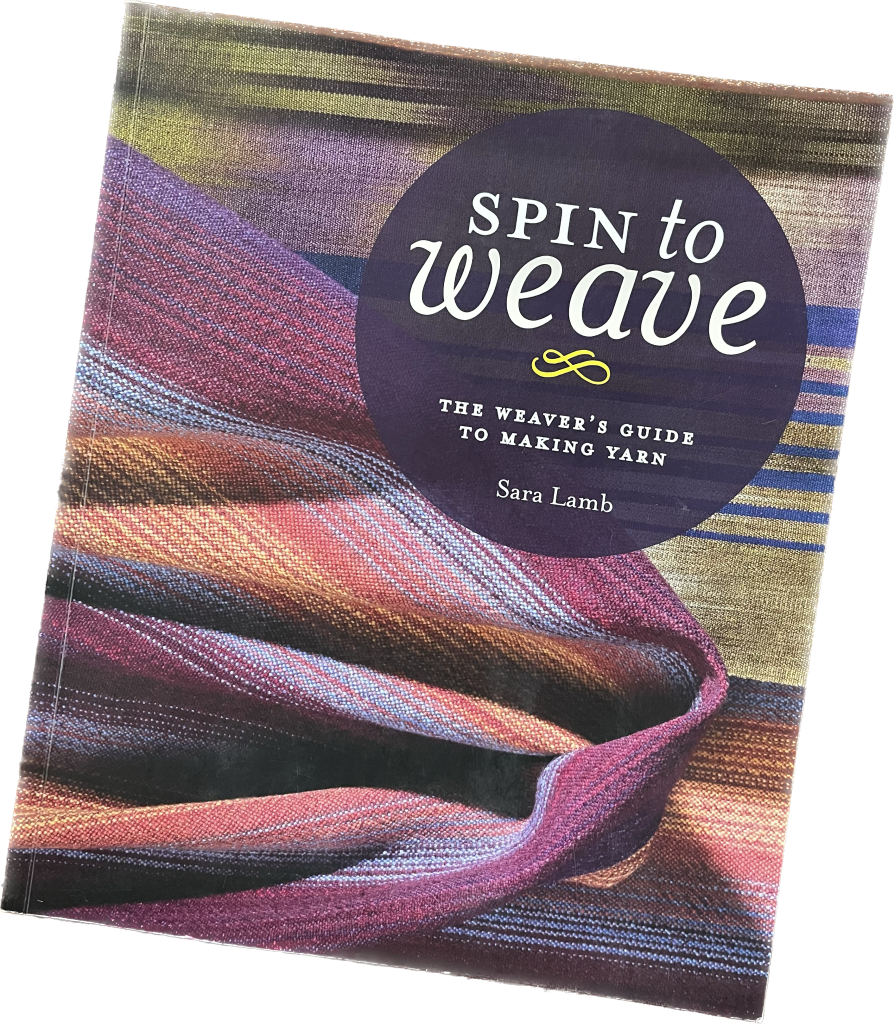
After a couple of visits to the spinners and weavers group I found this gem of a book in the library: Spin to Weave, by Sara Lamb.
What an inspiring book! If you are a spinner and interested in using your yarn for weaving, this book will surely help you get started.
After my success at the Show, I figured I could work towards spinning yarn for weaving, but I was intimidated by the amount of spinning required, and the apparent skill I would need to get the right twist and evenness in the yarn.
It turns out just weaving it is the best way for me to judge and improve my spun yarn!
I could spin two whole bobbins of singles, then ply them together, wash the yarn in a hank and then wind onto quills for weaving. But that requires a lot more patience than I have right now!
So, why not try weaving with the small quill of unwashed singles yarn I’ve already spun? I had a linen warp sitting there just for sampling, after all.
What could go wrong?
Singles yarn showing wraps per inch. About 25 wpi (fine!)Weaving using my singles as weft: looks amazing!Before wet finishing: the curling edges are caused by unbalanced twist in the yarn.After wet finishing the sample hangs beautifully.
It turns out I totally can weave with hand spun yarn: I just have to have enough patience to spin more than one quill of yarn before I use it!
Okay, so how about two quills? This first one I spun woollen-style (soft, lumpy and with less twist).
I thought I would need two strands of yarn for every overshot pattern pick, because the yarn was so fine at times.
The sample ended up rather fuzzy and was bulky in the hand.
Super fun to weave!
The second quill lasted a bit longer because I only used one strand for each pattern pick.
This one is spun worsted-style (more twist, short forward draw, making a firmer yarn).
This sample is more successful, I think. It has nicer drape and the pattern is much more distinct.
The colour gradation is due to a couple of things:
Some of the Corriedale fleece locks I used were paler grey than others
The colour is also pale where the yarn was really thin.
I think I need to try to spin even more than two quills so I can make something that is not just a sample!
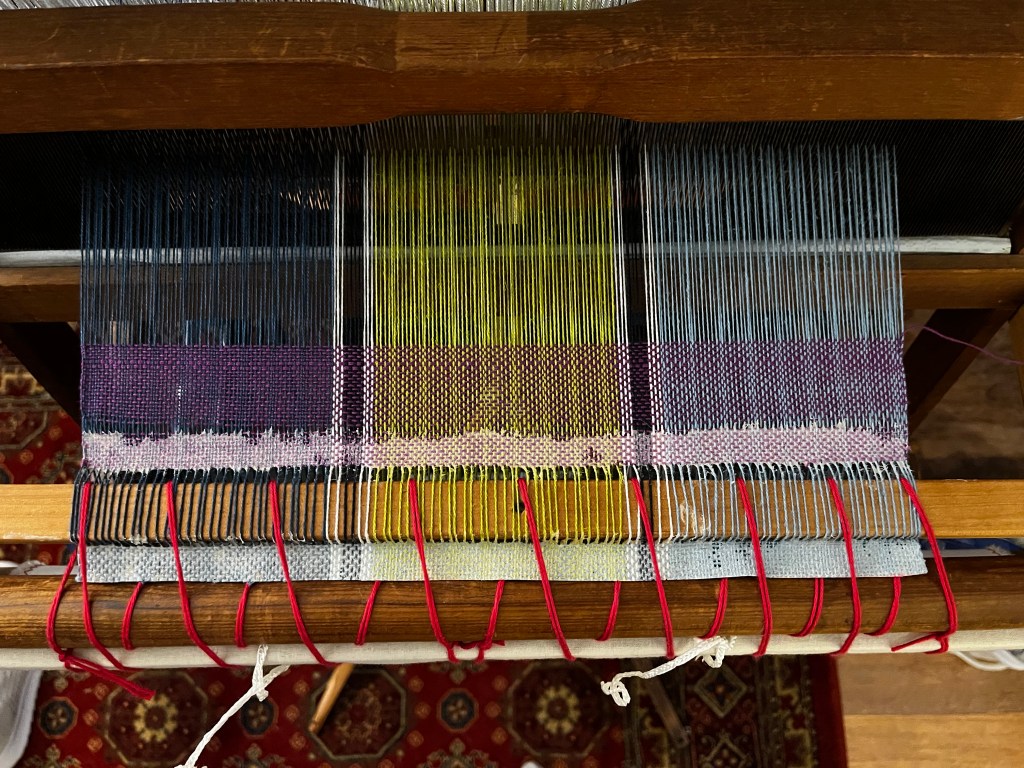
My current spinning project is to make a fractal yarn using some hand-dyed (not by me!) Merino top. This will be a 2-ply yarn, so I’ll be forced to spin the whole lot before I weave it.
The original dyed topSeparated into four thin rovings, and one thickSpinning the thin rovings sequentially onto the first bobbin
I acknowledge the Gundungurra people as First Peoples and Traditional Custodians of the land on which I currently live. I pay respect to Aboriginal Elders and recognise their connection to country.
I also pay my respect to the land itself, because of its astonishing natural beauty (can you believe this view is just ten minutes drive from my house? Jaw-droppingly vertigo-inducingly lovely).
This is a place where you can take a deep breath.
Here I am no bigger or more important than the birds and creatures around me. I am an observer. A caretaker.
I respect the land also because of what it gives us, in return for hard work, and our careful attention.
Nurturing the land: cell grazing
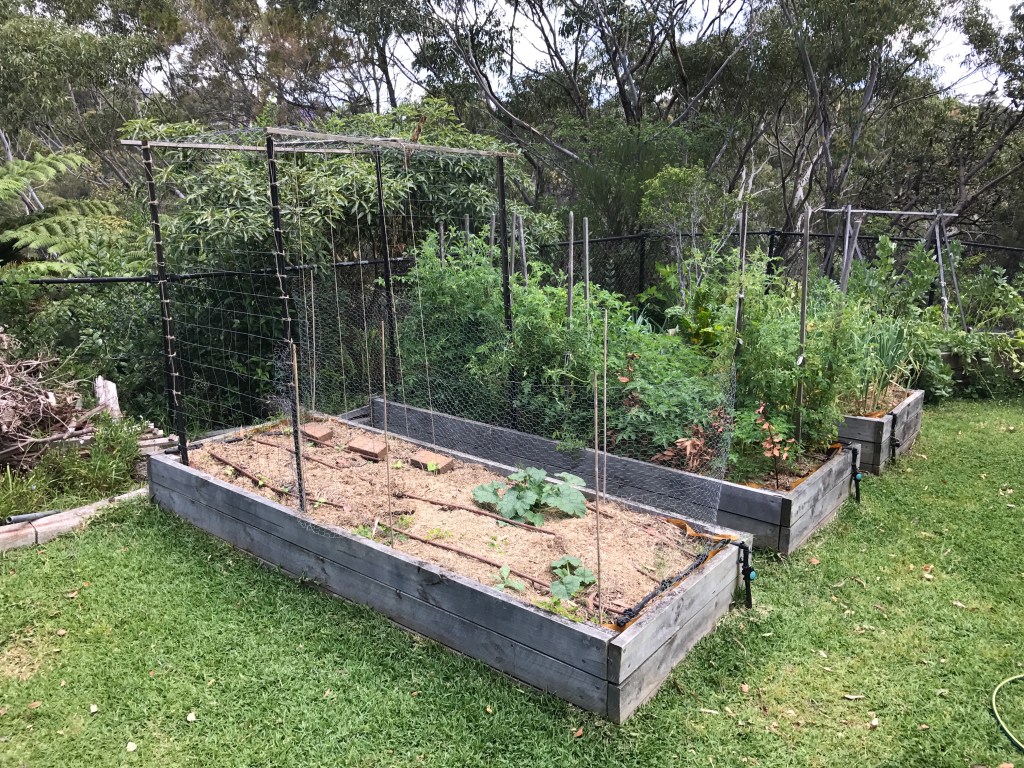
I am lucky: I live on just under two hectares of land, which includes a dam, a large number of trees (both native and introduced) as well as grassy fields and vegetable gardens.
Our goats are lucky, too! In spring and summer time they visit different pastures on our grassy areas, each patch enclosed by a portable electric fence. Every four days we move the fence, and they don’t return again to the same ground for a few months. This is cell grazing in action!
Pumpkin up to her neck in seeding grassesDay One in a new pasture: late summer grass
We have a couple of great reasons for doing this: the biggest is controlling parasitic worm loads. Worms are very dangerous for goats (and sheep and alpaca) and failing to control worms can kill a goat.
By moving the goats frequently to fresh pasture, they are always eating grass that is uncontaminated by worms.
Worms get onto pasture when infected animals (sheep or goats) leave their droppings on the ground. In ideal conditions (wet, hot weather) worms will hatch and begin to climb onto blades of grass, ready to infect new hosts. But this takes more than four days, even in perfect conditions. Thanks to cell grazing our goats have already moved on by the time worms become active!
Parasitic worms that are dangerous for goats (and sheep) are not dangerous for other creatures. In fact, if these worms are ingested by our chickens, wild ducks or other birds, or by kangaroos and wombats instead of our goats: they die. If they hatch and fail to find a host (only a sheep or goat), they die. It’s not much fun to be a parasitic worm!
All this bad luck (for worms) means that after three months without seeing one of our goats, most of them are dead. This is why we wait before allowing the goats to graze the same patch. Again: cell grazing!
Normal worm management in our area is drenching (chemical worming) once a month during ideal worm conditions in order to keep the worm count low. (Worm count is the number of eggs counted in a sample of some droppings).
With cell grazing, we have needed to drench our goats only twice in two and a half years.
It makes a massive difference.
The second good reason for moving our goats around like this is to rejuvenate the grassland. Our goats are good eaters, and the natural consequence is we get lots of goat droppings wherever they go. Goat owners lovingly call these “goat berries” because they are basically just little cocoa-bean-sized bundles of goodness.
Unlike cow or horse poo, goat poo is dry, grassy, and totally inoffensive. If you squish a goat berry, it’s largely fibrous and will crumble (unless it’s super fresh). Within about a week it starts to disintegrate into the grass, and you can hardly tell it’s there. This stuff is gentle fertiliser applied directly to the grass: no spreader required!
We haven’t added commercial fertiliser (like Dynamic Lifter or liquid seaweed fertiliser) to our grass since we got our goats, which is awesome (we have a lot of grass!). After the 2019 drought we needed to replenish the grass quite a bit, using our ride-on mower and a spreader. Since our goats arrived, they are fertilising all our patches of grass the most natural way they know, and it’s evenly applied. Perfect!
Garden bounty
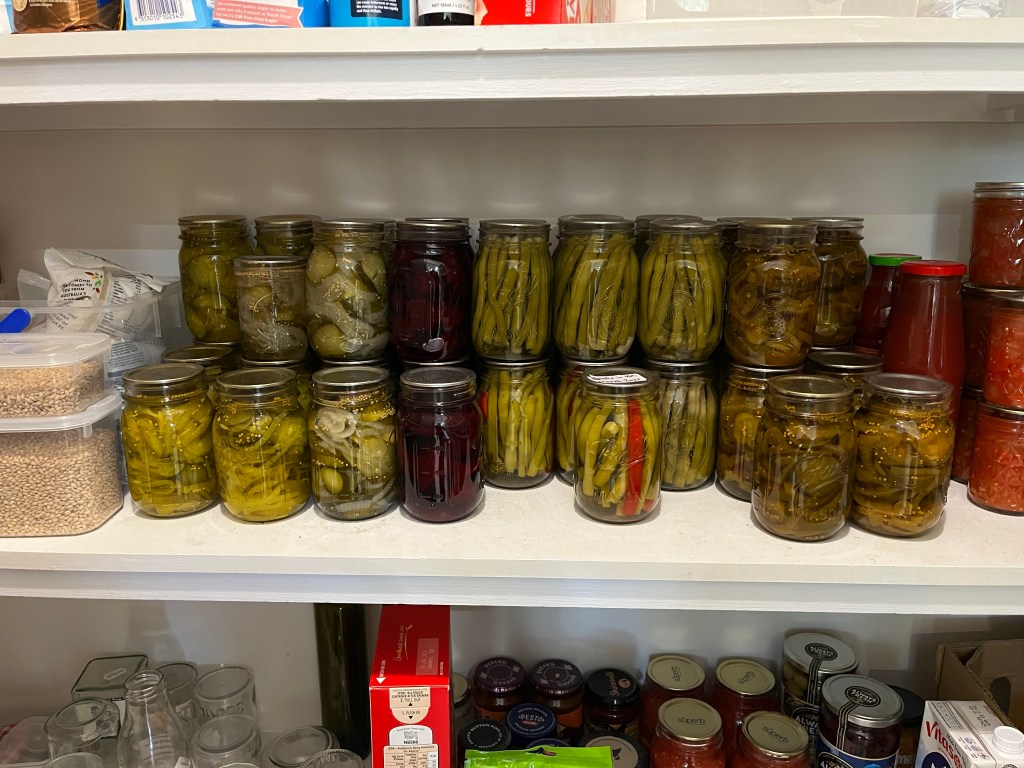
Okay, so people obviously don’t eat grass! But we are eating the vast majority of our fruit and vegetables having grown them on our land.
We’ve always had a knack for growing garlic (I’ve written about our harvests here and here and here in past seasons, for example). Now Stephen is really ramping up the volume with other crops as well.
We seem to grow enough of the following to have year-round availability (in other words, we don’t buy any of these foods or vegetables any more):
Green beans (what we don’t eat we pickle as dilli beans or freeze)
Garlic (we chop finely and freeze flat in bags to always have garlic at hand)
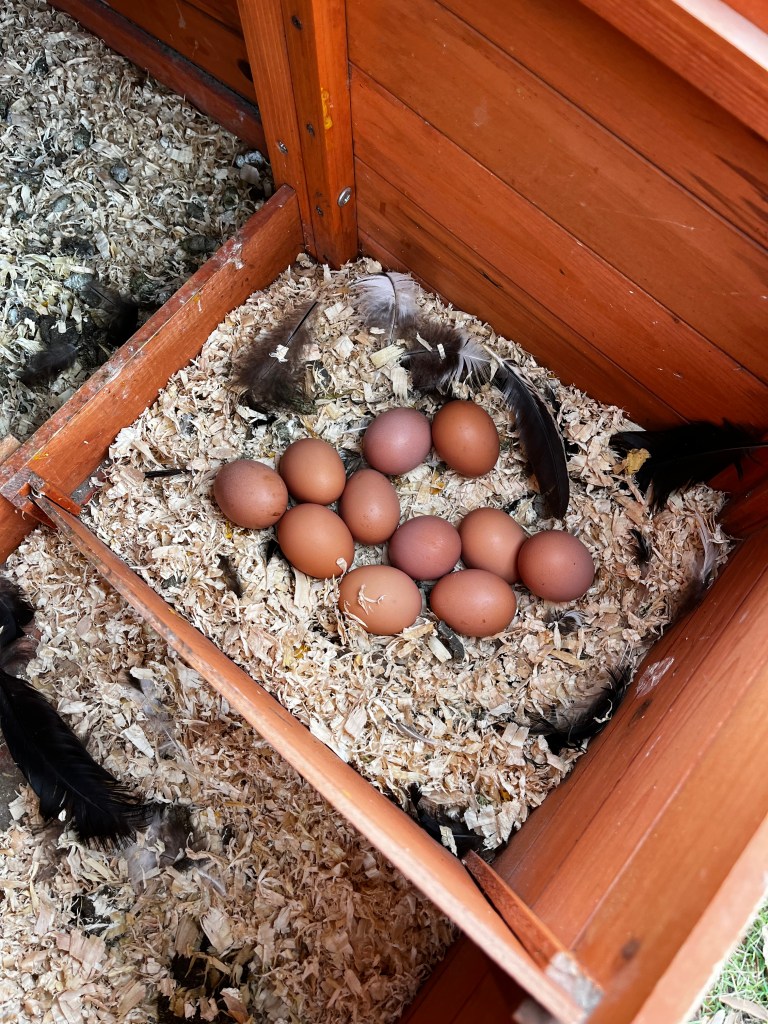
Eggs, now that we have four young hens laying every day
Broad beans (mostly stored frozen after shelling, for convenience)
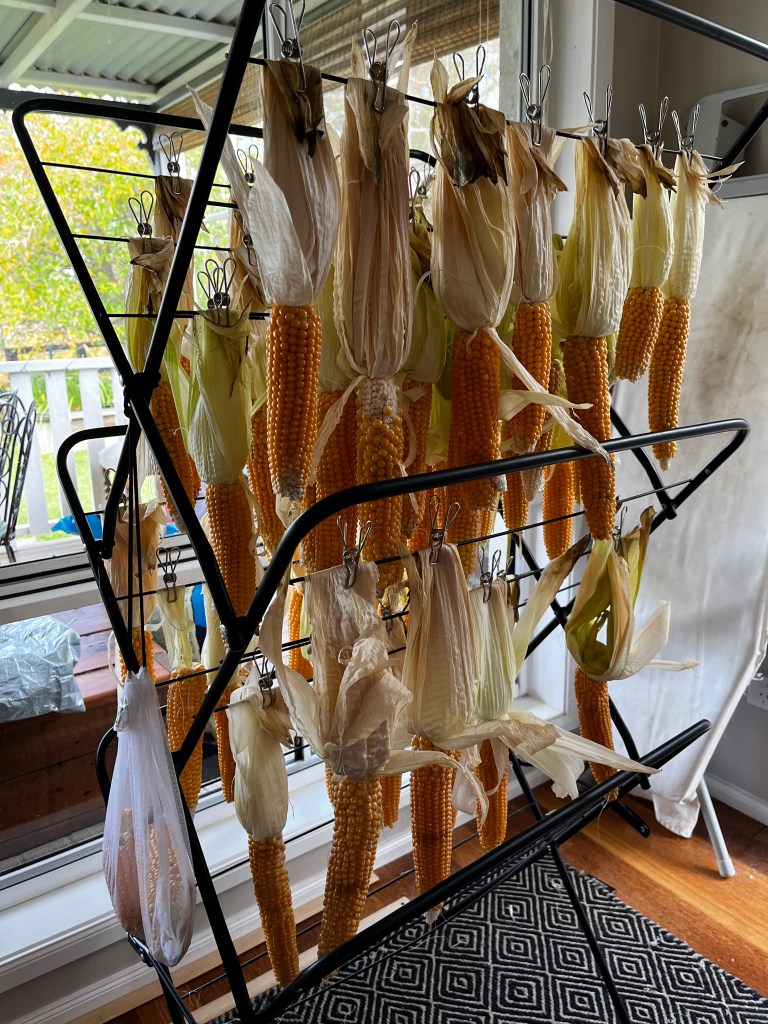
Popcorn (yes, really!)
Zucchinis (very close to all year thanks to the greenhouse)
Silverbeet, lettuce, spring onions (a.k.a. shallots in Sydney) and salad greens
Figs (we didn’t previous buy figs before but we certainly have all we can eat, now!)
Beetroot (eaten roasted and pickled)
Raspberries and Youngberries (we store excess frozen or as jam)
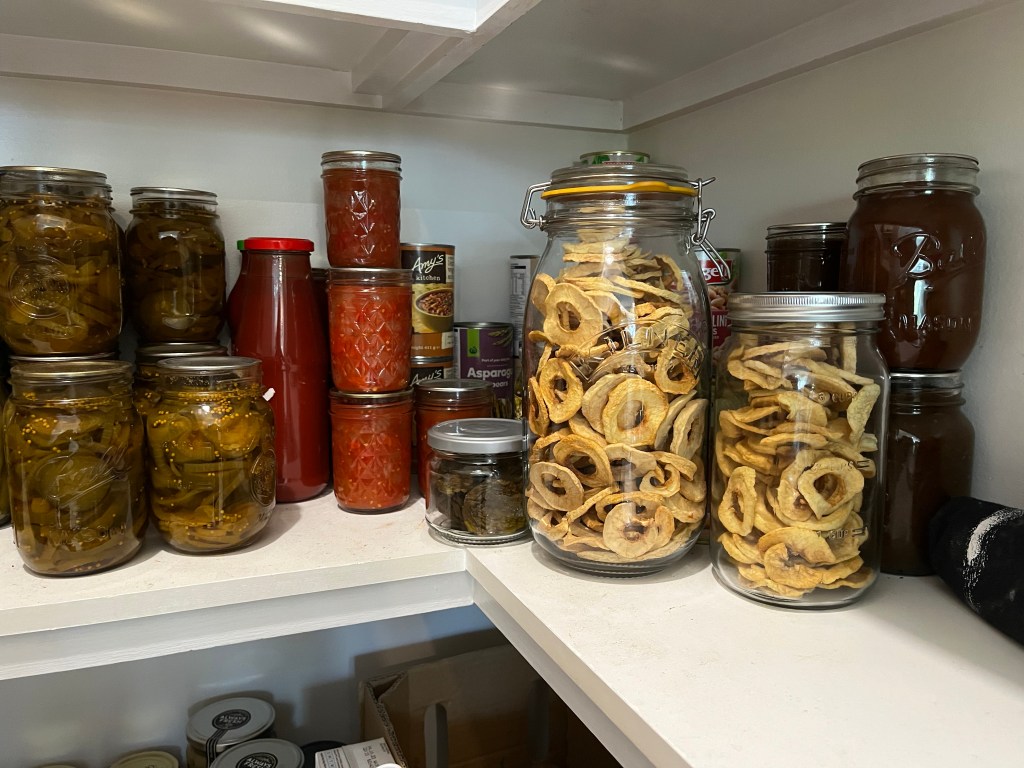
We are getting close with tomatoes, but we do still buy tinned tomatoes and tomato passata, just in much smaller volumes. Stephen is over-wintering tomatoes in the greenhouse so that we get fresh snacking tomatoes most of the year!
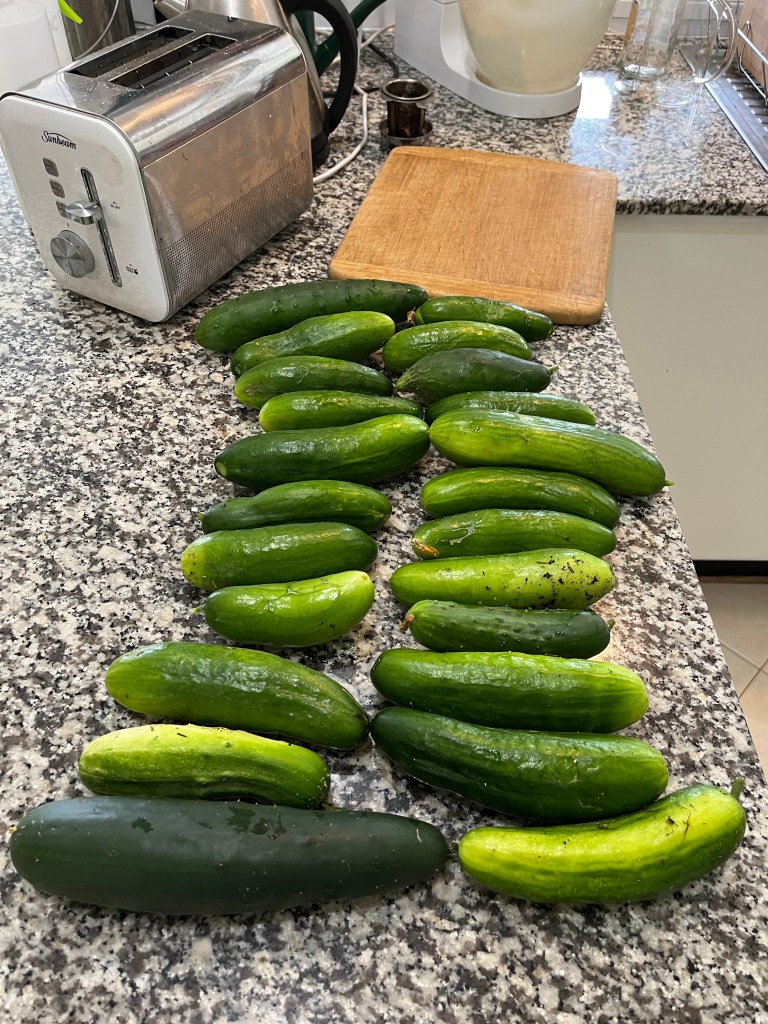
We also have plenty of sweet corn (enough to freeze but not to last all year), cucumbers (getting close to growing these in the greenhouse), carrots, potatoes (we store enough for all but a few months of the year), green peas (not enough to supply our frozen pea needs due to voracious household consumption) and celery.
We still buy the following in normal quantities as we work towards growing more: onions, broccoli, capsicums (in the greenhouse), mushrooms, and avocados. Really, this list is getting rather small, and thank goodness as the cost of buying fresh food has been dramatically increasing!
All in all, Stephen’s hard work results in an enormous bounty from our land.
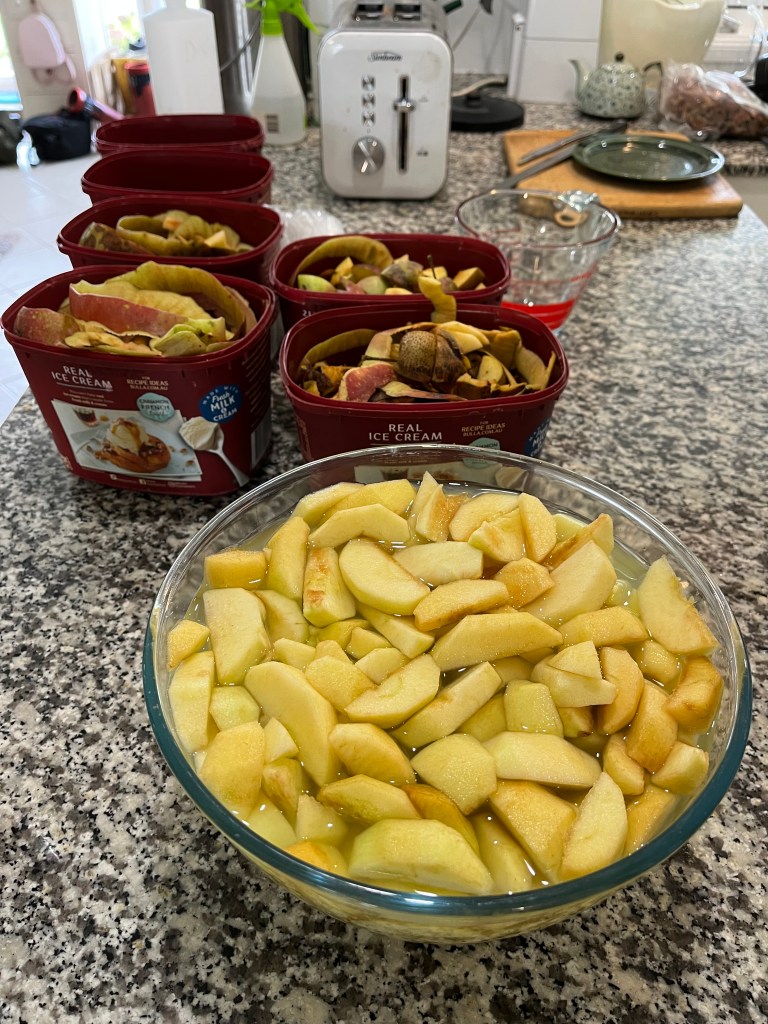
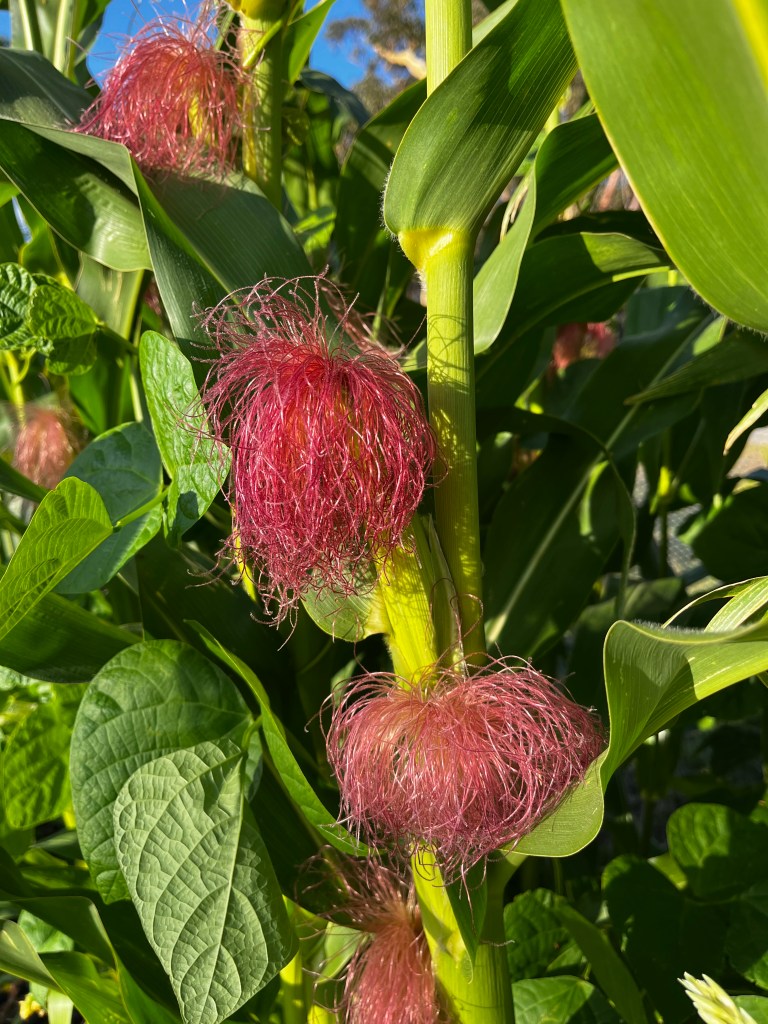
Cucumbers: this volume every few daysPumpkin, growing onApples being prepped for bottlingColourful corn silksPopcorn! Seriously. Enough for a couple of years, we think.About two days’ worth of eggsBottled cucumbers, beetroot, dilli beans, more cucumbersBottled passata, dried figs, dried apple and syrup apples (I think)
Fruit is a little harder to do, but we’re working on it. There are some times in the year where we buy little to no fruit. During berry season, we mostly just eat berries! During apple season, we just eat apples. Sometimes we have fresh figs, but mostly these get dried or turned into jam.
At other times of the year we eat dried fruit (often purchased, like apricots and sultanas) and we purchase some bananas, commercial apples, oranges, mandarins or grapes for our “daily fresh” (bananas and citrus are harder to grow here).
In years to come we hope to have more fruit from our orchard, which currently contains very young tress. Pears, plums, apples, apricots and peaches are all still a few years off yet.
You might wonder, “how on earth can I do this, this is just so big”?
Well, this didn’t just happen for us overnight. We’re not trained horticulturalists. We started in a typical suburban Sydney block that had a lawn, just like a lot of people.
Our very first step: we bought a chicken coop with three hens: bam! Self-sufficient for eggs.
Then we added some vegetable garden beds on top of the lawn to start growing some vegetables.
Yes, we absolutely failed to grow many things (we still suck at broccoli!) and we totally let things go wild when we got busy and it didn’t always work as intended. But those failures didn’t cost us a whole lot; some seeds and some time.
Nobody came along and mocked us.
But we learned a whole lot. And we got our hands grubby, and we exercised our bodies, and honestly, even if you fail to grow a thing, you have still won when you spend time in your garden, attempting to nurture something that grows.
When you succeed, it’s amazing.
Here are a couple of things we found easy to start with. You don’t need a whole hectare for this, just a square metre or two in a sunny spot. You can do it!
Leafy greens and herbs (biggest bang for buck). Herbs are expensive! Easy ones include oregano, rosemary, basil, parsley. Leafy greens are sometimes hard to get and wilt in ten seconds, so growing your own means you ensure your supply. Plus it tastes so much better if you grow it!
Zucchini (massively productive). One plant is all you need. Two is more than you need. Give zucchini to all your neighbours and also feed your chooks.
Spring onions (cut and come again). No need to buy a whole bunch, just cut a few blades for your salad or dinner, as you need them. We have these growing in our footpaths, from seed that blew out of the garden bed. They practically grow themselves!
I have made an astonishing amount of fabric since I started learning to weave in earnest. Since my first warp in August last year I think I’ve woven at least 80 metres of handwoven fabric!
Quite of lot of this fabric was destined for Christmas presents, so I couldn’t really show it off until the gifts were distributed. Now I can finally reveal some of the best bits!
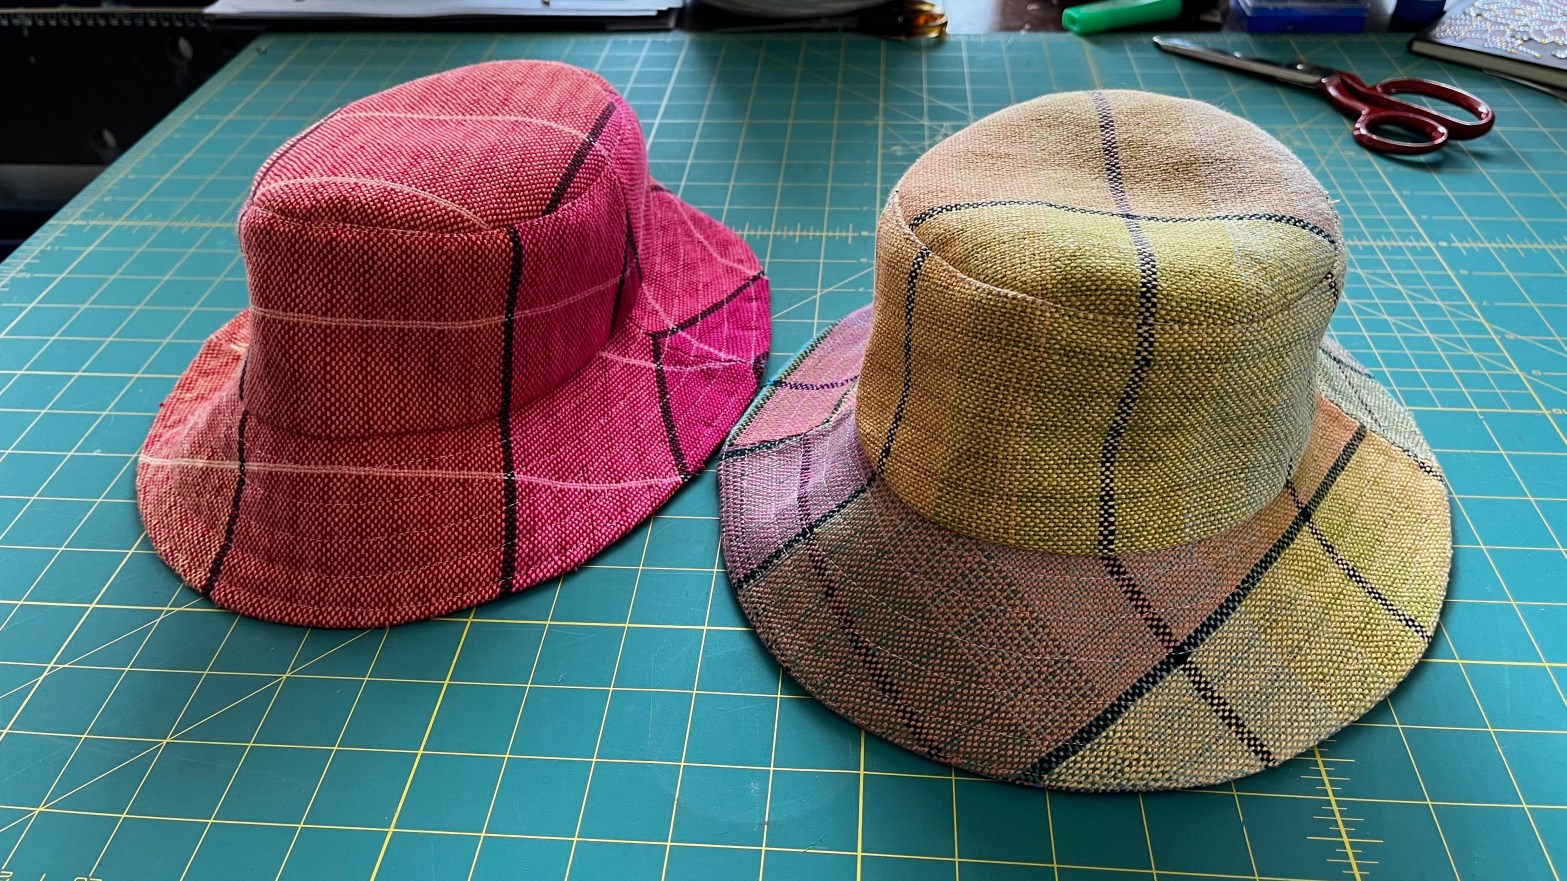
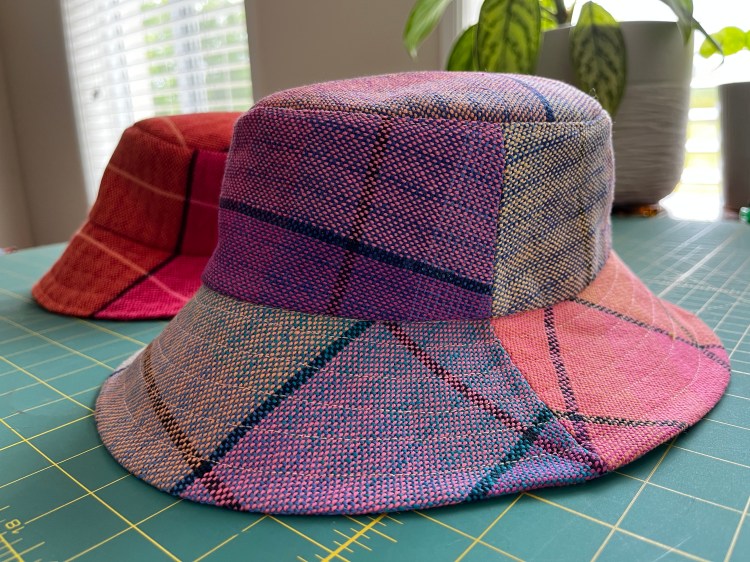
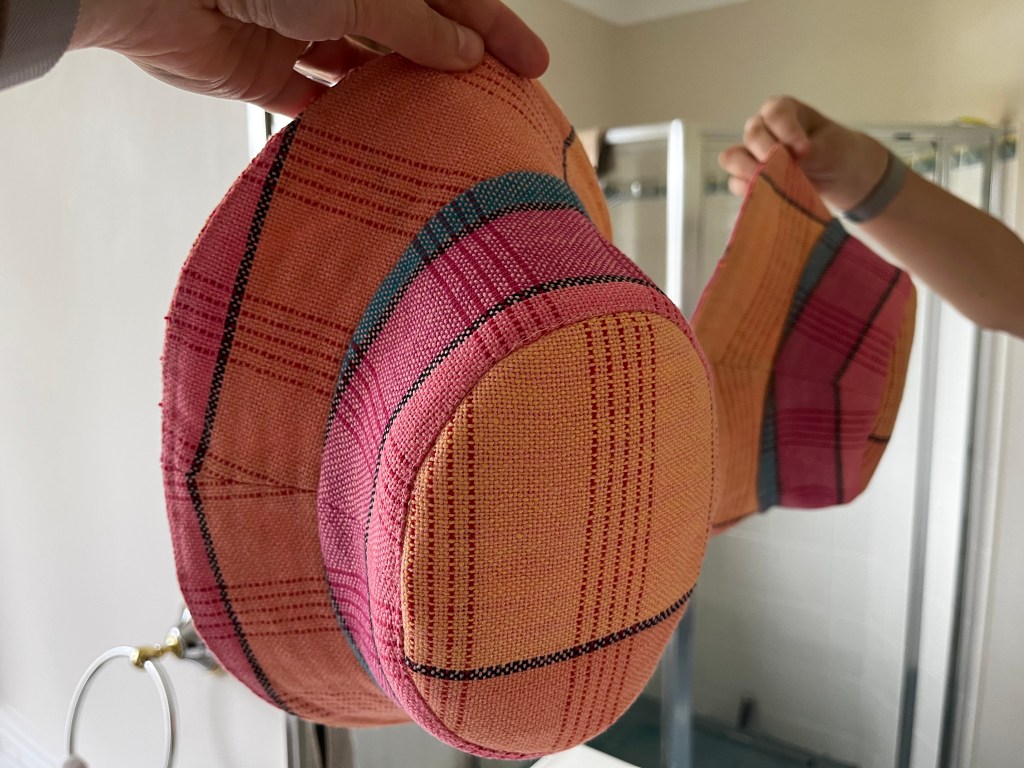
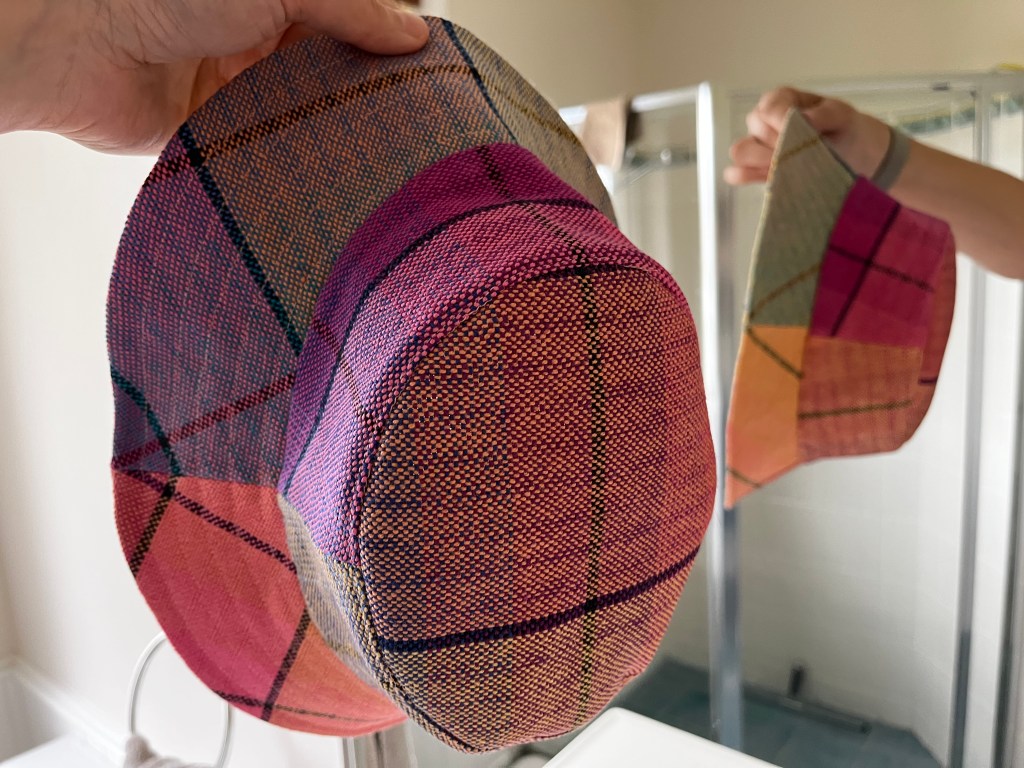
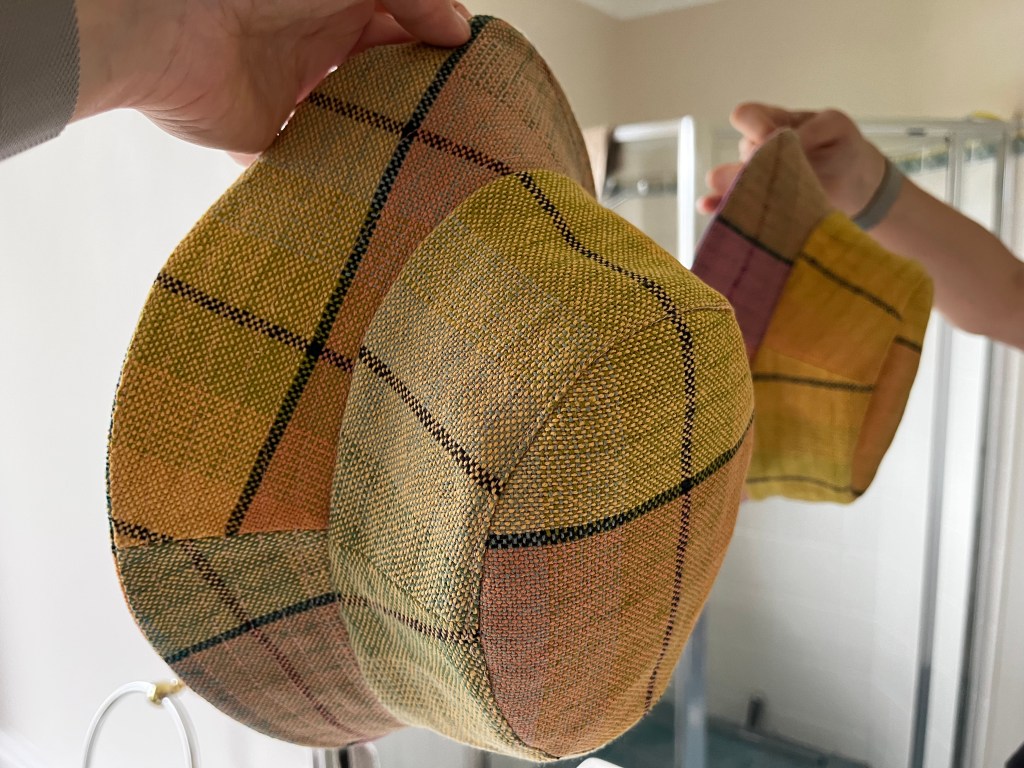
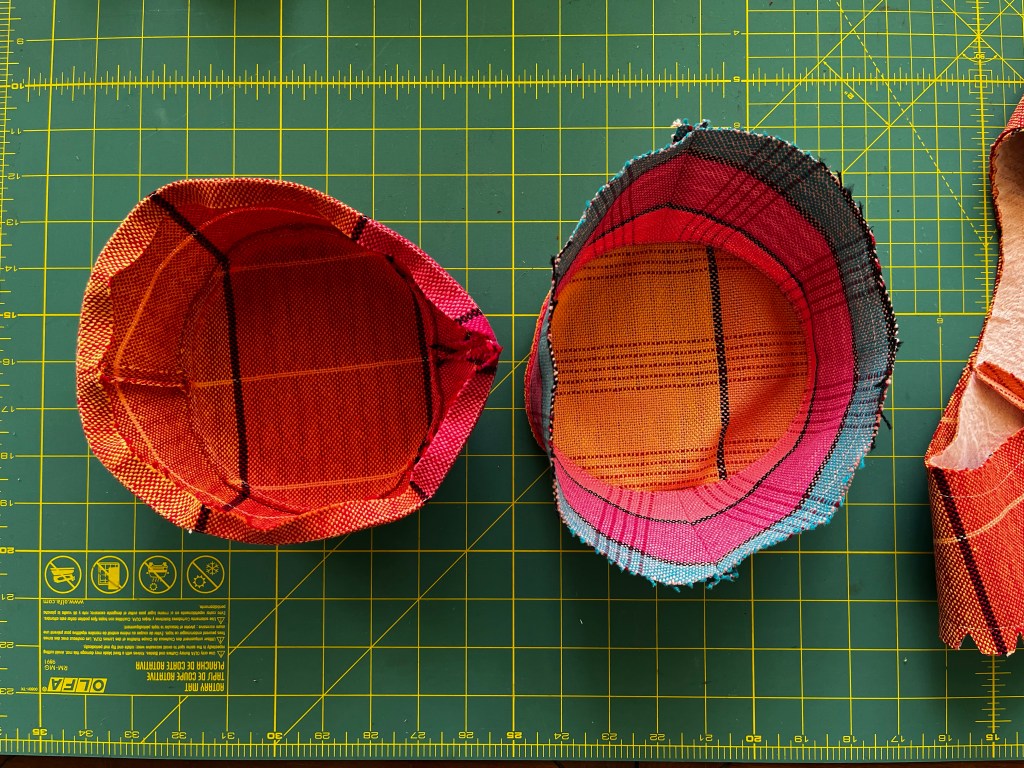
In particular, these two adorable reversible bucket hats that my nieces scored. Aren’t they just amazing??
Planning the project
I’ve had this Oliver + S bucket hat pattern in my stash for years and years, and I’ve never made it up. I figured with hand woven fabric it would make a great Christmas present!
Could I do it? Turns out, yes. With knobs on.
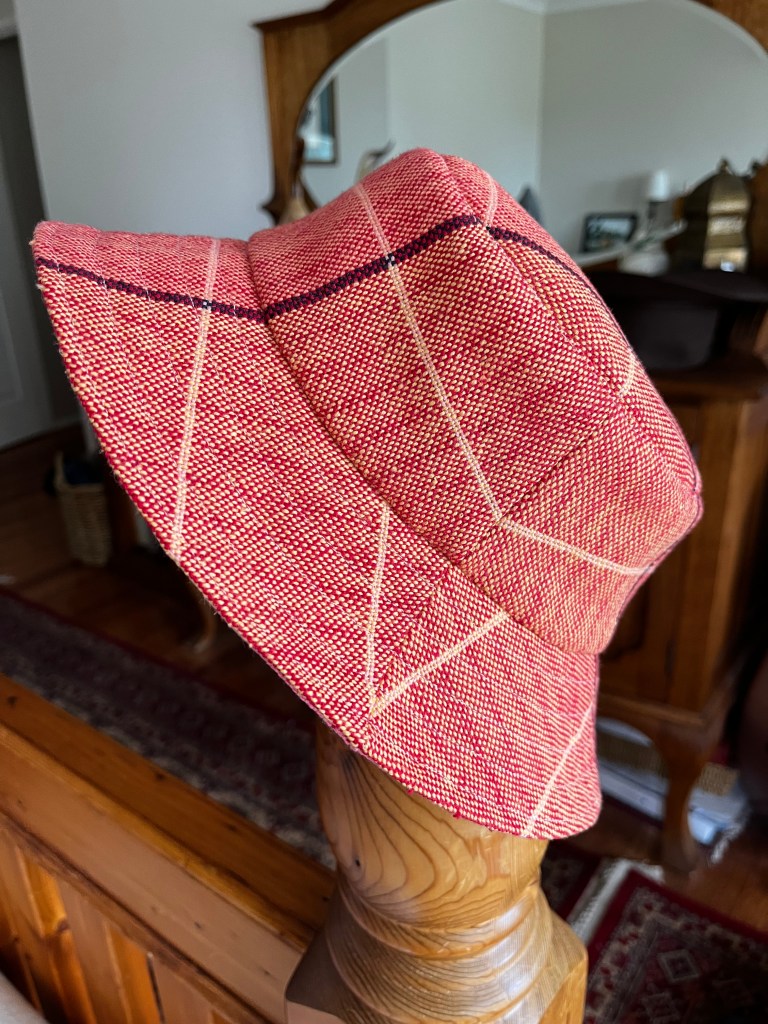
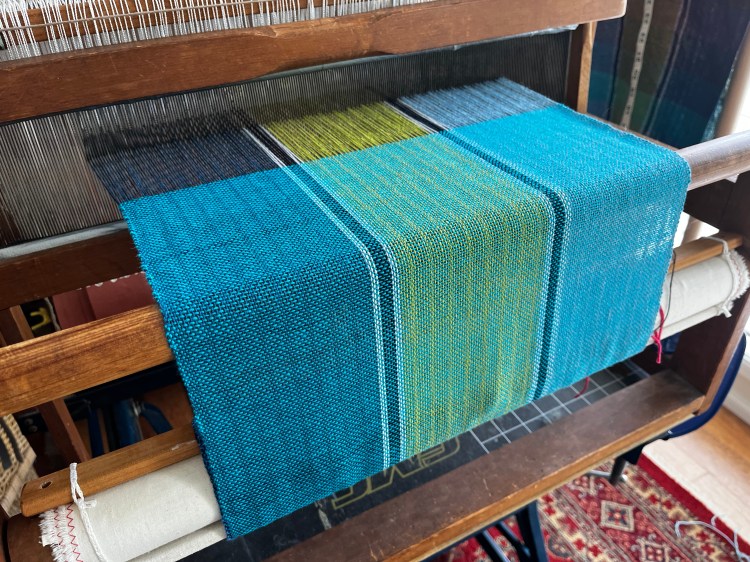
One of my online classes at the Jane Stafford School of Weaving is a colour study called “Parrot” (based on the colours of a bird). It’s woven in 2/8 cotton, sett at 18 ends per inch (epi) and is an asymmetrical colour gradient across the warp.
It’s a little bit rainbow! 🌈
And at around 17 inches finished width, it would be perfect for making a large child’s bucket hat.
I printed out my pattern pieces, cut them in the largest size, and laid them out so I could judge how much length of weaving to do for the inner and outer parts of each hat. Since none of the pieces was very wide, I could see that they would all fit inside the finished width of the cloth.
I was generous with the spacing between each pattern piece because I knew the fabric would shrink in both directions and I wanted to definitely have enough to work with.
Unfortunately I didn’t record how much cloth I actually wove, but it was similar to a large tea towel per inner / outer hat. Maybe 40 inches?
The weaving
I needed to wait until my new Louët Spring II loom arrived so that I could weave the warp I’d pre-wound, because 18.5 inches in the reed was too wide for my little retro-fitted table loom. As Christmas hove into view it was looking grim for me being able to get this woven and sewn up in time!
On the 24th of November I was giddy as a school-girl as the delivery truck finally arrived. I wasted no time putting the loom together and beaming the Parrot warp onto the loom.
Weaving on the new loom is a dream.
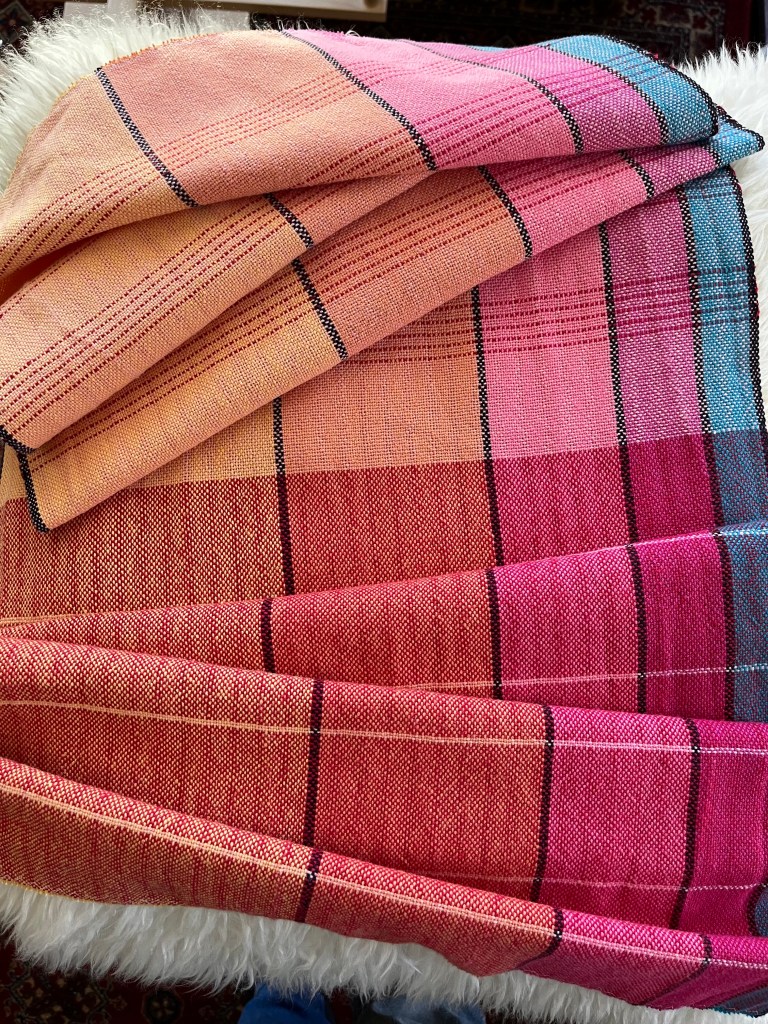
I wove yardage for the first hat as follows:
Inner: background of Salmon, with five single pick stripes of Cerise every few inches.
Outer (almost the opposite): background of Cerise with a two pick stripe of Salmon every few inches.
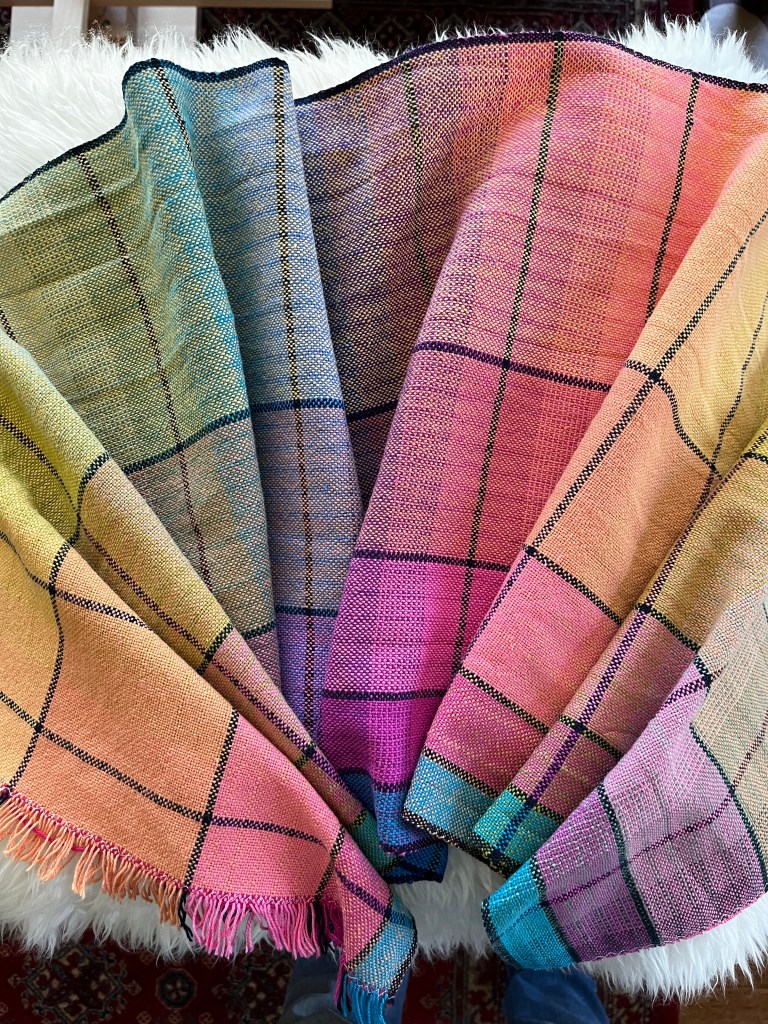
The yardage for the second hat was a continuous colour gradation round the colour wheel (channeling serious rainbow vibes).
I blended from one colour to the next by alternating picks of each colour for an inch. Each colour pair was separated by a black stripe.
Soooo yummy!
Preparing to Sew
Lots of people say that preparing to cut into handwoven fabric gives them chills. I have to say with the time pressure I was under, I was just keen to go, go, go, so I just plunged straight in!
To give myself confidence cutting out curves, I decided to starch the fabric. Boy, I’m glad I did!
I’ve used starch before, for quilting projects, so I know this makes for easy cutting and sewing. This time was no exception! I had no frayed edges, and my fabric pieces were easy to manipulate, even though they were bulkier than typical store-bought cloth.
This time I used flour starch from this recipe. I diluted the thick goopy mixture so I could use a water sprayer to apply the starch, and I ironed the fabric under an old pillow case until it was flat and dry (it smelled pleasant: like toast!).
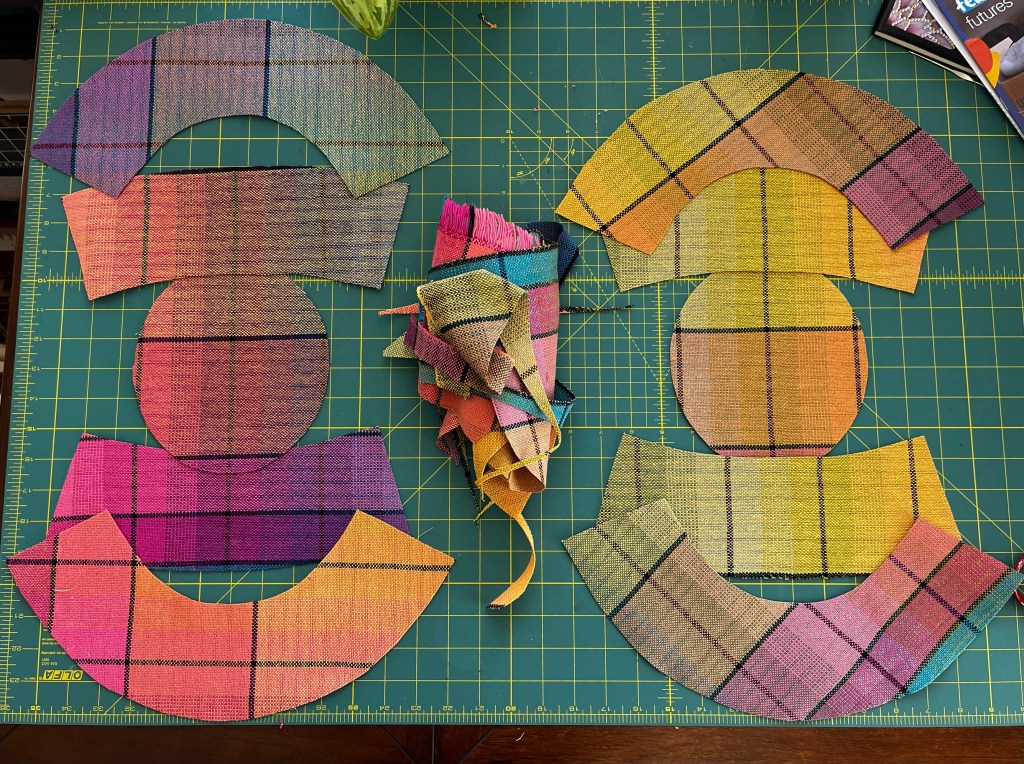
I cut the shapes using a rotary cutter (and nerves of steel).
The rainbow hat, cut and ready to sew, showing leftover scraps. No fraying!
The first hat I cut laying the pattern pieces straight up and down the warp, using the suggested grain line. This meant I could pattern match the vertical lines on the hat, and resulted in a very smart result.
Outer hat (RHS)Outer hat (LHS)Inner hat
The second hat I barely had enough yardage to do both inner and outer layers, so I got creative with the brim pieces and laid them off-grain and on the bias-grain to fit them in. This resulted in amazing colour complexity.
Sewing with a bulky handwoven fabric turned out to be not such a big deal for this project, although I did lose some of the hat dimensions to turn-of-cloth-thickness.
I made sure I stay-stitched all the curved edges (there are lots of those!) and I clipped the curves before I stitched pieces together.
The instructions that came with the pattern were easy to follow (I have lots of sewing experience so YMMV), and I believe I just followed them until I was done.
Clipping the outer edge of the brimInner and outer hats, stiff from starch
I do recall topstitching at the crown to give a crisp finish, and I trimmed the inner seam allowance there to reduce bulk when the two hats were aligned (one goes inside the other at the end of the build).
I also topstitched the edge of the brim and continued into a spiral quilting pattern to add extra strength (hoping to reduce future floppiness).
Final verdict?
Wow, just wow.
I wanted to keep both of these hats for myself! Luckily, they were both too small for my adult head. 😉
My nieces loved the hats, and I couldn’t have been more pleased with the outcome.
The project took a fair bit of time to complete. From starting weaving to the finished project I took 8 days of elapsed time, which included:
Dressing the loom (a day),
Weaving (several days because I also did tea towels and napkins from the same warp),
Washing and drying, and a first press to finish the fabric,
Starching and pressing again,
Cutting, sewing and hand stitching the final step (several more days, IIRC).
Phew!
Basically, it was enormous fun, and I’d do it again like a shot.
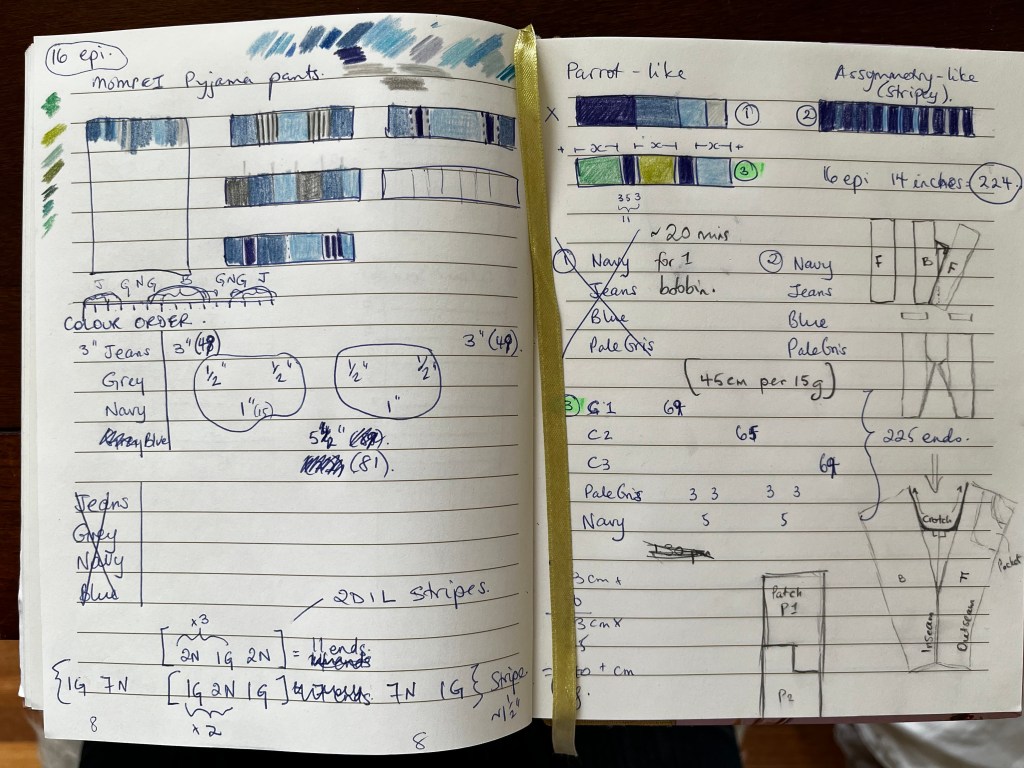
I came across a plan for Mompei pants on the curious weaver website, and figured a pair of these Japanese field pants would be achievable for me to weave, and then sew.
I would need at least 5 metres of cloth, woven at 14 inches wide. In 2/8 cotton, sett at 16 ends per inch, that means about 224 ends (individual threads in the warp).
I started learning to weave late last year with Jane Stafford’s online School of Weaving. One of her lessons involves designing a warp, so I sat down with some coloured pencils and started drawing swatches.
Each swatch represents blocks of coloured warp threads. Sketching helps visualise different arrangements of stripes (thick? thin? blocks of colour?).
I took a couple of days to fiddle, until I settled on a design I liked: three symmetrical colourful bold stripes, separated by a narrow navy stripe (number 3, highlighted).
The plan here was to create a vertically striped fabric, with nothing fancy in the weft. That way if my weaving wasn’t even from pick to pick, I wouldn’t have to match anything horizontally (like checks or plaids).
Plotting the execution
If you have ever woven anything, you know it (a) takes a bunch of time, and (b) takes a bunch of space. It’s rather obvious to most people in the house.
I had to be a tiny bit clever whilst starting this project to avoid tipping off my son that I was weaving him a gift. Mostly, this involved hiding in plain sight!
I warped up my little table loom with simple stripes in colours I knew my son would love: blues and greens.
This is Maurice Brassard 2/8 cotton in Jeans, Pale Limette and Slate, separated by stripes of Navy and Natural.
At this point, my loom looked just like it had for my all my recent projects, which were samples from my online weaving course. There was nothing here yet that screamed “secret Christmas pyjamas project”.
Sample time
The first thing I wove off this warp was a sample to discover the best weft colour combinations for this warp:
Sample showing green and red weft choicesThe same sample showing blues and reds
I already have a startling array of colours from the School of Weaving samples (acquiring a lot of colours like this is a tad expensive, but totally thrilling). I have plenty of leftover yarn (whole cones!) to put to good use in projects like this.
I love many of these combinations, particularly the greens!
I showed this sample to my younger kids and asked each one which was their favourite.
Both children thought I was asking about colours to make more tea towels (since I’d been doing a lot of that for my online course).
Hehehe. Sneaky.
My son’s clear favourite was Peacock, a vibrant green-blue colour.
Weaving, and Sewing
Once the weft colour was chosen, I just got cracking with the weaving.
I hid the table loom in my bedroom, and wove during school hours. It was comparatively fast: plain weave is the simplest weave, and with only one colour, it’s just a matter of filling bobbins and weaving them off, until you run out of warp.
I recorded some stats as I wove, to see how quickly I was making progress.
Each bobbin weighed roughly 15 grams, covered 45 cm of cloth at the loom, and took me about 20 minutes to weave.
(This sounds rather fast, now, it’s hard to believe I was really weaving that quickly!)
Several days later I had a bolt of cloth to wash and prepare for sewing.
After washing, the cloth measured 12 inches wide, and had fantastic drape.
I was nervous of cutting into the cloth without dealing first with the edges, since I’d heard that hand woven cloth is prone to unravelling.
I used a bold thread to mark out the cutting lines, then I put zig-zag stitches on either side before I cut.
In future I would skip all this, and use starch to stabilise the fabric before cutting. Much easier!
The pants came together very quickly.
I was able to use a flat-fell seam using the selvedge to cover the diagonal cut edges. This was very flat and easier than a regular flat-fell where you have to fold the seam allowance!
Since my handwoven fabric was bulkier than typical store-bought cloth, I bound the crotch seam with cotton binding, for strength and comfort.
Determining the length of the pants was a leap of faith: I grabbed a pair of tracksuit pants from my son’s wardrobe, and added a generous amount up top for the waist band to fold over twice, plus a bit for hem.
In the end, I guessed exactly right, phew!
At this point I had the waist band elastic inserted, but loosely safety-pinned in place so I could adjust it if needed.
The final touches were to hem the pants, but I left that until after the gift was unwrapped so that I could double check the length on his body.
All in all, I think this is a pretty approachable project for a novice weaver (like me). It doesn’t really matter if you can’t get a tidy selvedge, since that gets sewn onto the inside of the garment. You just need a bit of patience, and the ability to install a longer warp (about 6 metres is a good idea).
The sewing is not too tricky, either.
Best of all, using one colour in the weft means you can develop a steady beat, and start to relax into a rhythm. I learned a lot from making this piece!
So, what do you think? The pants turned out perfectly for my son: he loves them. He spent all of January wearing them, so they must be pretty comfortable.
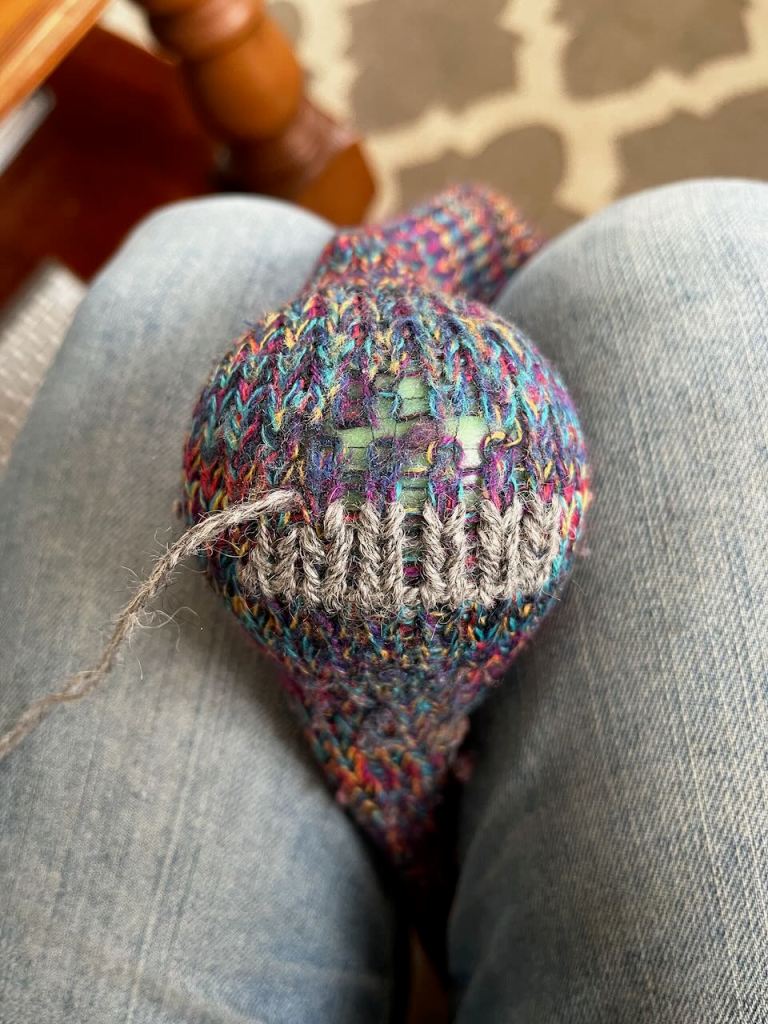
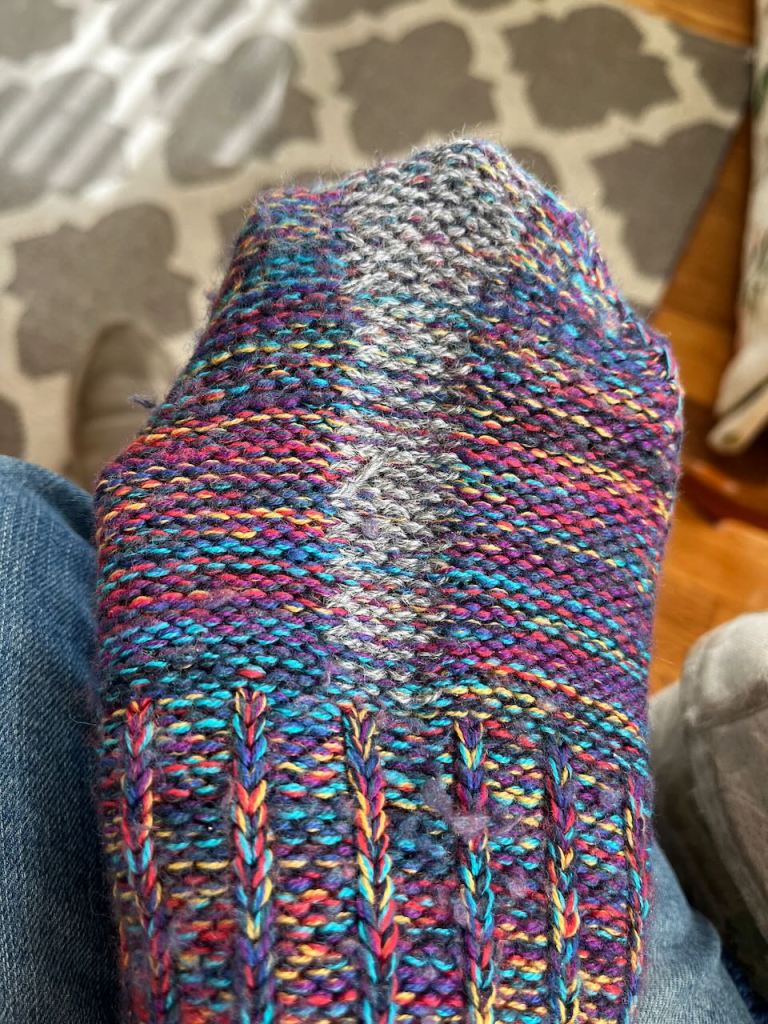
Darn it, I’ve almost put a hole in my favourite knitted socks! Luckily, I know just what to do: darn it!
I noticed this hole appearing in the heel of my sock just in time!
Can you see the filament thread tracing the shape of the knitting? That’s all that remains of the original yarn, and it’s all that’s holding the sock together right now!
My go-to technique to fix a hole that hasn’t quite exploded (like this) is to knit over the top with new yarn, using a needle.
I’m calling it needle-knitting. Or Knit-weaving.
Needle-knit-weaving?
Okay, it’s really just darning!
But I’m not making the classic cross hatch needle woven patch, instead I’m recreating the original knit stitches so the sock is still stretchy.
So much more comfortable to wear!
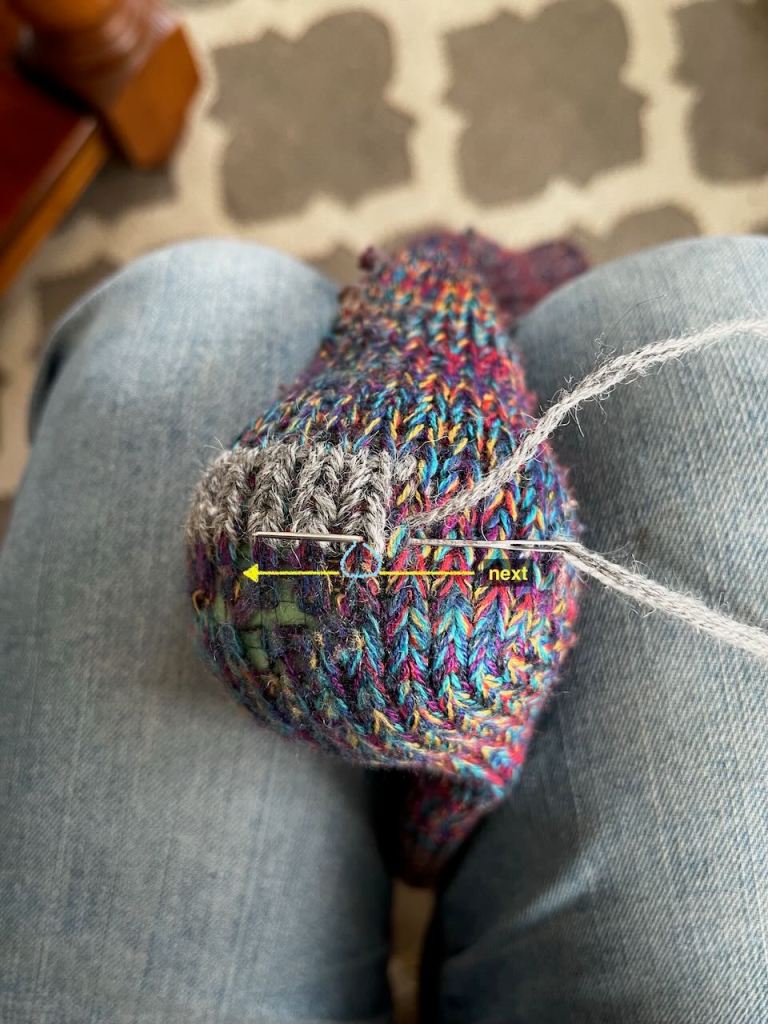
I’m using a tapestry needle to make stitches, following the path of each existing row. Here you can see me making the top of a stitch, working right-to-left (because I’m right-handed).
I always choose to start my first row a couple of stitches wider than the degraded yarn (the hole) so I cover a couple of “good” stitches on either side.
When I get to the end of the row, I flip the sock around so I can work again from right-to-left.
You start the first stitch in the row by coming out inside the stitch above. Here I’m coming sideways into that stitch.
I’ve shown the stitch I’m about to create in blue. It starts where the needle is just coming out, snakes down and around the stitch below, and comes back up to where it started.
The next needle position (shown in yellow) will form the bottom of the stitch. It goes behind the two yarn threads in the stitch below.
In this photo, I’m just completing a stitch, and I’m starting the next one. Each stitch has two sideways needle movements: at the top and the bottom.
See how I’m catching the two loops from the row above? This is what knits the fabric together!
I’m just following the original yarn around: left, down, left, up … repeat.
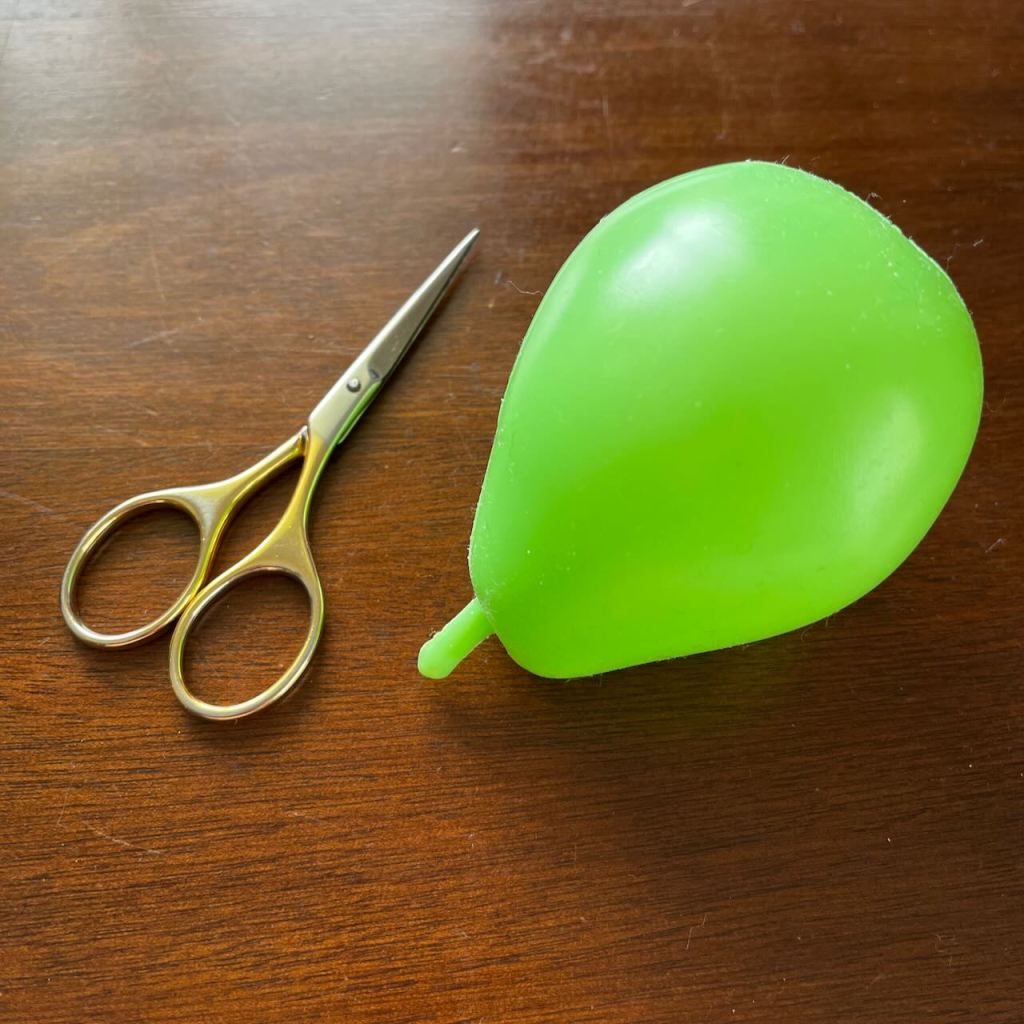
It’s easier to see the path of the original yarn if you stretch the hole over something smooth, round and hard.
Not too tight! You don’t want to snap the fragile threads.
My smooth, round, hard thing is a plastic toy pear (embroidery scissors shown for scale).
You can use anything, really! The classic option is a wooden darning mushroom, and I’m sure that works brilliantly well.
I use what I have. 🤷🏼♀️
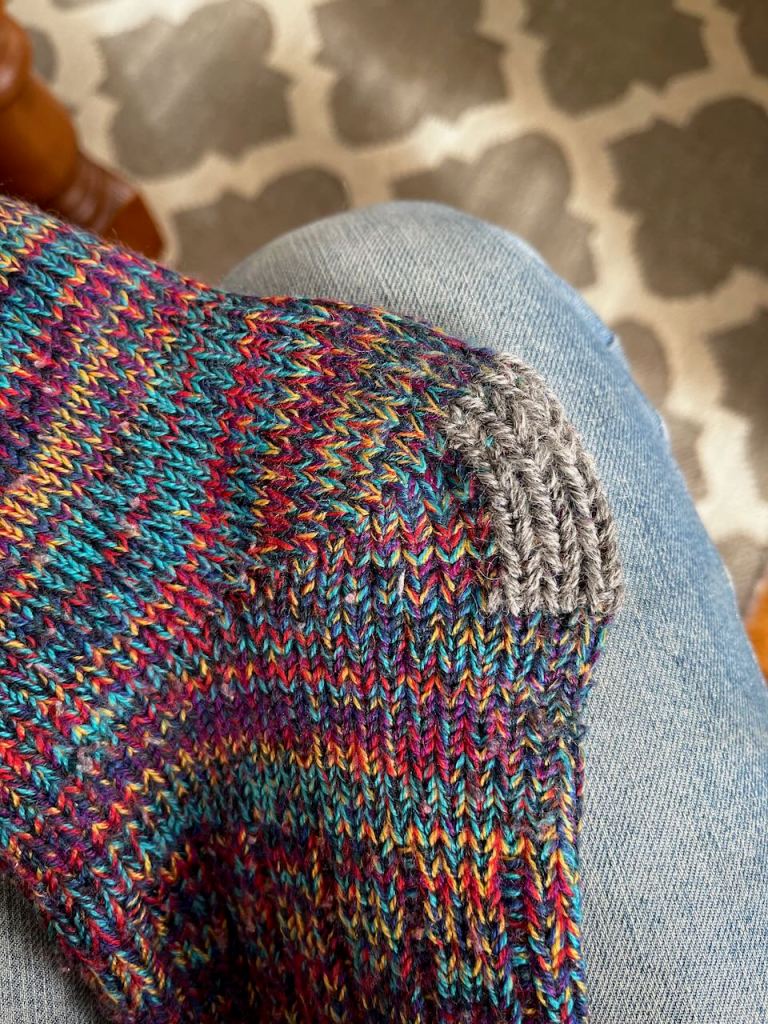
When you’re done you have a patch that is seamlessly integrated with the original sock.
It looks like knitting, and it stretches in the same way. It ends up a little chunkier, though, because it’s hard to get the same tension as the original.
I rather like the contrasting colour on my patches, and it makes it easier to work (especially on dark coloured socks).
All (patch) shapes are welcome!
Another (larger) patch
The same patch from the inside
This technique works really well if the original yarn hasn’t completely disappeared.
If not: it’s so much harder! Almost impossible, in fact.
Once the yarn breaks, the hole tends to explode: you can easily have dropped stitches (causing a ladder in the sock). The stitches around the broken threads collapse, making it hard to follow the yarn’s path. And worst of all, there’s no way to place a new stitch without a knitting needle (or something to hold a row of stitch loops).
When this happens, I revert to just closing up the hole any-old-how, resulting in an ugly pulled-in snarl. It’s rather uncomfortable to wear a sock with a repair like this, and it usually ends up in the compost!
For now, these socks live another day. Yay! They are cheerful, comfortable socks, and I’m really glad I don’t have to pay to replace them just yet!
I’ll probably get another season out of these patches, and then I might have to darn them again.