
I’m no stranger to viking reenactment, having made several apron dresses way back in 2017. These were made of linen, and have been excellent for camping in garb, or just for everyday wear at home (minus the giant brooches).
I’ve wanted to weave my own apron dress fabric for some time, especially since it’s very difficult to get wool fabric in Australia that is suitable for reproductions. Now I’ve finally done it!
Background / about the apron dress
There are a large number of archaeological finds that include textile remains associated with the viking age, and women’s clothing in particular. Most of these remains are tiny fragments, often preserved against metal objects, such as oval brooches. There have been some larger fragments of cloth found, notably at Haithabu harbour (Hägg 1984, p. 38 via Thunem), and there has been plenty of debate about how these fragments formed part of the original clothing.
Since we don’t have any large pieces of garments, or much in the way of seams, we have to speculate about what a Viking apron dress was really constructed.
If you want to read a wonderfully detailed article about the apron dress that analyses the physical evidence as well as art sources, I highly recommend Hilde Thunem’s “Viking Women: Aprondress“. Thor Ewing’s book, “Viking Clothing” is also an excellent resource.
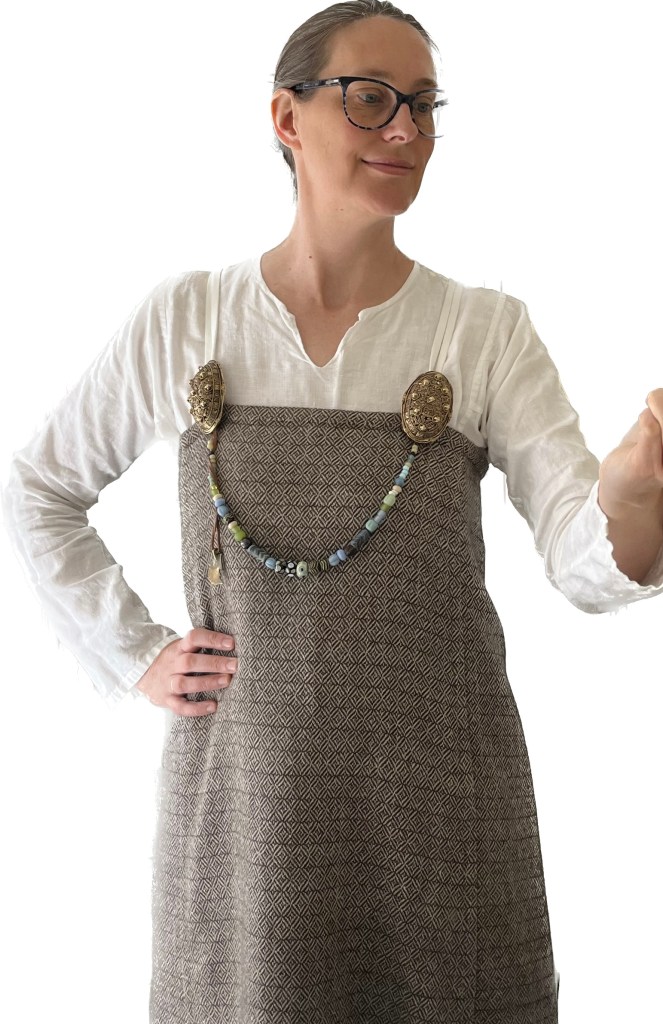
I’ve chosen to create an apron dress that is closed around the body, fitted at the very top, and sweeping gently to a wider hem at the bottom. The dress is suspended above the bust by linen straps that are fastened in the front with oval brooches.
Yarn possibilities
Both linen and wool are possible yarn candidates for apron dresses. Hägg used the layers of cloth inside the oval brooches and the location above or below the body to identify both linen and wool fragments as being likely to form the apron dress (Ewing, p. 29).
The loops of the dress were most often made of linen, but could also be wool. The majority of the finds have brooches with multiple loops either at the top or bottom of the pin (Hägg 1974, p. 103-105). It’s quite feasible that more than one apron dress could be worn stacked on top of each other.
Since I wanted a warmer dress for winter wear (and windy night time camping), I chose to use wool for my dress. But what kind of wool, and where to source it?
Types of weave
I wanted to reproduce cloth that could reasonably have been woven in the Viking era: this means choosing a suitable weave structure as well as finding wool that resemblers the fibre from the extant fragments as closely as possible.
The first task—choosing the weave structure—is relatively easy compared to the second. Thor Ewing shows a breakdown of all the fragments found (at the time of writing) according to their weave structure: plain weave (a.k.a. “tabby”), plain twills, and reversing twills (Ewing, p. 141).
He also states that typical woollen textiles are either “fine wool twills with Z-spun yarn” or “heavy woollens with a woven pile”. The latter is likely used for cloaks, rugs or coverlets, rather than the apron dress (Ewing, p. 145).
Of the twills, the most common structure is 2/2 twill, but 2/1 twill is also found (later period textiles only) (Ewing, p.143).
I elected to weave 2/2 twill.
Finding a suitable woollen yarn
The woollen twill fragments found at Birka were the finest of their type from the Viking age. They commonly have thread counts between 20 and 46 threads per cm (50 to 115 epi) in the warp, and from 9-16 per cm (22 to 40 ppi) (Ewing, p.144).
They were also exclusively singles yarn (meaning they were either Z- or S-spun and not plied together). How on earth could I source yarn like this?
I believe the only way to get tightly spun fine singles yarn is to spin it myself. Realistically, I don’t yet have the skill to attempt this, and even if I did, it would take a lot of yarn (and therefore time) to make enough for a complete apron dress.
So I needed to fall back on a 2-ply yarn. I am able to source a high quality 28/2 Merino yarn from Venne that could give me an approximate sett of 28-32 epi, but it costs $382 (AUD) per 1kg cone, and this is just a bit steep for me to use for my first woven woollen project!
The more affordable option available to me comes from Bendigo Woollen Mills: Classic 2 ply, $40.50 (AUD) per 500g cone. Their website doesn’t list the Nm value, but it samples at about 18-24 epi, making it similar to 8/2 cotton.
I figured that if I wove at 20 epi (which gave me a lovely drape in balanced 2/2 twill) I would be getting close enough to the fineness achieved at Birka, and is suitable for cloth woven at other locations throughout the Viking world.
Sampling for colour and pattern
Having chosen my source for wool, I wanted to sample a variety of colours that would have been possible to achieve from dyes available to the Vikings. Penelope Walton Rogers has analysed Viking period textiles (Ewing, p.154) and discovered that they were dyed with:
- Blue (woad) which forms a large proportion of dyed textiles
- Purple (lichen)
- Red (madder and bedstraw)
- Yellow (mystery compound “yellow-X”)
Walnut shells used for dyeing were also found at Hereby and the Oseburg burial, making it possible to dye shades of Brown (Ewing, p.155).
Wool from coloured sheep was also used, undyed. Shades of brown and grey would be possibilities here.
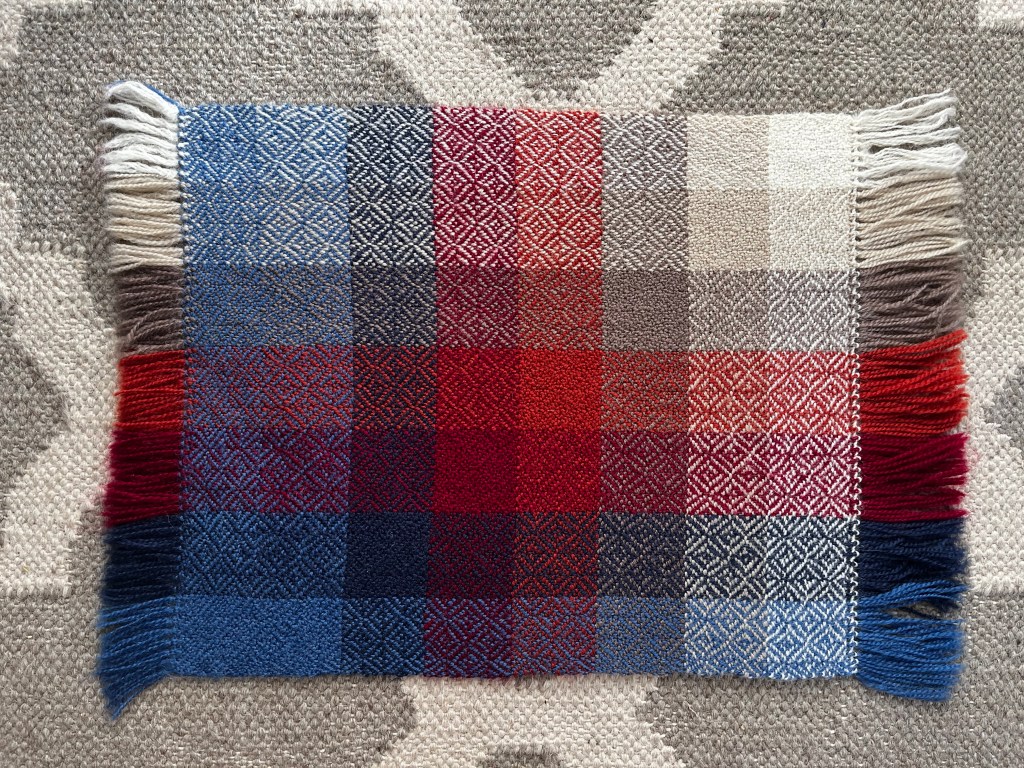
I chose to sample yarns in Almond (simulating undyed sheep wool), Raffia and Java (shades of brown), Chilli (an orange-red), Cranberry (a blue-toned red) and two shades of blue: Aztec and Midnight Blue.
This colour gamp is woven in balanced broken diamond twill.
I also tried a Chocolate coloured weft (a blend of Possum and Merino) that I acquired from my local craft gallery. This was not suitable for warp, but I was able to use it as weft.
Vikings were not particularly matchy-matchy when it comes to colour, but I am! I auditioned my samples against the linen apron dress and jewellery to see how I liked the various colours. The blues and browns were clear winners in my eyes!


Finally, a note on the pattern itself. I chose a broken diamond twill, as it appears to be the most common twill found on woollen fragments that might relate to the apron dress (Thunem). Herringbone twill (broken twill that doesn’t reverse to make a diamond) was typical for Viking leg wraps (Ewing p. 95).
Designing the apron dress
With suitable cloth samples in hand, I then set to designing the apron dress.
I sat down with a pen and paper and drew several cutting layouts based on different fabric widths (after shrinking and fulling). I wanted to create a garment that included a panel shaped like the one recovered from Haithabu harbour, if possible.
I also wanted pattern pieces that wouldn’t need to be flipped (leaving the wrong side of the fabric facing out). I knew that the patterned fabric would not have a “right side up” to deal with so I could rotate 180° without problems.

Version #1
Width: 13 inches
Length: 180 inches (4 panels).
✅ Includes Haithabu piece (*)
🤔 Lower hem ~76″ (just okay)
❌ Nine seams
Version #2
Width: 14 inches
Length: ~200 inches (3 regular panels and 2 shorter panels).
❌ No Haithabu piece
❌ Lower hem ~72″ (too narrow)
❌ Eight seams
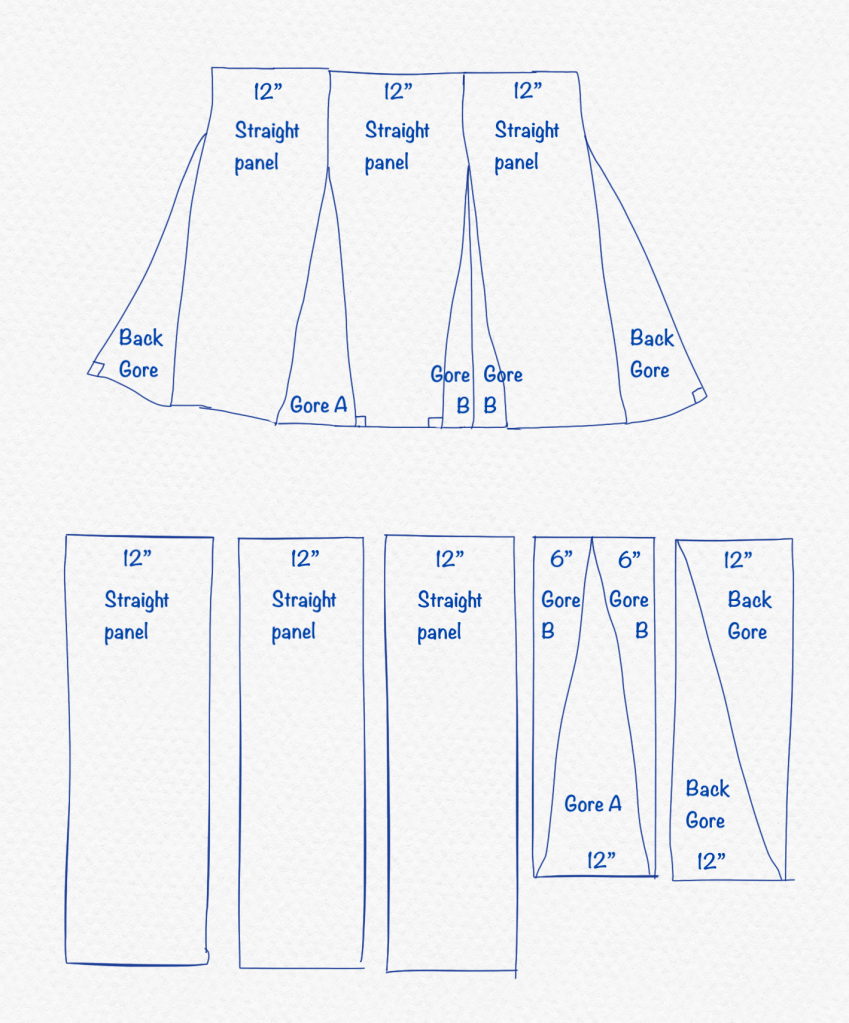
Version #3
Width: 24 inches
Length: 135 inches (3 panels).
✅ Includes Haithabu piece (*)
✅ Lower hem ~84″
✅ Five seams
Version #4
Width: 36 inches, consistent with Grágás vadmál (Østergaard, p. 63 and Ewing p. 146).
Length: 90 inches (2 panels).
✅ Includes Haithabu piece (*)
✅ Lower hem ~102″
✅ Six seams

Versions #1 and #2 seemed vulnerable to being woven a little too narrow (shrinkage is not an exact science!) and the narrow gores would be gobbled up in all the necessary seam allowance. They also had too many seams for me to finish by hand.
Versions #3 and #4 are both good options. I leaned at first towards Version #4 because this width was likely woven during the Viking age (on a warp-weighted loom), however I ended up going with Version #3 because:
- The wider width would use my entire loom weaving area, larger than I’ve ever attempted before. I was nervous going full width!
- Wider on the loom means more ends to thread, which adds extra time whilst preparing the warp for weaving. I would rather weave for longer, than thread for longer (within reason).
- Both options were similar in terms of hand-sewing (number of seams). Version #4 has a larger hem, which takes longer to hand-sew. I didn’t think I needed the larger hem.
Weaving
Having chosen a cutting layout (Version #3 above), I was then able to calculate how much yarn to purchase for my project. One must allow extra for shrinkage, as well as draw-in and take-up on the loom.
I have a spreadsheet to help me do this! I estimated I would need 0.9 cones of yarn for the warp, which was a little close for comfort. Instead, I bought two cones for the warp so that I’d have plenty of spare yarn, and so I could wind my warp faster using two ends in my hand.
I wound a 4.5 metre warp with 570 ends, then threaded eight shafts as though for turned twill (i.e. two alternating blocks of twill using shafts 1-4 and 5-8).
With this tie-up, shafts 1-4 weave twill in one direction, and shafts 5-8 weave the other, completely offset.
Each twill block contains 8 threads, so the diamond contains a total of 16 picks per repeat.
A lovely side effect for using this method is that I can get perfect plain weave on this threading, by tying up odd shafts vs. evens!
My selvedges were a single thread of warp yarn, left floating at the edges, with weights added at the back beam.
I sleyed a 10 dent reed at 20 epi, giving me a width in the reed of 28 ¼ inches.
Once the weaving was underway, I was comfortably beating at 18 ppi (so, a balanced weave, but slightly fewer picks per inch than 50/50).
The diamonds are slightly elongated in the warp direction (and Viking textiles would have exaggerated this even more, having fewer weft threads per cm than warp).
The weft is the chocolate-coloured Possum/Merino blend.

The weaving progressed in a fairly steady rhythm, however I constantly had problems with my right-hand floating selvedge. This thread un-plied itself every 20 cm or so. Each singles yarn didn’t have enough twist to sustain warp tension, so the thread would break.
This drove me nuts, having to repair the thread throughout the weaving!
I persevered, however, and finished the weaving as I started: with a simple header and hemstitching.
Finishing the cloth
Once cut-off the loom, I wet-finished (fulled) the cloth in warm water and dishwashing liquid by squeezing vigorously for two minutes. I then rinsed in the same temperature water until there were no more suds.
I draped the cloth on a clothes-airer to dry in front of our slow-combustion heater, until the cloth was only slightly damp. Then I pressed the cloth firmly with a cool-warm iron, on both sides of the fabric.
The resulting cloth has a thread count in the warp of 10 threads per cm, and 8 threads per cm in the weft. This is in the ballpark for woollen twills in Viking Scandinavia (Ewing p. 143), although not as fine as the fragments from Birka.
The finished cloth width was 23 inches (a little narrower than I wanted) and the finished length was 136 inches (slightly longer than I’d planned).
Cutting and Sewing
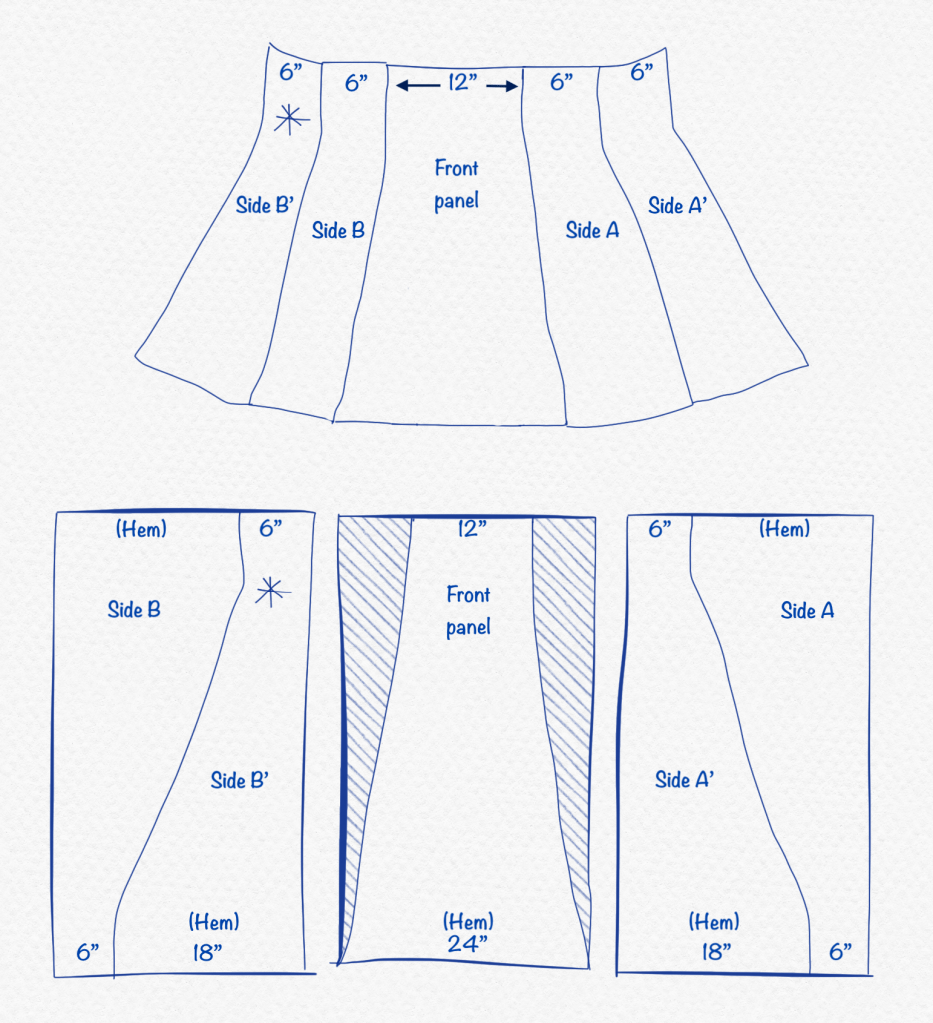
I cut the cloth into three equal panels, each 45 ½ inches long. I chose the best panel to be the front piece, and cut diagonals away to create a long trapezoid. The triangle pieces I have kept aside in case I need to patch the cloth at a later date.
The remaining panels were cut diagonally, with a short straight section at the end of each diagonal. These pieces are all shaped like the fragment found at Haithabu.
Sewing was fairly simple: I placed a selvedge edge against a cut edge for each seam around the body, then used my sewing machine to join them, since this stitching wouln’t be visible.
Then I felled the selvedge down over the cut edge and overcast by hand, using the wool from the warp.
The back seam joins two cut diagonal edges, so I needed to fold over the edge before flat-felling. The fabric was prone to fray when cut off-grain.
The top hem is double-folded and sewn by hand with a herringbone stitch, again sewn with woollen warp thread.
This allows some stretch in the weft direction, making it easier to pull the garment over the shoulders without snapping threads.
This was quite time consuming, but I think is worth it. On the front, this shows as a single row of straight stitches.
The bottom hem was also double-folded, but I used an overcast stitch instead of herringbone.

Straps
I chose to use simple fabric loops in bleached white linen (matching the fabric from the underdress) for my straps, as well as for the loops on the front of the apron dress. This matches the great majority of loops found inside oval brooches:
The smokkr was fastened to the brooches with loops made from folding a strip of cloth and stitching over the edges. Loop fragments are found in 105 graves in Birka. The majority of the loops were made from linen.
Hägg 1974, p. 54 via Thunem
I cut long strips of fabric 1 ¼ inches wide, then joined them on the bias to make one (seemingly infinite!) strip. This I folded like bias binding: the edges to the centre, and then folded in half.
I used a ladder stitch to sew the edges together along the entire length (in cotton 20/2 yarn). This took me days and I had to stop frequently to avoid causing injuries in my hands.
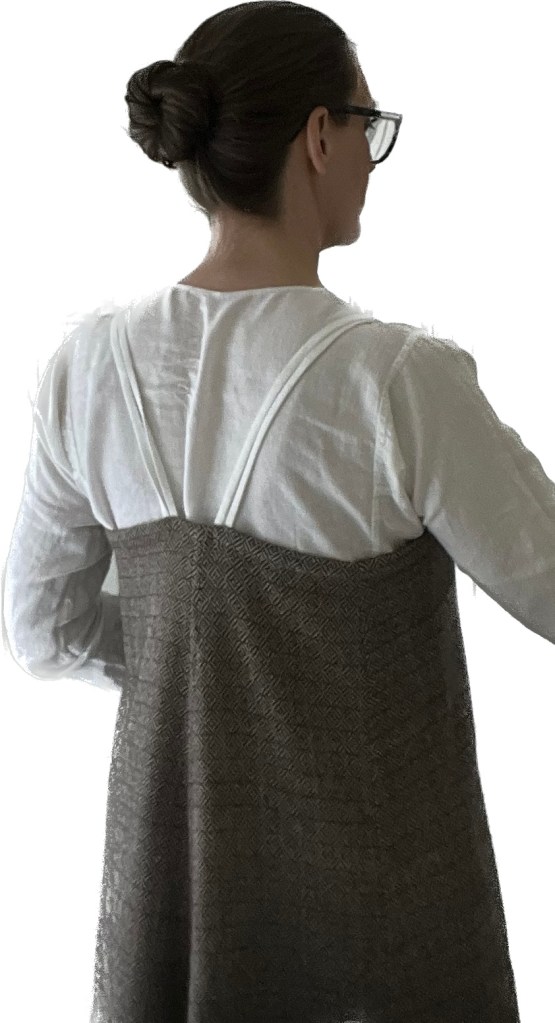
Eventually I had enough length for the loops: two short ones in the front, and two 18 inch loops for the back. These go over my shoulders and are seated at the centre back of the dress.
Making the long shoulder straps was time-consuming, and required me to have long strips of linen fabric on hand.
I can’t help wondering whether the long straps were really constructed this way over the shoulder. Perhaps they were tablet woven, with loop ends on the ends? Perhaps a wider strap that might be more comfortable?
I can only speculate. We don’t have any evidence of where the back straps attached, and whether they were linen loops the whole way over the shoulder. We only have evidence of the loop hooking into the top of the oval brooch.
Final thoughts
Overall, I’m really pleased with my new apron dress. The wool is soft, surprisingly lustrous, squishy and warm.
It hangs nicely from the brooches and back straps, and has lovely drape.
It looks marvellous with my viking bling!
Would I do anything differently?
Yes, probably I would do something creative with the shoulder straps to avoid making really long hand-sewn lengths of linen. Next time I might try tablet-weaving with wool, and use short linen loops only at the end of the strap, where they hook onto the oval brooch. I would like to compare how time-consuming this would be, compared to hand-sewing fabric straps.
The other thing I would change is that right-hand selvedge thread which drove me crazy by snapping all the time. I would use a sturdier wool thread for the floating selvedge, something that has more twist built into the singles. Perhaps I might spin such a thread, since it would only be for two warp ends!
I would like to try weaving with the more expensive, finer yarn from Venne in the warp, paired with a bulkier yarn (like the Bendigo 2 ply) in the weft, to more closely match the extant thread counts with the finer weaves.
What did I learn?
This is my first wide project woven with a woollen warp. I have certainly grown in confidence weaving with wool!
I learned how to draw out extra weft yarn after catching the shuttle, to avoid pulling the edges in on the next throw. I wove with a swooping arm action (quite energetic, actually) which pulled thread off the bobbin long enough to pass across the wider warp.
I also learned how to better control draw-in on a wide warp by letting the weft loop at the sides until the draw-in stabilised to a comfortable amount. Once I’d got the hang of this and used a larger weft arc I was able to weave comfortably.
Finally, I practiced (repeatedly) how to repair a broken warp thread. I think I can call this lesson done, now!
Bibliography
Ewing, Thor. Viking Clothing. (The History Press, 2009).
Østergård, Else. Woven into the Earth, 2nd Edition. (Aarhus University Press, 2009, E-book production Narayana Press).
Thunem, Hilde. Viking Women: Aprondress. 10 April 2020, https://urd.priv.no/viking/smokkr.html#int-material. Accessed 24 Sep 2023.
Sundström, Amica. “Women’s Attire in the Viking Age,” Väv, 4, (2022): p. 36.
