Our Dec 2016 garlic harvest was our best ever crop!
In 2015, the garlic harvest was sickly, with small bulbs — that’s probably why I can’t find a previous blog post about it. The cloves were quickly rotting, and about half of each bulb ended up being composted.
In 2016 we decided to give our garlic crop the most love ever, with nitrogen fertiliser (in the form of pelletised chicken manure and worm wee) every few weeks.
October: garlic at left
November: Garlic and leeks behind
And what a huge difference this made! Our garlic grew wonderfully bushy, with tall, green leaves. And when it started to yellow off over the late spring, we knew we were ready for a great crop.
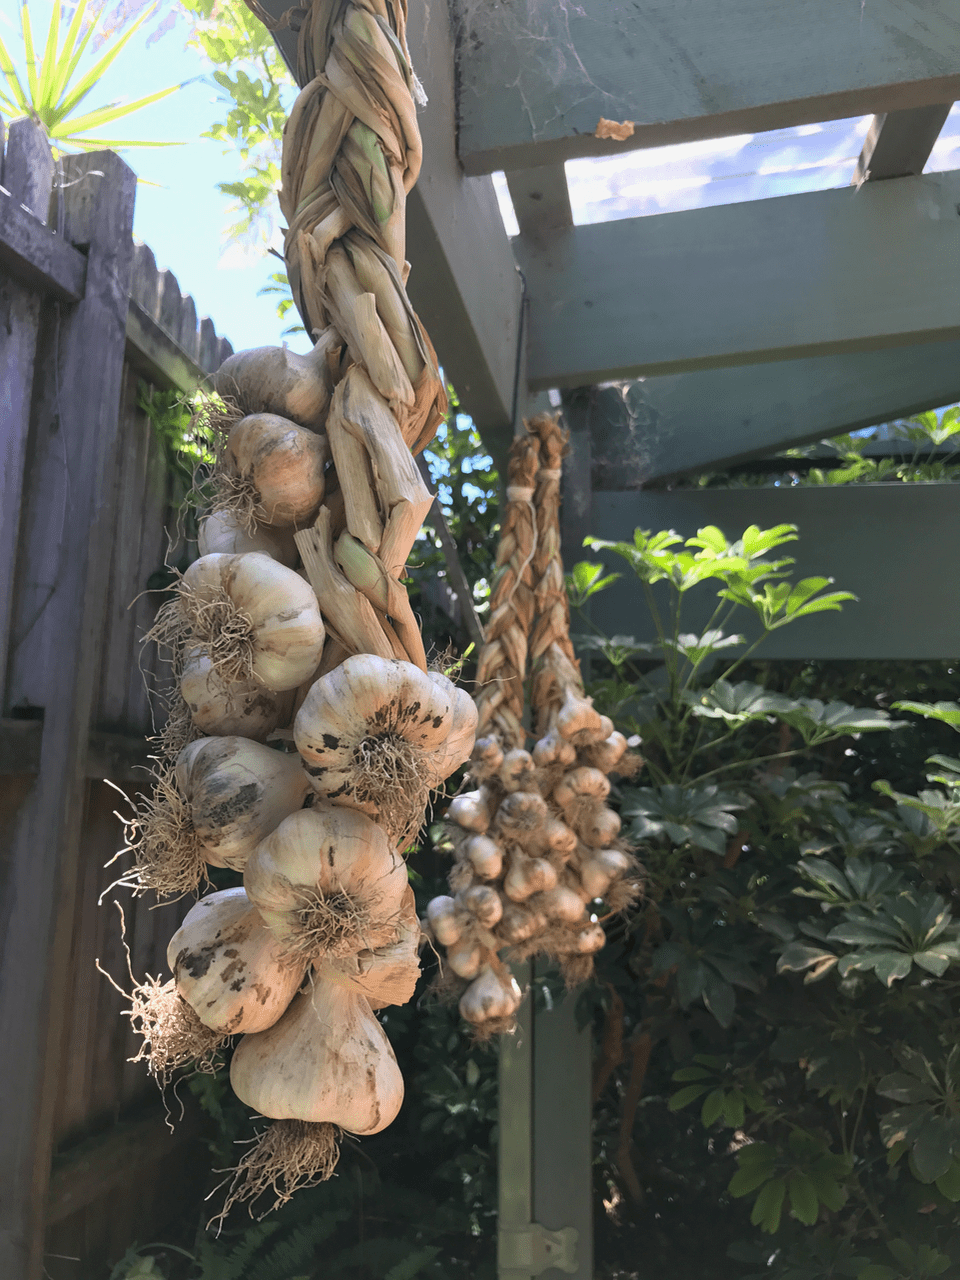
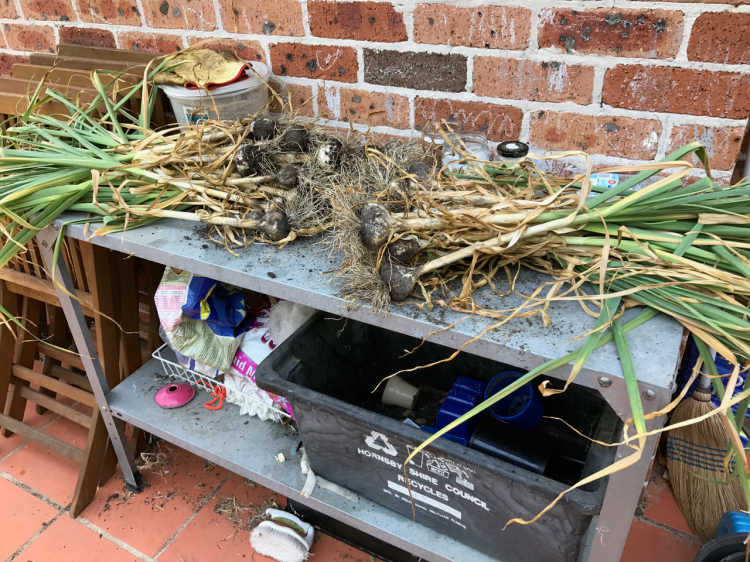
We harvested 43 bulbs, all of them of good size, and some of them enormous!
Big FAT clove
Giant bulb
I set aside the 6 biggest and best bulbs for planting next year, then made 3 ropes of 12 bulbs each using the method described by Penny Woodward.
Two ropes of garlic, each with 12 bulbs, drying in the shade.
The remainder of the garlic has been stored in the kitchen, and is delicious as it looks. 😀
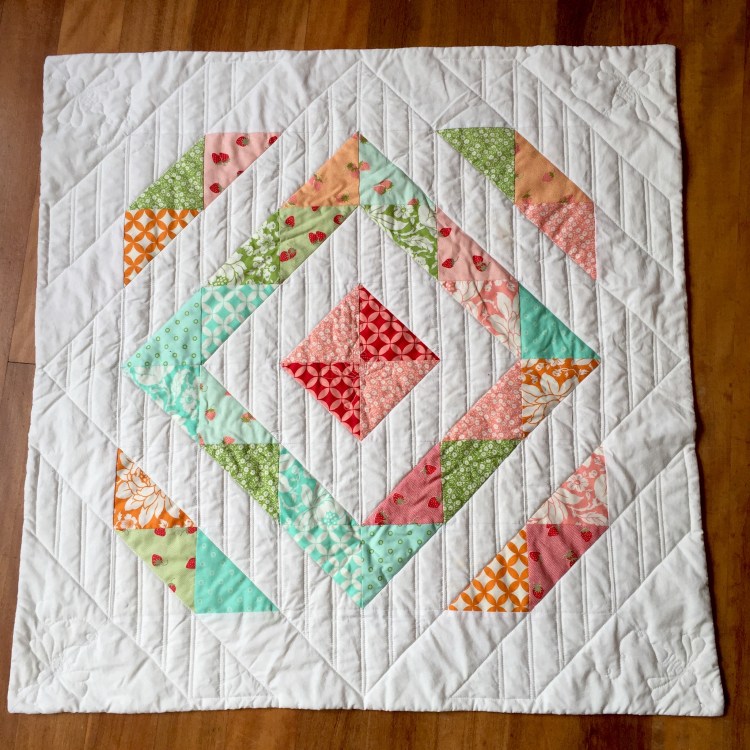
This baby quilt was made for a new niece way back in March. March! I am still a little puzzled about why I have not blogged about this yet, because it is super gorgeous:
Right?
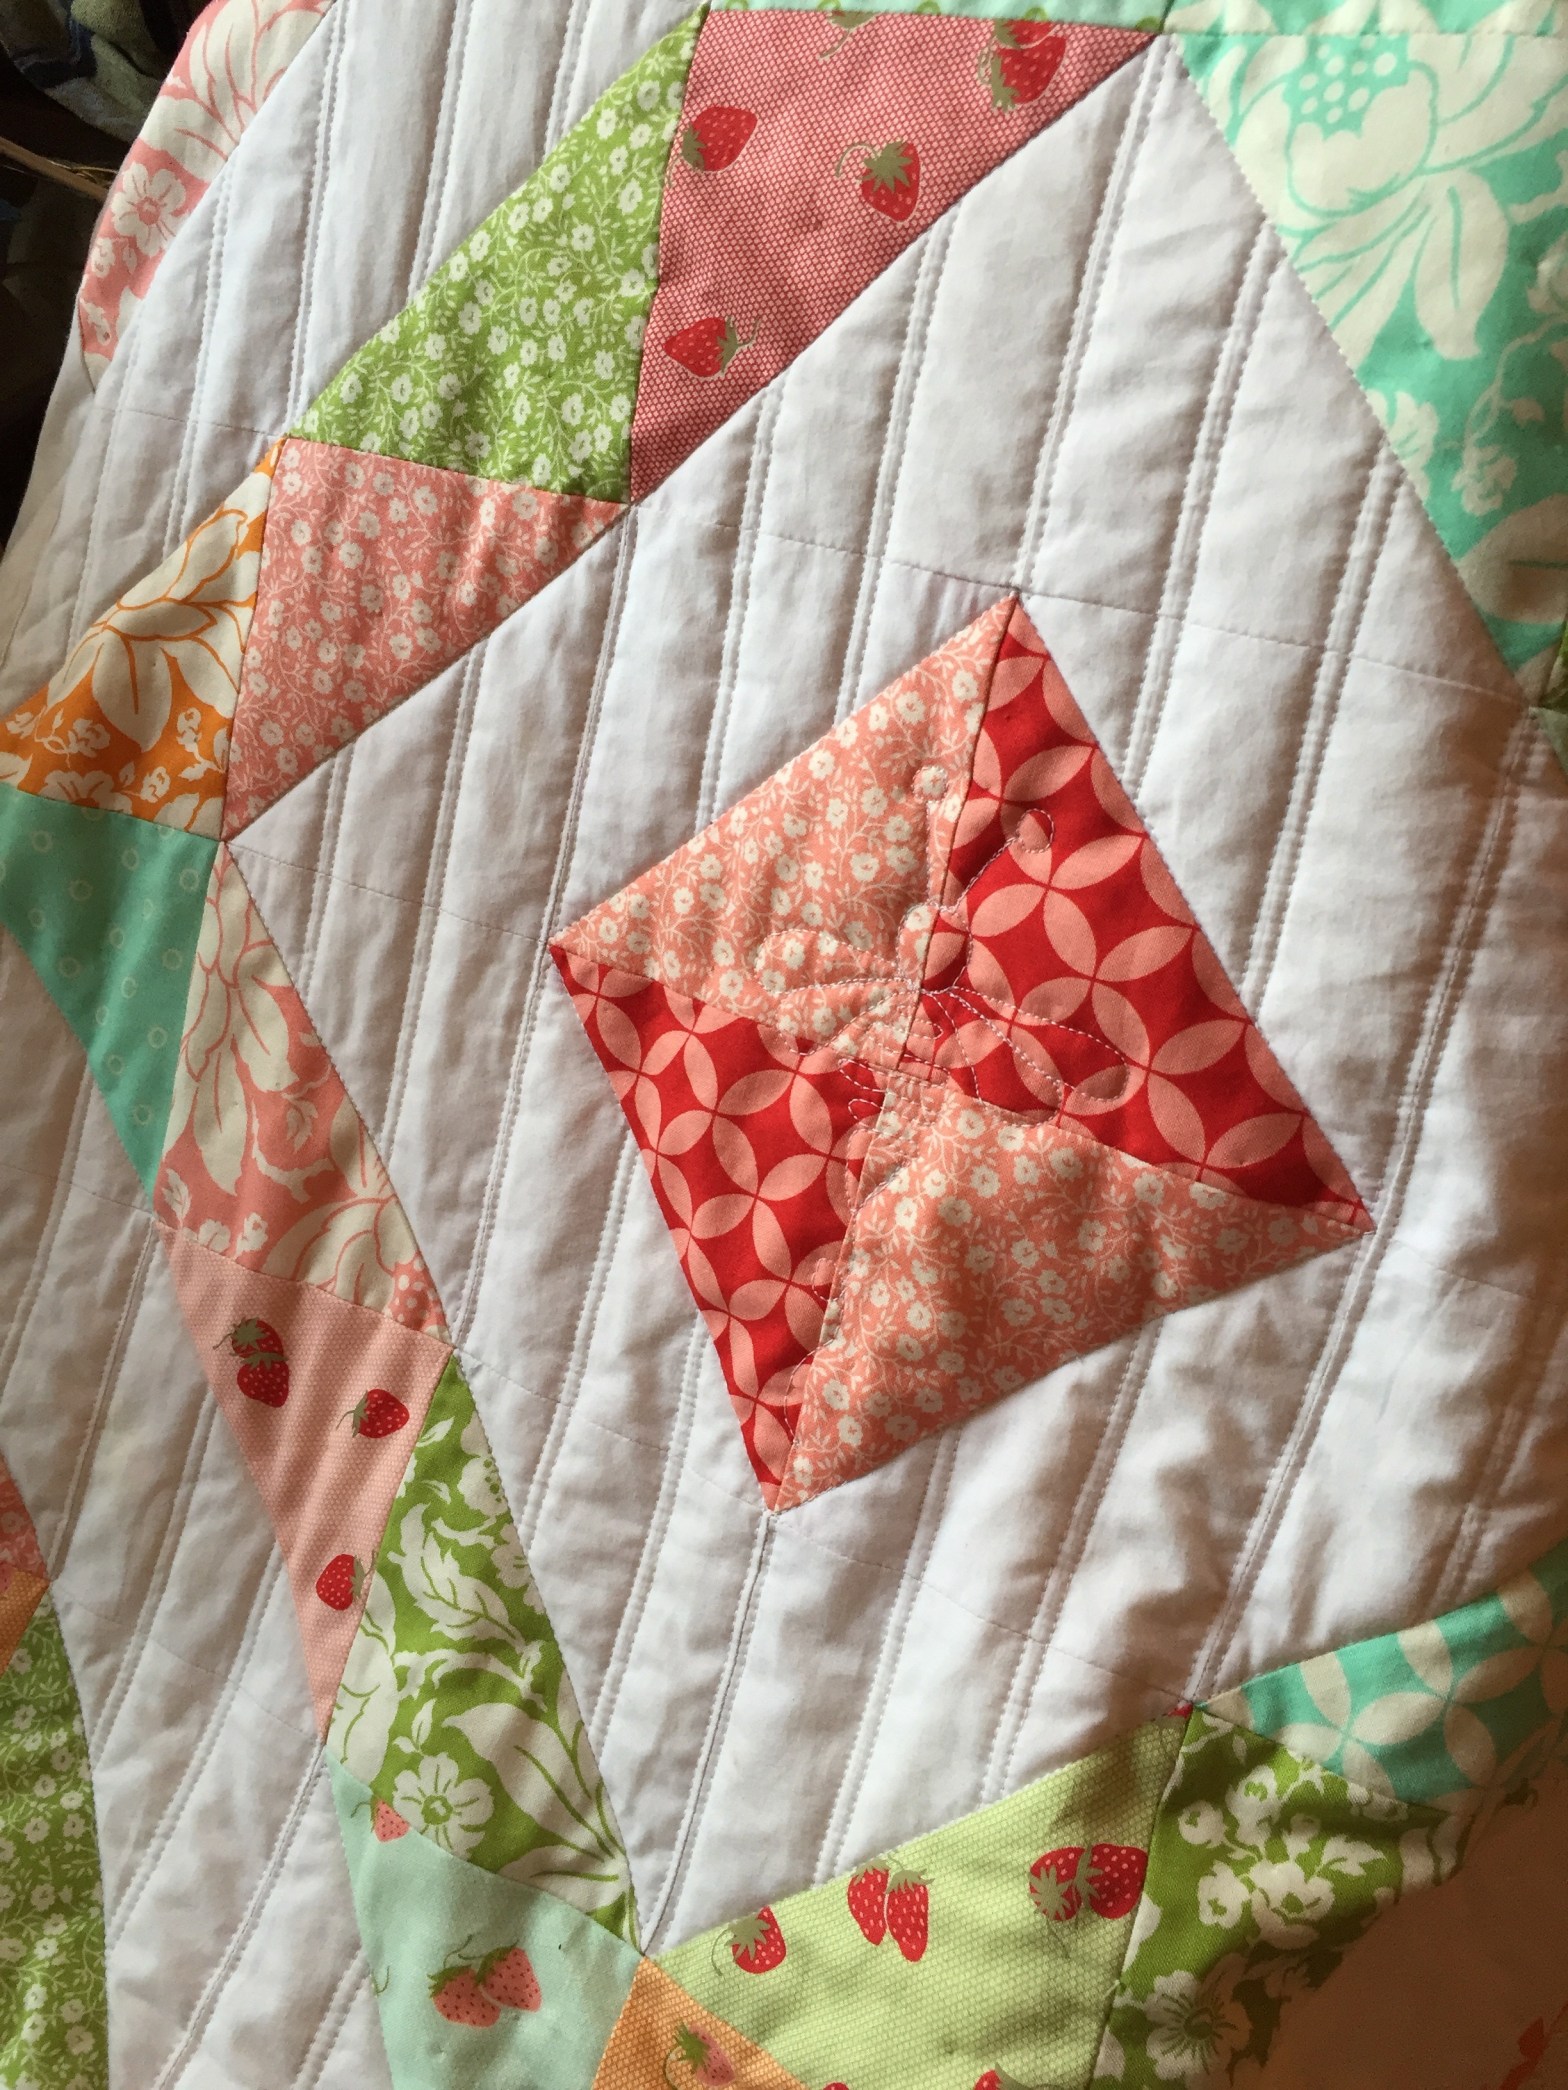
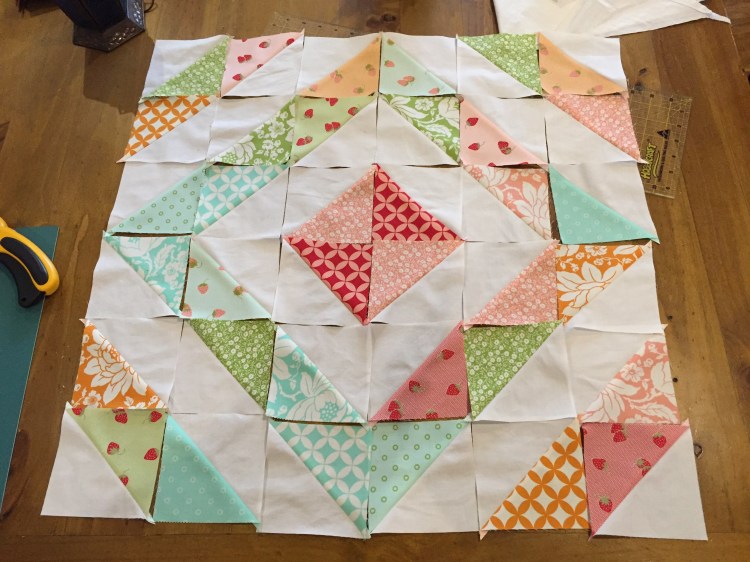
I originally pieced this in Springtime last year (about this time of year, in fact!), using a simple half-square triangle (HST) block.
The hourglass shaped motif in the centre really pops out!
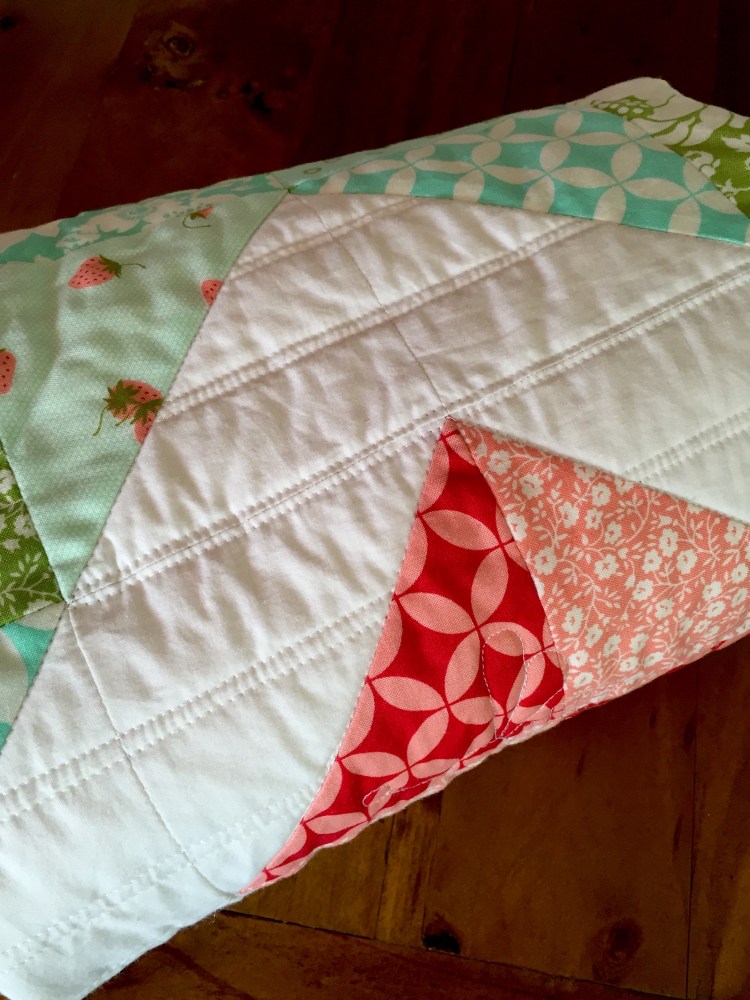
Have you ever tried finishing the edges of the quilt without using binding? This time I decided to seam the backing fabric directly around the edges of the quilt top, just like sewing up a pillowcase.
With this technique, the quilting happens at the end, and can go right up to the edges of the quilt!
Here’s a rough guide to how to put this together:
Pin-baste the quilt top to the batting, then
Sew on the backing, leaving a gap to turn inside out.
Turn inside out!
Smooth and re-pin the basting through all the layers.
Quilt.
This worked nicely for a baby-sized quilt, but I’d think twice about doing it for something larger. There is a lot of room for things to shift about during the inside-out wrestling phase! Plus you can’t trim the quilt back to square if the quilting creates an uneven edge.
Here’s the final look once I’d completed the quilting:
You can see how the areas with closer quilting lines end up drawing the quilt edges in. I like this effect, here. 🙂
I went for some strong linear quilting in the white space to completely destroy the line of the sashing border seams. These are now almost completely invisible!
It took me a very long time to decide how to treat the corners. I wanted to be a lot bolder with some free motion quilting, but I ended up settling on a bumble bee motif from a tutorial by Lori Kennedy.
I think I did a reasonable job for my first stab at free-motion quilting motifs! There is another bee in the middle of the central hourglass, too, but it is not so easy to spot. 🙂
This quilt is backed with a pale yellow flannelette sheet, to be super snuggly. I hope it has seen a lot of use in its new home with my niece!
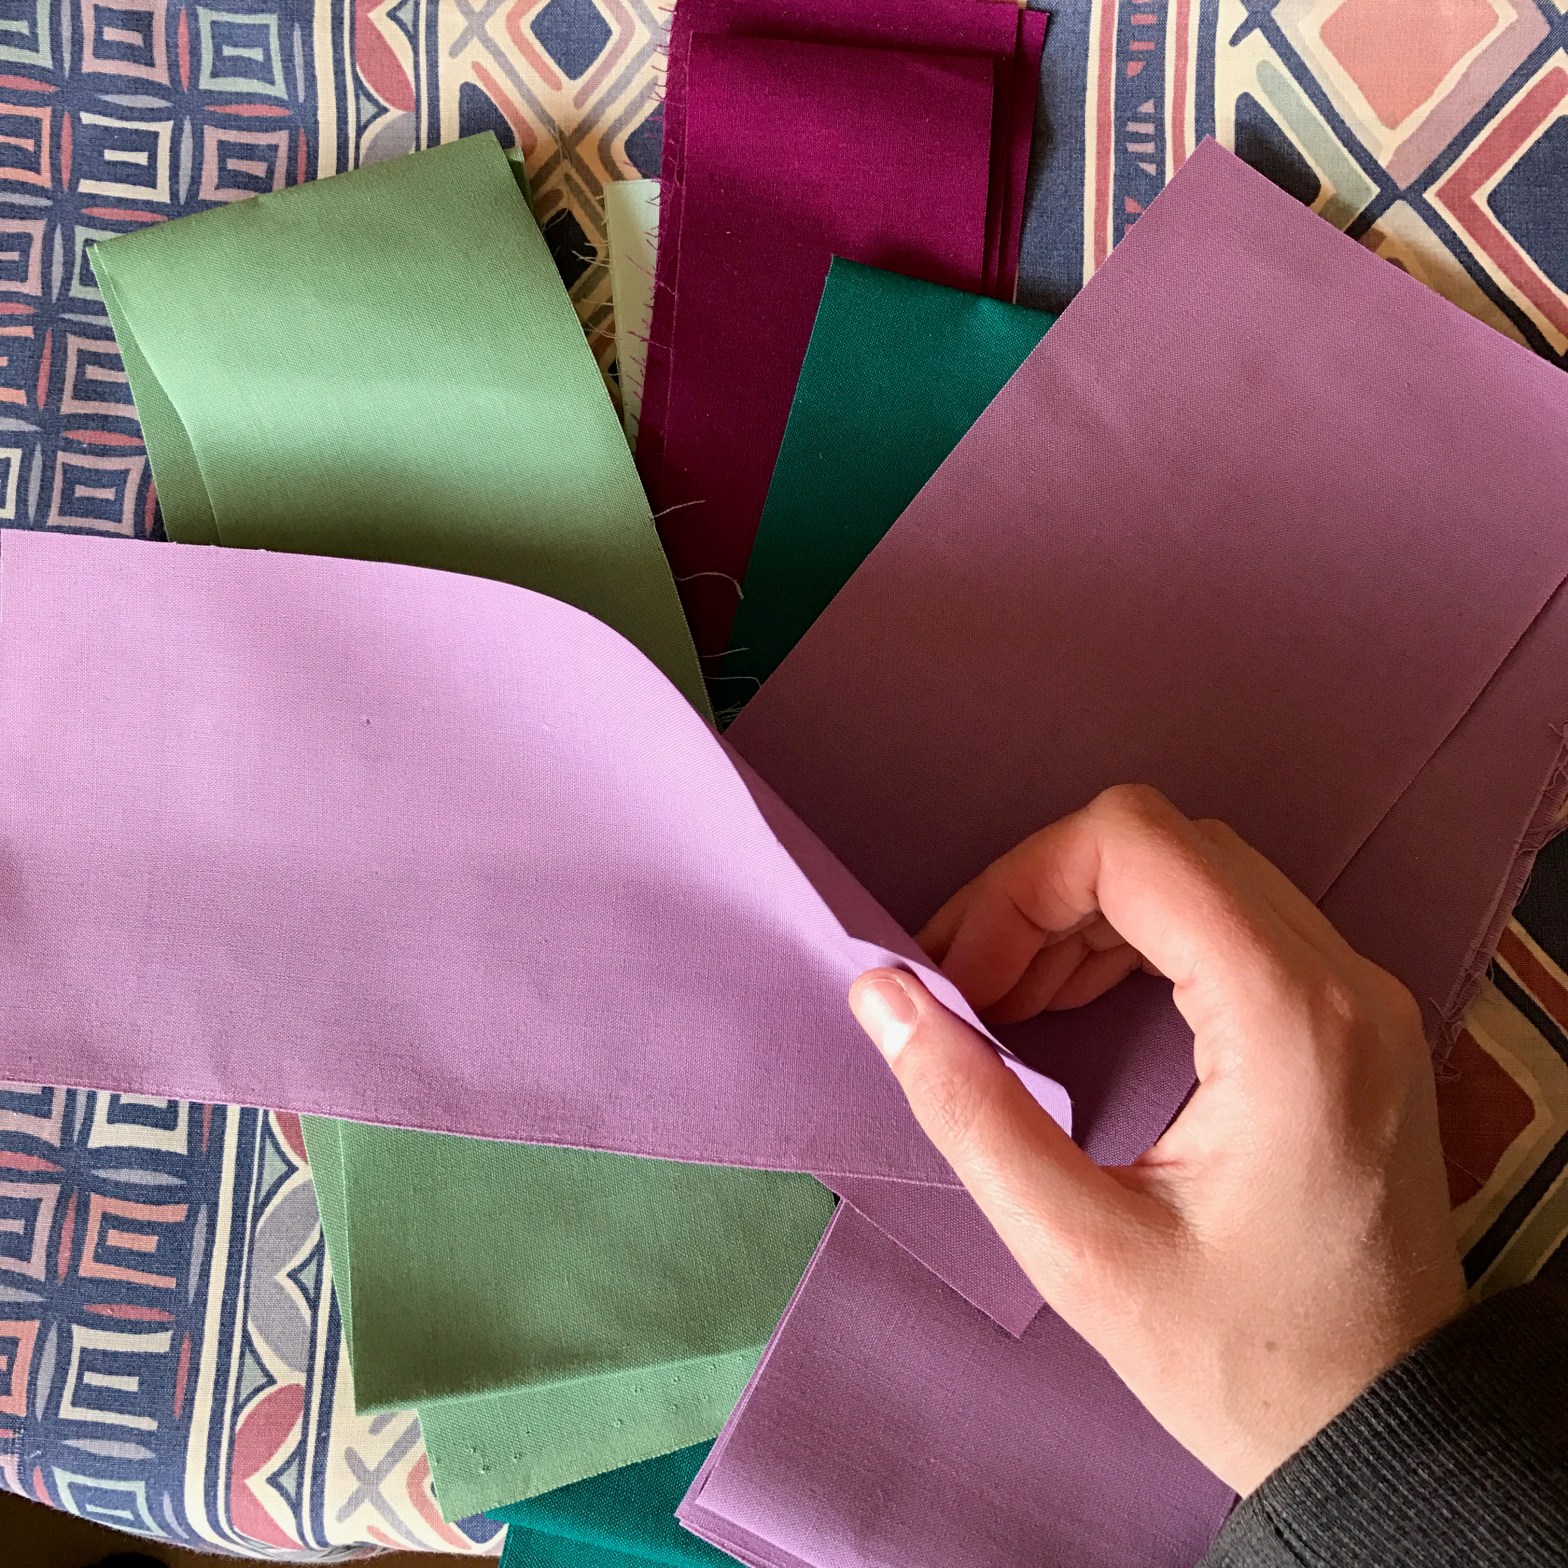
I’ve recently discovered how wonderful it is to cut and work with fabrics that have been starched.
It took a long time for me to get on board with this idea. I figured the hassle of finding starch, and then preparing the fabric, would stretch out the cutting stage of the project, and this is where I already tend to get bogged down.
However!
My latest quilting project (or one of them — I’m trying out doing a Leaders-and-Enders quilt whilst I’m working on this one) involves a bunch of bias edges. Many, many stretchy edges that I am advised will be much more manageable with starched fabrics.
Getting hold of starch in Australia is more difficult than just idly wandering through the Laundry aisle at the supermarket, and I figured that this is a problem that was probably already solved in medieval times. So: make my own.
Easy!
I took about two cups of short grain starchy rice, and I cooked it on my stove using my usual no-rinse method. This kept all the starch in the cooking water.
After the rice was cooked, I drained it into another saucepan and poured some boiled water over the top. This rinsed the starch out of the (very!) gloogy rice. I ended up with at least 1.5 Litres of cloudy, starchy, water — possibly more!
I set aside the rice for making into meals (fried rice, etc.), and let the starchy water cool a little. Then I swished it around and poured it directly into a spray bottle.
Done!
I’ve made my own starch 100% for free, since this is just a waste product from my normal cooking process. Win!
I was apprehensive about using starch, as I’ve heard the iron can scorch the fabric pretty quickly. But this turned out to be easy too!
Place a cloth over your ironing board so you don’t get starch all over your normal cover (I used an old pillowcase, which worked great).
Lay the fabric down on this — good side up — and spray with the starch water.
Spray down the length of the fabric so you’ve wet it all down.
Flip it over so that you can press over the back of the fabric.
Wet on the “good side”
Now for the actual pressing. Fingers crossed!
Using an appropriate setting for the fabric, and no steam, quickly and lightly run the iron around the fabric, to heat the piece lying on the board. Quilting cotton is fairly easy to do directly, but if the fabric is slippy or grippy when damp, maybe use a light cotton cloth between the iron and the fabric, to avoid dragging the fabric and making wrinkles like a sand dune.
Once the heat starts to steam the water out of the fabric, it becomes easier and easier to press more firmly. I then made an up-down motion of pressing instead of pushing back and forth, which kept the grain line straight and avoided wrinkles.
After pressing — no steam!
It was fun watching the colours of the fabric changing from damp to dry as I pressed!
My iron was used directly on my fabric and I had no fears with the scorching. The pressing plate did get a little dirty and will need to be cleaned, I think. But it isn’t a sticky dirt (yet).
Cutting the fabric once it was starched was positively dreamy. I actually really enjoyed the whole experience! I will certainly be doing this again, especially when using recycled or slippery fabrics like I did on my sister’s Wedding Quilt top. Oh man — hindsight.
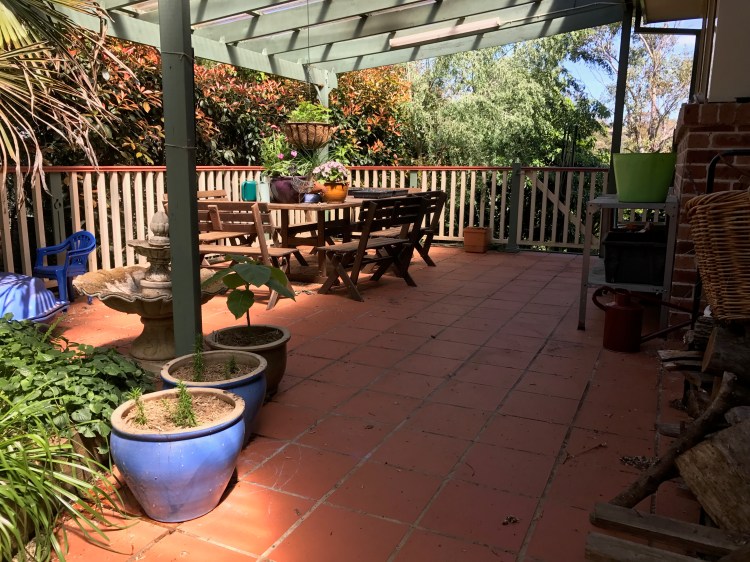
Now that Spring is here, we are changing some of our garden spaces around.
This back patio gets very hot in summer. We are preparing to create an outdoor kitchen / potting bench area here, to make better use of the space. At the moment we are using the area as a nursery to raise seedlings for the rest of the garden.
These trolleys are doing a great job keeping the seed trays organised, and we can move them around to follow the sun if we find that they are not getting enough where the are. We moved the metal potting bench out of the greenhouse (which is far too hot even in early spring!) and up here, with good access to water and the potting mixes.
Much more useful!
Cucurbits (front), Tomatoes (middle) and Alliums (back)
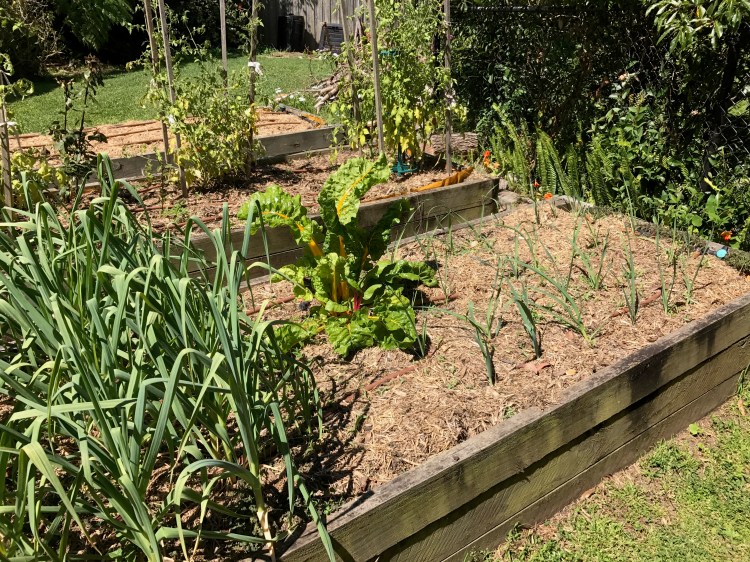
Out the back, the three garden beds have rotated, and we’ve planted zucchini seeds, transplanted tomatoes, and are growing garlic and leeks in the Alliums bed.
Greenhouse Tomatoes
Self-sown tomatoes
The sad looking tomato plants on the left have come from the greenhouse, where they were raised over winter. The much more lush and shrubby tomato plant shown on the right came up in the legumes bed during winter, and I didn’t have the heart to remove it. What a huge difference between the two!
Looking back at the Alliums bed, you can see the garlic doing very nicely at the front (we used way more nitrogen fertiliser to get these established this year), with leeks growing on in the back. They are finally starting to get bigger, having spent the entire winter as spindly little seedlings. 🙂
This garden bed is the “Potatoes and Brassicas” bed. There are mostly potatoes growing here now, plus a lovely big Kale and some Beets at the front that we grew during winter. We’ve had to put up some ad hoc fencing to keep the brush turkeys out. Grrr.
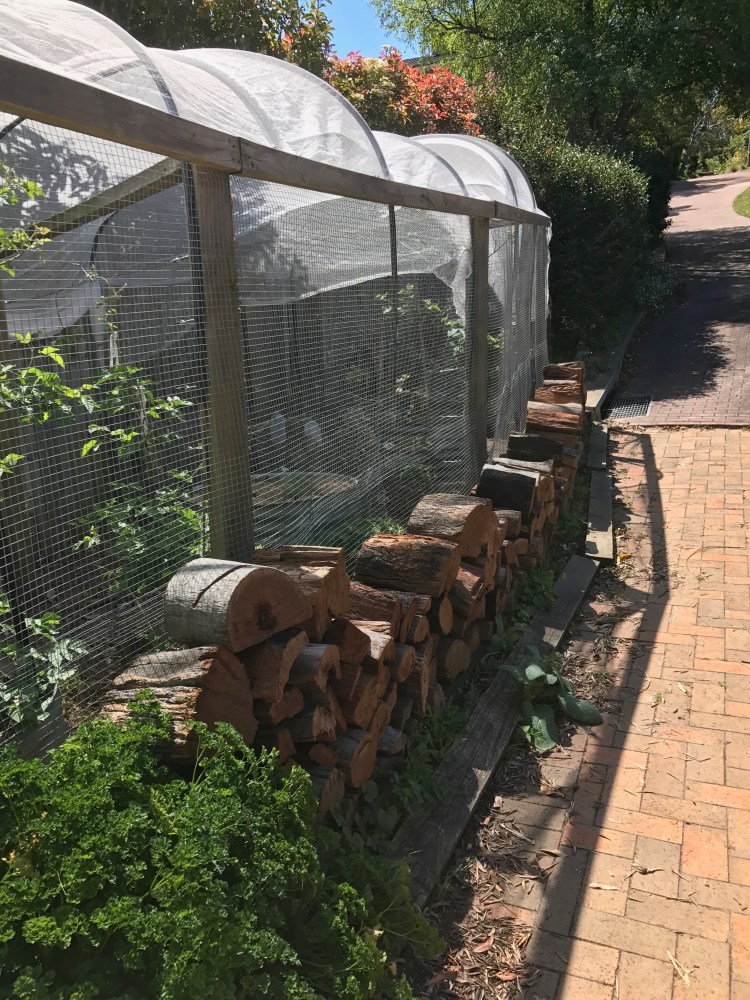
Up the side of the orchard we have stacked our winter firewood. I much prefer this location!
You can also see here that we have a new net over our orchard, as the old net we put up a couple of years ago decayed last autumn after two seasons in the summer sun. We figured it is easier and cheaper to net every couple of years than to work out how to put a proper wire roof on to this difficult orchard space!
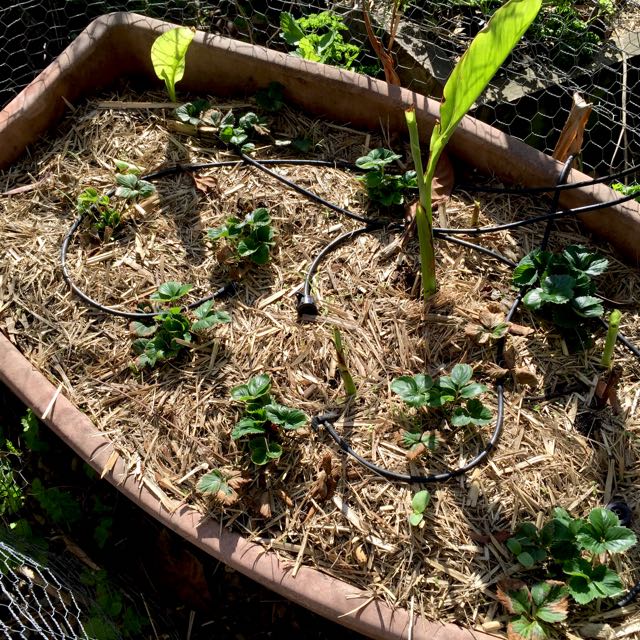
We also replanted new strawberries into the old asparagus bed, after pulling up the asparagus corms. The locations we had picked for both of these perennials was inappropriate — too shallow for the asparagus, and the strawberries in the orchard were overgrown by the arrowroot we had in the same pot.
Now the strawberries are back in prime position and already fruiting merrily. We are trying out some new varieties this year: Tioga, Alinta, Red Gauntlet and we’ve saved two runners from our Cambridge Rival plants. So far the Tioga taste rather bland, but ripen early and are productive. The Alinta berries have been delicious, but we’ve only had a few so far!
Our weeping (maple?) tree is looking gorgeous this year, with lots of beautiful new leaf growth. And of course, the lavender bushes are always flowering. This shrub I grew from my neighbour’s cutting three years ago is finally hitting the Wow! stage.
Springtime is always rather busy — this year we are making a bigger effort to get involved with the garden and learn some new skills. There is always something to discover!
Springtime is a busy time — when we are paying attention to our garden! This year we’ve moved some garden beds around, so we’re redesigning our vegetable rotation, and what goes where.
For example, we’ve moved the strawberries from their old too-shady location, to inside the netted orchard:
Strawberry runners, now protected from the birds
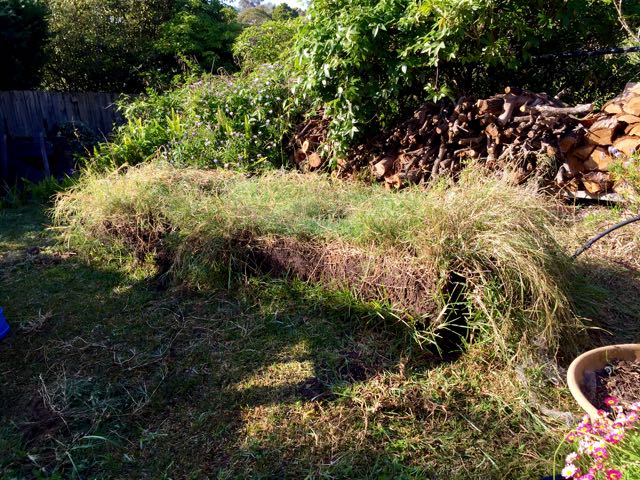
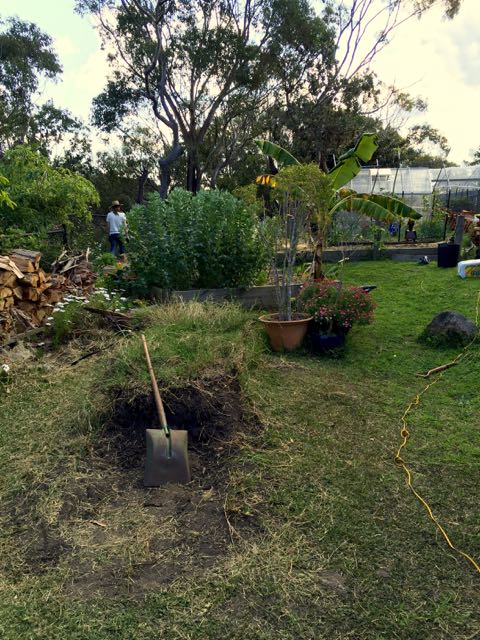
More dramatically, we disassembled the raspberry bed entirely, and rebuilt it in a more appropriate location that gets better sunshine.
First we unscrewed the boards from the old bed — it was so overgrown and compacted that the soil just stayed in place, like a cake just come out of a springform pan!
Looks naked without the boards!
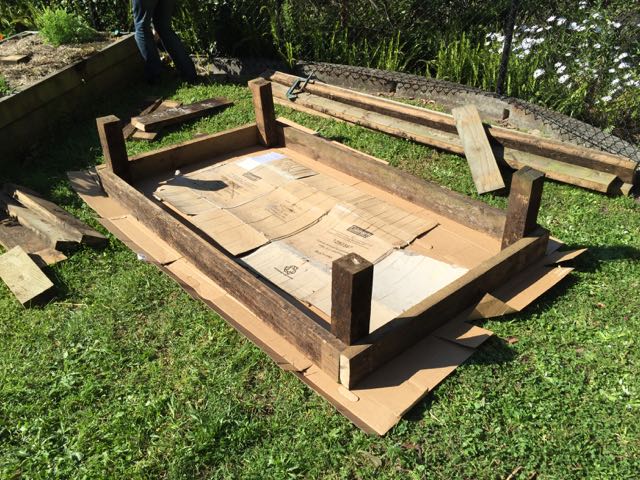
Then we laid down some cardboard in the new location, and started to cut and assemble the new bed.
We’re hoping that the cardboard skirt will stop the grass growing long right up against the boards.
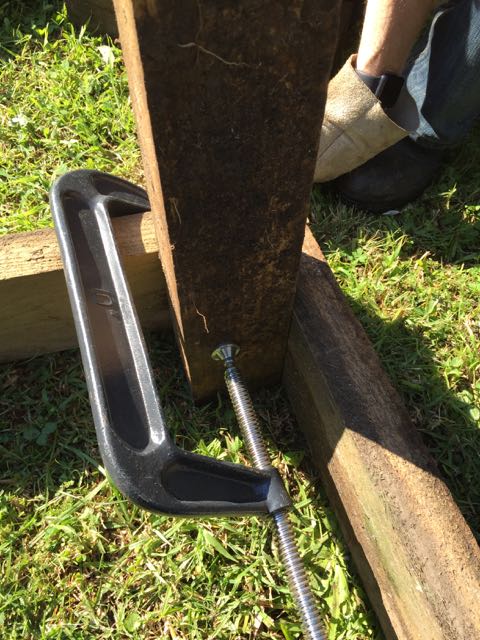
At each corner we use an upright piece that gets screwed to each board.
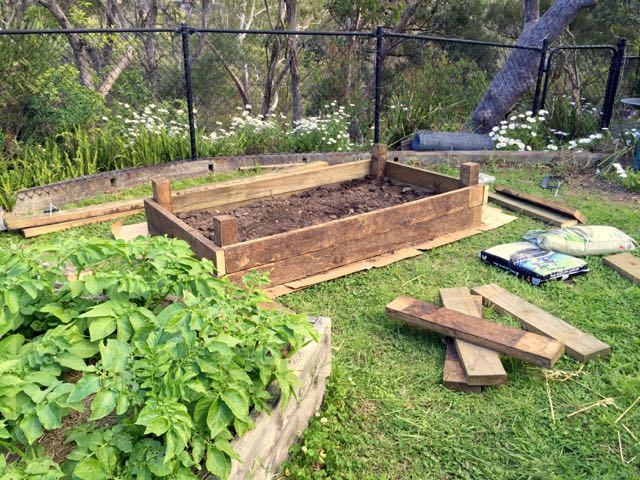
As we add boards to the outside of the bed, we use layers of mulch, manure and soil dug from the old bed to fill as we go.
By the end of the day, after a huge amount of hard work from Stephen, the bed is filled, and ready to mulch.
We used all the soil from the old bed, even though we cut some of the boards shorter!
Digging away at the old soil “cake”
The next day, I took this sweeping picture across our backyard to show the dirty patch where the bed used to be, and the new location with our other beds. Our backyard is not shaped like this! It is straight, but the panorama gives the photo a very fish-eye lens look 🙂
Old bed was on the left, now it is on the right.
This new garden bed will be growing cucurbits (cucumbers, pumpkins (winter squash), zucchini (summer squash) and lettuces and annual flowers in the centre.
I’ll leave you with a few lovely shots of our garden helpers. Enjoy!
The path between the greenhouse and the garden beds always looks lovely at this time of year.
Just a quick note to let you know I’ve fiddled with the site to make it easier to find the Comments section. This should now be visible for you by default (instead of hidden). Minimal is nice, but there is such a thing as too minimal! Your comments are important to me, and I’m tired of having them hidden away!
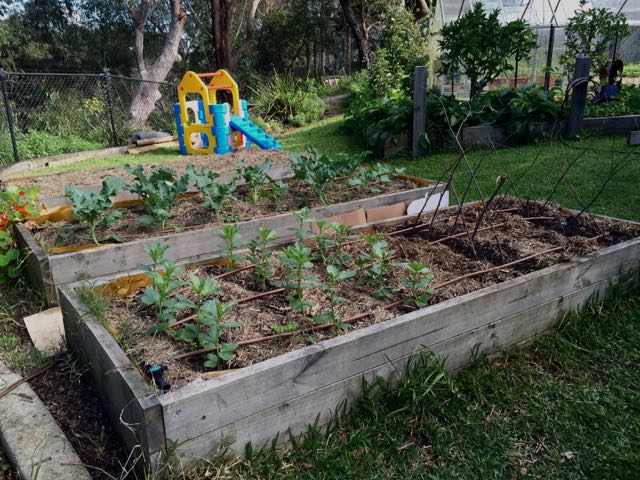
Last time I spoke about our vegetable garden, it was Autumn. Seedlings of broccoli and broad beans were just starting out:
I netted the broccoli so that we could avoid the cabbage white moth, which lays eggs on the underside of brassica leaves. Did it work? Well, yes. It did!
We had some nice broccoli heads (small compared to a store-bought head) and quite a few side shoots from these plants. I think we may have had a better run, had we done any actual gardening over winter.!
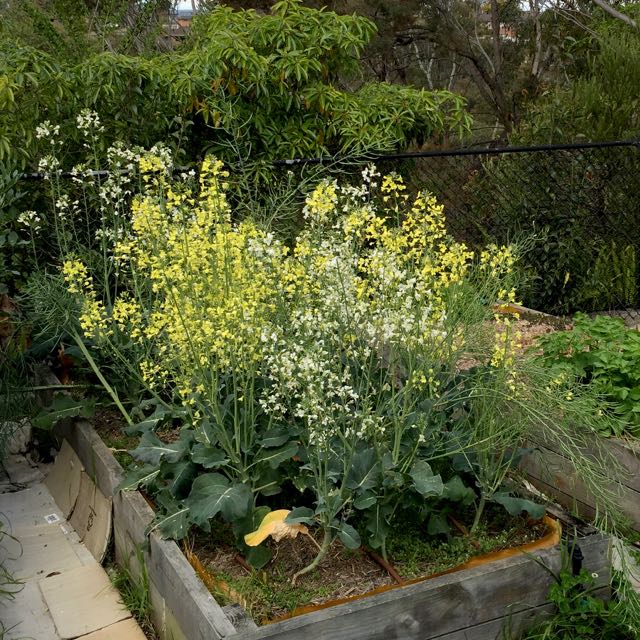
Cut to the start of Spring, and what do these beds have to show for themselves?
The broccoli is now finished, and seeding. The yellow and white flowers are different, I think, because this broccoli is growing from seed we’ve saved from last year’s crop (which was also saved from the year before).
I think we are not being terribly particular about what seed we are saving, so we are getting a bit of a mix. I think next time we grow broccoli I would like to watch the plants to see which ones go best, and tag them for saving the seed. Otherwise I think we might be selecting for plants that bolt early!
The broad beans were yet to produce bean pods. As of today, though (a month into Spring), there are pods ready to pick! In front of the broad beans, the pea plants have grown up enough to flower and even harvest pods. That was a dramatic transformation!
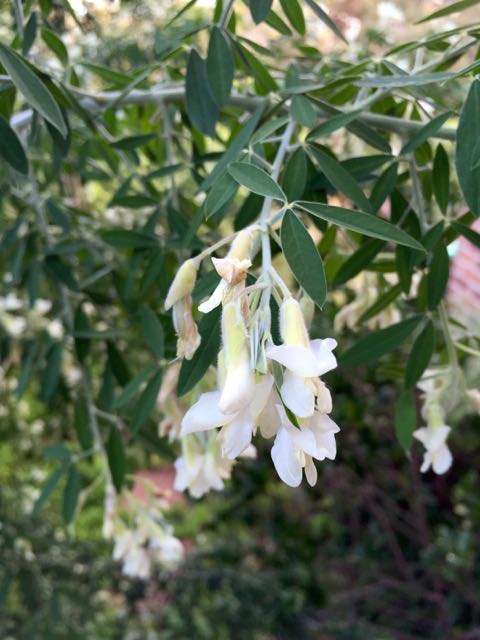
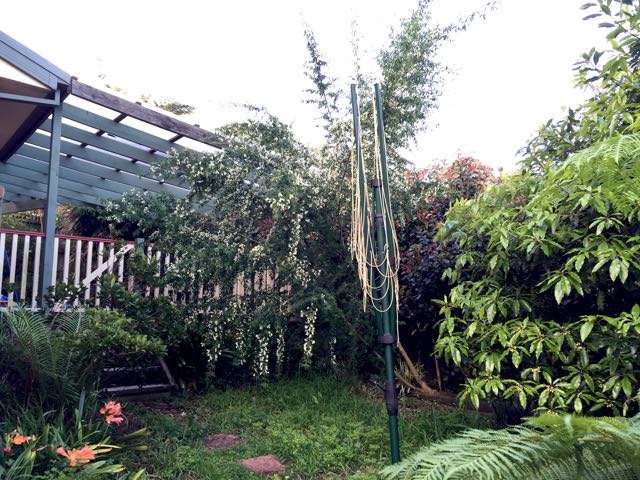
Elsewhere in the garden, Spring is proving to be a good time to get on top of the weeding and pruning that got away from us over the winter. Take the Tree Lucerne, for example:
Flowering Tree Lucerne trying to hide behind the clothesline … failing.
What … the heck. Do you remember seeing this plant when it was first put into the ground? This was February last year (ie. 15 months ago):
Tree Lucerne, about a metre tall
That is some serious growth! The plant in the picture above would reach no higher than my thighs, I should think. Now, it towers over my head.
Kapow! Flowers!
Close-up of the flowers
When I pruned this tree back, the bees were absolutely zinging with happiness about the blossom in this tree. The photos don’t really do it justice. It has quite a weeping habit that reminds me of a willow leaning over water — beautiful! And it smells divine!
Unfortunately, it was leaning over the walkway, which made it a bee infested, face-slapping hazard, and the weight of the branches was pulling it well away from the fence.
Before pruning
… and after.
You can see above just how much I needed to cut away to reveal our back verandah and an entire flowering garden bed. Sheesh! 🙂
Now the tree has gone from flowering, to podding up, just to remind me exactly why it is in the legume family. Just look at how beautiful this tree is! Both when flowering, and when developing pea pods. Wow.
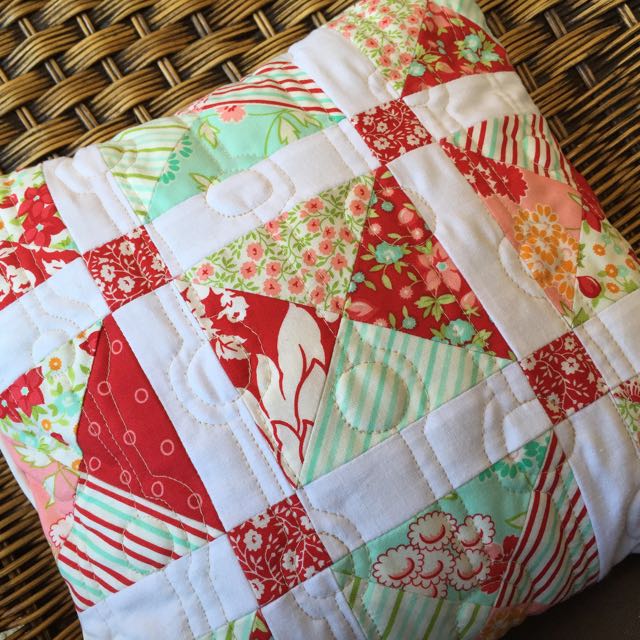
I mentioned that it was birthday season, right? This year I happened to be in a “quilting mood” as the September birthdays approached, so I got my mojo on and made some cushions!
Free motion quilting (FMQ)
Quilt as You Go (QAYG)
HST and FMQ
Each pillow is an experiment with a new (for me) technique.
Last January I watched a fantastic Craftsy class in Free Motion Quilting (FMQ) with Christina Cameli from A Few Scraps (would totally recommend!). My initial experiments were okay, but I did experience a bit of a downer because the quilt felt very “sticky” on my sewing table. I made notes and resolved to try again … soon.
Ha.
Okay, so fast forward a few months and enough time had passed for me to have another go. I had already pieced the first pillow top, and I was enthusiastic to put a simple stipple pattern onto it:
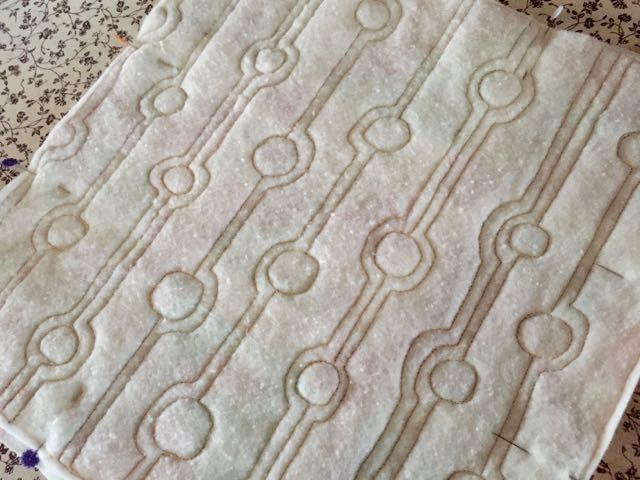
It came out so well! This time it didn’t feel “sticky” to quilt. I don’t know what changed, but I just ran with it. 🙂
I started in the centre and wiggled all around the centre diamond. Can you see the little hearts in the corners? Around the outside I became really bold and made a vine-like loop-de-loop thing which was a little tricky to make look even. But I think it looks whimsical. 🙂
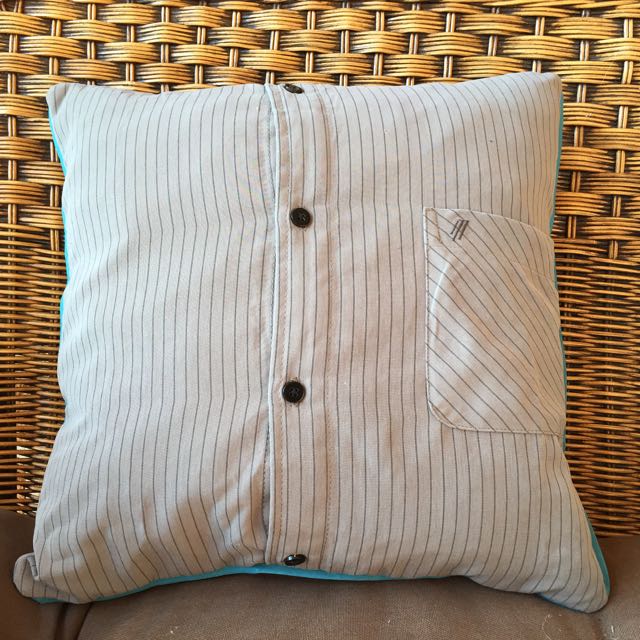
The back of this pillow is a man’s shirt front, complete with the original pocket. I thought it would be cute to have a secret pocket on a pillow! The fabric was also used on the pillow top, in the border.
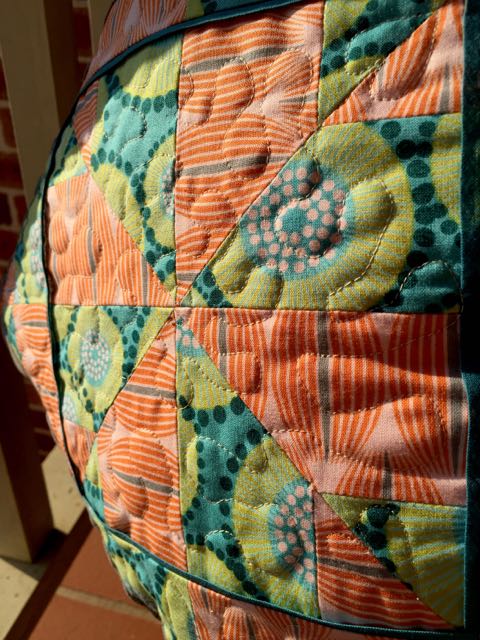
For the second pillow, I used a tutorial from “Hey Let’s Make Stuff” for quilting a Scottish Thistle. I used my pre-cut fabrics here, too, for a completely different look to the first one:
Quilt as You Go (QAYG)
Envelope back
This time I kept it simple with the quilting, because I wasn’t keen to switch over to the darning foot on my sewing machine, every time I added a strip. I loved this pillow so much I almost couldn’t give it away.
The envelope backing idea was from Crazy Mom Quilts, and I basically followed her tutorial with the dimensions modified to match my pillow top. She also has great instructions for making the pillow form that goes inside of these! I made mine out of old curtain fabrics that used to hang in the kitchen. 😉
HST and FMQ
Pillow back
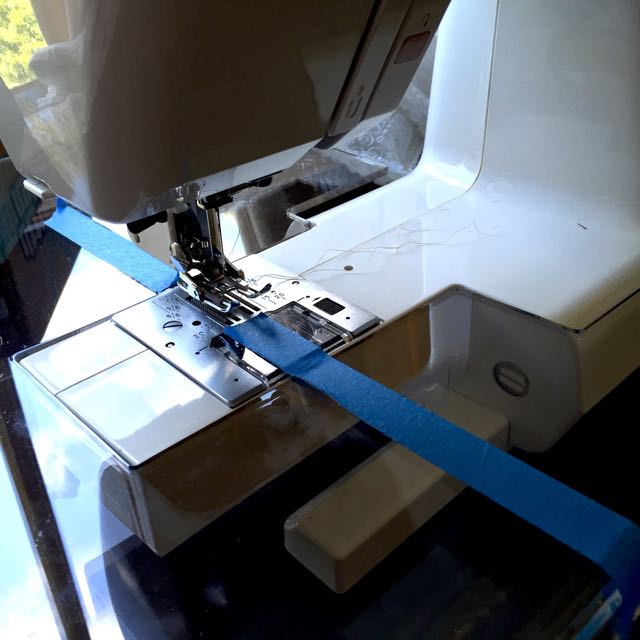
The third pillow was an experiment in piecing Half Square Triangles (HST). I taped my sewing machine extension table so that I didn’t have to do any pencil marking. This was sooo much quicker and more fun than my previous experiences! The seams were a little curvy in the middle, but I don’t think it mattered too much in the final assembly.
Using tape to line up HSTs
I also tried out this technique, of trimming each HST before pressing them open. This made is vastly faster to trim and press all the HSTs at once. I will definitely do this again, but be more careful with the accuracy of my seams to make sure all my points meet up!
My FMQ choice here was to go with something simple, but a little more improvisational than the very traditional layout of the pillow top itself. This is a variation on one of Christina Cameli’s “beads on a string” designs.
After I completed these pillows, I was ready to keep on going. I’m working now on a baby quilt which will hopefully stretch out my FMQ skills a little further!
It’s birthday season again, which means my mind turns inevitably to creating gifts for people, and counting out the days that I can feasibly make something.
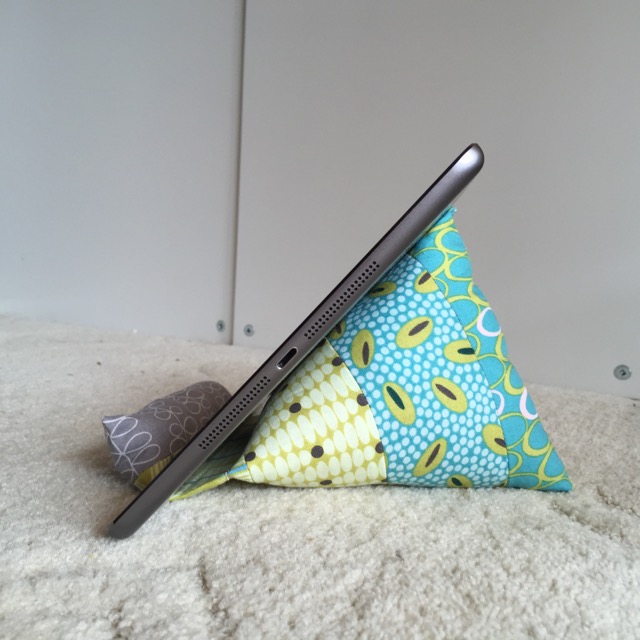
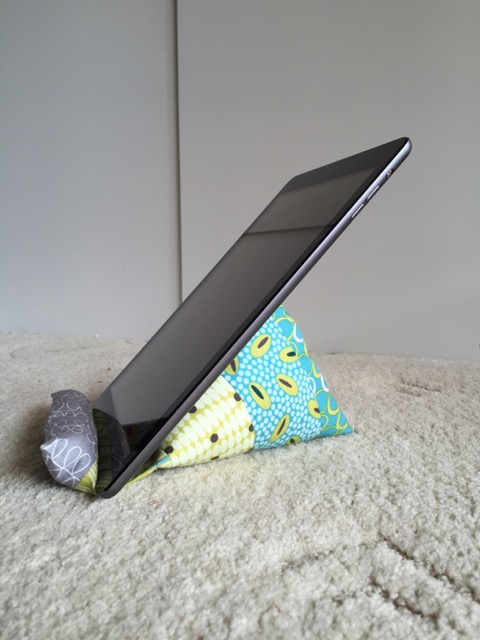
Well, hey, an iPad stand turns out to be a fantastic gift idea!
I made this little beauty in about an hour, using this tutorial. I used a jelly roll (“for you”, Zen Chic from Moda) which made it super quick to piece together with nicely matched colours. I don’t often use pre-cut fabrics, but it is so much fun just to get straight into a project, instead of searching through my whole stash!
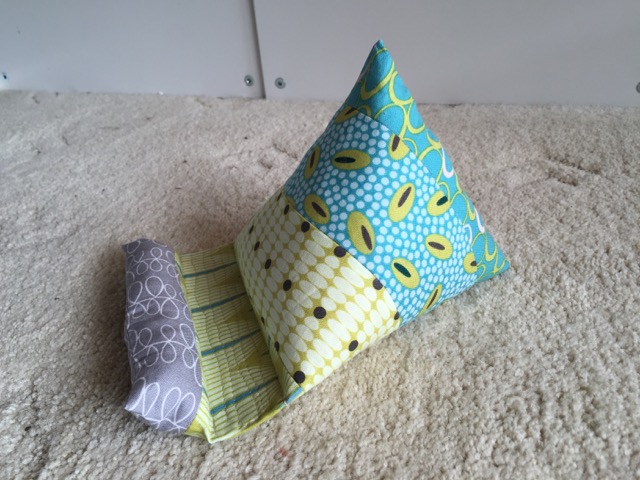
The upright part of the stand is filled with rice, which means it can’t be washed (so, maybe not for reading recipes, alongside the spaghetti sauce pot!). For stiffener, I used a folded strip of jeans-denim instead of Pellon interfacing, because I prefer to re-purpose items that have worn out. I haven’t purchased interfacing for years!
I have three nieces with birthdays in the same week, so I’m spoilt for choice as to who gets it.
Landscape mode
I think it might have to be the one turning 13, because this iPad stand simply screams “Hello teenager!” to me. 🙂
It works very nicely in landscape mode, but surprisingly is also steady in portrait mode (which is how I read my e-books, these days).
Works in portrait mode, too!
Evelyn has been trying it out, watching TV on the couch, and it seems just about perfect: solid and stable. I suspect she’s going to be pretty upset to give it up for her cousin!
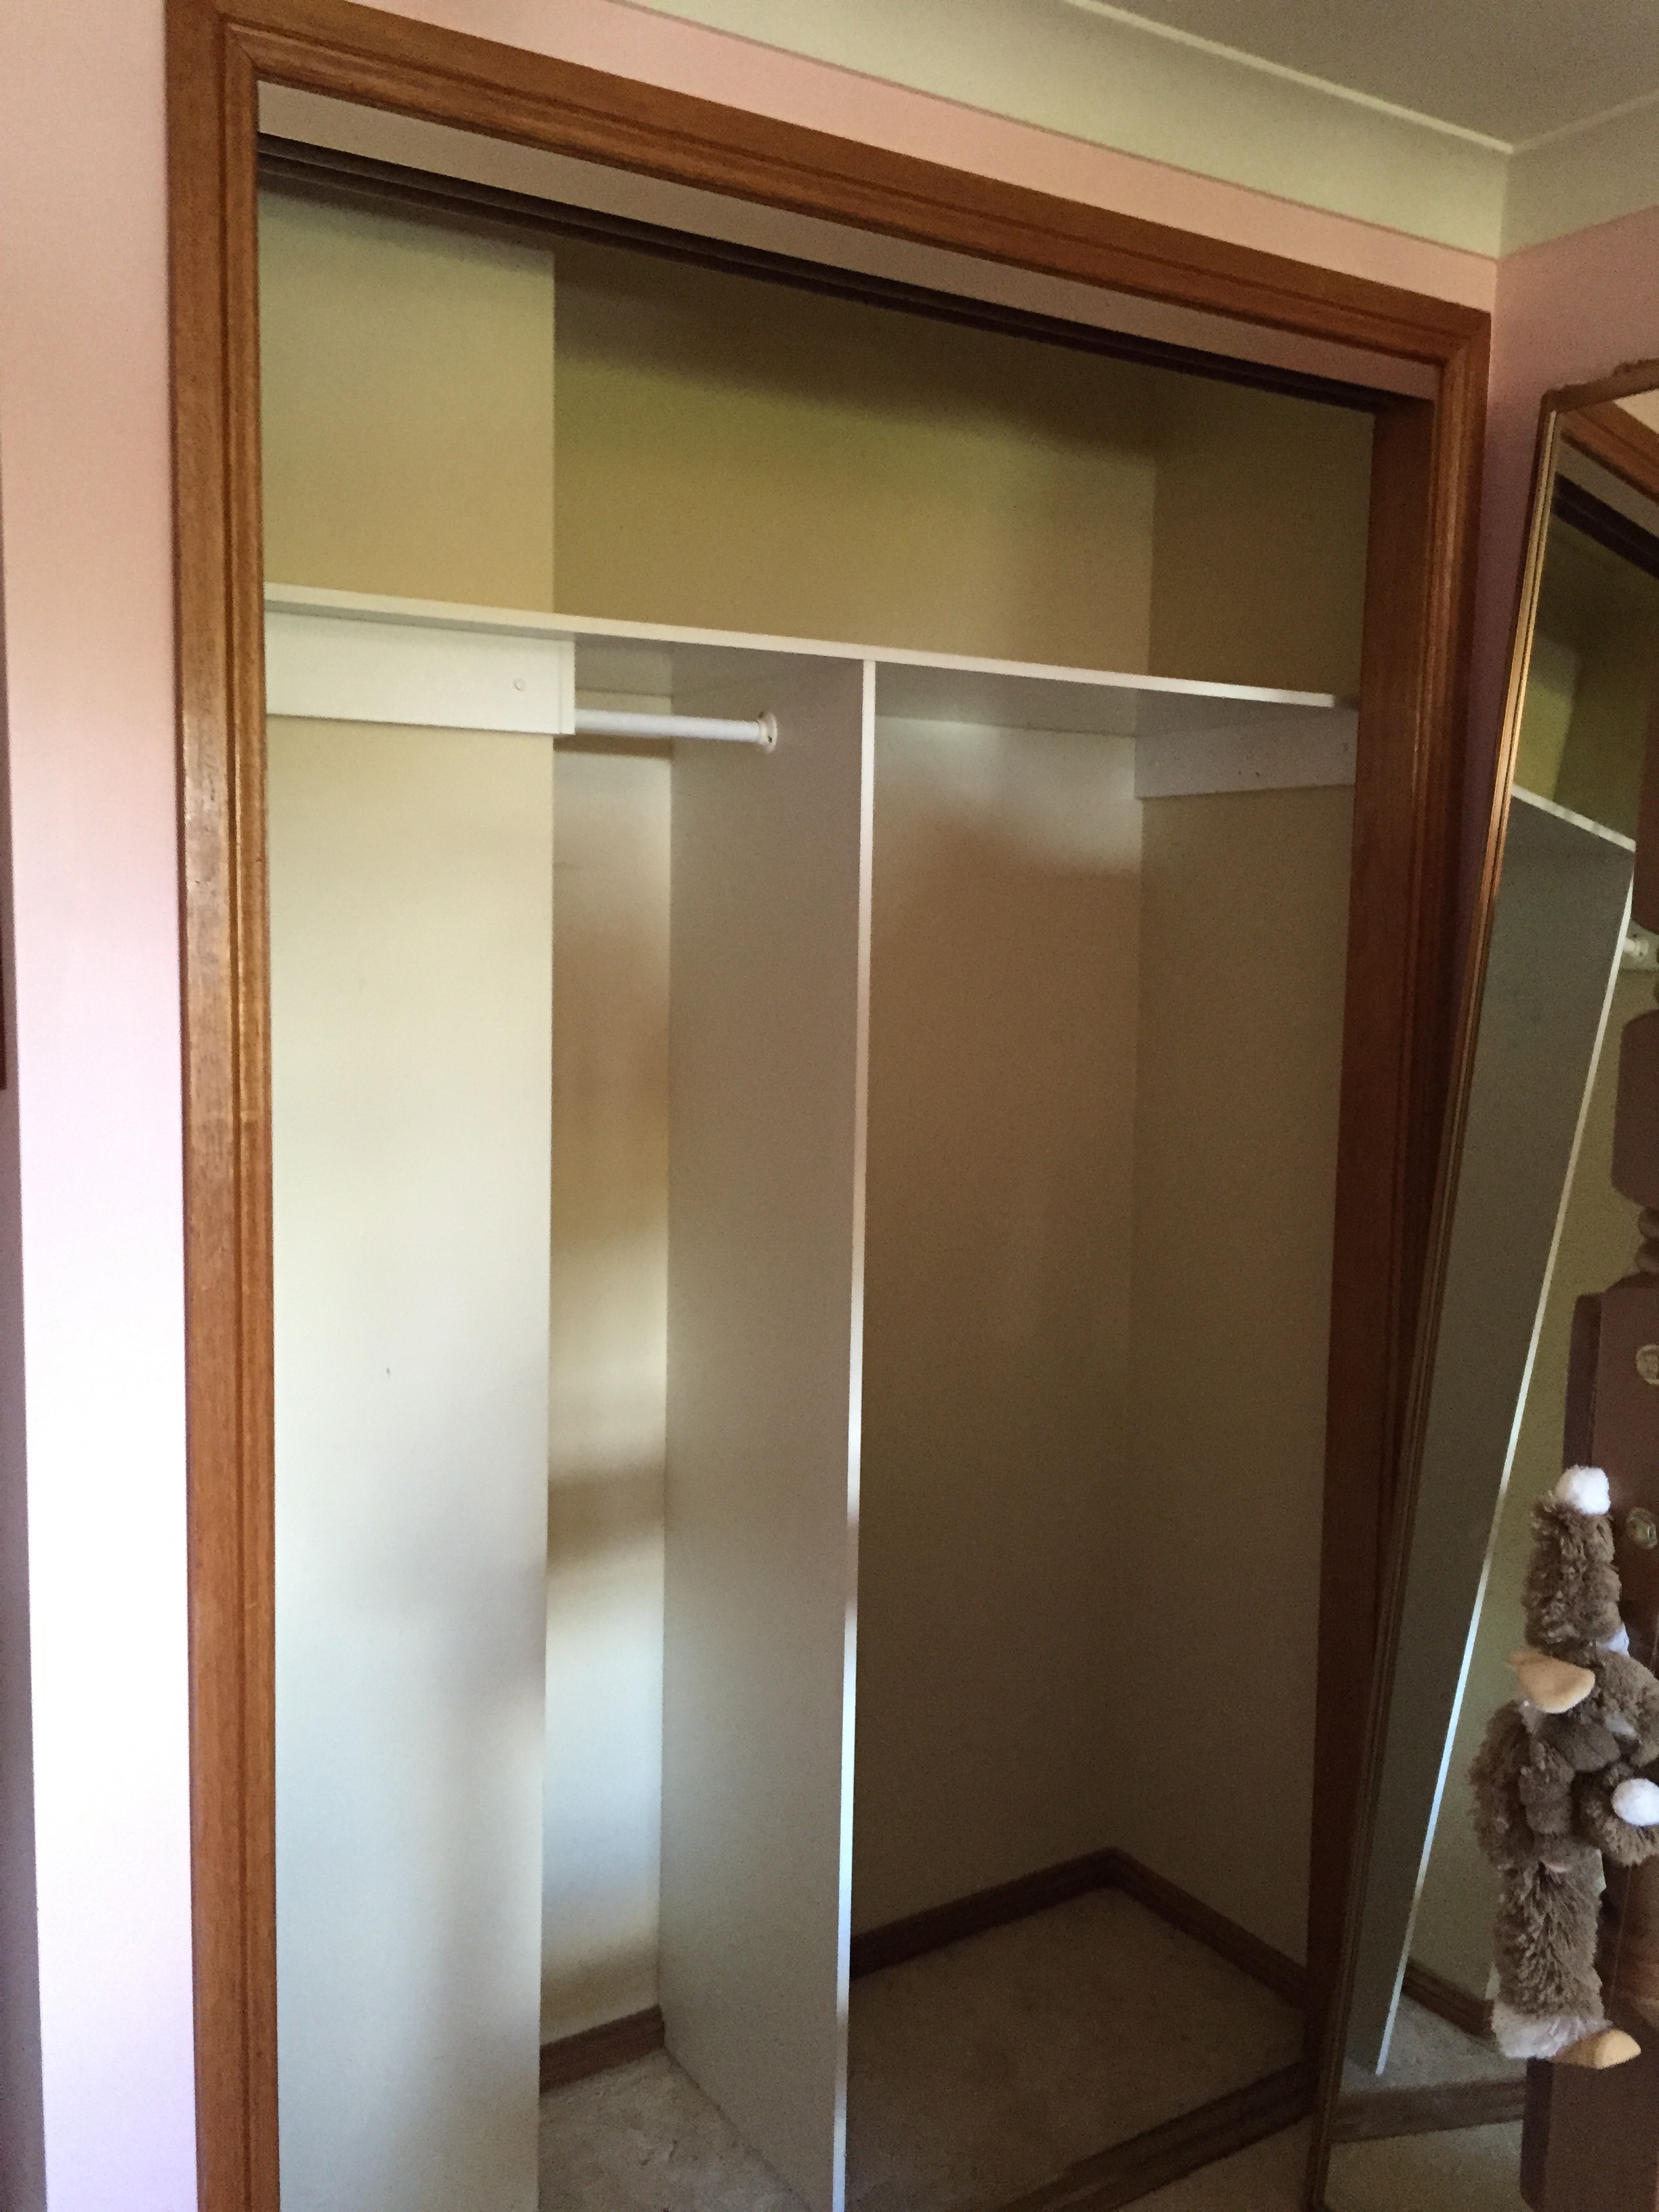
Okay, so I teased you some time ago now about upgrading Isobel’s wardrobe, right?
If you remember from back then, Isobel’s wardrobe looked like this:
Unfunctional — meh
Having achieved great results with the little kids wardrobe, I wanted to do basically the same thing for Isobel, but with a more teenage flair.
For ages (and I mean, years, maybe?) I’d been toying with converting Isobel’s wardrobe into a closet-office, just like the one shown at no. 29 design. How fabulous would this be? I’ve used chalkboard before, to make a play wall for my kids, and as a feature in the kitchen. The only problem with this solution, is where would we put Isobel’s clothes?? 😀
After seeing the great results in the little kids’ room, I had a brainwave and merged these two ideas into one: the chalkboard wardrobe.
This looks insanely good. I want it for myself. Seriously.
The odd blank wall on the left hand side of the cupboard is hiding an air-conditioning duct. Now it is a fantastic chalkboard surface that Isobel can use to write slogans, maths homework (ha ha ha) or just decorate with doodles.
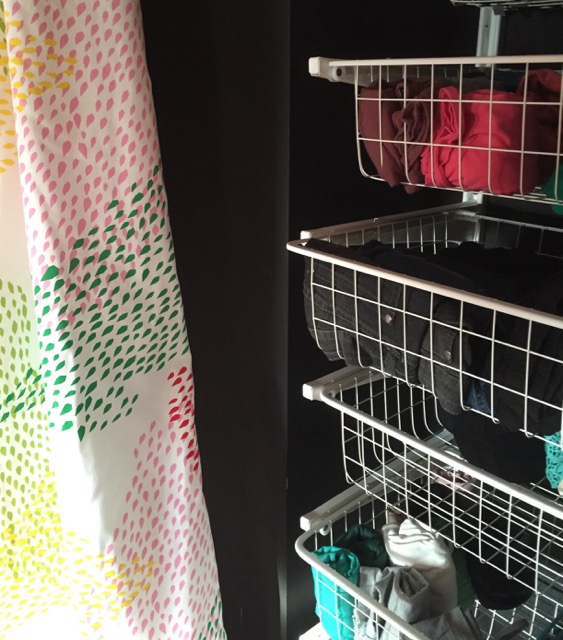
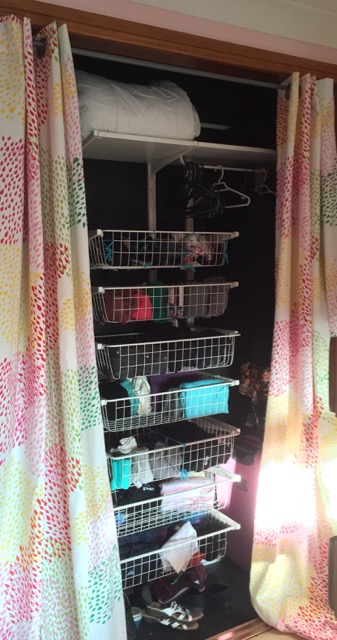
We used the same wardrobe system here as we did for the little kids, but switched it up for Isobel’s needs. She doesn’t require a lot of hanging space, but she certainly needed some drawers! This system can be changed around if it turns out she needs more or less hanging space down the track, so we are happy with that.
I’m not going to show you a billion pictures of the finished wardrobe, because this is my teenage daughter’s bedroom, and I think she she some right to privacy. 🙂
Also, it’s a wee bit hard to get great pictures of a room that a teenager lives in. If you have one of your own, you know what I mean!
I waited to show you these pictures until we’d found some curtains to finish it all off. These work soooo much better than the old sliding-glass cupboard doors that all our rooms came equipped with.
Glass panels are nice for bouncing light around, but in these cupboards they really impede access to the contents. Now that the cupboard itself has some character, the curtains are fun way to frame the whole effect, or hide the contents if needed.
I’m 100% happy with how these have turned out. Now Isobel can draw on her walls, if she wants to, or just leave them a dramatic matt black!


 Also, it’s a wee bit hard to get great pictures of a room that a teenager lives in. If you have one of your own, you know what I mean!
