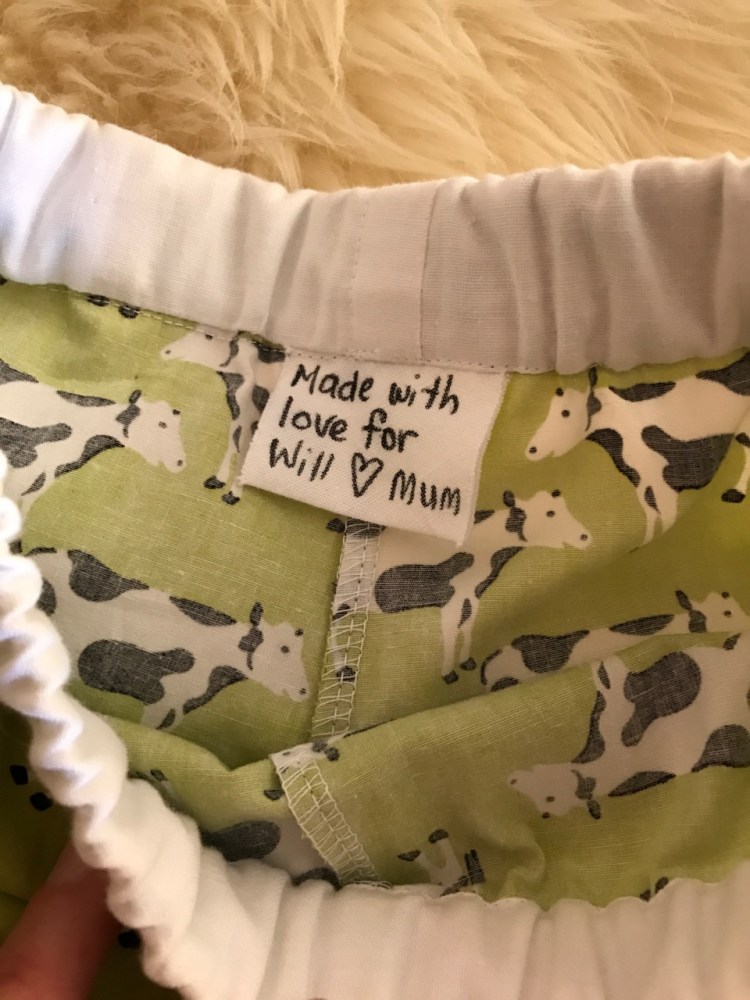
This year Evie asked me to make her teddy some clothing, as a present for her birthday.
This material just begged to be made into something sweet for Evie, as it has all her favourite things: pink colours, gold sparkle and some busy geometric shapes. I can’t even begin to describe the squeeee moment I had when I finished this dress for teddy.
It is beyond cute.
To manage this mischief, I kidnapped teddy for a while and got to work with some paper: gradually cutting away shapes and fitting around teddy’s floppy narrow neck, and working out how long to make the back straps.
The one button on the back fastens the skirt and the straps together in one.
I made a second dress using the same pattern, using some leftover fabric from a top I’d just made for me. With this dress I used two buttons so that the dress could be reversible!
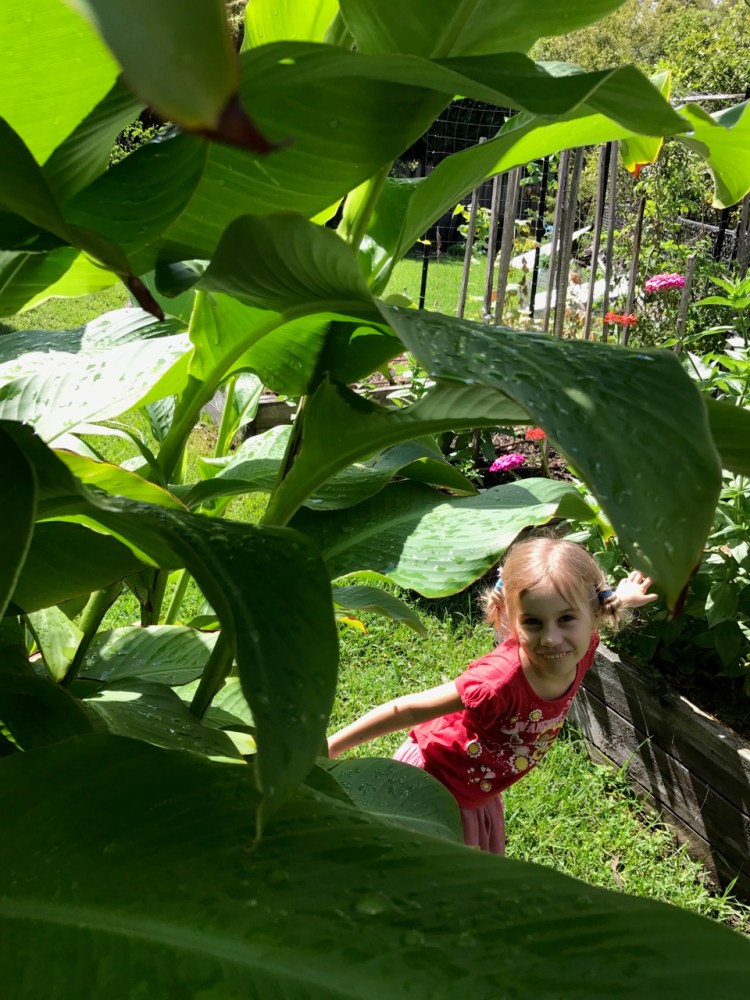
With all of these posts lately about sewing and handcrafts, have you been wondering how things are going in our garden?
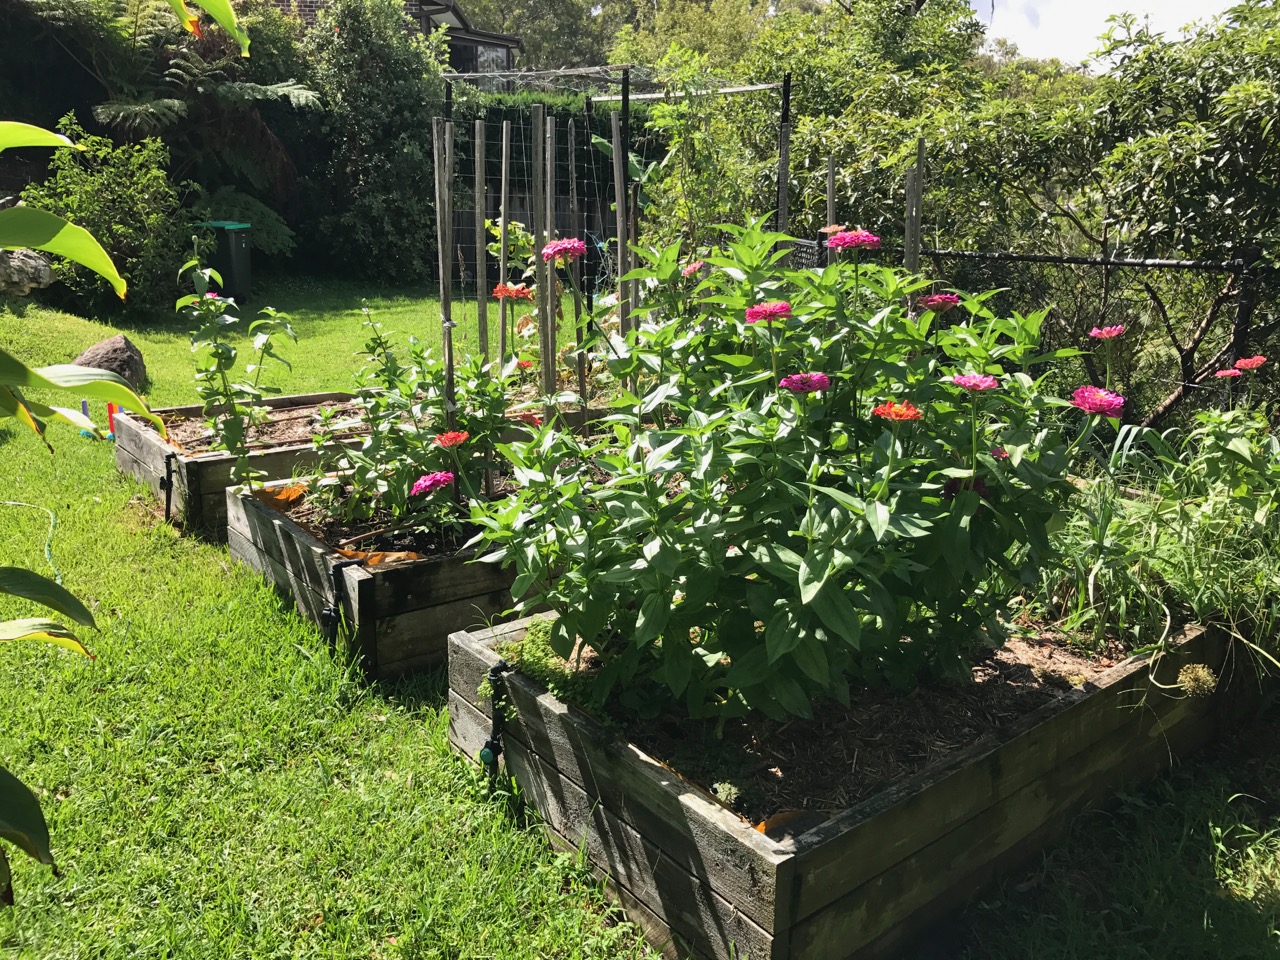
All of the summer veggies are finished up, so we’ve pulled out the zucchini plants and the straggly tomatoes. In their place we have some self-sown Zinnias, plus seedlings of tomatoes and some cucumbers. Maybe the warm weather will allow us to get a second cropping.
Can you see the pixie?
There she is! A very cheeky pixie. 😀
I’ll leave you with a couple of shots of our garden produce, both in the soil and on the kitchen bench!
I have a photo fiesta for you today, showing the various types of seam treatments I have used inside the humble SCA T-tunic. This is a basic medieval garment that is worn as underwear or layered for warmth.
The T-tunic is made up of various rectangles and triangles that fit together in complicated ways. I like to use a square underarm gusset, which makes assembling each tunic a little like folding origami, mixed with thumb wrestling.
Flat tunic showing square underarm gusset
When the side seams are finished, the square gusset appears as a triangle and has plenty of “give” to allow the arm to move freely up and down.
Gusset fully sewn
Over the years I’ve used a bunch of techniques to finish the insides of the tunic. Here are some details with my thoughts!
Overlocker / serger
This is the quickest method by far, but does not wear very well, especially in a child’s tunic. My tunics double up as winter nighties (the ones made of flannelette, anyway) and so they get a *lot* of wear.
A well-loved flannelette tunic
Gussets: Easy to do
Gores: Need to hand sew the point before serging, but it can be done — with practice.
Straight stitch with zig-zag edge
This is just like the serger, except that you must sew the seam and then tidy the edge in two separate passes, so it takes a little longer.
The benefit here is that my sewing machine makes a sturdier straight seam than my serger, so the garment stays together better. Is is also easier to sew a curve, or make an adjustment before finishing the edge of the seam.
Zig-zag seam finish
It looks pretty yuck on the inside, though.
Gussets: Easy to do
Gores: Yep, no worries.
Flat-felled
Flat-felling the seam requires a straight stitch seam, then some trimming, some folding, pressing and finally hand-sewing the edge to the main fabric of the garment.
Flat-felling showing gores and the underarm gusset (top-left)
Benefits? Pretty darn good-looking on the “good” side of the garment. Very hard-wearing seam, and probably the reason this was very commonly used in medieval times.
Downside: Lots of work, really. It’s fiddly! I have trouble with hand-sewing these days, so this is becoming a major factor for me.
Gussets: More difficult. You need to decide which way to fell the seam (left? right?) and be consistent. I choose to fell away from the gusset.
Gores: Yep, no worries — this is the best way to do gores, really. So medieval. Love.
Pressed open with edges overcast hemmed
This is like flat-felling, except instead of trimming one edge and folding over to one side, you fold and hem both sides.
Pressed open and hemmed
Twice as much hand-sewing. OUCH.
This is also not as sturdy a seam as the flat-felled variety. So why would you do it? It is Super Pretty!
“Good side” view
No, really. It is. I did this for a teen-sized tunic (see above), and it looked so beautiful I did it on a kirtle with 8 gores. Never. Again.
Gussets: As easy to do as regular zig-zag edge, because both edges fold away from the seam.
Gores: Mmmm, it is a fiddle to do it, but I have. It is a pretty big fiddle, actually.
French Seams
My favourite is the French Seam because it requires hardly any hand sewing, but it looks absolutely superb on the inside.
French seams showing the inside view of the gore and gusset
The French seam sews wrong sides together first, you press, trim and enclose the first seam allowance and then sew another seam to finish.
This is a bit of a fiddle to execute but looks so tidy on the inside! It requires you to be more focussed, or it is easy to forget to sew wrong sides first. Intersections are no trouble unless you are in the gusset area, in which case, get your thinking hat on.
It also gives a medieval-looking finish on the outside, which is important to me with re-enactment.
The main down-side here, is that you can’t really use this technique with a very bulky fabric, like a thick wool. It works just fine on medium weight linen, and lighter weight fabrics.
Gussets: If you are good with spatial stuff, you can do this much like on a serger, just remembering the two steps to finish each seam as you go. You need some patience, and probably some scribble paper to work things out. One day I might write this up with pictures. It is very hard to explain without doing!
Gores: I just worked out how to do this. I will have a tutorial coming soon! In short: don’t sew all the way to the point. Then flat-fell the point of the gusset. You can do it! 😀
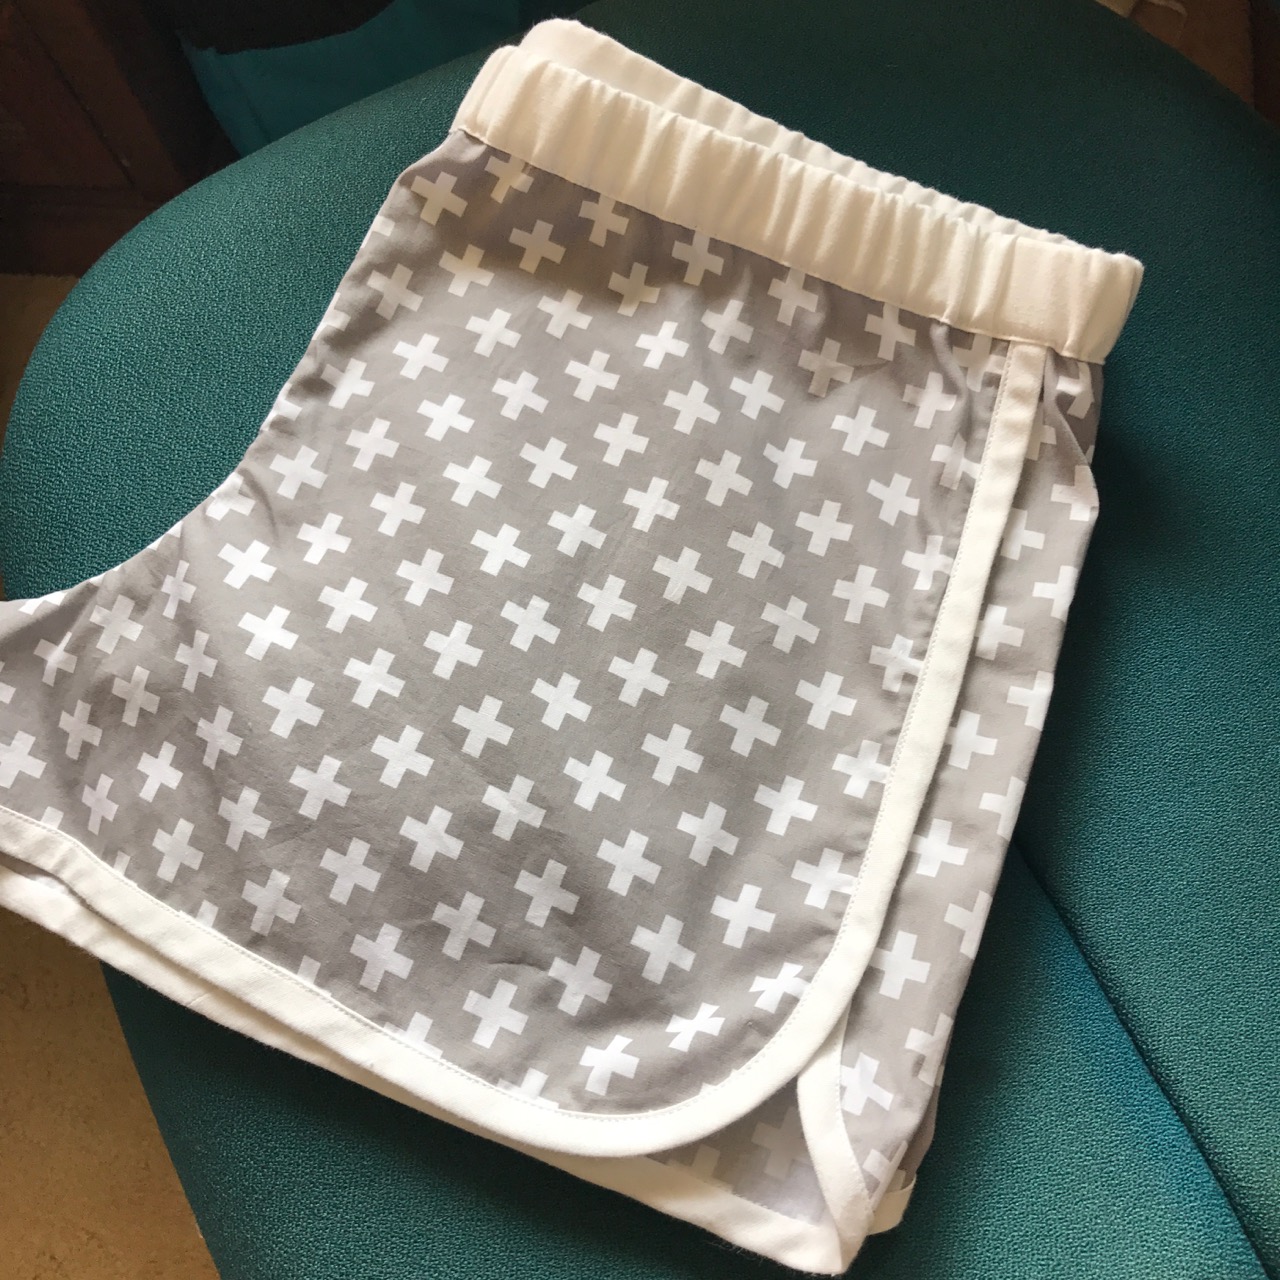
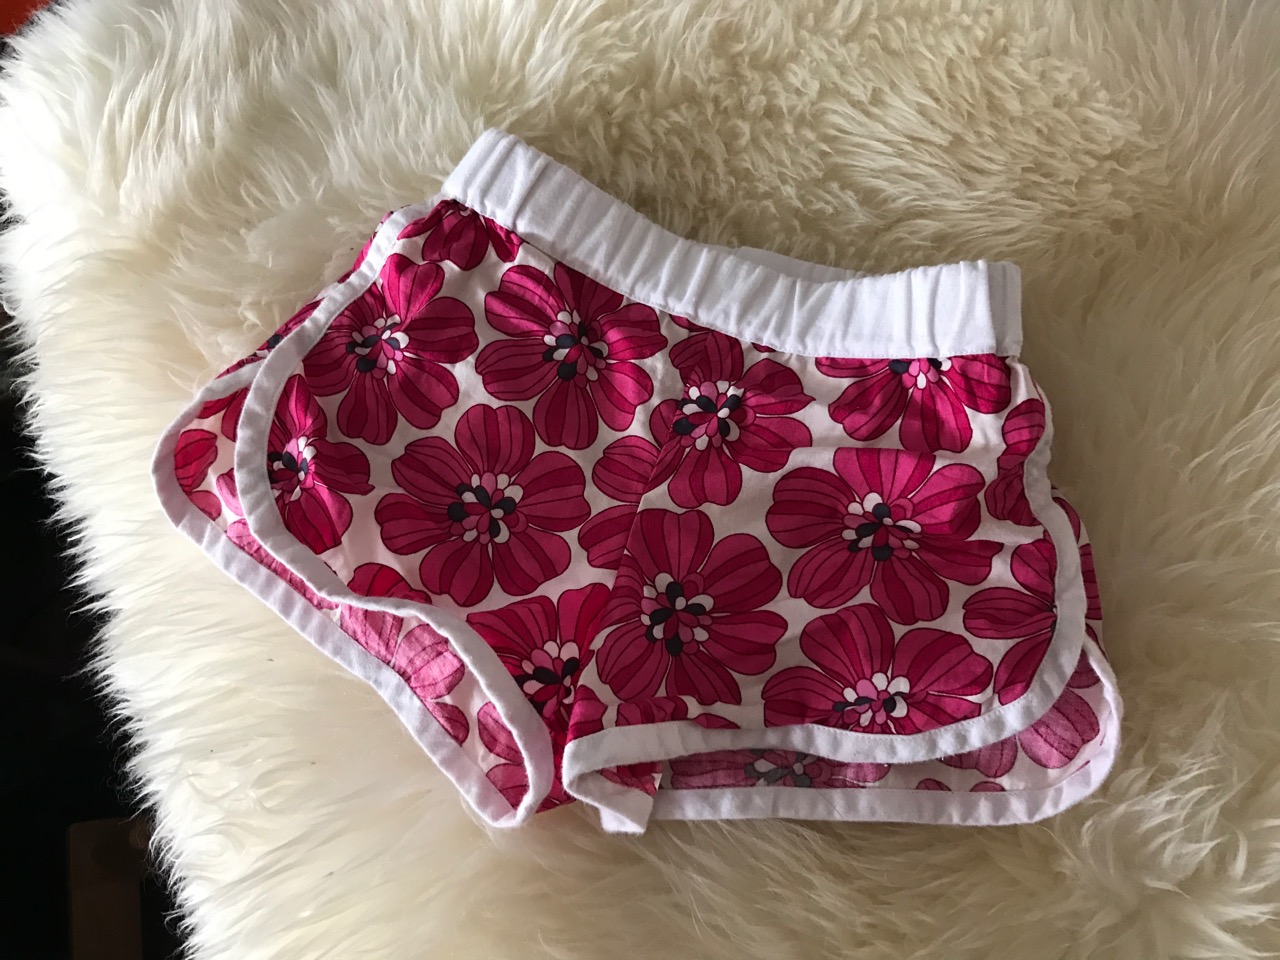
I made another pair of City Gym Shorts as a birthday present for my eldest. Happy Birthday Izzy!
This time I decided to try finishing the seams with the teeniest tiniest French seams you can imagine. And it worked!
I am a big fan of French seams because they are very quick to sew (provided you are paying attention and put the wrong sides together the first time around!) and they produce a very tidy finish on the inside, that is comfortable to wear.
Particularly for little shorts!
I used a 1/8th” seam to sew the crotch pieces together and then sewed the second seam at a generous 1/8th” (maybe closer to a scant quarter inch) to finish.
The very narrow seam allowance meant I could turn the curved part of the seam on itself without clipping. Worked a treat!
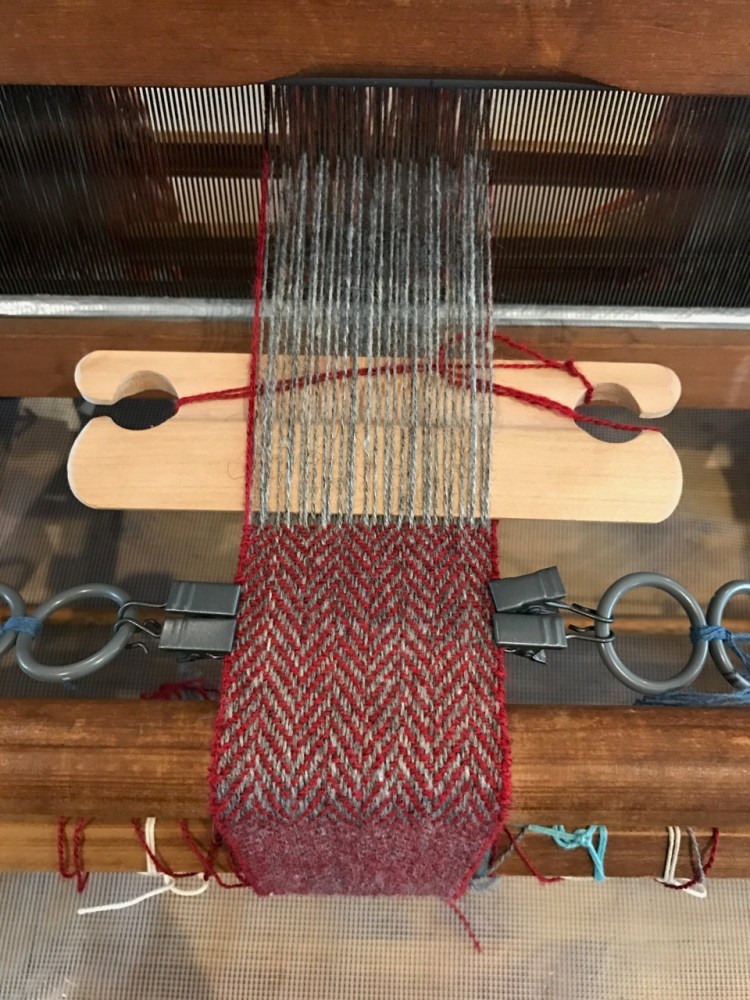
My husband laughs at the terms I use in weaving. “You’re sleying the reed?? How is that even a thing?”
Well, now I’ve started using a “temple”! 😀
This is a device that forces the width of the woven piece to match up correctly with the “dents” in the reed (haha, there I go again). This stops the selvedges and edge warp threads from crowding inwards, and keeps the piece at the width that I want.
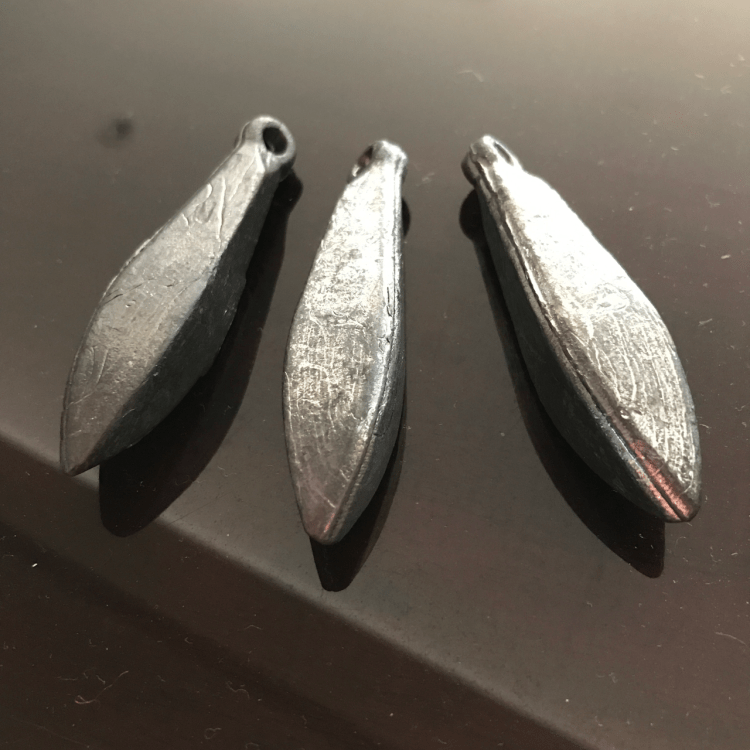
Selvedges (red threads) are clipped to hanging weights
Mine is improvised from fishing sinker weights and some curtain clips I had lying around after putting up my Ikea curtain rods.
Every inch I weave, I re-clip the temple right up next to the weft threads.
Everything is now so straight and even! And I’m no longer breaking the edge warp ends because the metal reed is no longer rubbing them so hard.
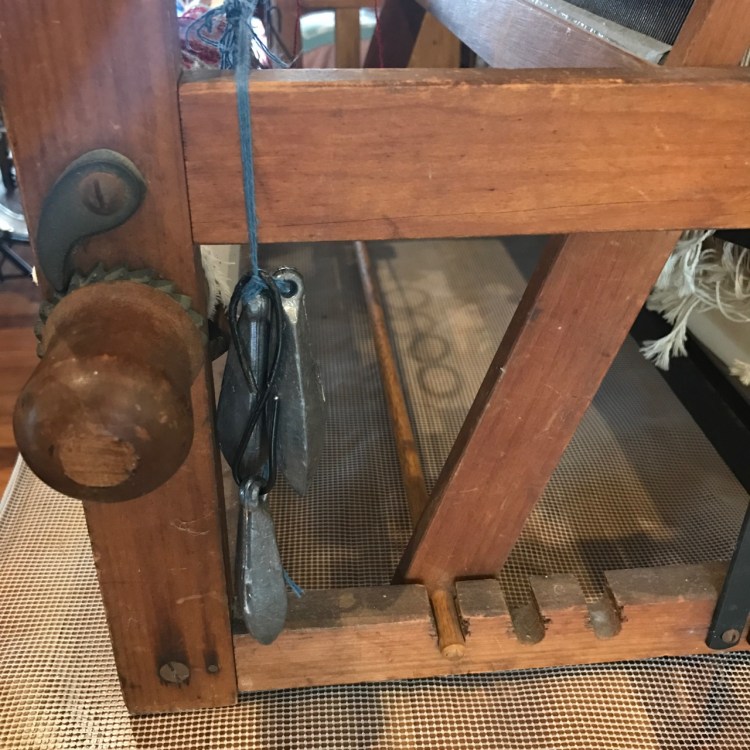
Sideways view of the weights
Each selvedge is weighted sideways with three of my new fishing sinkers (each one weighs 4 oz, or 115g). I am loving these! Ever since I tried them on my Birka tablet woven piece, I’m finding applications for them everywhere.
Floating selvedges are weighted using fishing sinkers
This warp is going to make a pair of viking leg wraps, and so is not very wide (just shy of 3 inches). I’m thinking I may need more weight on a wider piece, but I will have to wait to test my theory until the next warp.
Which might be a twill colour gamp? Or a wider piece for making into a viking hood? I am feeling deliciously full of want-to-weave projects at the moment. 😀
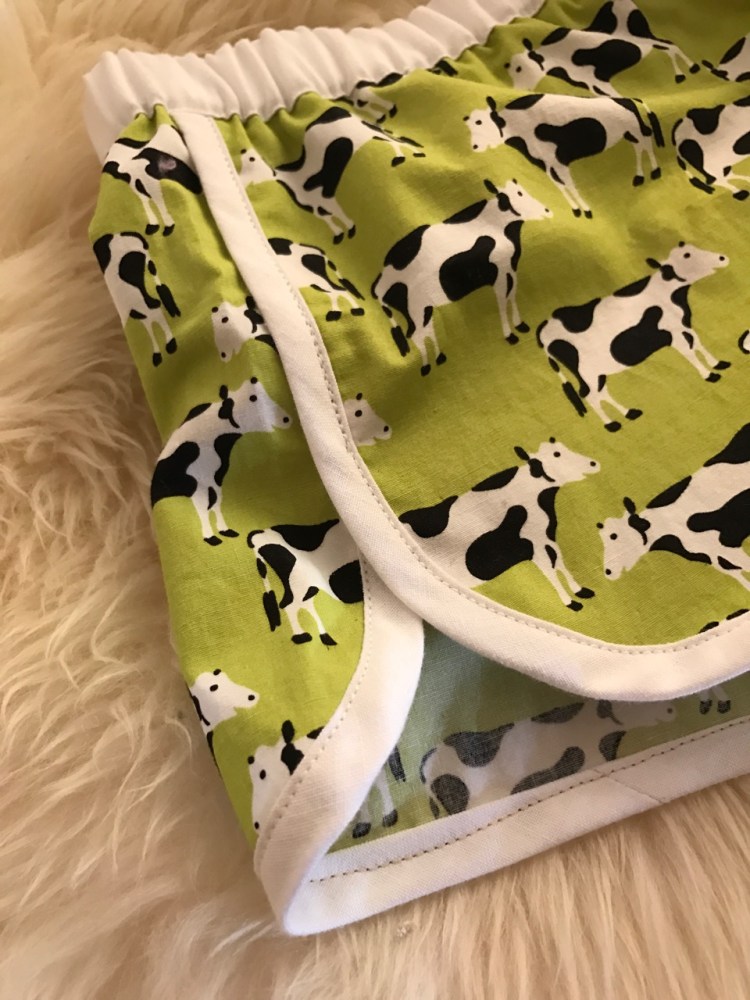
Last year my kids picked out a couple of fabrics to make up into pyjamas. These fabrics sat for ages in my stash, waiting for the right inspiration to come knocking.
Then I saw this great set of instruction from Purl Soho, to make up their City Gym Shorts. I figured — why not pyjama pants?
I printed out the pattern and then compared an existing pair of shorts to determine what size I should use — my kids have small waists and still have size 2 shorts in their cupboards, despite wearing size 6 in shirts!
The pattern instructions were easy to follow, although I deviated in the construction in the way that I attached the binding. I like to attach the binding to the wrong side, and then flip over the edge and topstitch. That way I am sure to catch both sides of the binding!
Both kids received these shorts for Christmas. I put my own tag into the garment where these things usually go — previously I have had cross words from them because they couldn’t work out how to put their pants on!
The tags are very simple: just the same bias binding I used for the edge, pressed flat and folded over so it tucks into the waist band. The bias edge has not frayed much in the wash since Christmas (maybe about 3 washes?)
I expect that I may make these every year, and the eldest has expressed interest in having a pair, too. So I’m storing the pattern on a skirt hanger, in my spare room wardrobe:
I like that this keeps the pattern clean and flat! I usually lose my self-drafted patterns in my sewing mess, if I attempt to roll them up. 🙂
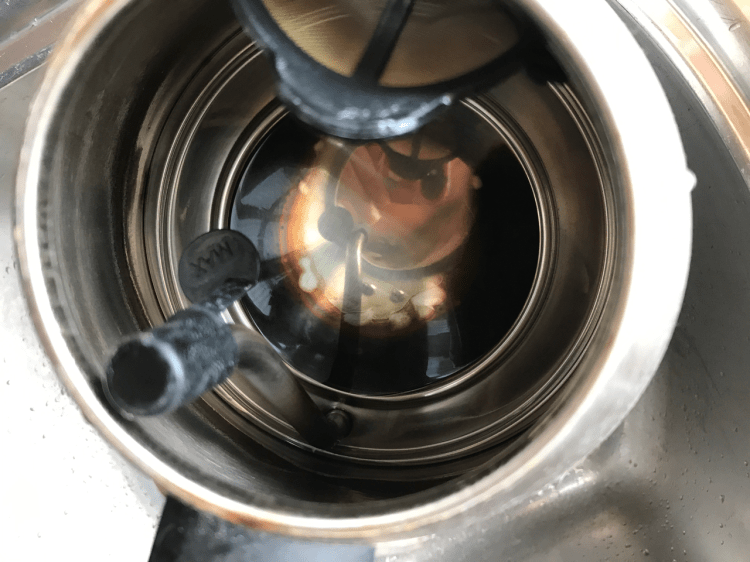
I’m an avid tea drinker, so every now and then I notice that my kettle has a build up of scale:
Black ring in the base is scale build-up
This is my cue to pull out the household white vinegar (ordinary cheap stuff I use for all sorts of things). I pour some into the bottom of the kettle, hopefully above the dirty mark line, and then let it sit.
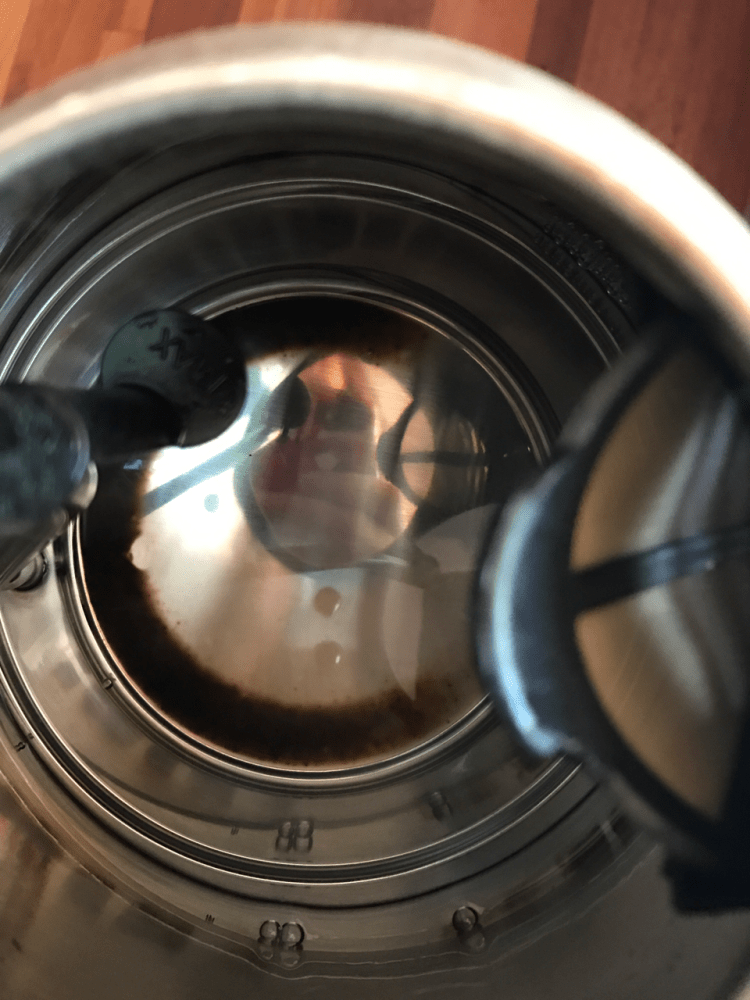
One hour later, my kettle looked a fair bit cleaner, but not done yet. I emptied out the vinegar and refilled for another go:
Black scale marks are now a faded brown
And this was after the second hour. Much cleaner! If I hadn’t wanted a cup of tea (two hours, I mean, come on!) I might have waited longer still.
A couple of important tips:
Don’t boil the kettle with the vinegar inside! NO, REALLY. You will notice immediately that you have erred, and there will be regret. I unplug my kettle and put a tea towel over the top so that I have two lines of defence against accidentally doing this.
Rinse the kettle out thoroughly before boiling it again with water. Otherwise that next cuppa is not going to be quite as good as you would hope!
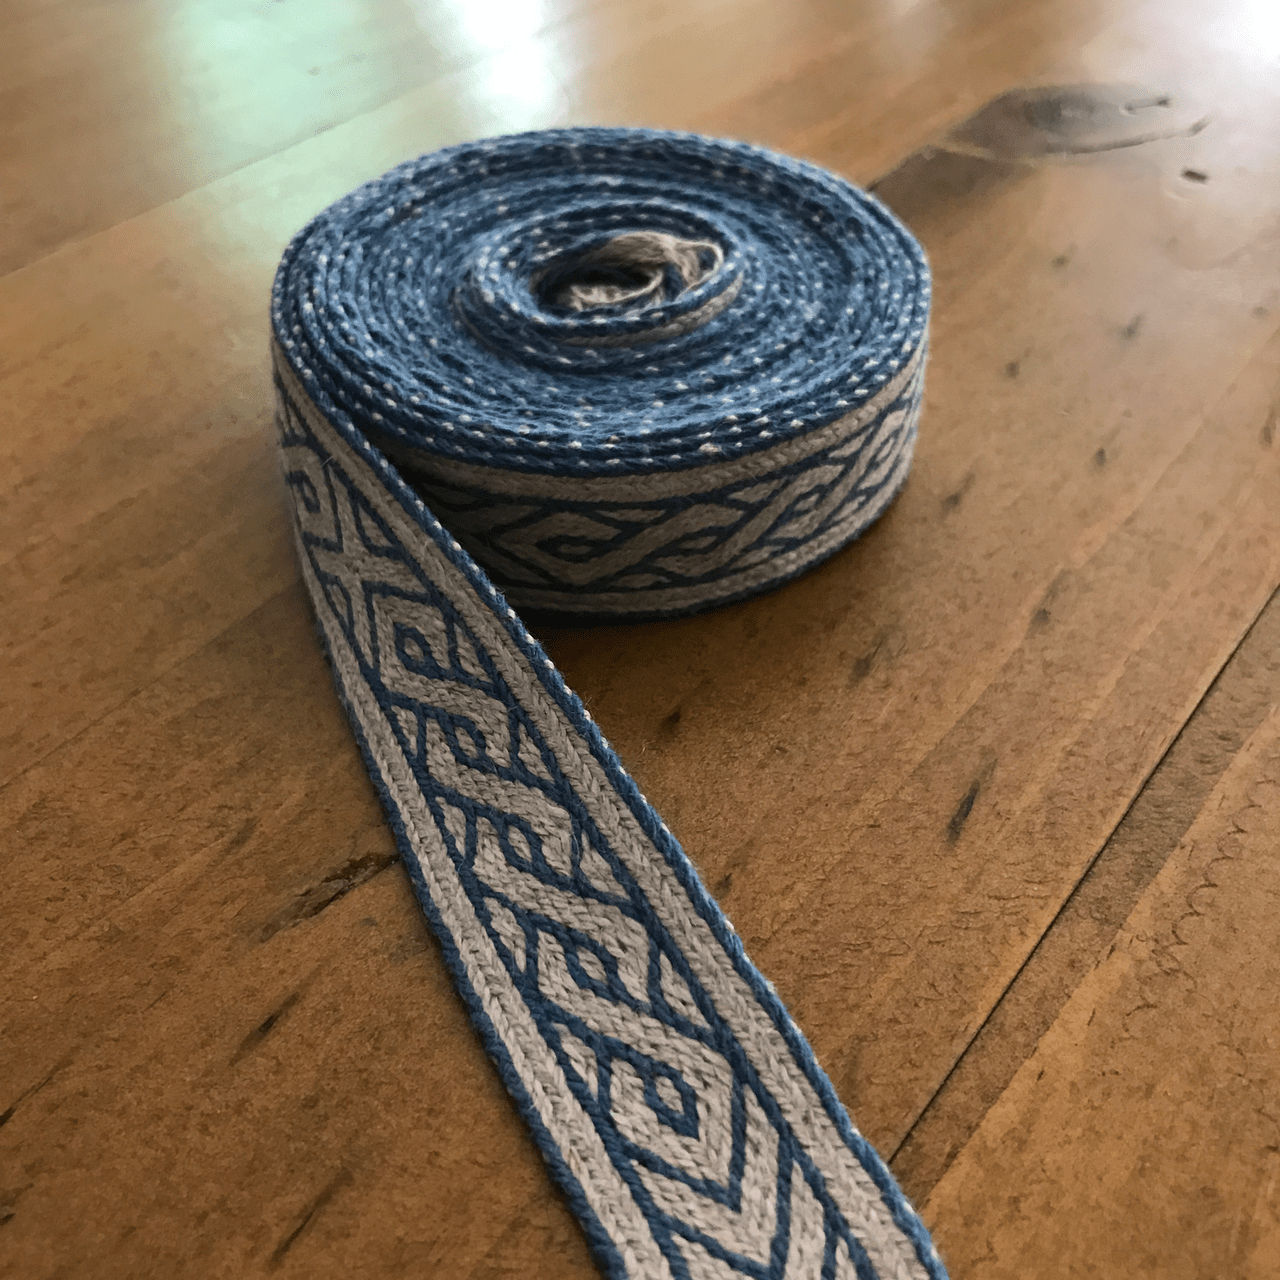
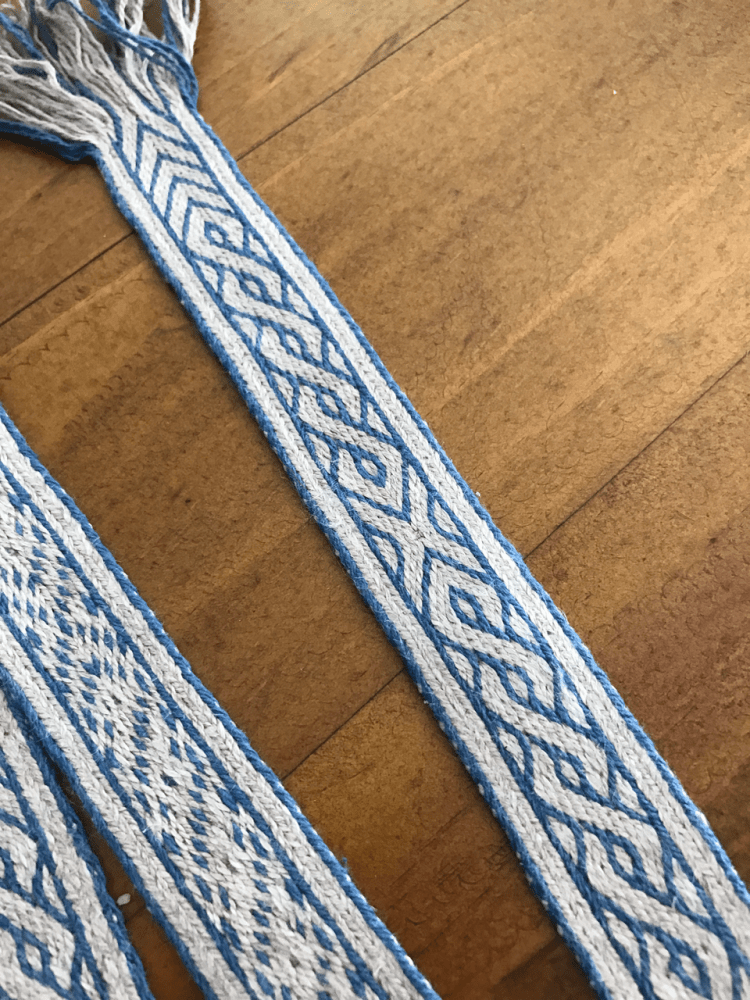
A long, long time ago, in a suburb far, far away …
… I wound a very looong warp for tablet weaving a belt. A 292 cm long belt!
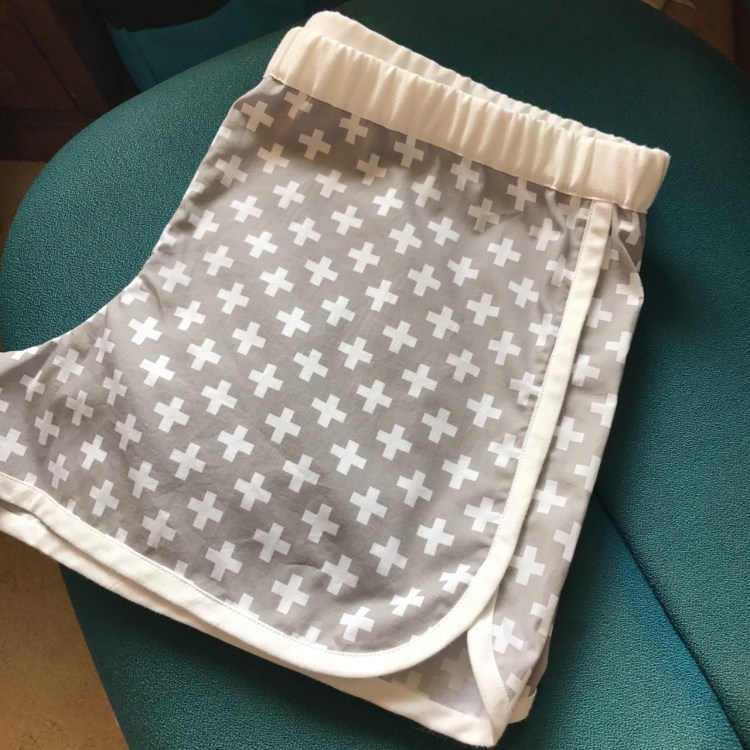
I used 20 tablets (in reality, playing cards cut into a square shape, with four holes punched at the corners). Each tablet was threaded according to my pattern, which was based on a twining motif from band found at Birka.
I used instructions from Shelagh Lewins’ site, which is a fantastic resource for patterns based on historical finds. The pattern uses missed-hole technique, but looking at my finished band, I believe I threaded all of my tablets with four colours.
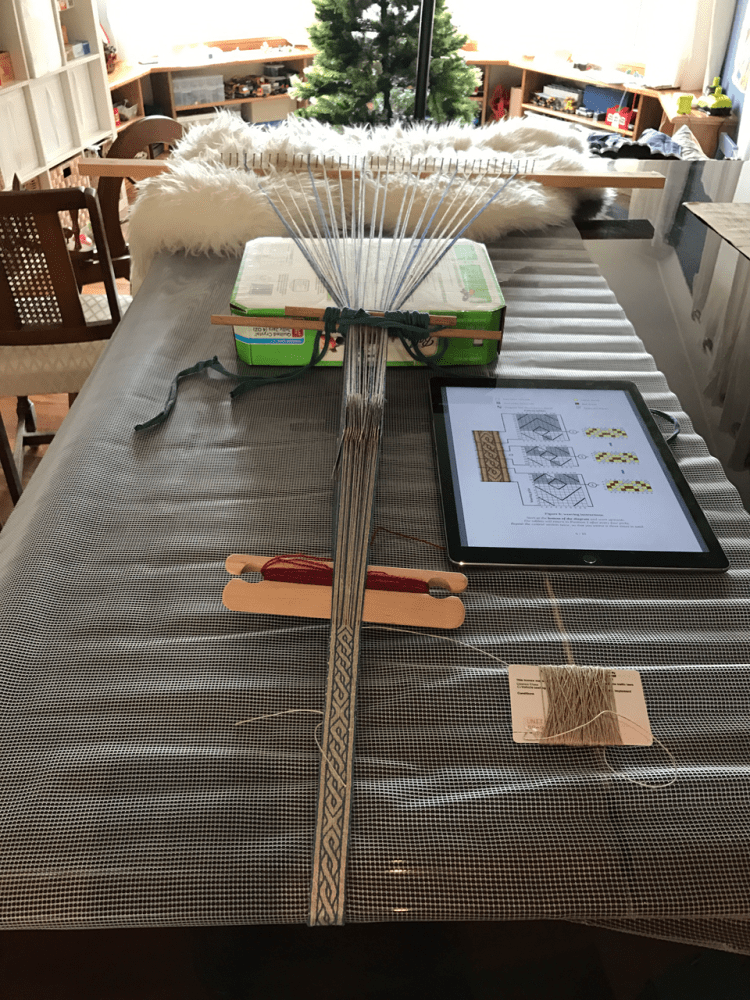
I think I started weaving this belt in April last year, and with such a long warp I quickly decided I wanted a better way to manage my tension. So I did some Pinterest research (as you do) and decided to try weighting each individual tablet so that I could get even tension and remove the twist as I wove.
Enter my collection of small preserving jars that were sitting idle in my cupboard! Each jar plus lid weighs about 135g, which turned out to be quite nice for attaching to the four threads in each tablet.
The spreader is my improvised weaving raddle I made after reading these instructions from Peggy Osterkamp. Each nail in the raddle is spaced by half and inch, which makes it easy to separate the individual tablets.
I soon realised that the raddle separated my pack and made it hard to turn the cards, so I wound together two rods using t-shirt yarn, to keep the back of the pack close together.
The tension system was fantastic, but it was a fiddle to adjust when I needed to advance the warp, and was a bit of a pain to transport around the house. The jars clattered together and required quite a large amount of vertical space in order to weave.
By the end of the weaving, I decided to shell out for some proper weights, so I purchased 115g fishing sinkers to replace my jars. These are vastly more convenient because I can hang them in a line. They are easier to adjust, too.
I’m now devising a warp-weighted loom that can accomodate a comfortable weaving distance when I have two or three separate packs going at once. For now I’m very happy to find a place to tie-up my weaving (tensioned using the piano lid, or the back of some chairs, or clamped to a table).
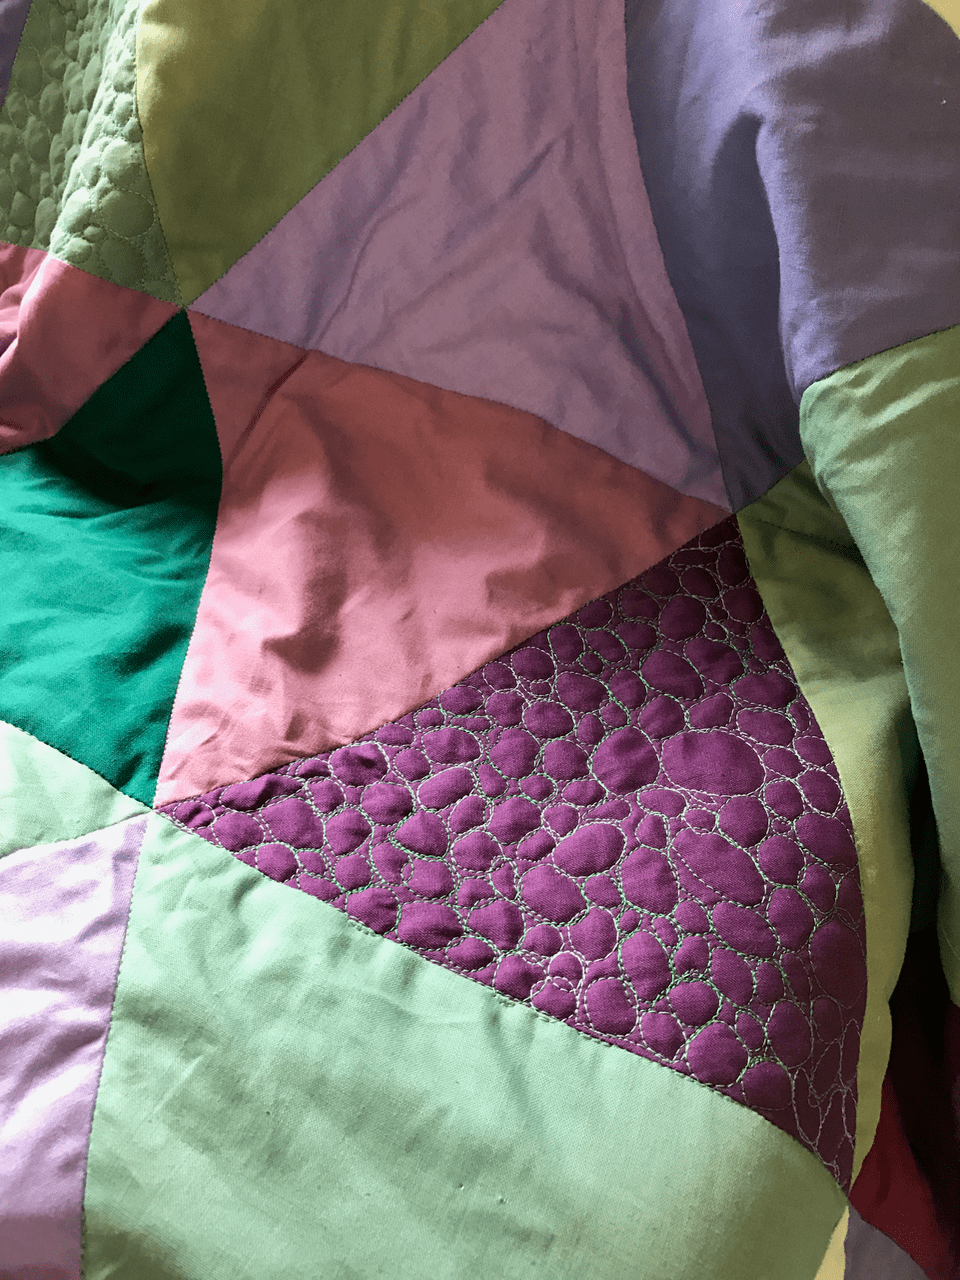
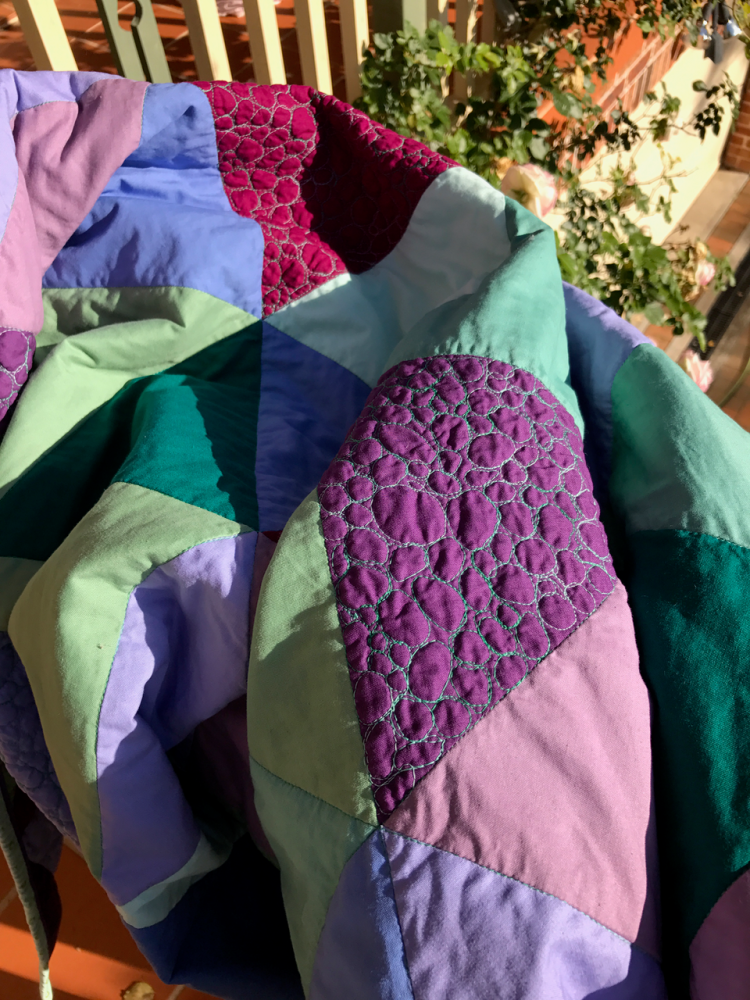
This Christmas I made Isobel a twin-size equilateral triangle quilt.
This is the biggest quilt I’ve completed since I was in High School! It overlaps her single bed with enough to tuck in at the sides.
This was the project that I hinted about last year, when I posted about using starch for the first time ever — it made it so much easier to cut the triangles accurately, and for sewing the points.
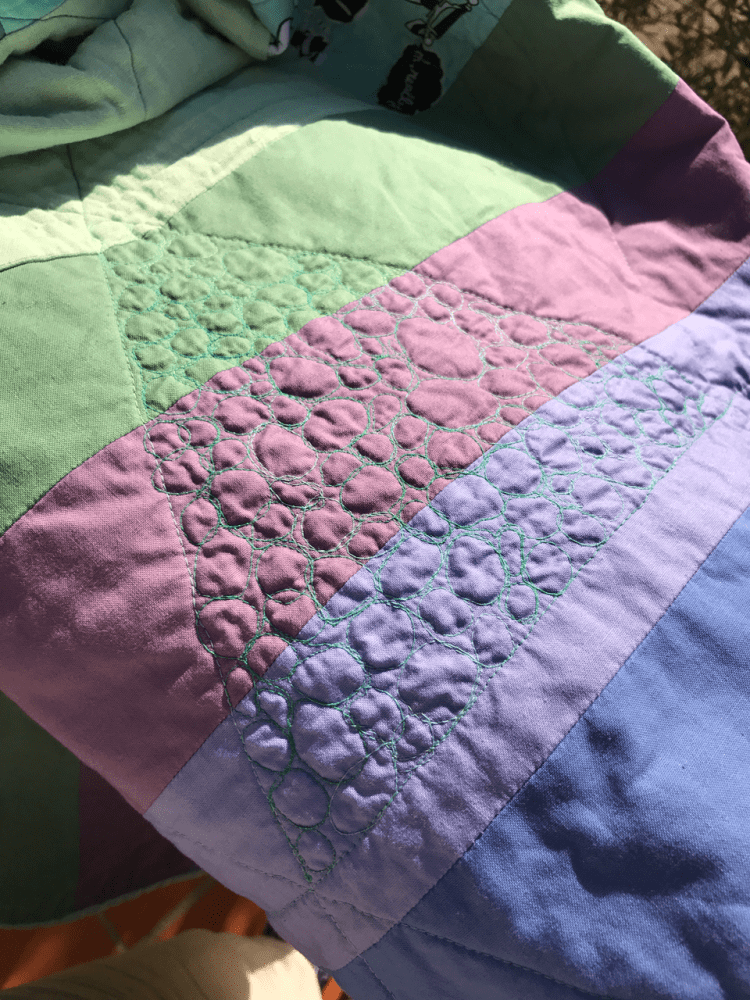
To quilt this (for me, giant) project on my home sewing machine, I first used my walking foot to quilt in-the-ditch around all the triangles. Then, having stabilised all the layers together, I picked out some triangles and did small pebbling, using my free-motion darning foot.
The contrast in the texture came out beautifully!
I also love the way the quilting thread shimmers: I used a variegated green cotton from Gutermann.
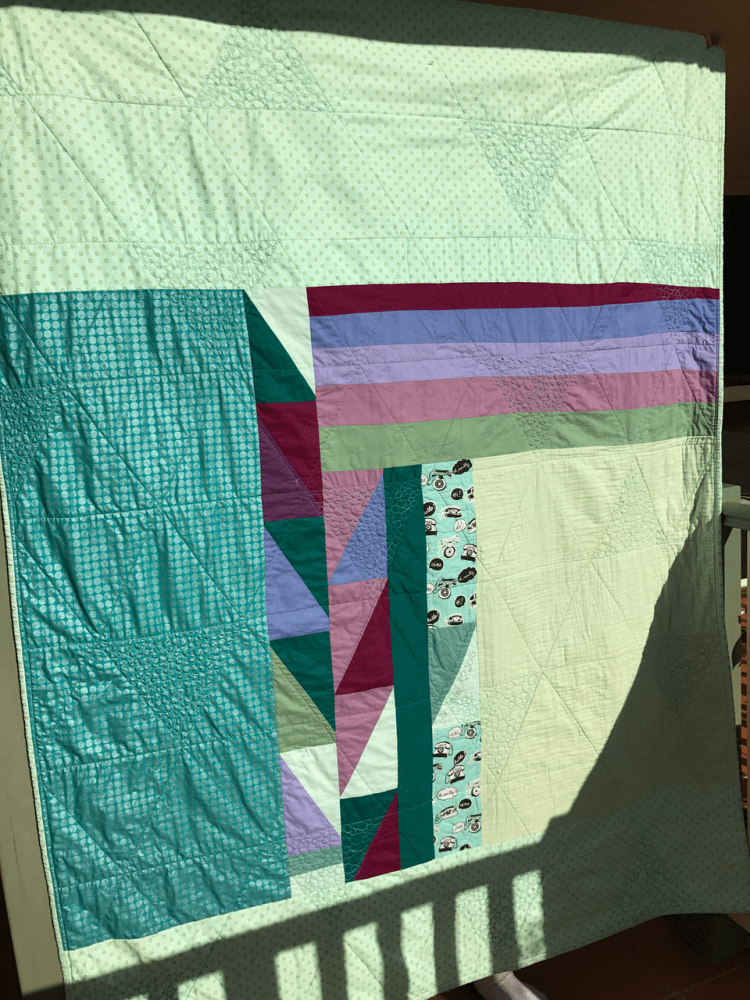
I always intended this quilt to have a modern flavour, so I pieced the back using scraps from the front, and with a couple of accent fabrics.
I expected to have more leftovers, but made the quilt bigger than I’d originally planned (that happens when you buy the fabrics two years in advance of actually making it up!)
I had to go stash diving to find enough fabric to cover the back. The pale green baby wrap in cotton gauze was texturally different and a little nerve wracking to include on the back, but I think it came up a treat.
I bound the quilt using a wonderful technique to make a contrast flange. I really love the way the darker purple creates a well-defined edge. I will definitely use this technique again!
This quilt measures 56 x 72 inches, and was completed on 26 November 2016.
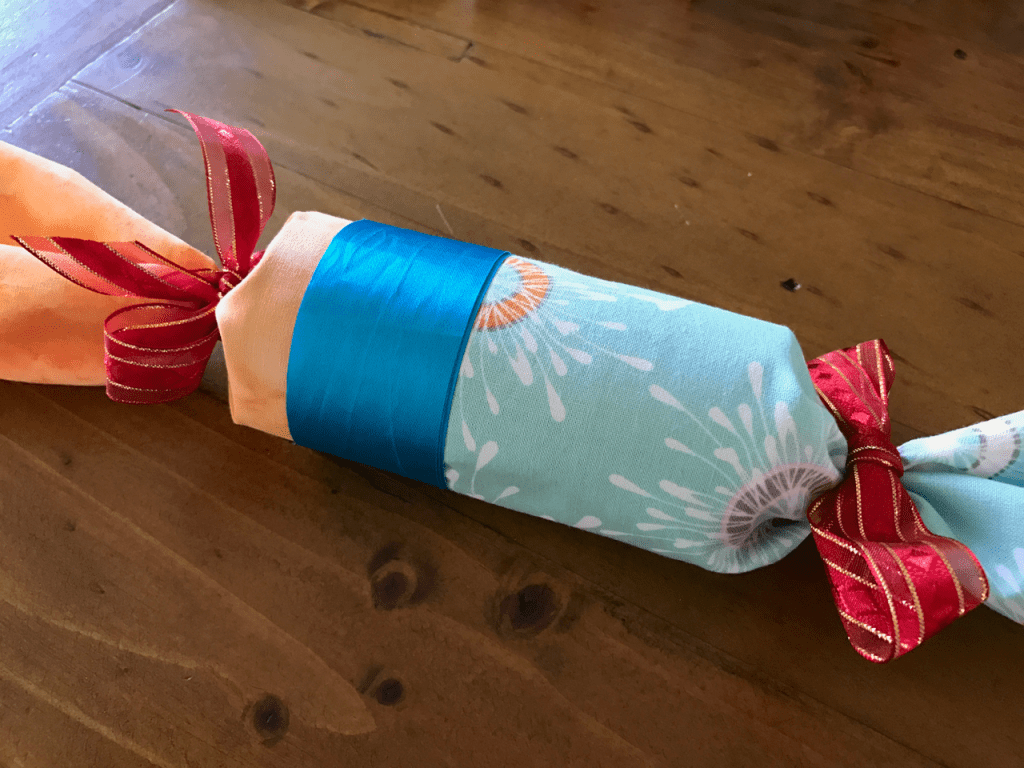
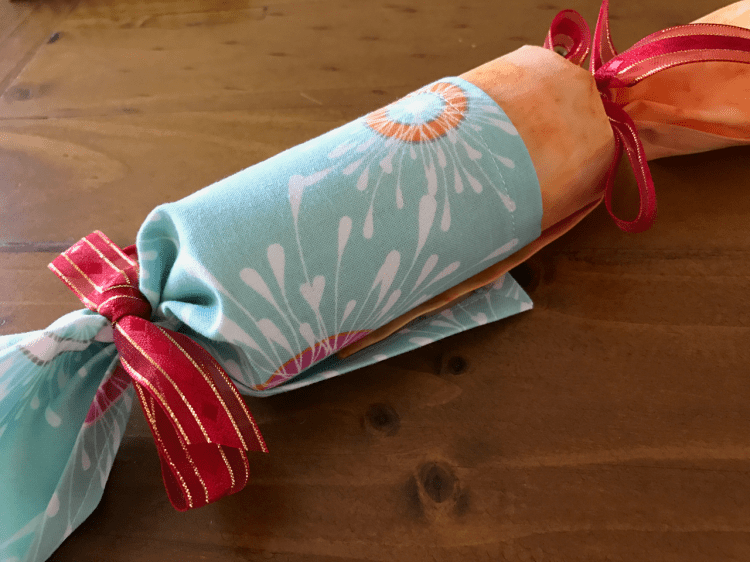
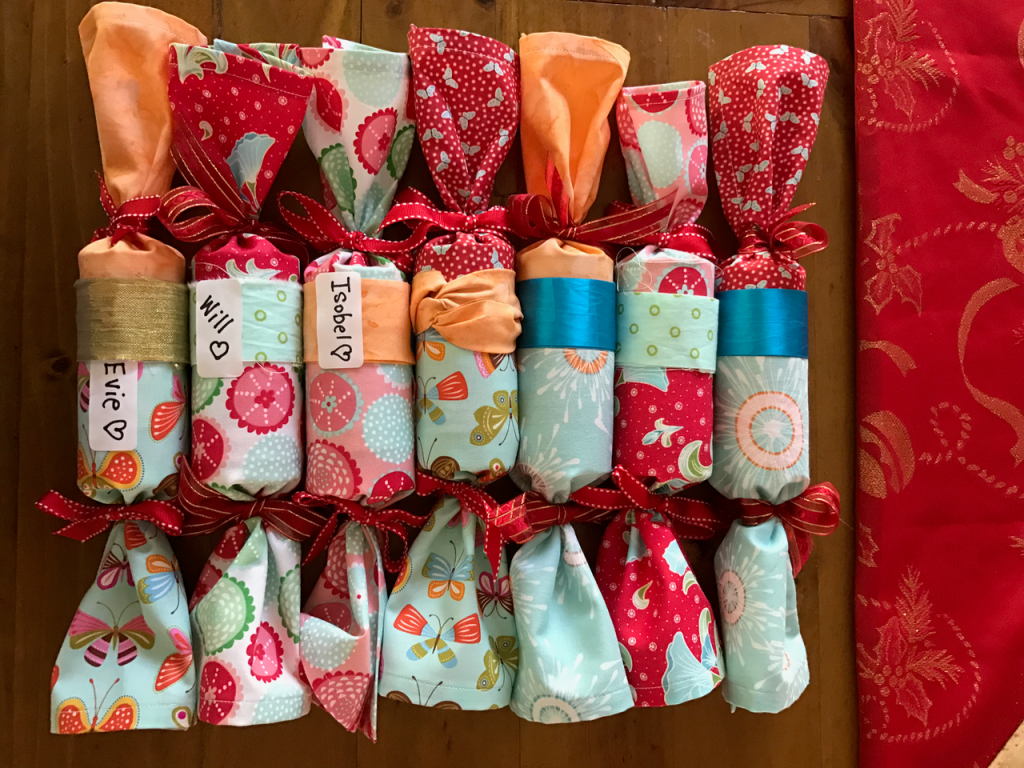
My family loves pulling crackers at Christmas time. In recent years I have had a bit of a love/hate relationship with them, though, as they are filled with ridiculous plastic disposable “toys” that everybody hates, and just fill up the garbage bin.
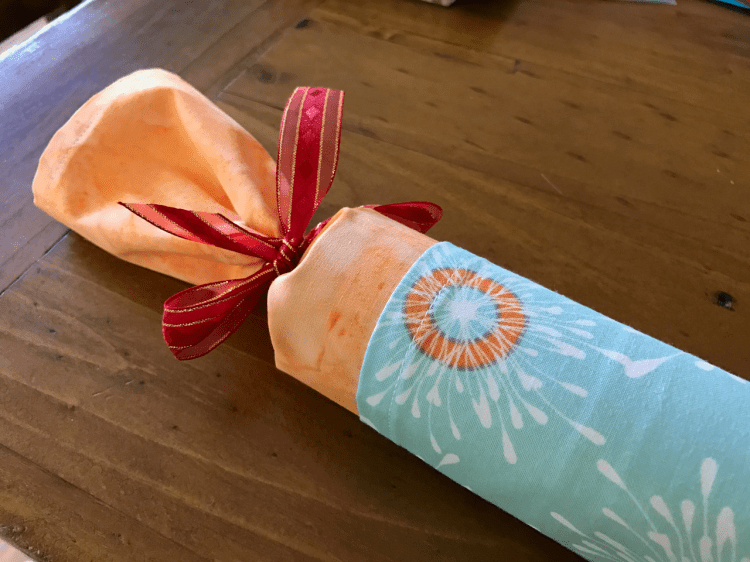
This year I made a special effort to replace the junk disposable crackers with some really wonderful, special ones.
And I did!
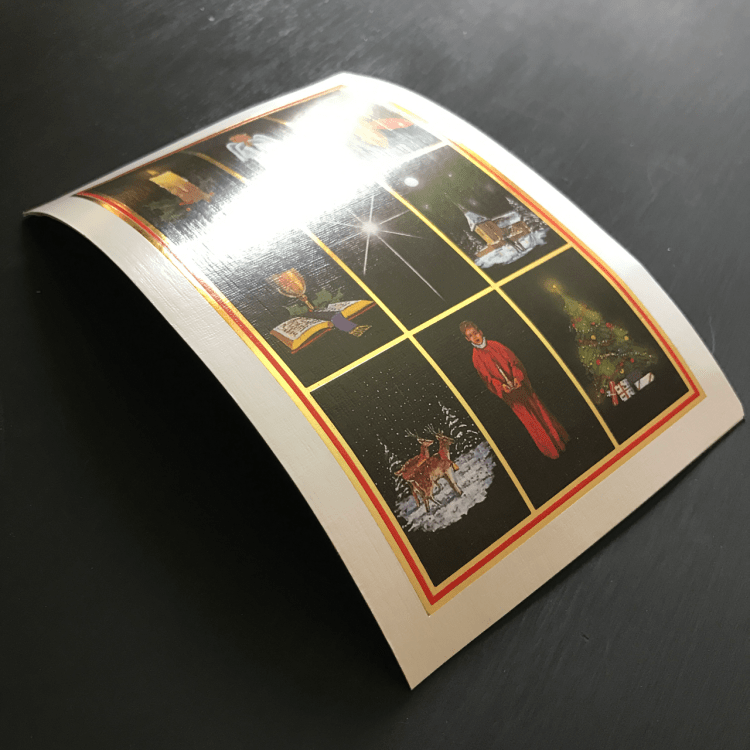
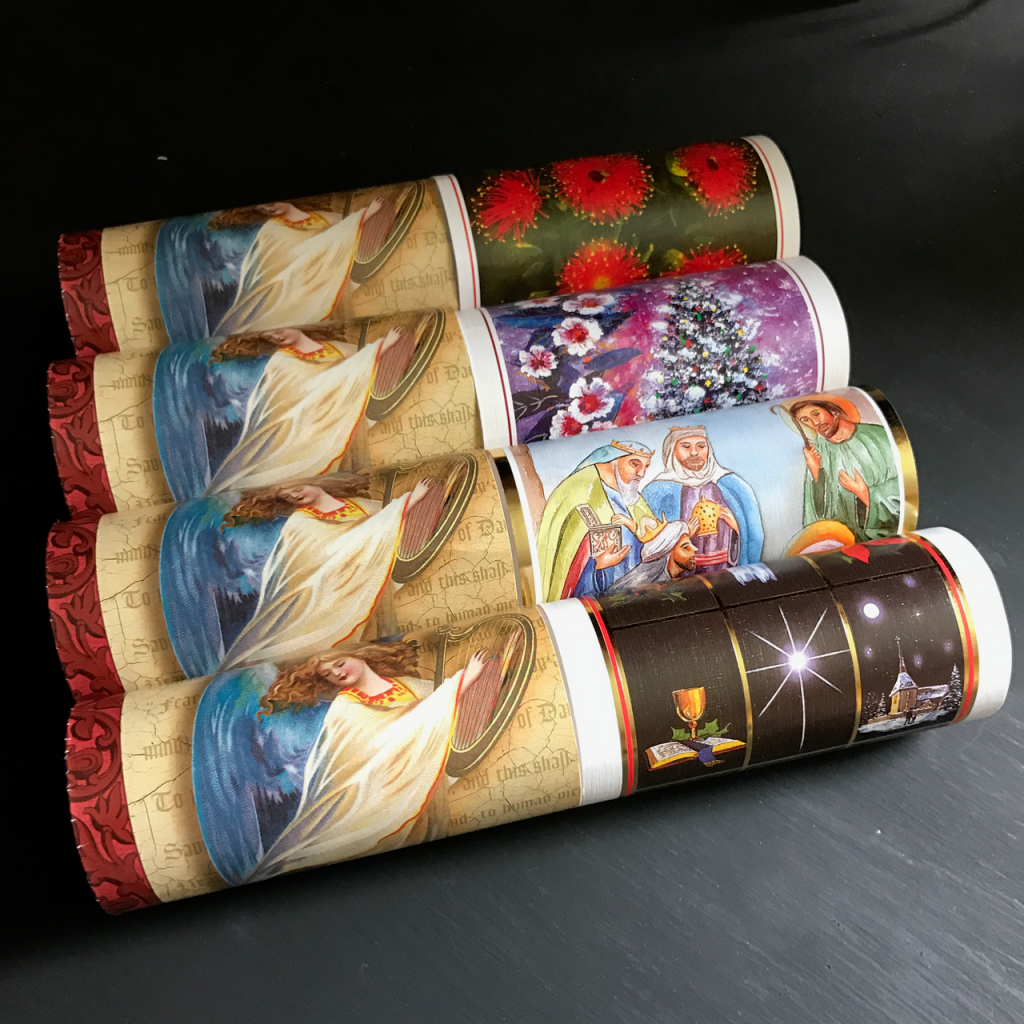
These crackers are made from some beautifully coordinating fabric, wrapped around re-purposed Christmas cards and tied with some ribbon.
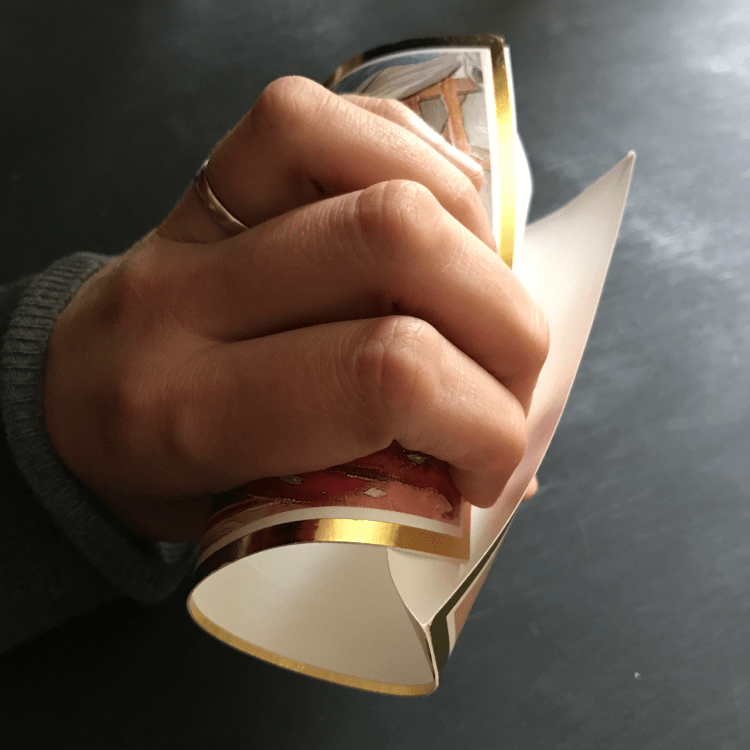
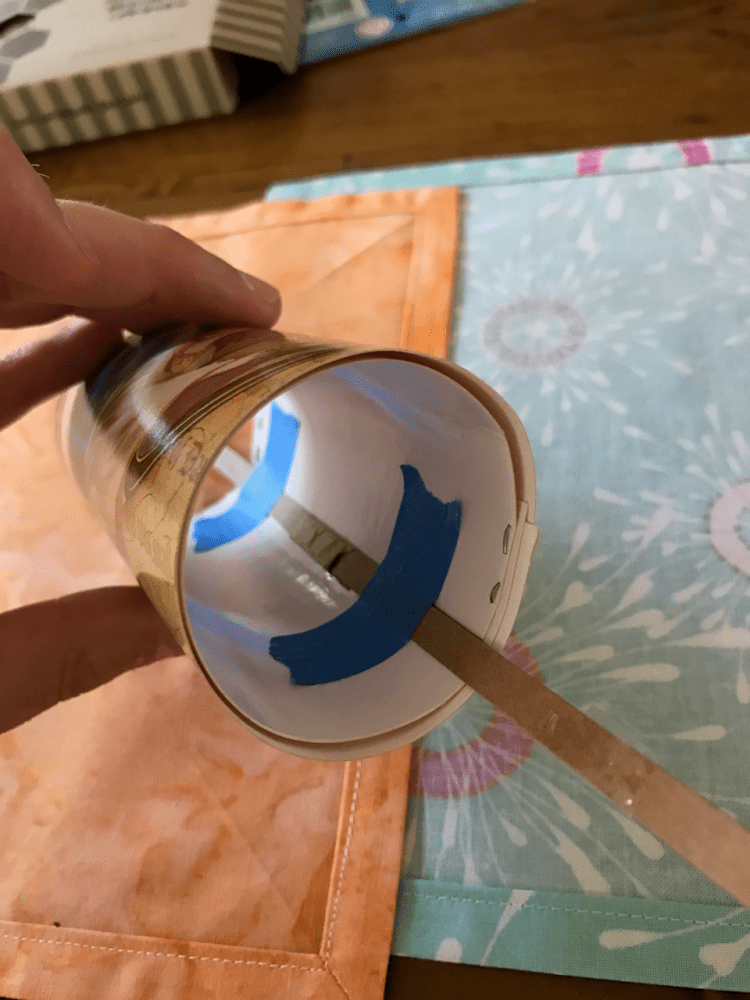
To make the cardboard core, take one used portrait-style Christmas card, curve the spine a little, roll it into itself, and staple it together.
Step 1: Curve the card
Step 2: Roll and tuck the spine inside itself
Step 3: Staple the overlap at both ends
These things are beautiful enough on their own to use, as the Christmas cards are glossy and designed by people with actual artistic talent. 🙂
However, they won’t hold party favours, so I went the next step of making some fabric covers. To make these easy to re-use each year, I designed the system to be simple to put together and wash (if needed).
All you need for each cracker is:
A Christmas card tube
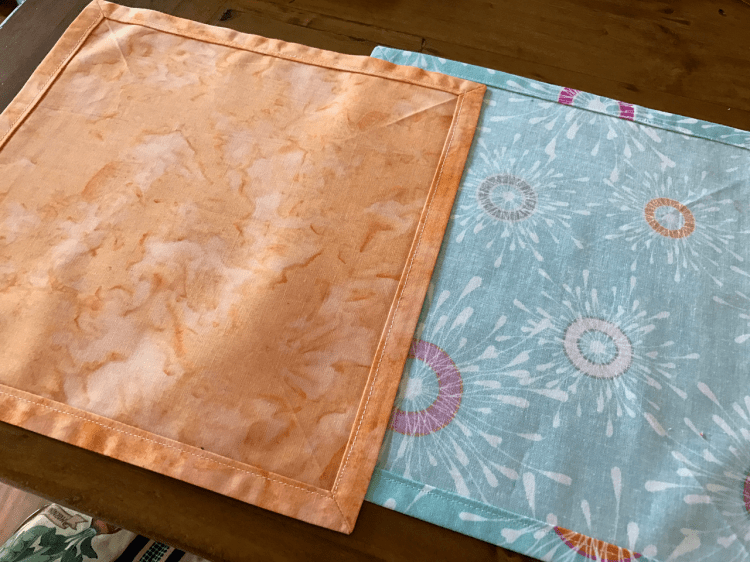
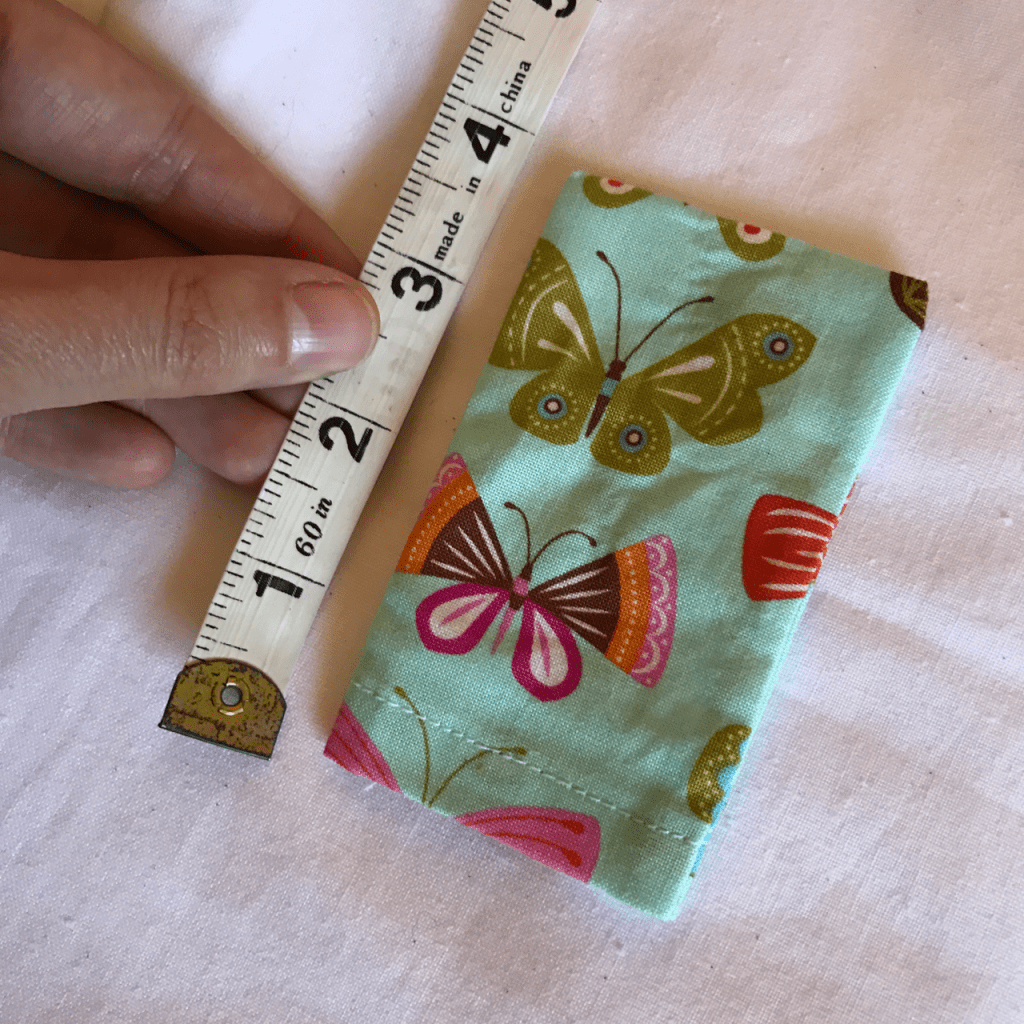
Two square napkins (I made mine 9 1/2 inches, with mitred corners for extra fancy)
Two lengths of ribbon (mine measured about 15 inches each)
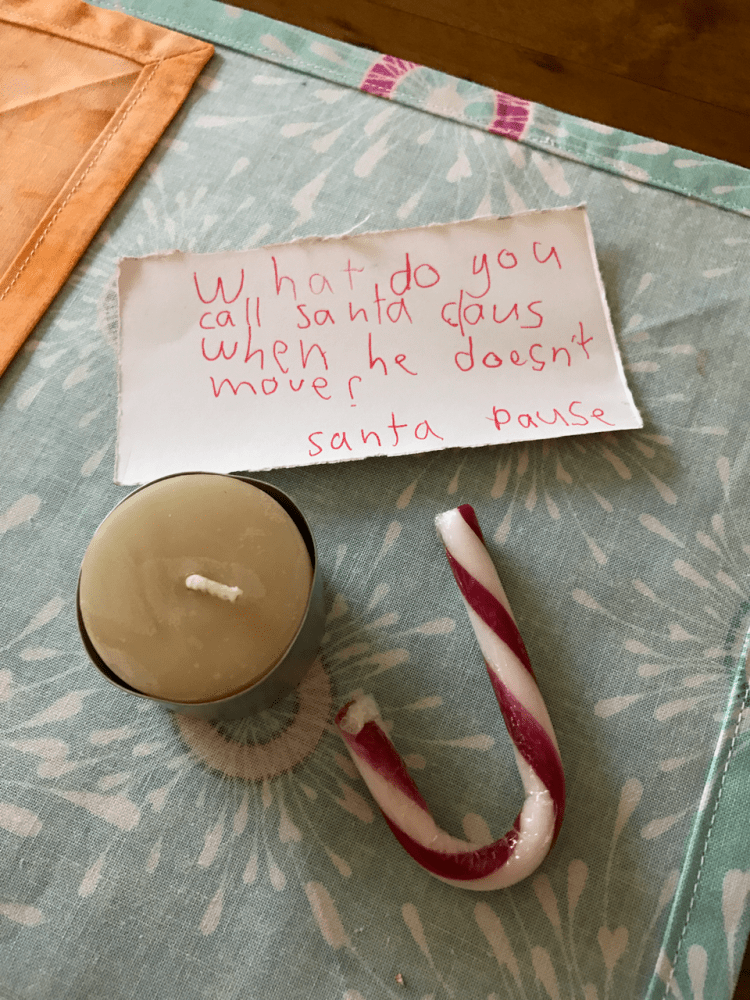
Something to put inside — my kids wrote some jokes, and I put consumables and a candle in mine
A cracker snap (a mini firework) — available in Australia from online craft stores. I found mine at Art Riot, but I believe Spotlight and Lincraft do have them seasonally
A wide ribbon, or a length of scrap fabric to tie around the cracker
I tested my idea with existing household napkins, to make sure it would make a satisfying “pull” before I invested in the pretty fabric. I didn’t need to add velcro or snaps, but you certainly could, especially if you wanted to skip the firework insert.
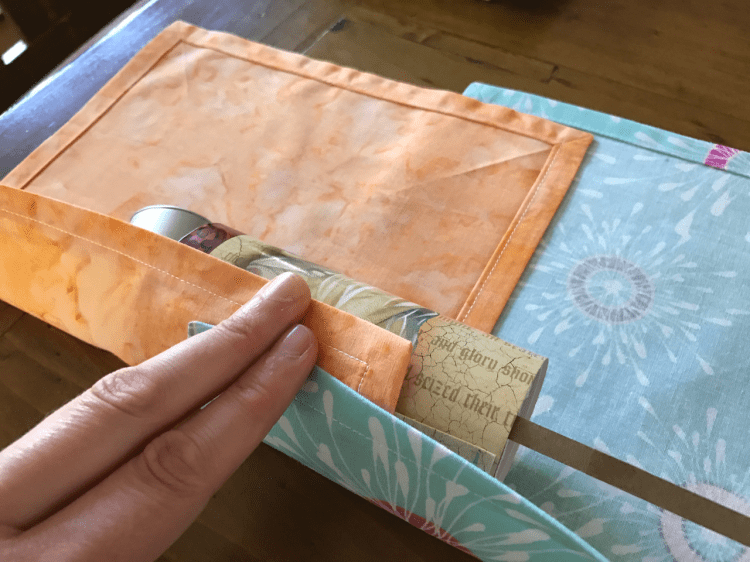
Here’s how to assemble your cracker:
Step 1: Overlap two napkins
Step 2: Fasten the firework snap inside the cardboard
Step 3: Roll the napkins around the tube
Step 4: Tie one ribbon around the end
Step 5: Stuff with goodies
Step 6: Tie the other ribbon to enclose
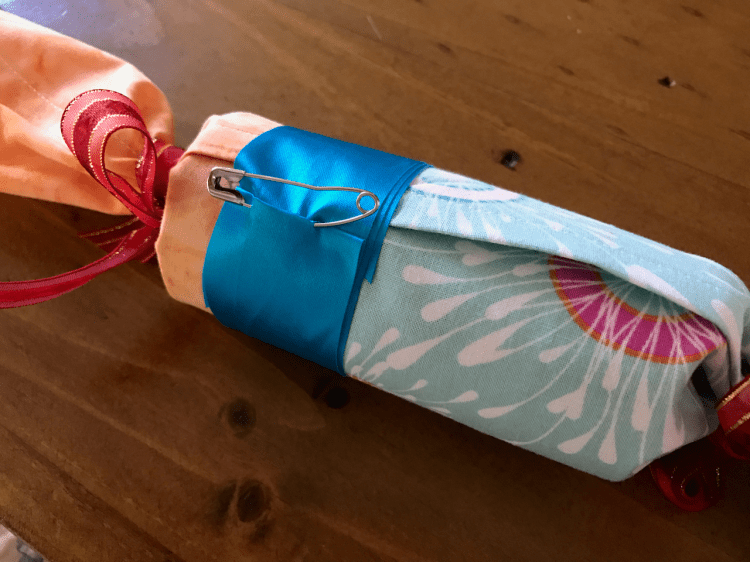
Step 7: Cover the join with ribbon and fasten
When overlapping your napkins, note that there should be a little offset at the top so that when you roll it up, the inner napkin (orange) is enclosed by the outer one (blue flowers).
The outer ribbon is decorative, but is useful to give a more satisfying “pull” if you wrap slightly firmly around the join in the napkins.
This year I fastened mine with either a bit of blue painters tape, or a safety pin (taking care to pin only the ribbon, and not the napkins). Next year I’m going to sew some ribbons with people’s names, so I don’t have to use a dodgy sticker! I’m thinking I might use velcro to fasten these.
I made some tiny little bags from scrap fabric that could hold little sweets (I chose Skittles and Jelly Beans) for my kids to eat, instead of a toy. The grown-ups received a beeswax tea light candle in their cracker.
One final note: Whoever is holding the inner napkin is likely to “win” the cracker! Useful if you have someone with special dietary needs or when pulling crackers with kids. *wink*
The final product is some amazing crackers that I can use again and again each year.


 All of the summer veggies are finished up, so we’ve pulled out the zucchini plants and the straggly tomatoes. In their place we have some self-sown Zinnias, plus seedlings of tomatoes and some cucumbers. Maybe the warm weather will allow us to get a second cropping.