Welcome to those of you who have just come over from Rhonda’s blog, Down to Earth! What a thrill it is for me to have you here. 🙂
You will probably not be surprised to learn that Rhonda was absolutely my first inspiration for living simply. From her I have learned how to make soap, make my own laundry liquid, make apple cider vinegar, … this list is pretty long! I bet many of you have learned so much from her too.
Let me clear off my kitchen table and we can all sit down for a nice cup of tea!
I haven’t been taking a lot of work-in-progress photos of my kitchen “remodel”, so there is a bunch of stuff that has happened in the kitchen since we first moved in that I can’t show you in pictures. Here’s a reminder of what it looked like at the start:
The kitchen, the day we collected our keys!
So far we have:
Replaced the stove (previously we had only two burners, and two grill things, with an extractor fan that sucked down into the cabinet below)
Replaced the oven (after I became over frustrated with propping the door closed with the broom handle)
Replaced the dishwasher (not strictly needed but the old one was terrible, didn’t wash the dishes, and was therefore not used)
Replaced all the halogen down lights with LEDs, including those dangling ones over the peninsula area
Removed the old curtain valance … thing … that went round the top of the sink area windows
There are also some more recent updates that I have a lot more detail to share, so I will show you those in separate posts. Is it too much of a tease for me to leave these as a surprise?
What I will show you today are a couple of little things that make a big difference in our kitchen.
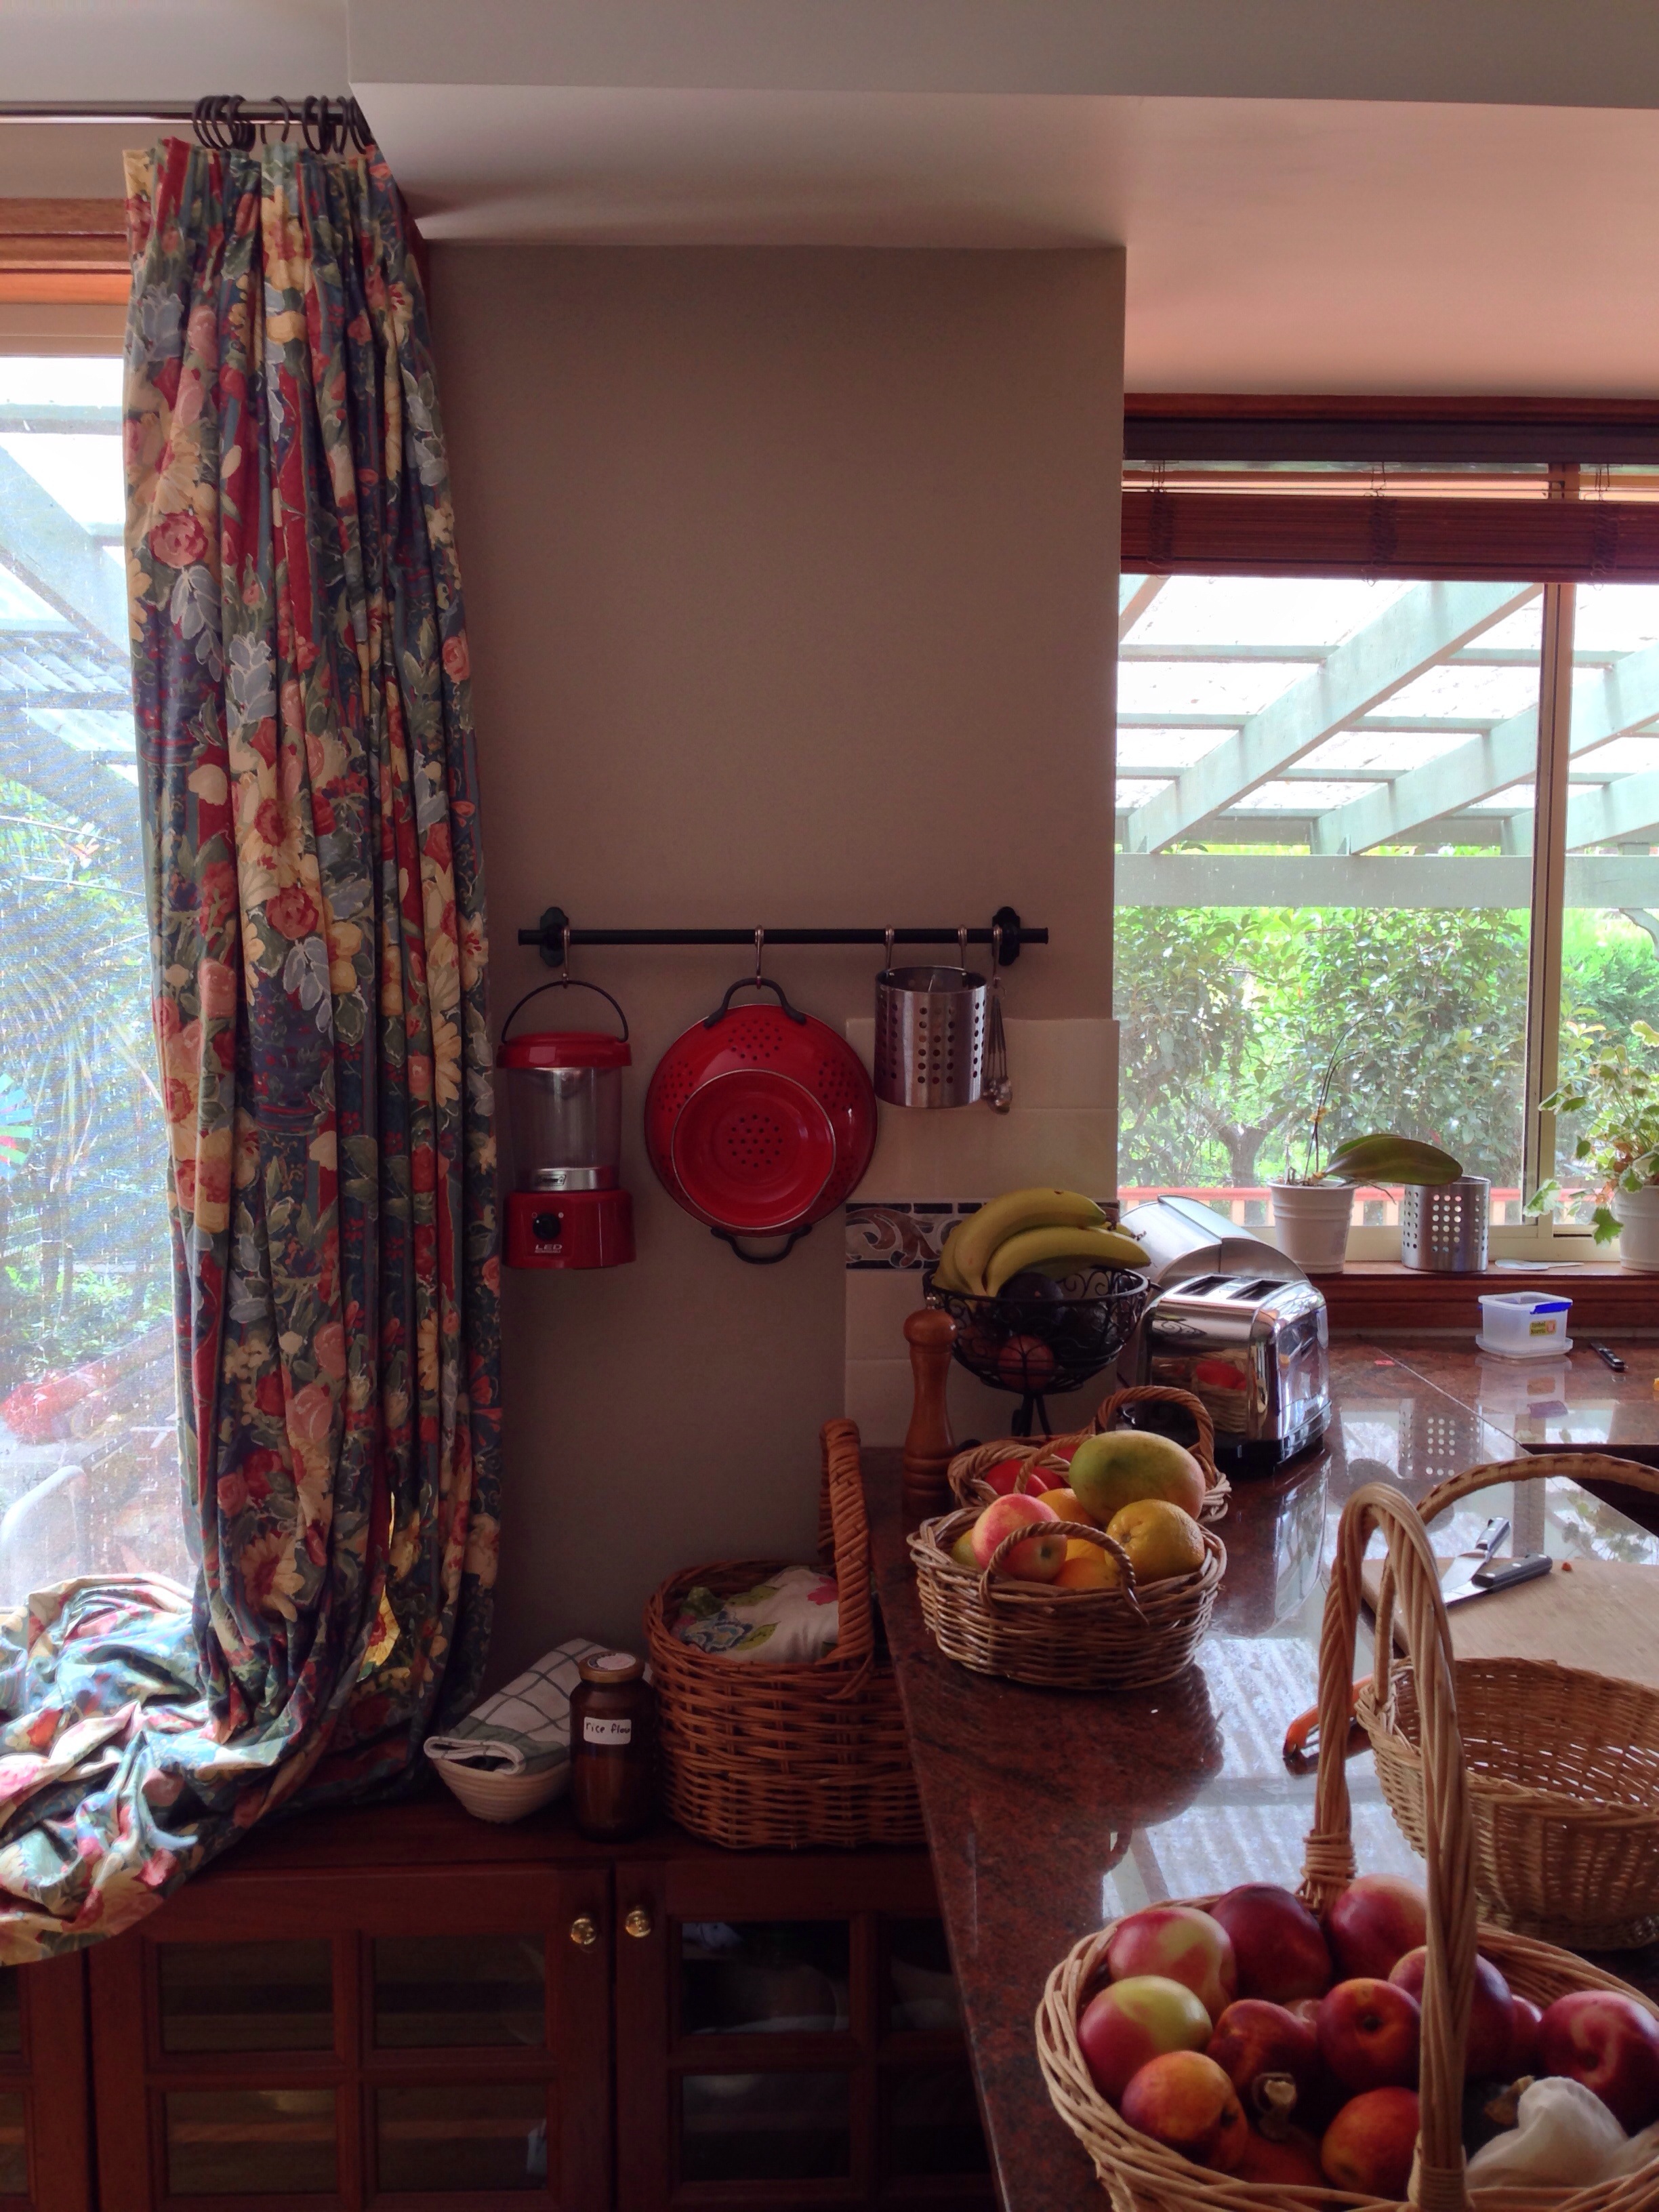
First up, we removed a large old fashioned plate rack from this wall, and replaced it with an Ikea Fintorp railing:
Our kitchen wall
I am so thoroughly pleased with this change! I don’t have a picture of it before, but you can just see the edge of the wooden rack in the “before” photo above. It really dominated the area, and removing it felt very strange at first. We have also painted the overhanging roof and walls. The new colours are both Dulux: Light Rice Quarter (roof) and Warm Neutral (wall).
I really love how my old colander and the new lantern we bought after Christmas just go so well together. I’m planning to put something above the rail: maybe another rail, or a floating shelf.
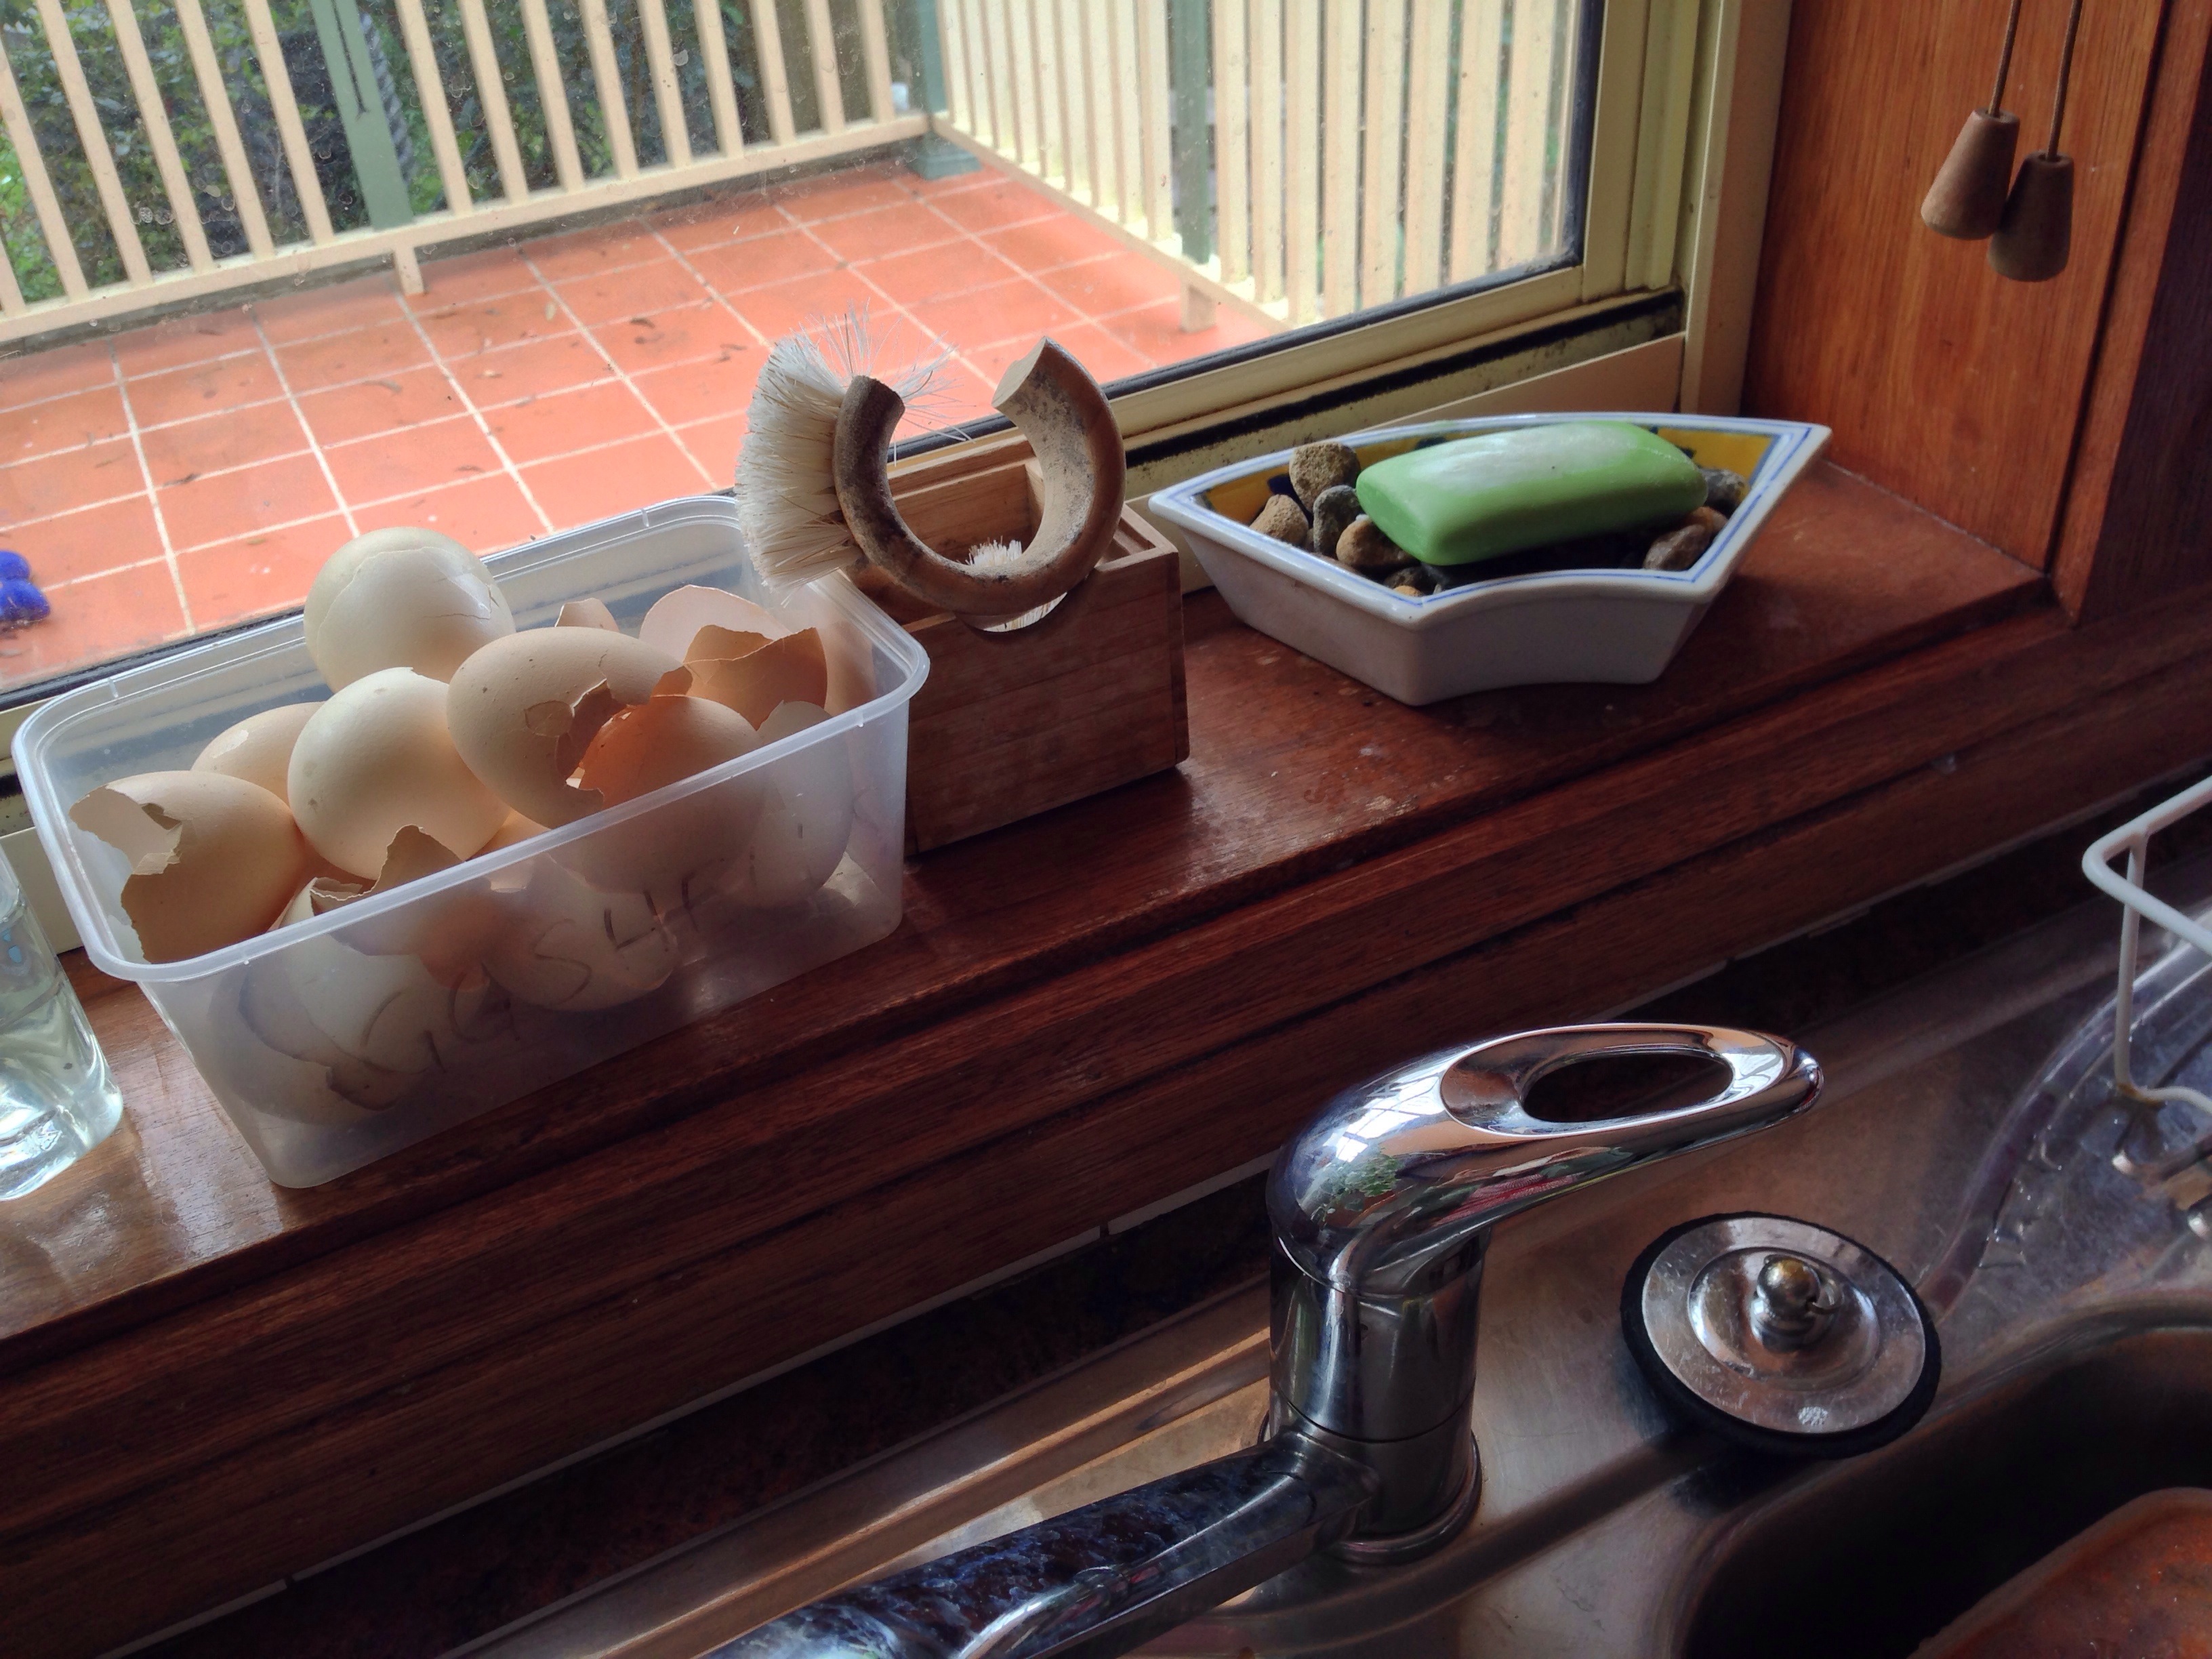
Secondly, I have switched to using Castille (or Olive Oil) soap, so we are now using soap dishes all around the house. At first I was just using a lovely old dish I found in the thrift store, but it made the soap go terribly soft and was always wet. I added some pebbles to allow the soap to drain and it has been 100% perfect ever since!
Bits and bobs on the window sill
We keep our eggshells, dry them out, crush them up and feed them to our chickens. This gives back some calcium that they need to make more eggs. 🙂
It may seem like a small thing, but having an effective soap dish makes a big impact when you are always washing your hands!
Upcycle, or re-purpose your old baby cot into a lovely day-bed! I really love the new space I’ve created for sitting and looking out over my beautiful garden:
Isn’t that dreamy? There’s a lovely breeze coming in the window and the soft South-facing light coming in is perfect for relaxing on a Summer’s Day. (I’m in the Southern Hemisphere, remember! South is our “dark” side.)
Creating this space was the easiest thing in the world because our old cot was already quite a flexible type: remove one fixed side and the other pieces hinge freely. I simply pushed the drop-down to side up into it’s “keep baby from climbing out” position and installed the cot base up high, like you would for a newborn.
Plonk the cot mattress back down, cover it up with a nice blanket or quilt (I’m using a daggy old cot sheet for now, but I’m planning to make a quilted cover), stick some comfy pouffy cushions or some bed pillows on top, and it becomes a wonderful day bed. It attracts the children like magnets!
Cot as day-bed under the window.
I had to shove aside my crafting table so that I could fit it into the room nicely (the sides are high, and solid, so they were too bulky in the corner near the fireplace). Which was a little sad, because that was also a great spot for the natural light to come in onto my sewing desk. Now I just shove the curtain out of the way to let some natural light fall in at the sides.
Not all cots can be taken apart easily like ours. I think this would work best with flat-pack items that you have to screw together yourself. You can still upcycle a solid cot, but you need to be willing to cut into some wood! This is usually a one-way trip, unless you are good with carpentry. 🙂
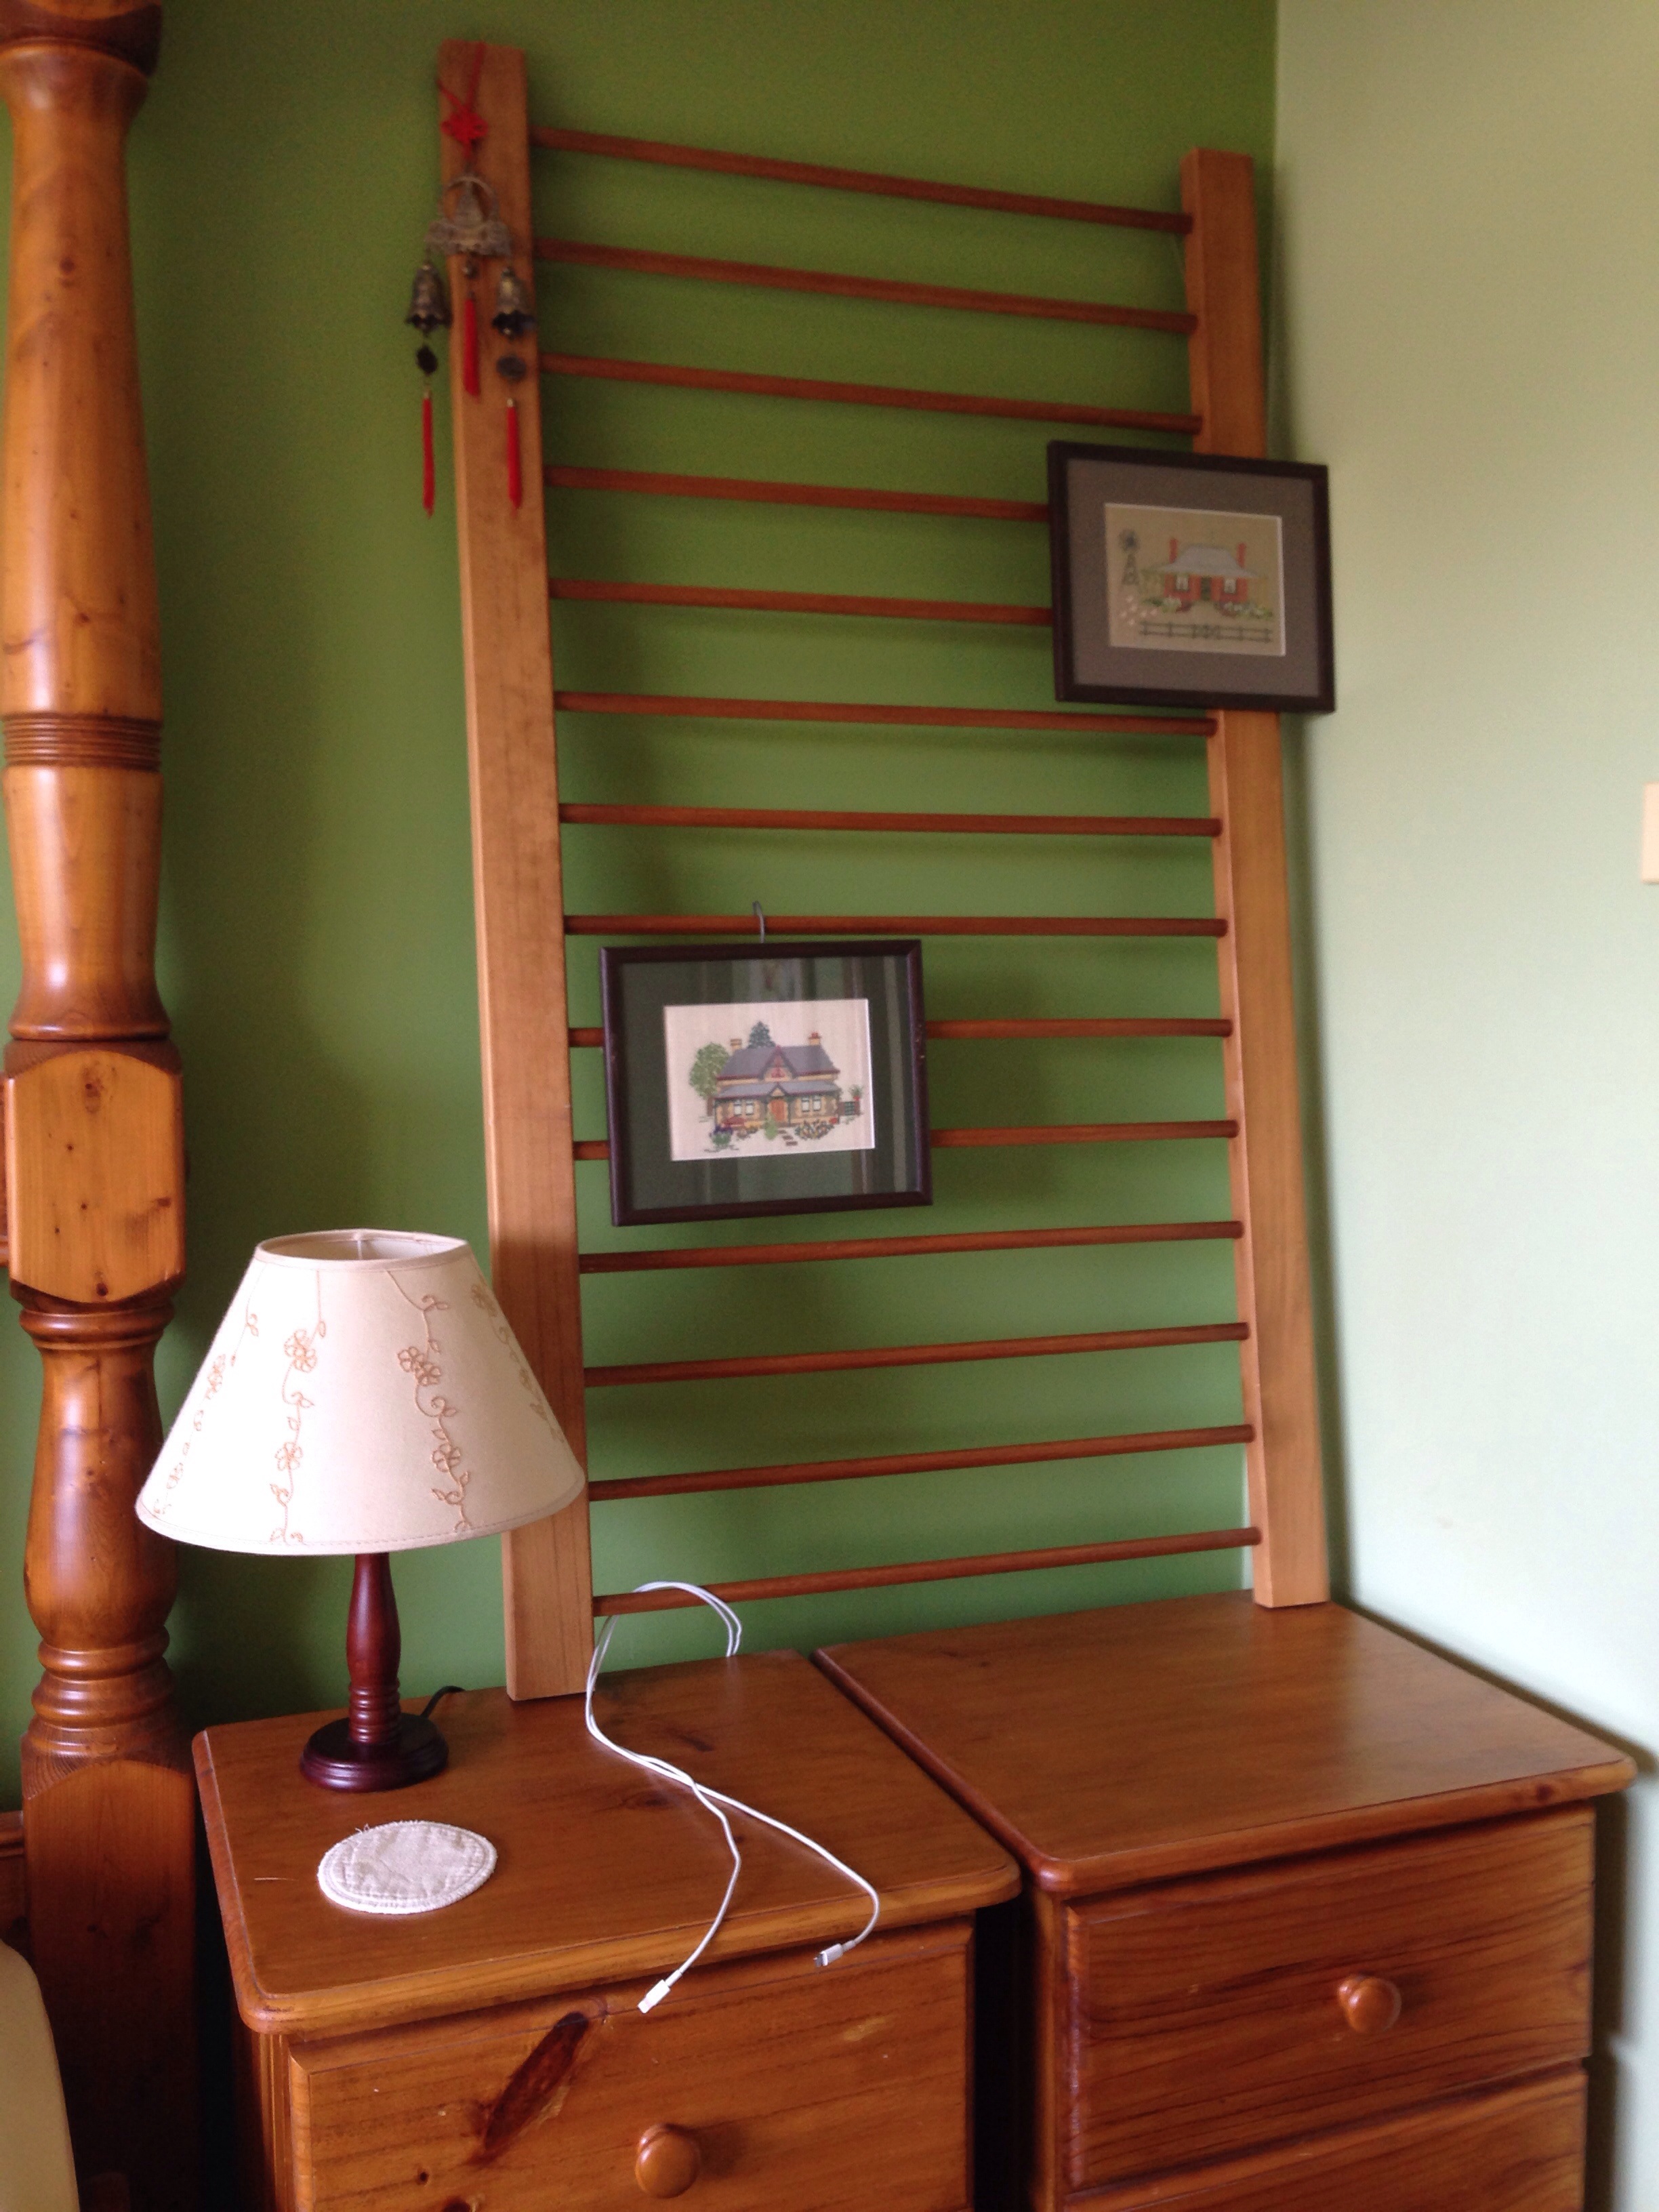
What have I done with the remaining side of the cot?
Re-using my cot as a display wall.
I tipped it sideways and balanced it on my bedside table area and used it to hang a pair of lovely cross-stitch embroideries (worked by my mother-in-law many years ago!). I like the sort of ad hoc way it fills the blank space beside the bed, without being cluttered. I find that I can only keep areas like this tidy by not having any stuff there, otherwise it tends to attract piles of stuff!
If you have an old cot, and nobody to pass it on to, why not consider re-using it for something else? If you haven’t got space and want to get rid of it, you can try selling it locally (gumtree or ebay or your equivalent), or just give it away to your local thrift store or charity. Would you believe I see cots like this on the kerb come council clean up time?
I’ve had a great weekend because I’ve just finished off a wonderful new quilt top!
“Windows” quilt top
I’m going to have a hard time giving this one away, but give it away I must! It’s a birthday present for my eldest nephew, who has just started school last week.
Today I wanted to share some thoughts on fabric choices for this quilt. I bet there are a lot of people like me who blench at the thought of paying retails prices for fabric when assembling even a lap size quilt like this. Fabric goes for about AUD $24 a metre around here (slightly over one yard). Yikes!
But I’ve managed to piece this quilt top together for a fraction of that price by being a little tricky about where my fabric has come from. Here are a few sources for fabric that you may not have considered before.
Thrift stores
This is my number one place to start when I need fabric for a project, but particularly when it involves smallish pieces (like for quilting, patchwork, softies, and so on). When you are at the thrift store, check out the following sections and see if there are fabrics there that would suit your project:
Fabric remnants — this one is not often as helpful as it seems, because you often find pretty awful stuff, or fabrics not very suitable for quilting (like gold spangles, or organza). You can be creative, though, and use crazy fabrics as a pop of texture.
Pillow cases — these are my best source for good prints and colours. Mostly made with cotton and with a feel just like a quilting fabric.
Curtains — great for finding backing material. That’s where the Laura Ashley print came from that went into Evie’s Christmas quilt back, my sister’s wedding quilt, and my new ironing board cover. I bought the curtains to use as curtains at first, but had more fabric than I need for my laundry window, and couldn’t resist making it up into lots of projects!
Table linens — if you want to find some embroidered bits, the napkins are often great, and do well for i-spy style quilts. Tablecloths are a mixed bag.
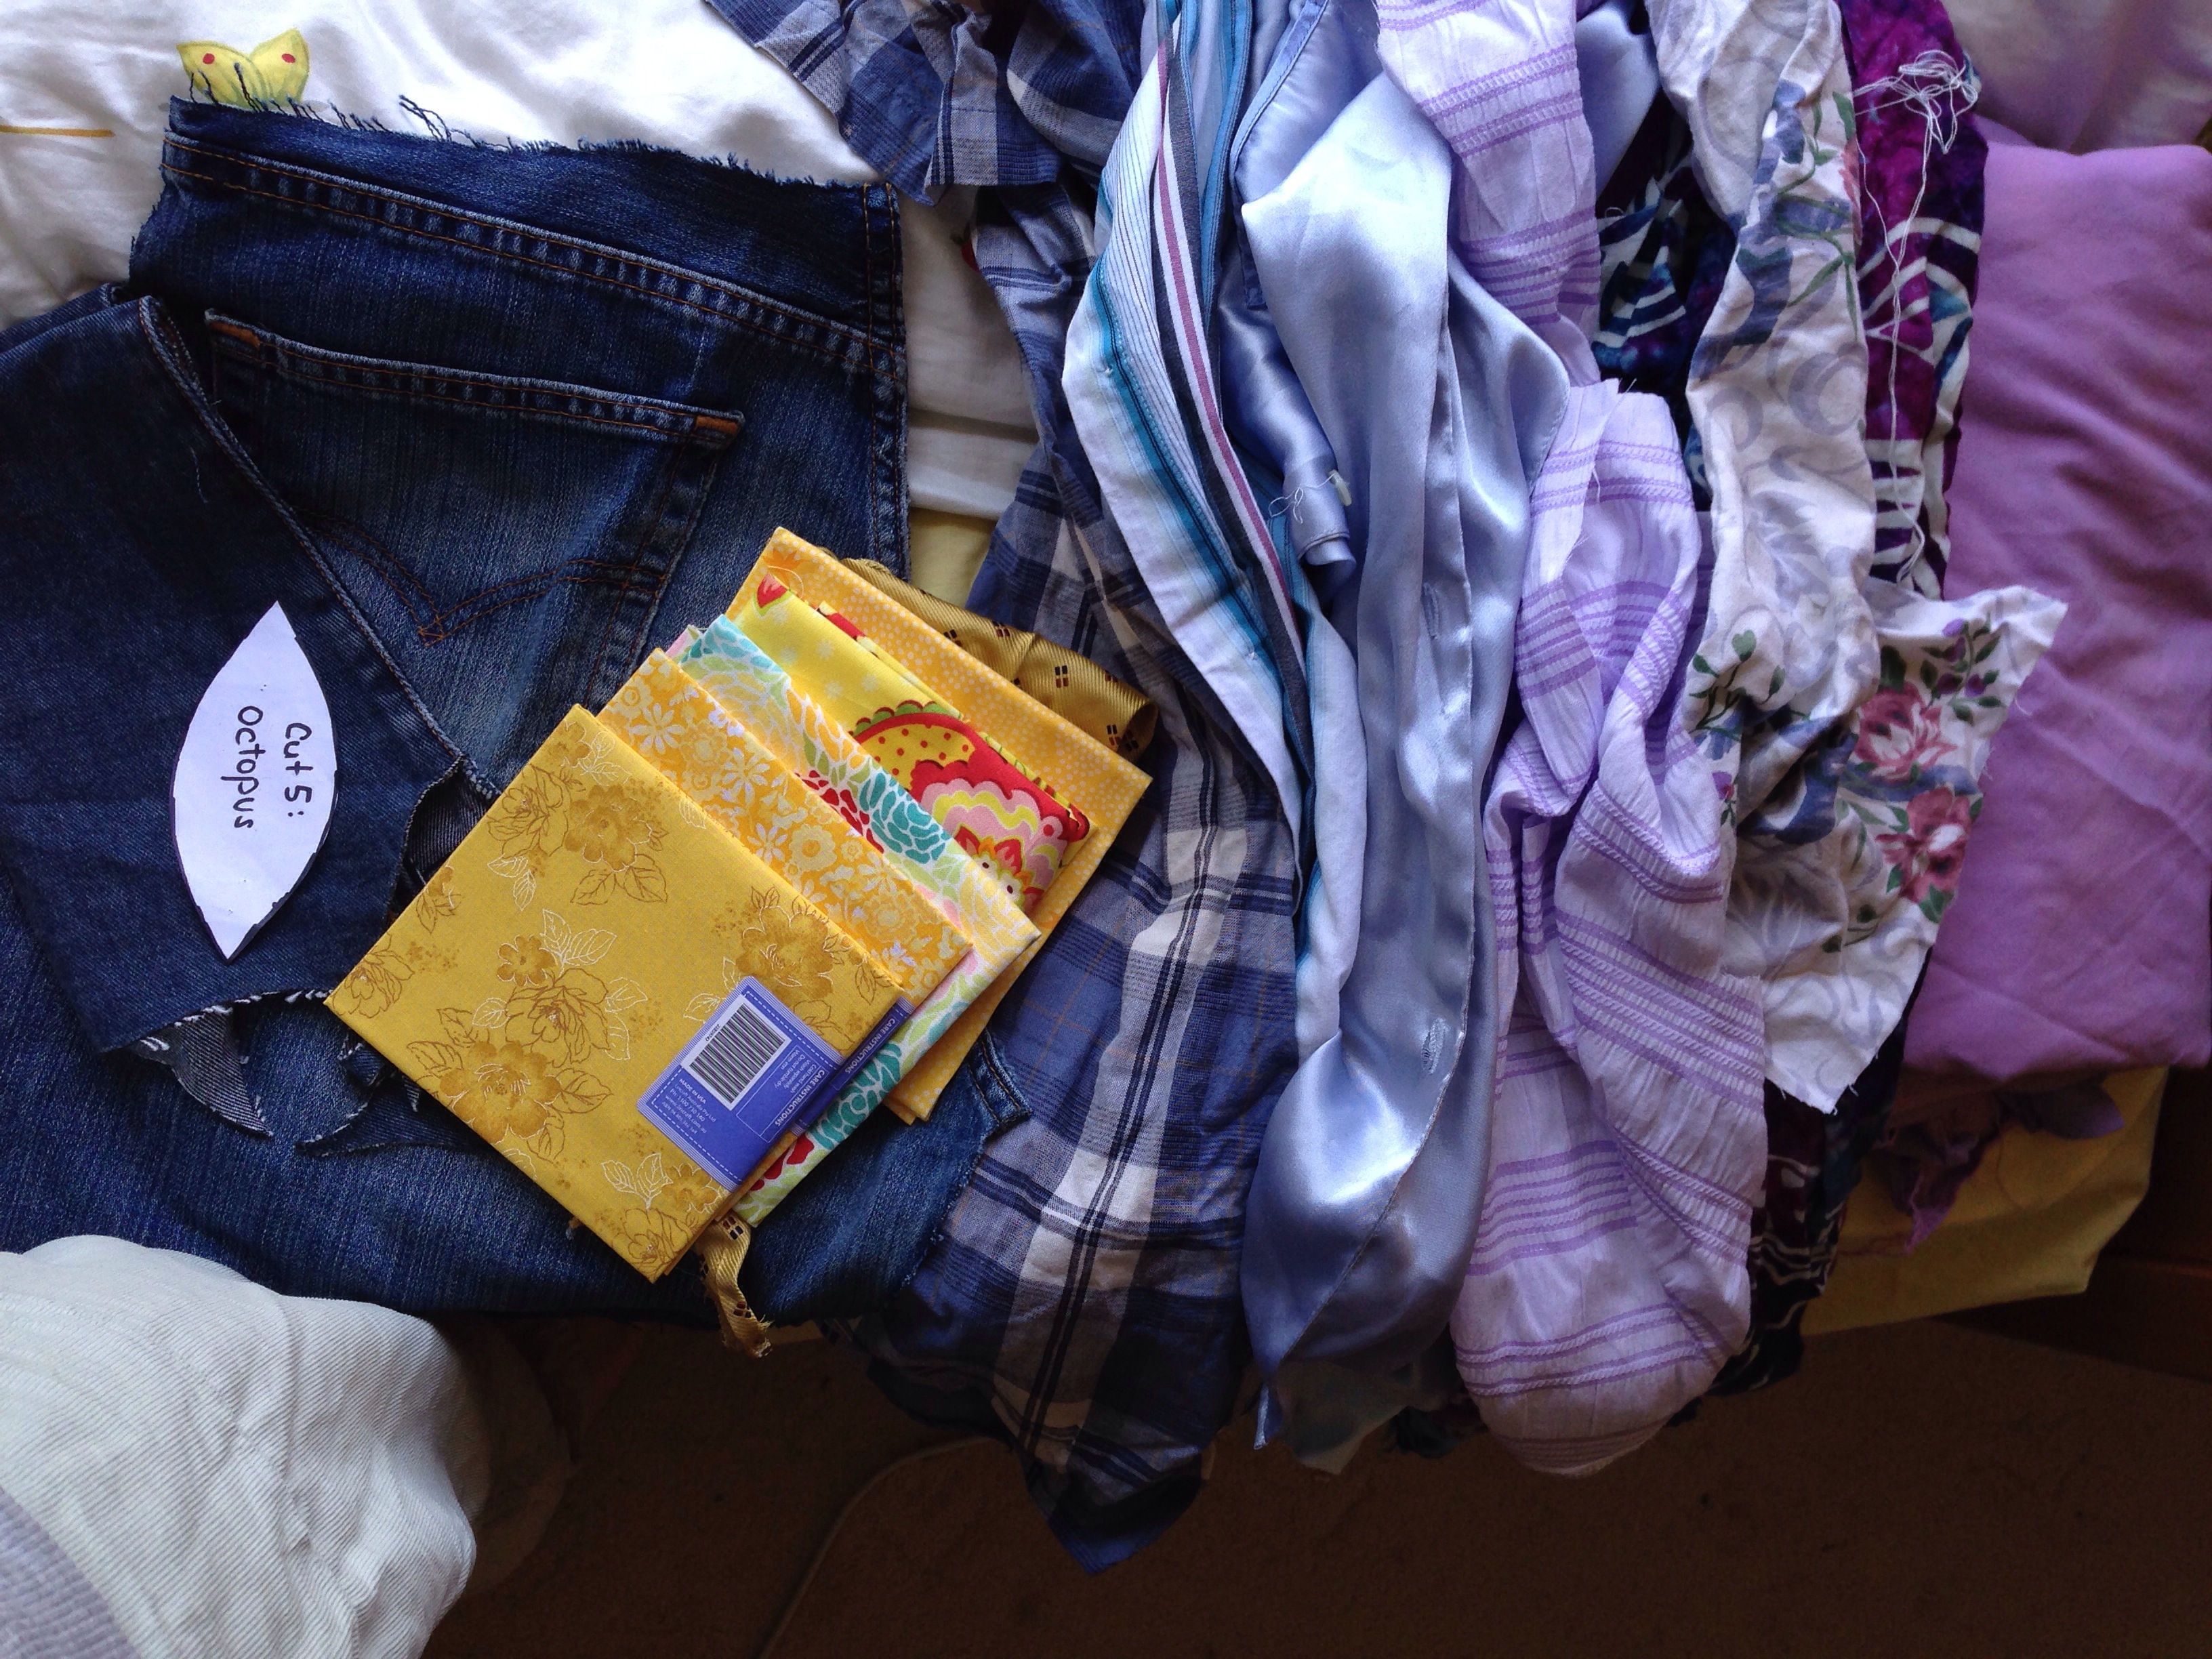
Clothing — at first I really didn’t want to start cutting into clothing for the fabric. I felt I was destroying something that was still useful. But some of the items I started with were really truly hideous, and I think I did the world a favour by re-purposing them! I have become reconciled with this source of fabric: after all, it might stay on the shelf forever and not be used: where’s the good in that? I tend to pick garments like skirts and woven shirts. You can also use the buttons and zips as free notions for your projects!
Notions — there are always buttons, snaps, curtain hooks and bias binding to be had at my local thrift store in this section. If you need belt buckles or a handbag clasp, you can also try the section with belts and bags and see if any items look dilapidated enough to cannibalise for parts.
Shop your house
All of the items I’ve mentioned above can often be found in your own house. If you haven’t been in the habit of de-cluttering, chances are there are items you hardly use that you could re-purpose. Try looking in:
Your wardrobe — clothes you love but will never fit again, clothes you bought and have never worn, you get the idea. Maybe don’t use gifts that you’ve never liked and stuffed in a drawer, because chances are you have negative associations and seeing that fabric again might bring those up to the surface. Or not! Re-purposing might purge the “never worn” guilt.
Your children’s wardrobe — clothes that they’ve grown out of, but that you loved may be better used on display in a family quilt! A lot of people make memory quilts for each of their kids.
Inherited clothes — you may have to sort through the wardrobe of someone well loved who has passed away. A lot of people also make memory quilts using these items, to have something tangible to snuggle.
Your linen cupboard — you may have holes or stains on some items that can be cut around. You could also get really creative and try bleach-painting or tie-dyeing the fabrics to give them a new look!
Bargain bins
Fabric stores will often have a remnants section you can dig through. The bargains here are not as good as at a thrift store ($4 in the remnants section might get you a large narrow strip of fabric, but a whole pair of curtains at the thrift store, for example). They are often quality fabrics, though.
Art and Craft shows
I’ve also found remnant bags at quilting shows, or local markets. This is like a lucky dip! Not all the fabrics you get in the bag will be stuff you want, but you could always use it to stuff the centre of a softie, or a cushion, or something like that.
Gifts from other people
Are people always asking you what you’d like for your birthday, or Christmas? Ask for a couple of fat quarters, and if you have a project in mind, be specific about colours (eg. red and white, or blues only). I did this, and got a bunch of lovely new fabrics at Christmas time. 😀
Assorted recycled fabrics, and some gift fat quarters
Once you have a bunch of items, what next? I’m still working out the best way to store my finds. Mostly I keep clothing as-is until it’s time to make the first cut. But once that happens, I’m starting to think it’s a good idea to cut along all the seam lines, save away the useful bits (like collars, cuffs, buttons and zips) and fold the pieces up like a fat quarter.
Larger fabrics like curtains and so on just go into my Expedit boxes under my TV. I’m starting to have to cram, so I haven’t been adding to the stash!
Looking at the quilt top I’ve just completed, I can spot just six prints that I bought as fat quarters at full retail price. I only used six and a half inch squares, so there is still plenty left from each fabric. There are thirty-eight different fabrics in this quilt top! That means there are thirty-two prints I received as gifts, or upcycled from other items, and this makes me one happy quilter!
I’ve discovered a great new way to save money on my grocery bill! It’s a simple tip: wait until the very last minute to do your shopping. How on earth does this save you money? Read on Macduff …
First up, if you are anything like me, then every time you step into the grocery store, you will buy stuff. At least $30 worth. Every time! Even when I take a list of items I need I still end up buying stuff I forgot to put on the list in the first place, or stuff I think I should have put on the list (but didn’t actually need after all), or stuff I want to eat (cheese is my biggest weakness, here), or …
You get the picture. Here are some classic ways to end up with extra items in your trolley:
Shopping when you are hungry. Most people know about this one: you are more likely to duck down the cheese aisle if your tummy is grumbling.
Leaving the house in a hurry. If you rushed out the door and forgot your list you are more likely to buy extra stuff, or forget items you actually do need. This one is really hard to work on, especially with kids. Feeling rushed can also make you want to de-stress by heading down that cheese aisle …
Getting sucked in by a “bargain”. A bargain only works for you if it is something you would normally buy. It’s not always bad to give in to a treat when it is on special (I do this!) but supermarkets are cunning, and put things on special more often than you should really buy these treats! Case in point: Brie Cheese. And especially potato chips. And especially especially the soft drink! That stuff is always on special!
Not knowing in advance what you want to buy. If you just have a general idea of “get something to eat for dinner tonight” (which is how I used to shop every night after work for years when I was younger) then you are more likely to get sucked in by the ready-made meals. You might also buy something “for tomorrow”, and then forget about it! I used to do that a lot, and food would spoil and go to waste.
These are the big ticket items for me, but you may have experienced other ways of coming home with extra stuff. Regardless of how it happens, all that extra stuff translates into extra money spent, and usually, wasted.
So, less trips to the shops = less spontaneous purchases, and for me: this means saving money! Not to mention the savings on the transport to and from the grocery store.
I’ve experimented since Christmas with my new shopping philosophy: each day I ask myself: “Can I make something for us to eat using the stuff I have at home?”. If the answer is yes, I don’t go to the shops that day. I only go to the shops when I absolutely have to, like when we are about to run out of milk.
Got Milk?
However, if I only ever buy just enough for that one meal, I’m still going to be going to the shops every day, right? The trick here is to make a stockpile, and use it.
That last bit (I sheepishly admit) was a bit of an oversight for me, at first. Sure, when I buy my flour in bulk and then use it up baking bread, that came as a no-brainer. But I have bought a whole tray (12 cans) of baked beans thinking the kids would devour it … nope. They don’t like that brand, apparently. Okaaaay!
Baked beans still in their tray.
I also buy extra packets of staple foods (like pasta) because I know that will be eaten up. But then when I go to the shop without taking my list … I get another packet anyway, because I couldn’t remember that I already had some stockpiled. Or, I can’t remember where I stockpiled it. >.<
So, stockpiling is a work in progress. But it’s mostly working well for me.
Before Christmas I did a big shop for stuff we use all the time: pasta, dried cranberries, popcorn, dry crackers, rice cakes, etc. – all things that get rapidly used up and that I didn’t want to have to buy when the shops were chock full of holiday crowds. This was doubly true for meat, which I get from our local free-range butcher. I didn’t want to miss out on the Christmas ham, so I ordered some in bulk, and stocked up on some other bits for the freezer.
Still have most of that popcorn!
With my supplies bulked up, after Christmas I enjoyed a really long holiday from going to the shops. It felt great! I don’t know about you, but grocery shopping is not big on my list of fun things to do. Skipping out on the whole thing was very liberating! Each day Stephen and I would work out what we could eat (it’s so great to share the meal planning with someone). We would eat some meat about once or twice a week, so I didn’t run out until about three weeks into the new year.
Even after I ran out of meat, I didn’t go shopping. I used up all the re-heatable meals waiting in the freezer. We chose vegetarian meals. We ate a lot of salads and way less bread than we usually do. In short, we ate a whole lot healthier!
When I did need milk, I popped to the local petrol station for some instead of going to the supermarket. That avoided me getting any tempting extra items! It was also a million times faster because I didn’t have to get the kids in and out of the car, and there are no queues for service at our local. Win!
Since Christmas I’ve been shopping three times at the supermarket. For me, this is amazing. I would usually go every other day to pick up bread (because I haven’t been baking very much lately) and also milk. So far, I’m definitely saving money! We can immediately see it in the bank statement. No more loads of little transactions on the credit card. Just a couple of big ones, when I’ve stocked up again. And when the shopping comes to a large total, you have a big incentive to trim it down next time!
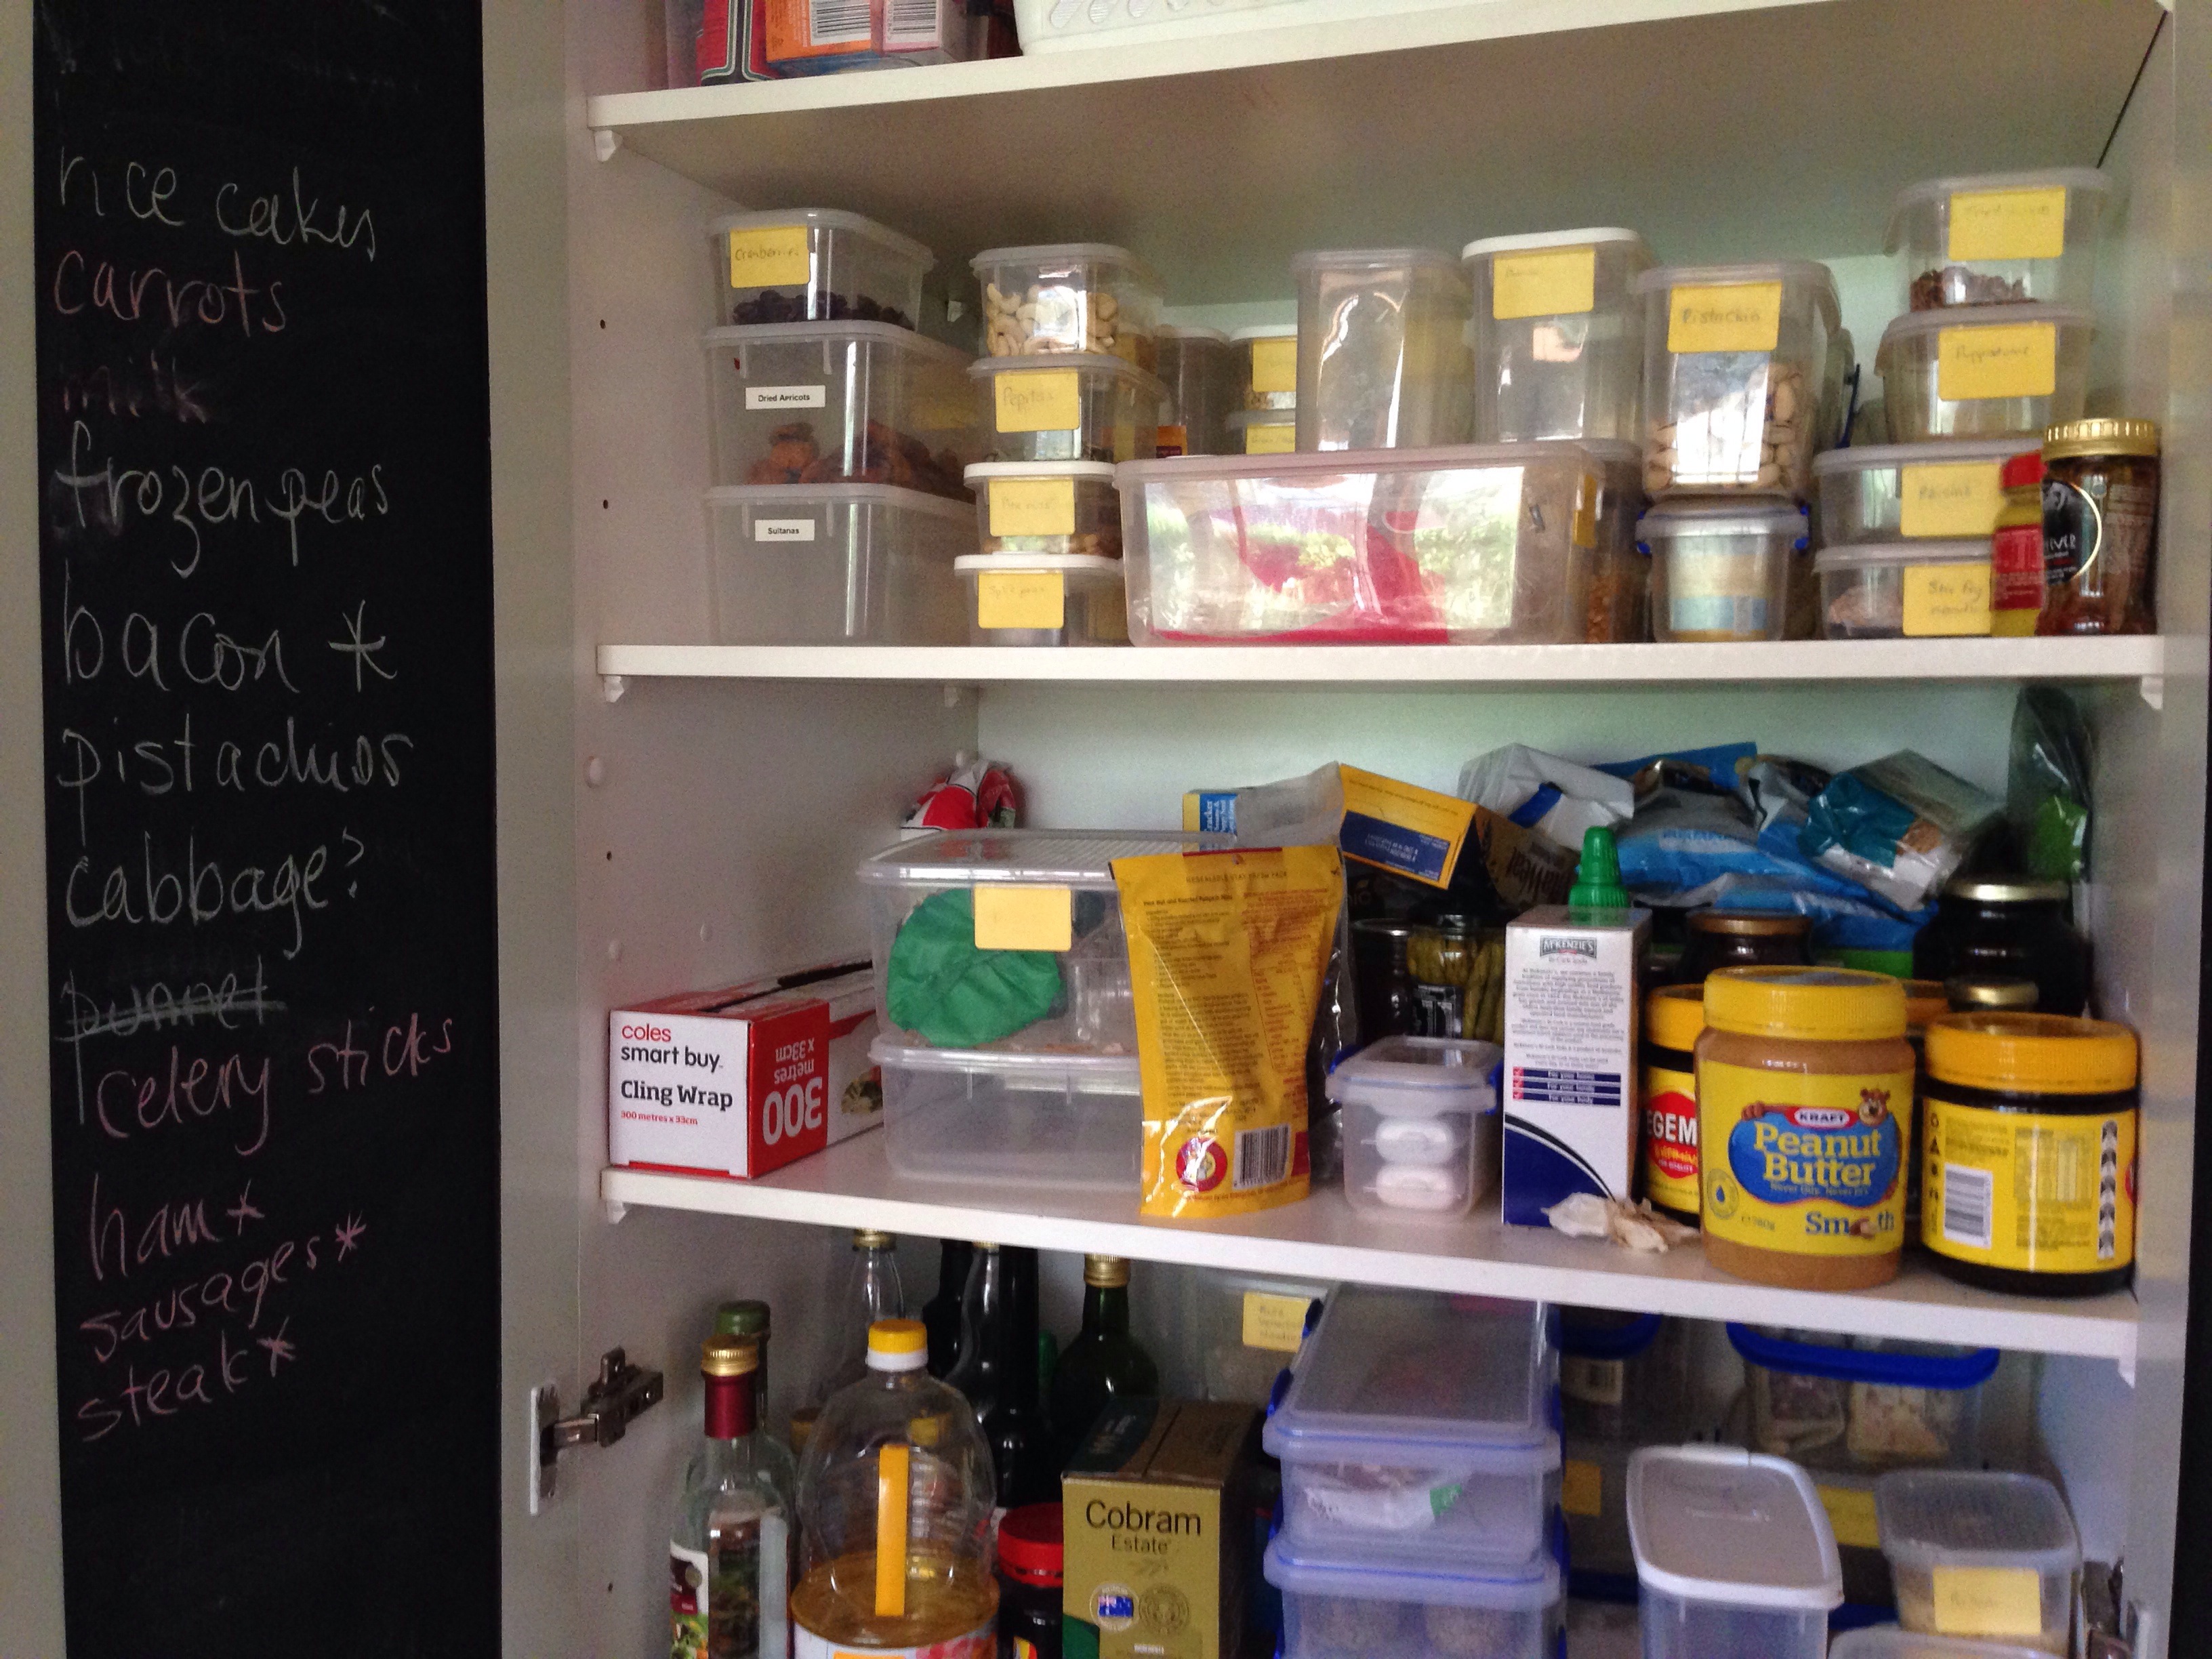
A peek inside my pantry.
Now that my supplies are run down pretty low I’m planning to restock them again by using bargains much more than I have previously. I’ve been researching coupon clipping and stockpiling to see what tips and techniques I can use with the resources available in Sydney. We have a wonderful online market here. I’m hoping I can get good quality produce like I’m used to, but with a bulk savings. Maybe! I’ve noticed that the organic stuff rarely goes on special …
If you have any stockpiling or bulk-buying tips for me, I would love to hear your thoughts. 🙂
Okay, so they won’t really grow beanstalks that reach up into the sky and lead to a cornucopia of golden egg laying geese, will they?
Bean shoots climbing
Immature Frost bean pod
Climbing beans reach for the sky!
I think beans are magical, though, because of the sheer distracting power they have over children. Ha, bet you didn’t think I was going to say that! Kids fighting in the lounge room over whose pillow should go on top of the precarious stack? Are your ears bleeding from the chorus of descant recorder “music” being played at top pitch as they shoot round and round the staircase? Beans are the answer for you!
No, really! One call of “Time to shell some beans, guys!” and I have 100% of their attention. In they come, eager to help. And at this point you can have fifteen minutes of blessed relief as they concentrate whole heartedly on painstakingly opening and popping out beans from their pods.
Helping hands make quiet work!
The beans my kids are shelling today are mostly Borlotti and Frost beans. I think the Frost beans may be related to the Borlotti somehow, but I’m not entirely sure. They don’t seem to cross-pollinate and make mutant beans, at least as far as I know (cue spooky music). These beans grow in bush form (i.e., they can support themselves somewhat without needing a trellis), and this is the type of bean we have the most success with in our garden.
The kids do best with podding the dried beans, but fresh are fun too. You will need to hang around and help your younger kids. Evie manages to do some even though she’s not yet two! She squeals with delight when you open a pod for her and she spots the little beans inside. William is four now, and a pro by now. He squeals with delight when he spots the occasional dark beans, like the top row in the shot below:
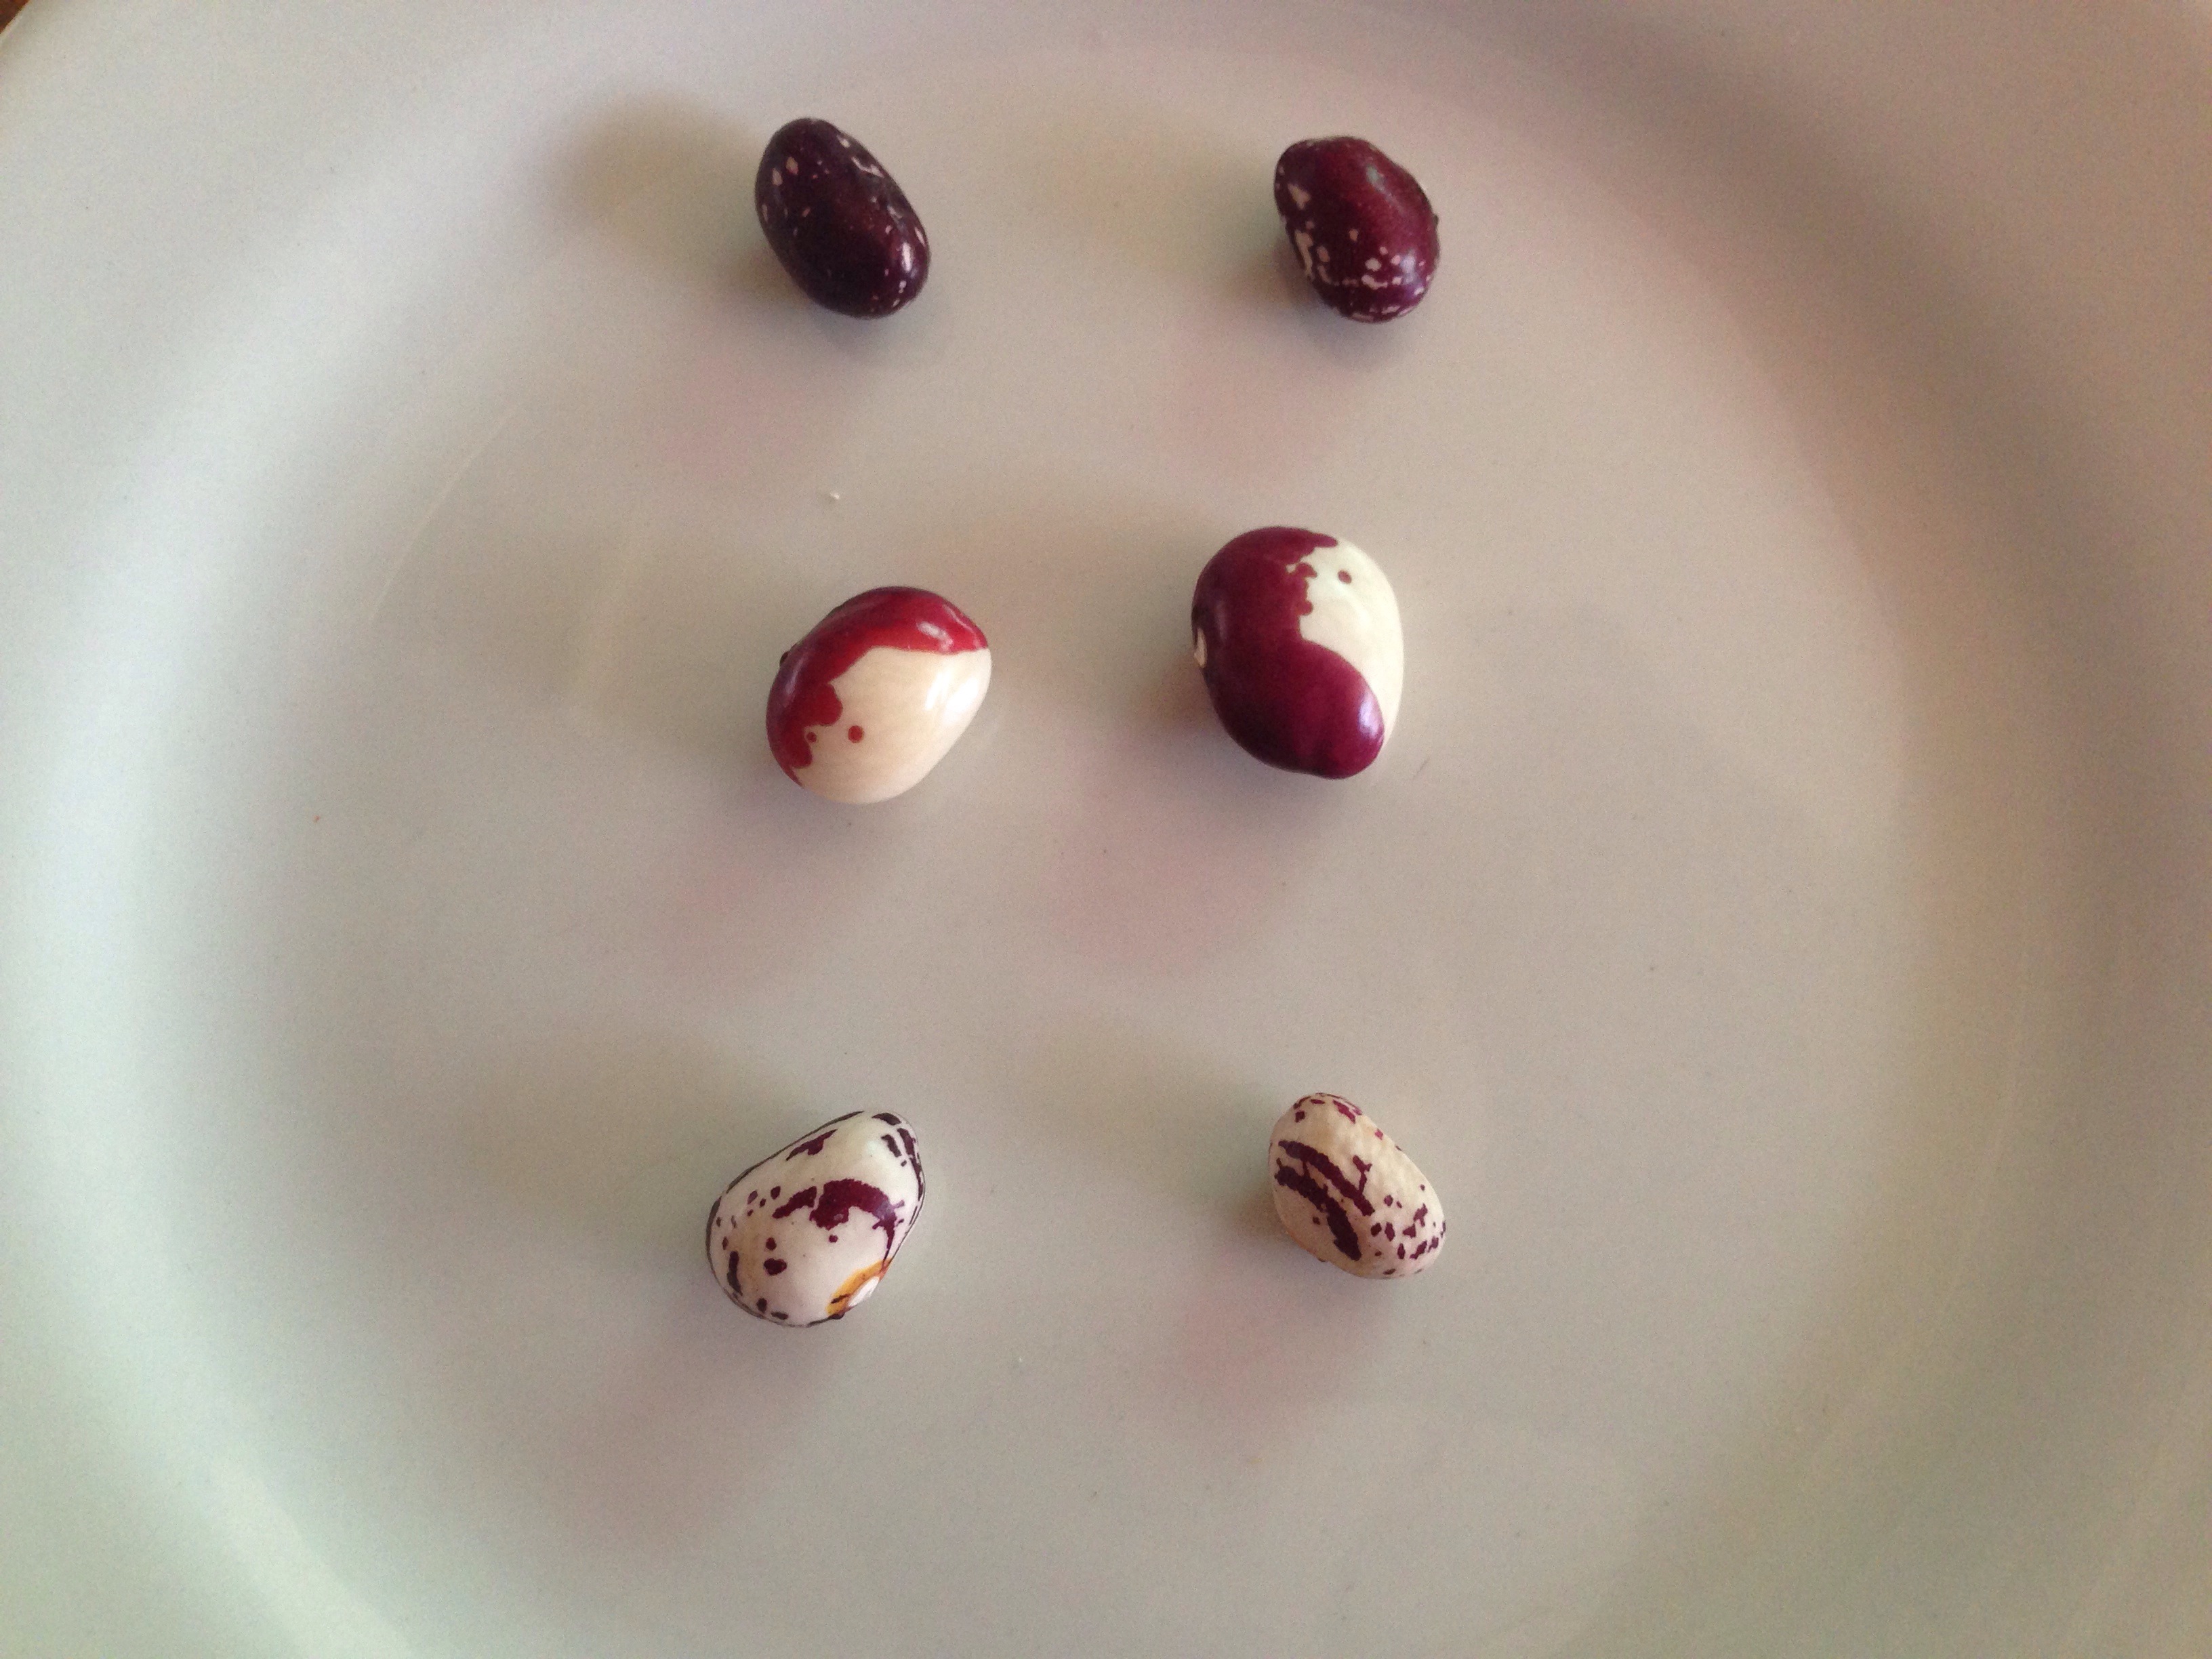
Borlotti, Frost, and Borlotti Beans
I think these are just a lucky type of Borlotti. For those that can’t see, they are dark like a kidney bean, but speckled like a Borlotti. We had only two pods in our entire batch that we shelled this morning! Like hitting the jackpot :). The second row are Frost beans, and have a yin-yang pattern. The third row are the Borlotti.
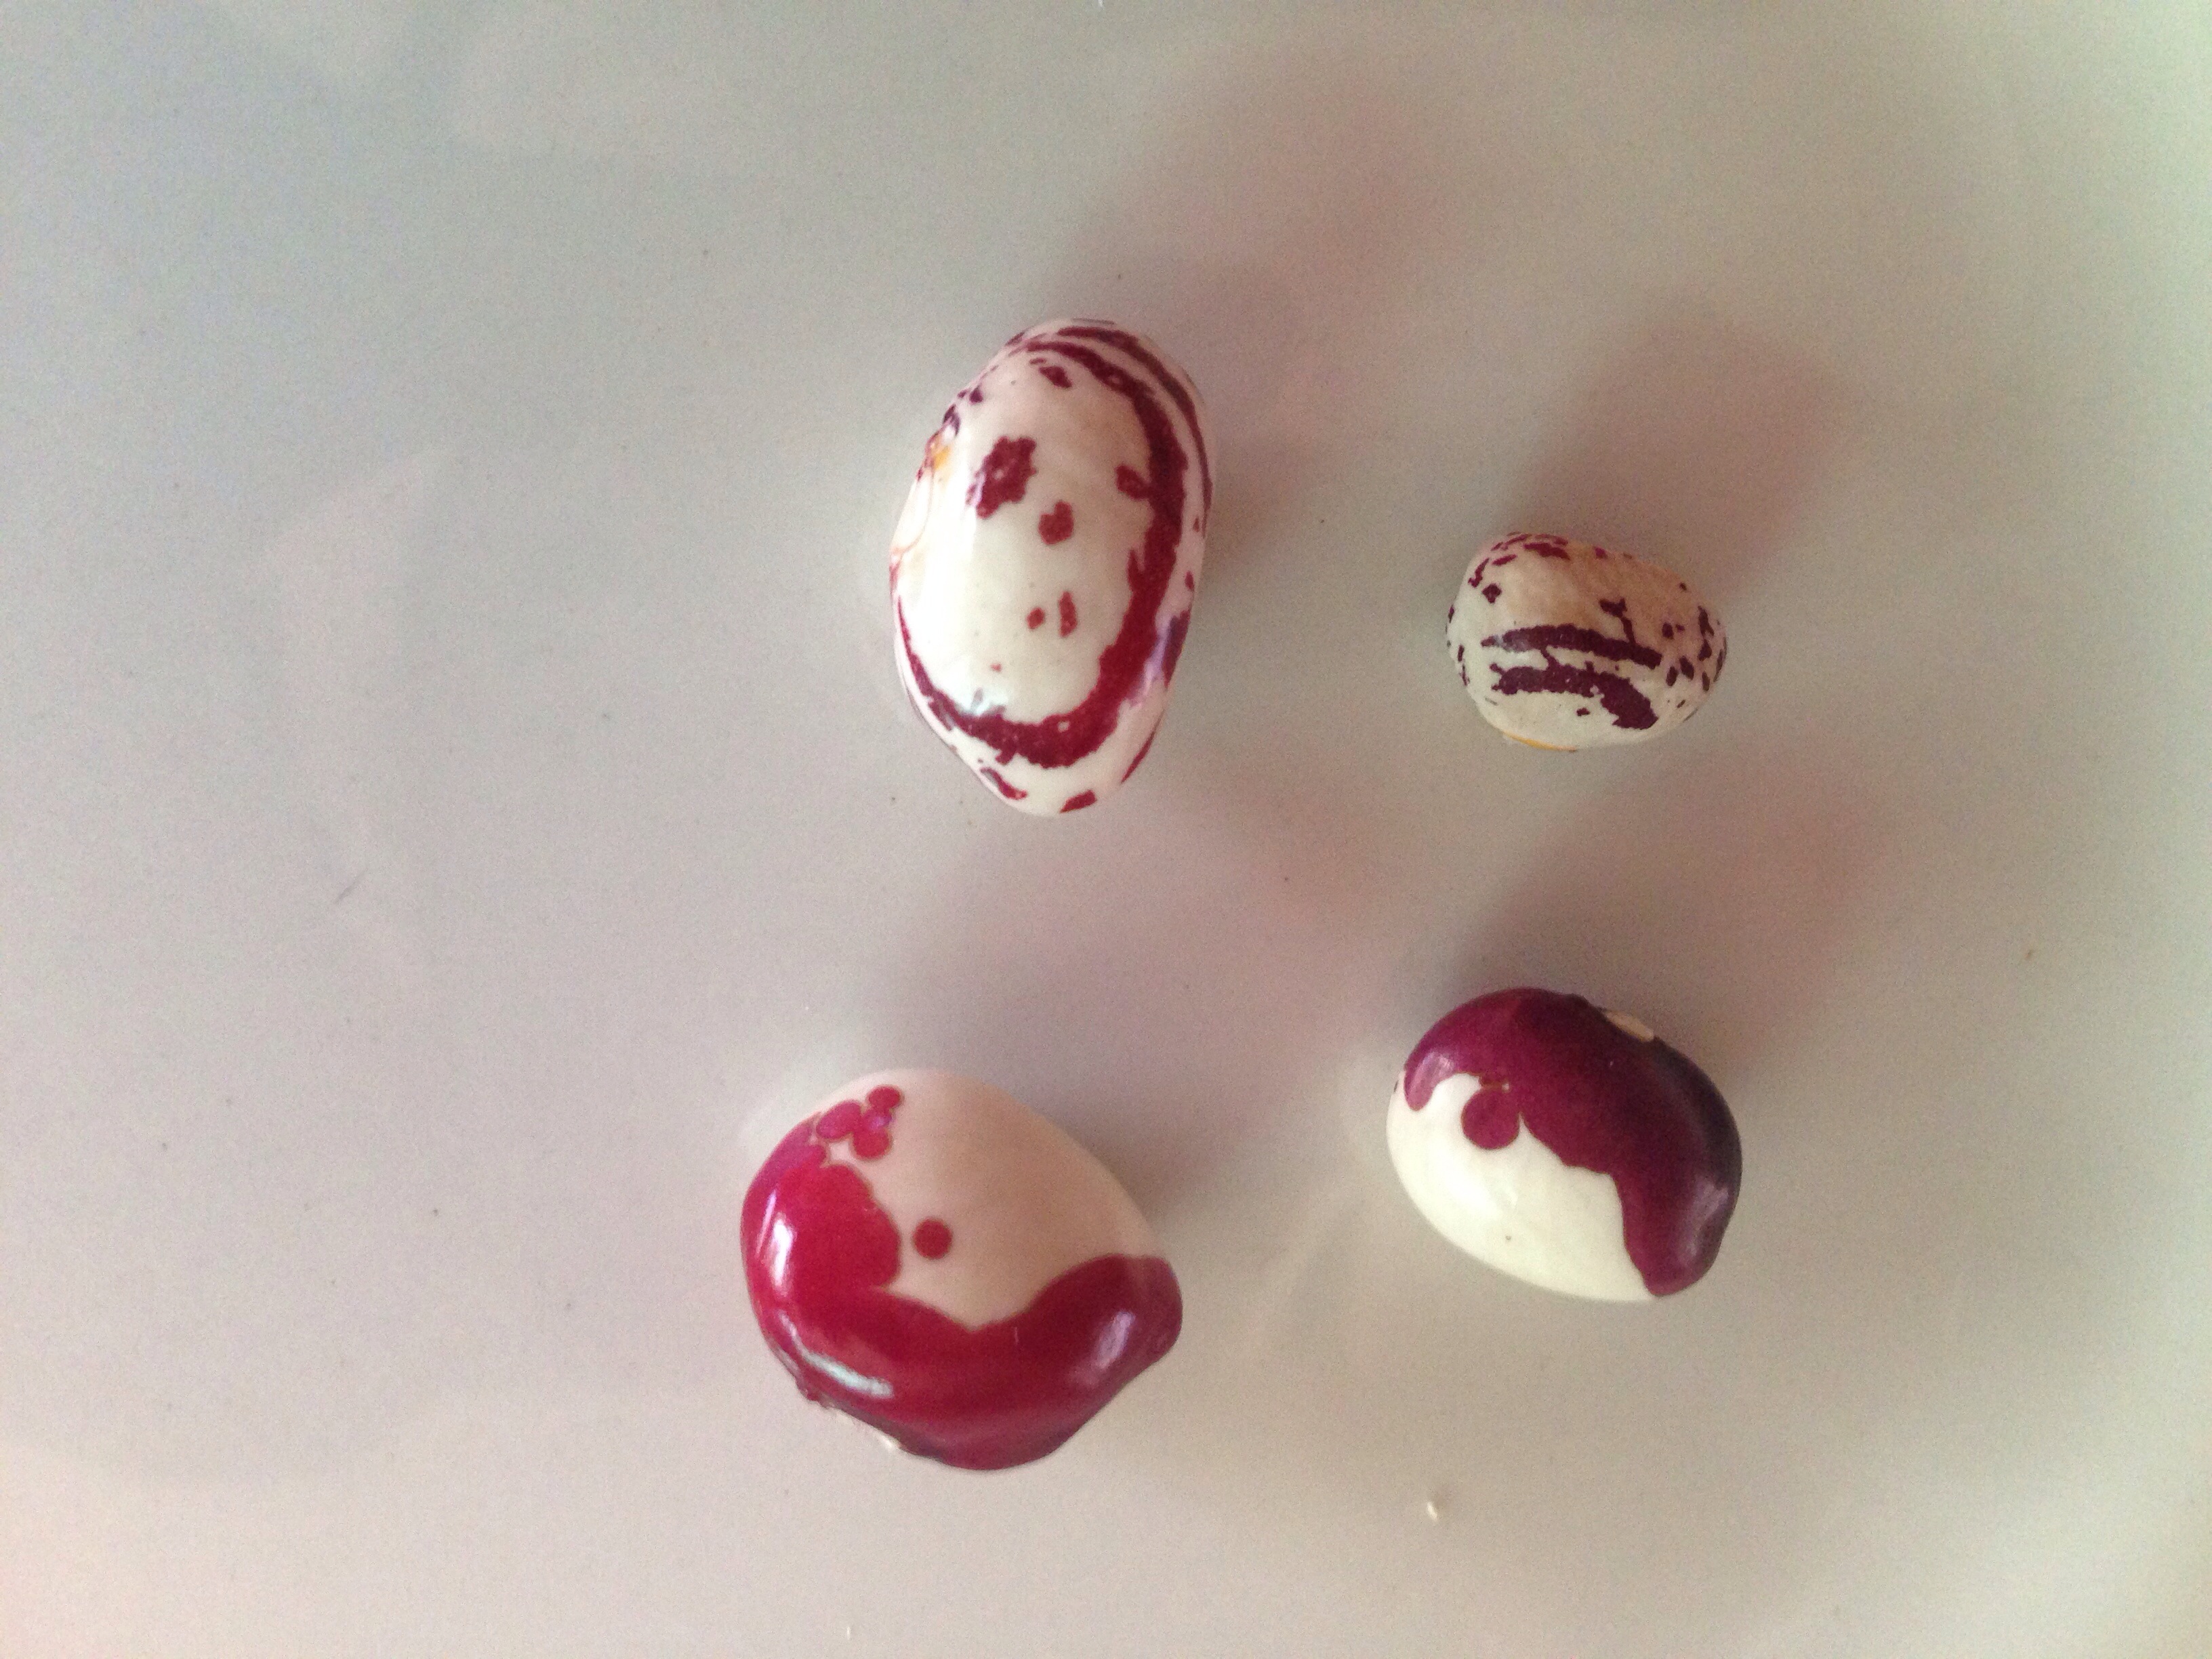
Fresh Beans vs. Dried
In the shot above you can see the difference between the fresh beans (on the left) and the dried versions (on the right). Fresh are bigger as they still contain a lot of moisture content. They are also quite glossy compared to the dried beans. If you put fresh beans into a sealed container, they will go mouldy pretty fast. I always store mine without a lid, until I make them up into something yummy (Minestrone!).
The best thing I find about having your kids shell your beans (or your peas, or peel the husks from your corn or whatever it is you can think up) is that they are vastly more likely to want to try the food you cook from it. Nothing beats them boasting at the dinner table about how they cooked the meal (ha!) and a lot of the time they are pre-disposed to enjoy the food, too. I think this is why Will loves beans so much!
If you don’t grow beans or peas in your garden you may still be able to try this with fresh beans at a local market. I’ve not seen them in the supermarkets here (which is where a lot of people buy their fresh veg) but the green-grocer often has them, and the delivery-box suppliers will almost certainly deliver unshelled beans or peas of some kind.
Fresh and Dry Beans, and empty pods!
I am keeping the fresh beans separate from the dried so that I can store the dried ones for use in winter cooking, and to replant next season. Only a few of the beans this time came out of the pod already sprouting:
Sprouting and mouldy beans
I will plant these straight away as “green manure“, probably in the spot where the lettuces are finishing up, in order to return some nitrogen to the soil. The empty shells will be composted as “dry” material. Nothing wasted! What’s not to love about the bean?
PS. If you have never tried fresh Borlotti beans before (i.e., you’ve used the dried or tinned kind): do it! Nothing compares to the texture of a fresh bush bean.
Our family has become increasingly vegetarian over the last couple of years as we start to question where our food really comes from, and how it was raised. This has been a gradual process, with an occasional leap forward when we discover new recipes.
One of the really wonderful discoveries in our vegetarian odyssey has been polenta. I don’t recall ever eating polenta until I came across it in one of our vegetarian cookbooks. I remember thinking “What the heck is that?”. Apparently my mum cooks now with polenta, but growing up … *shrug*. Possibly it was served and being an incredibly fussy eater (sorry Mum!) I just didn’t touch it, or purged it from my memory … who knows.
Now I find that polenta is a very useful alternative to pasta or rice when you want to make something with a sauce, but you are, frankly, sick of pasta or rice. (Pasta in my house is like a magic food and is practically guaranteed to be eaten by the under fives, provided it is spiral shaped, and is served plain without sauce. *rolls eyes*)
Tonight I made one of our favourites: polenta with a white wine and mushroomy-Dijon-rosemary sauce. I won’t post the recipe, because I make this one straight out of my cookbook, but I will share how to make up some polenta, so you can try it out for yourselves, if you are like me and have never tried it!
The tasty polenta I like best is made with vegetable stock (I just use powder for this), milk, parmesan cheese, and polenta. Typically you use one part polenta (eg. 1 cup) to four parts of liquid (1 cup of milk, 3 cups vegetable stock or water). You bring the liquid to the boil (if you use milk, don’t wander off without stirring or the milk could stick on the bottom). Then you add a bit of the polenta and stir it through much as you would a risotto, but on fast forward. This stirring phase only takes about two minutes for me! You are aiming for a thick soft consistency and it gets harder to stir the pot.
Once it’s good and thick, I stir through a bunch of grated parmesan. Not too much, because (a) it’s not the cheapest cheese in the world, and (b) it’s a little fatty to add a lot, I prefer just to taste the cheese. Maybe a half cup max? It’s up to you. “To taste” as they say.
Then you pour the mix into a cake pan of some kind, that you have greased up. Tonight I did something a little different and put it into a muffin pan:
Polenta in a muffin pan!
This worked so much better than my usual flat pan technique, that I was inspired to write this post. An innovation! Well, maybe. Two of these muffin serves work really well for an adult, and one for the kids. I tried to convince the small ones that they were “polenta muffins” which got Will really excited, but he still only ate like a sparrow. He did say “Mmmm! Delicious, my favourite!”, which means he liked the flavours, at least. 🙂
Once the polenta is in the mould, you just let it sit for an hour until it sets (you can refrigerate it and leave it overnight if you like). Mine just popped up out of the muffin tray within half an hour and I served them just like that for the kids. For us, I fried them a little in some butter, like so:
Gently frying polenta in butter
Then we had our favourite sauce on top, with some greens. Easy :). Lots of different sauces work well with polenta. Tomato sauce with basil and cannellini beans … maybe even just baked beans for the kids. You could also try a beef-bean chilli (although don’t quote me on that!)
If you haven’t got time to use a mould and let it sit, the polenta is also really tasty just straight out of the pot. It is a little like a soft mashed potato in consistency. So you just stick the sauce on top even though it isn’t set! This works great if you have to feed the kids right now and you can give them something sneaked out of a pot (so much more delicious than when it gets plated up!). This also works well for any extra polenta that didn’t fit into your chosen mould!
For reference, I got 12 muffin pans from my 1 cup of polenta, which I will use as six adult serves (ie. tonight and a bunch of lunches and kid serves). I got to lick the pot, too!
Dinner! Polenta with Rosemary Dijon Mushroom sauce.
This long weekend we attempted to catch up on time we lost last week due to very hot weather. Saturday was still reasonably hot, but Sunday was lovely and cool, and we made a big chunk of progress on our latest garden upgrade: fixing the roof on the orchard.
Our “orchard” consists of four espalier trees: a plum, a peach, a Gala apple, and a Pink Lady apple. The plum has two different varieties grafted onto the one rootstock, so it cross-pollinates with itself. Space saving! The peach is an Anzac (I think?) and self-pollinates, but we needed two different varieties of apple to ensuring fruiting.
In between the trees we also have tubs of blueberries, thornless blackberries, and a boysenberry. These go into the orchard because we have bird netting surrounding the area, and the birds and possums can’t get at the fruit.
Espalier apple with ripening fruit
We bagged the remaining fruit on the Gala apple to keep out the rats!
However … the roof is too low. The peach tree is amazingly vigorous and grows through the netting every year, punching big holes that have to be repaired. One year we found that a hole in the roof net had allowed a possum to come in one night and eat every single almost-ripe apple on the Gala tree. That was about thirty apples! Pretty devastating! This year there are more holes than net, and we didn’t get many blueberries as a result (birds!). Rats have eaten most of the apples and plums, too.
So, now that we only have fruit ripening on the Pink Lady tree, we decided it was time to raise the roof once and for all. We’ve been researching Hoop Houses and figured this would be best solution for our awkward fence line. The neighbours up the driveway and over the fence have a fairly prominent view of our orchard roof area, so we needed to make it reasonably pretty. We decided to use black irrigation pipe to make roof arches, and stretch knitted black bird netting over the top. Stretching the netting means that birds won’t get tangled when flying past or if they decide to roost on one of the arches.
The prototype arch was very successful.
Saddles to secure the pipe.
Stephen installing another arch with me supposedly assisting.
Here we are installing the arches, which didn’t take too long (maybe about a morning, give or take). The saddles made the job pretty easy: we just put one at the top rail on the fence, and one about 30 cm lower to stabilise the pipe vertically. We also stuffed the pipe with a couple of bamboo garden poles to give the arch a bit of rigidity at the fence line.
We put one arch above each espalier frame, and then another in between, for a total of five arches. We concentrated on the area above the vigorous plum and peach trees. The apples up the top end of the orchard are still only half their height, and are dwarf varieties. They will probably not cause us much trouble height-wise.
We anchored the in-between arches to the driveway-side top rail, but there was nothing to fix the lower part of the pipe at that point. Ultimately they will be lashed to the new orchard wire which we used to replace our old black net:
Wire skirt on the new orchard wall.
Next section almost done …
… and completed.
We installed a skirt along the bottom of the wire, to try to prevent rats from entering (from that direction, anyway). This is the same technique and wire we used when constructing the walls of the chicken run. We don’t have any worries from foxes or goannas, but the rats seem to be deep-miner varieties that tunnel from across the yard. They keep making new tunnels into the chicken coop and we keep stuffing them with rocks. :-/.
The new skirt meant we had to dig all the dirt and plants out of that driveway garden, and then put it all back again on top of the wire. That was amazingly heavy work! Not much organic matter in that soil, it’s all crushed up rock. The Gazanias seemed to be okay with this treatment, but we will have to cross our fingers for the Daisy.
At the end of the weekend we ended up with some secure wire walls to keep our chickens inside, and the back end of the orchard has been seeded with lucerne (and a few other green manures) to replace the dreadful grass we’ve had in there. The seeded area is fenced off from the chickens so that they can’t scratch there. Boy was there a frenzy when Stephen was scattering the seed!
Ad hoc gate and fence to keep seed bed safe.
Stephen hoed the grass up in the back section for seed.
Chickens relaxing in the combined run.
This is a Work In Progress because we still need to:
Secure the tops of the arches with bamboo sticks to stop them toppling sideways under the weight of the netting,
Repair and then put the netting over the top,
Source more wire for the top end of the orchard, and the bottom end near the chicken coop that is currently temporary chicken wire,
Make a door and frame like we have for the chicken coop, so we can enter the orchard more conveniently.
When we first moved into our house (almost five years ago now) we were lucky enough to have a place that was already rather nice, with only a couple of minor eyesores. We had lived for a few years in rental accommodation, and we were used to blank walls and adequate kitchens and bathrooms. Our new place was really a lot better than “adequate”. We had a lot of space: two living areas, including a formal lounge with carpet, and an informal living room with floating hardwood floors. Nice, right?
We immediately painted the bedroom that Izzy chose: it started out as aqua, with green cornices (!) and a patched and shabby white ceiling. The master bedroom was a little more sedate, but sported a frieze of frolicking cupids (!!) with apricot cornices (I’ve run out of exclamation marks). I wish I could show you the pictures of the original rooms, but alas, we had no idea I might one day want to reveal these horrors to the internet. We painted the two rooms before we moved in.
From a rental to owning your home: we were so excited to be able to paint! So we were bold with our colour choices and had great fun with feature walls in each room. We even let Izzy choose a very vibrant shade of pink for the main wall colour! When that colour was going on the walls, we thought that Izzy would have a pink glow-in-the-dark afterglow from spending the time in the room: it’s sunny, and boy was it pink! It softened with furniture, though. 🙂
Izzy’s room
The master bedroom
We loved our coloured bedrooms so much that we painted the nursery in time for Will’s arrival (yellow, with orange feature wall). And by the time Evie came along, we’d prepared the final bedroom for William with yellow and blue (can you guess we liked the feature walls?)
Nursery colours
William’s blue room
Now our world was coloured upstairs, but downstairs was still the original wall colour: yellow greenish cream. Once I had babies at home, I spent a lot more time staring at those walls, and learning to despise them. Before too long, I was starting to prepare a grand plan of eradicating that wretched colour from the entire house! There are a surprising number of walls in a house, once you start really looking at them. Preparing dinner, doing laundry, sitting in the lounge room pushing toy cars on your leg for hours at a time … basically, those walls were becoming oppressive!
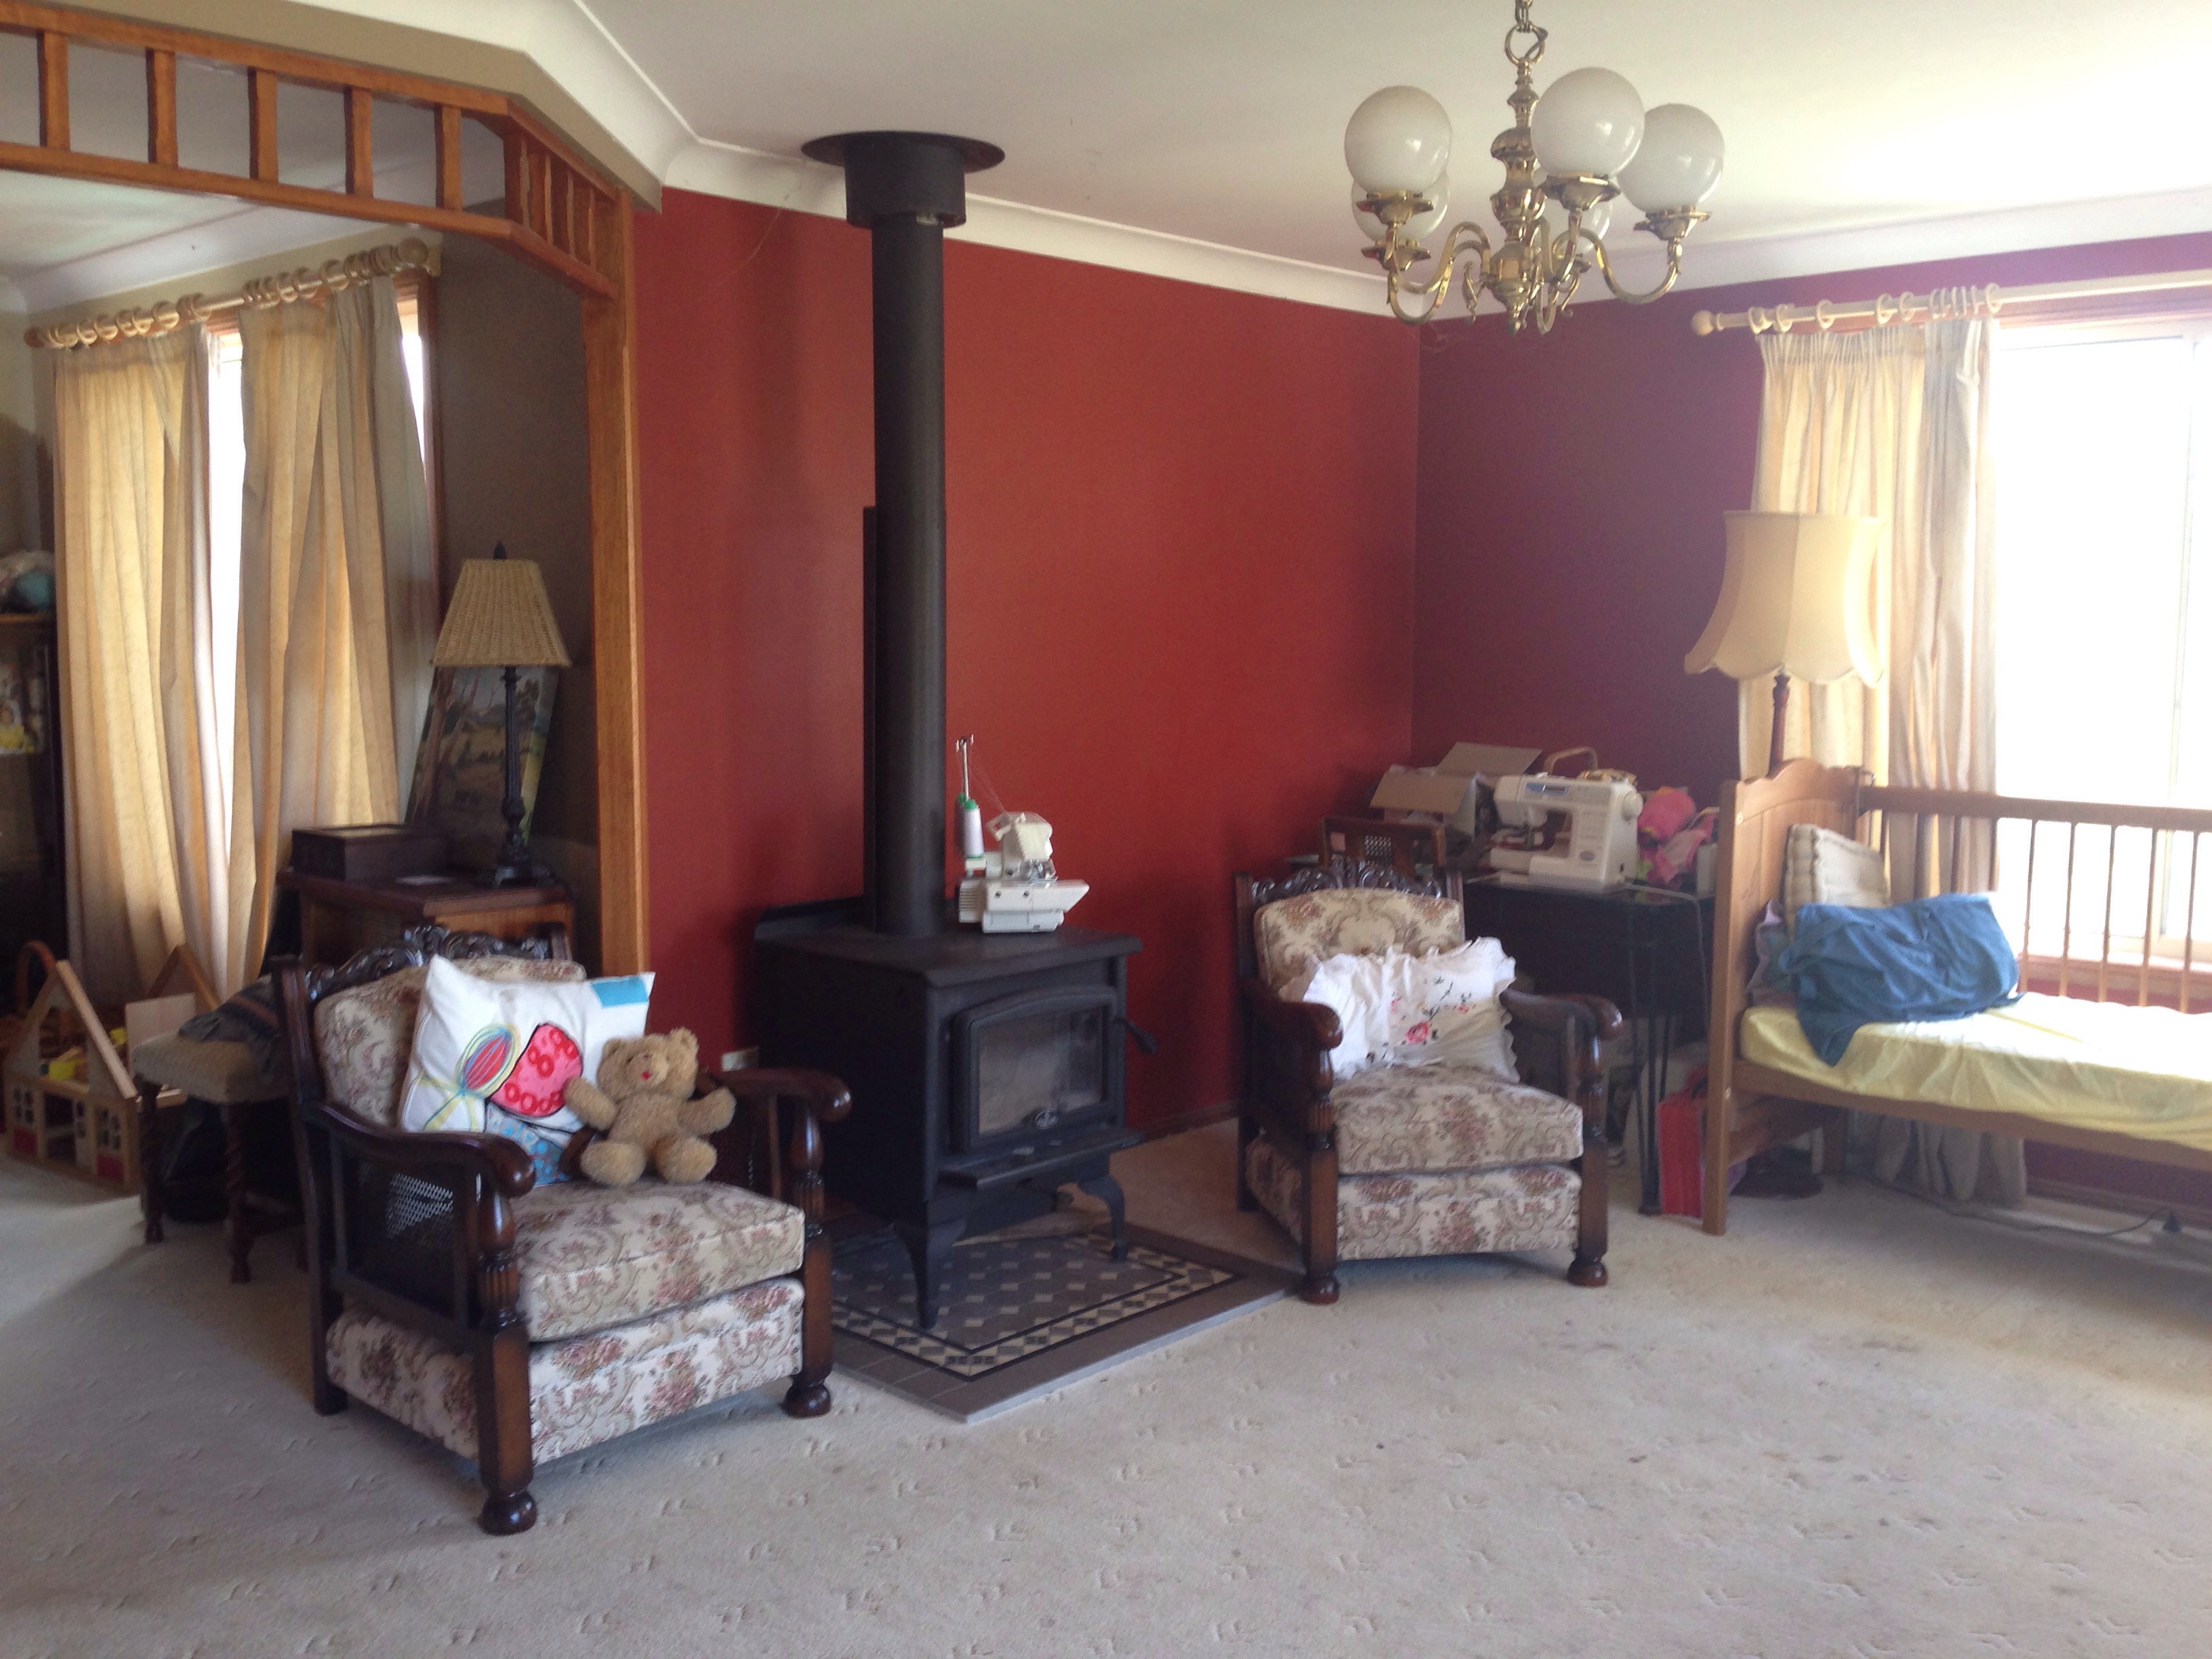
I don’t think my husband and daughter had any idea of just how deep my plans were running. I took thing easy at first, suggesting that maybe a new lounge room colour might be a good idea … maybe the living room would be more cheerful in winter if we had some blue on the wall … maybe the living room could be a nice warm colour … how about a lovely deep red?
One of the wonderful things about my husband, is he lets me have a go! So I got to try out my red lounge room. We love this room now!
Lounge room before …
… and after!
Blue in the living room? No worries! Now we’ve really got the colour-my-house bug!
Living room before …
… and now!
We decided to replace the yellow-green-cream colour throughout with “Warm Neutral” by Dulux. We are slowing (ever so slowly!) painting walls and removing the sickly pallor room by room. It was such a relief to take this colour off the kitchen ceiling! It immediately made the sink area a whole lot brighter. The lighting in the living areas is also hugely different. Both of these rooms face West, and we get a lot of sun in the afternoons. Having darker colours on the walls really changed the “glow” in the evening. Sometimes when the sun is setting in winter, the red lounge room really lights up with a warm fiery glow. The calmer blue room always feels cooler, and we love using this room in summer time.
I really wish we had more “before” photos so you could compare what things used to look like. Especially upstairs in the bedrooms! Unfortunately, you’ll just have to take my word for it. 🙂
All this is leading up to the biggest change we’ve embarked on yet: updating our kitchen cabinets! This room suffered most of all from being gloomy, and although the layout is very functional, we’ve always disliked the red-brown tones that goes pretty much from wall to floor. After upgrading our living spaces elsewhere, it was time to tackle some change in the kitchen, without it costing us thousands of dollars! This project has taken on a life of its own, and has morphed into a full kitchen redo. I’m going to post some of the details of what we’ve done so far, and what we’re intending to end up with. There’s so much detail, though, it’s going to take me several posts to get through it. Hopefully, you will find it useful, and maybe even inspiring. 🙂
I’m going to leave you now with a shot of the kitchen that we took on the first day we took possession of the house: