
I have been doing a lot more sewing lately, as I start making gifts for people, and repairing items I would normally stuff in a box and forget about. The other day I was trimming apart some Half Square Triangles (quilting! I will post on this project soon 🙂 ) and I put the point of my scissors straight through my elderly ironing board cover:
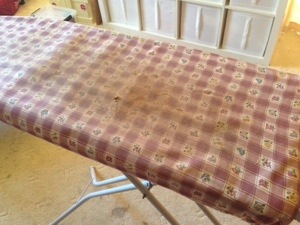
Isn’t that hideous? I have had this cover for as long as I can remember, and … ergh! Not only is it tired, faded and stained, it now has a hole that is rapidly getting bigger! So this was the kick-start I needed to finally re-cover this puppy, which has been on my Todo list for about a year.
I knew I wanted a fabric I would like to see more of … a lot more. So I pulled out a lovely neutral print I scooped for a bargain at the local thrift store. This fabric was made up into some curtains and I’ve used it as part of various projects already. The backing for Evie’s Christmas quilt was made from it, for example. I already love the fabric because of the previous uses, and it goes nicely with the warm tones in the lounge room (which is where the ironing board is kept). Great!
I took off the old cover and kept the cord so I could use it again. The old cover was pretty crinkled and it was difficult to lay it out on top of the new fabric, but I managed it after giving the cover a quick iron. How, you ask? I put three cloth nappies on top of the ironing board as a makeshift cover. 🙂


I cut around the old cover, then overlocked the raw edge, just like the original. If I didn’t have an overlocker I would have followed this technique, folding the edges over twice to make a pocket for the cord. Having an overlocker is a boon, sometimes. It made this job a lot easier!
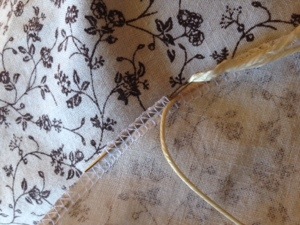
Threading the cord through the stitching was easy enough using a tapestry needle.
Finally, I cut a new piece of batting to go on the board using the previous foam as a template. The old foam is still there, but the new batting gives it some more pouff, which was sadly lacking after all this time. Now it feels nice and squishy. 😉
After a brief wrestle to get the old cover on, I realised that some of the edges of the cover were too loose. It was sagging around some of the sides where the cord wasn’t pulling the extra fabric in. So I flipped the whole ironing board upside down, got down and tucked up the slack using a needle and thread. I would have used little safety pins if I had any, but thread tacks did a great job.

The new cover looks a thousand percent better and I can’t believe I waited this long to fix it!


