Here in Australia, we call them woolly “jumpers”. 🙂 When they are too pilled and moth eaten to be of further use as clothing, you can re-purpose these useful items into wool nappy covers. If you’ve been using cloth nappies with PUL covers and want to try wool, don’t be afraid to give it a go! It’s much cheaper to make a wool cover from an old sweater than to buy a PUL cover. You can often get two or three covers from one sweater, if you are handy about what pattern shapes you choose!
The first step is to find a suitable wool sweater, and felt it. Not all sweaters are made of wool (a lot of them are acrylic, now) and not all wool sweaters will felt. Look for a wool mark symbol and wash instructions that say “hand wash in special wool detergent”. If it is an easy-care wool, it won’t shrink!


In the images above, I’ve shown the sweater I used before and after shrinking. Notice how much the wrinkles have flattened out? It also gets really thick and chunky. I like to felt it a fair bit, but it will still shrink, so be careful to wash your wool covers carefully once they are made up.
I shrink my sweater by using the washing machine, on a “Cotton” cycle, which is a vigorous wash with a fast spin. I did the cycle first at 40 degrees Celcius, but that didn’t shrink it enough, so next time I used 60 degrees Celcius, and used my home made soapy detergent, rather than wool wash. Perfect! The key to felting is: agitation, soap, large temperature changes. So, if you felt by hand, give it a good rub with soap flakes and plunge it into some hot or cold water to shock the wool.
The next step is to cut one (or more) wool covers from the shrunken sweater. There are a bunch of different patterns on the internet, and I’ve tried a couple of different types. A lot of them look very strange when they aren’t on a baby (the ones with the leg holes pointing up at you, for example), but they look great on a cute little baby bottom. Here are some good tutorials I’ve used in the past:
- The Byron Life: wool shorts that are quite like little hot pants. These are pretty good, and I made my first one like this. I needed to make a dip on the front waistband, though, because a baby tummy tends to push over the top. Make sure you leave lots of room for a bulky nappy (make it bigger to start with and then sew it smaller if you need to!)
- “Bum Sweaters”: This is a diagonal pattern which looks bizarre, but I warmed to after I started using flat nappies. This is because I would fold the nappy into a triangle shape (the “Chinese” fold) and I figured this pattern would go over the bulky nappy with room in all the right places. I made most of my nappy covers like this, and they look great.
- Longies: Oh boy, these covers are the most adorable thing I’ve ever seen. I really want to make some of these! Stripes! Yum. These use the arms of the sweater, so I’m going to see if I can get one out of the bits I have left over.
Having made a lot of Bum Sweaters, I knew I wanted that shaping, but to get more out of the sweater I have by changing the design. Cutting on the diagonal is not very efficient unless you can somehow use both parts of the diagonal cut. I tried doing this on a previous sweater by cutting up lots of smaller equilateral triangles and sewing four together, but they ended up getting holes on the seam lines due to weaknesses (I hand sewed them, to reduce the seam bulk).
This time I decided to pick out the best fitting cover from my stash, and use it as a pattern to get the right shape, but changing the seam lines.

I started with the cover above. You can see the Bum Sweater seams which run from the leg holes up to the centre of the front waistband. The leg holes are created by leaving the bottom end of this seam open, and folding it back to make a cuff.
In order to “knock-off” this cover, I folded it in half and placed some A4 paper over the top. I used a marker to trace the outline of the waistband and leg holes. See below:


I did the same thing for the back, so I had two A4 sheets of paper, with a “front” and a “back” pattern. To make a full nappy cover pattern, I took two more pieces of A4 and traced each pattern again, in reverse. Then I stuck them all together using sticky tape, to look like this:


I hope you can see how the shapes are supposed to fit together. If you need to ask questions, go right ahead. 🙂
The sweater I had was long enough to make just enough for one whole nappy cover on each side. The front of the sweater has a dip in the neck line, and I used that to make the front waistband of one nappy cover, as the shape was almost a match. If the sweater had been too short, I would have needed an extra seam between the front and back pattern pieces. If this happens to you, make sure you allow extra fabric for the seam allowance (I used 1 cm).
I cut around the front piece pretty closely, but I left the back piece square at the back, because my original nappy cover had an elasticised waist. If I had cut both front and back according to the original shape, I may not have had enough stretch in the waistband to get the cover over the fat nappy! The back waistband can be gathered in with elastic if it sags down when it’s on the baby.

You can see that the seam lines for the nappy covers are a little inaccurate because I squared off the back piece. Luckily, the felted sweater is a very forgiving fabric! I just placed the waistband edges together at the top, and stretched the seam as I went so that it matched up at the bottom, too.
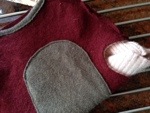
That’s the side seams done. If I had been thinking properly, I would have put the inner soaker piece on before I sewed up the side seams. The inner soaker is just a second piece of sweater that adds thickness to the crotch area and back “seat”. I used a contrasting grey piece of wool from another sweater, but you can use parts of the sleeves for this too. I was able to insert my soaker by hand with a running stitch (it doesn’t take a lot of stress) and on the second one, with a bit of wrestling, using the machine. Much easier to do this before sewing the side seams!
Once the side seams are done, you just need to finish the leg holes and waistband. For the leg holes I like to use the sleeve cuffs, since they are already “finished” along the cuff edge and don’t need hemming. If they didn’t shrink down too much, that is. I put my sleeves through the leg hole on the nappy cover to check whether they would be the right size:
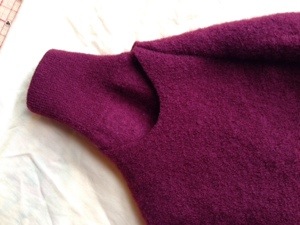
It was a perfect fit. 🙂 So I snipped off each cuff and pinned them inside the nappy cover, like so:


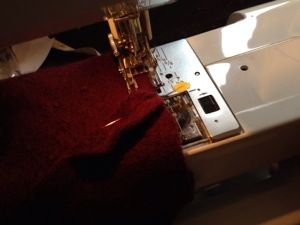
Sewing the leg holes by machine was only just possible. My leg holes came out about 8 inches in circumference, which is smaller than the barrel of my machine. I needed to stretch it over the machine and really help it along when I was sewing. I think the quilting “walking” foot really helped, here. If you can’t get your machine to do the work for you, hand-stitching will hold together just as well. My pink cover at the top of this post was done entirely by hand. You can get lovely flat-felled seams that way!
If your sweater sleeve shrinks too much and won’t fit the hole in the cover, you will need to make your own cuff. Cut a rectangle of fabric that is as long as the shape of the leg hole, plus a bit for the seam. Sew the short edges of your rectangle together to make a round cuff. I used a wide zig-zag stitch to piece my cuffs (for the second nappy cover). That way when I pulled on the seam, I had a nice decorative ladder, and a flattish seam.


For the waistband, finish up any raw edges as best you can. I managed to get my waistbands to fall on the sweater waist cuff (mostly) so I only needed to finish the front piece on one of the covers. I just used a bit of cuff from another sweater and wrapped it over the raw edge. Since these fabric are pretty felted, I’m not too worried about them unravelling. But the waistband will get a fair amount of stress pulling it on and off, so having a finished and firmer edge works better, I think.


This is the cover with the finished top waistband edge. I just trimmed the piece close to my stitching. If it ravels, I will felt that edge by rubbing it vigorously with soap and my thumb. Note that the inside seams are also unfinished. If they ravel, I will felt them or zig-zag them. 🙂
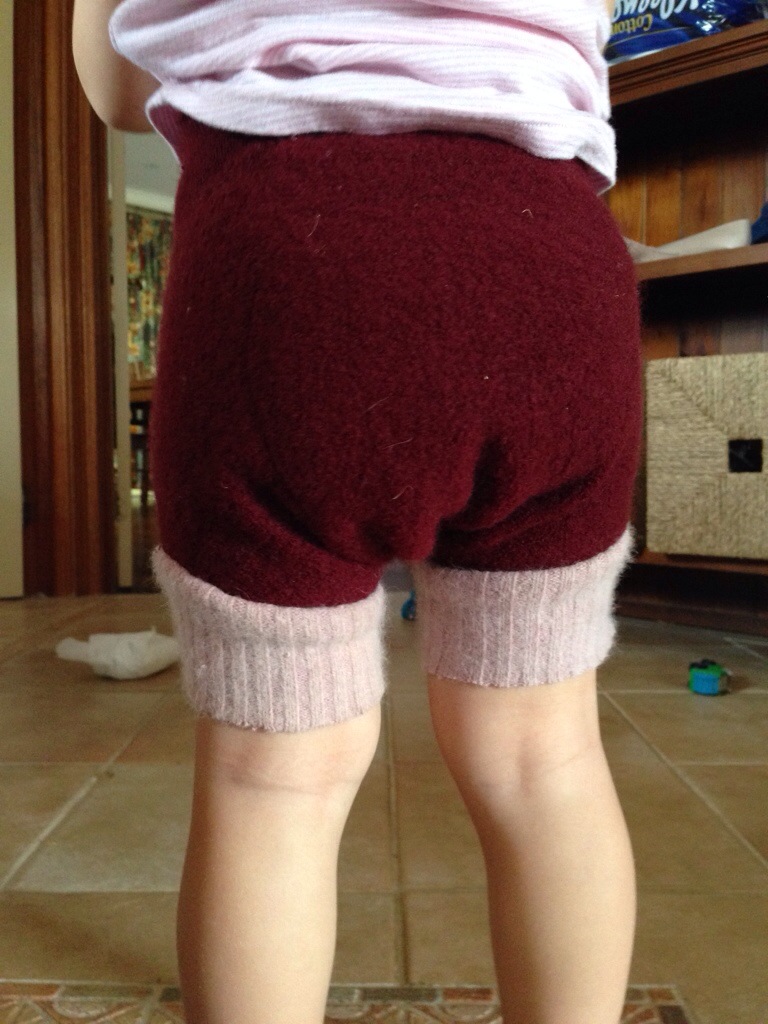
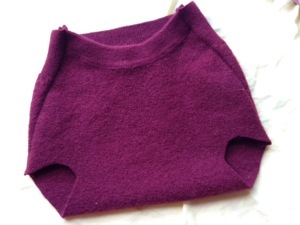
And … here it is, all finished up, and modelled by my (somewhat hefty) almost-two-year old. For reference, she weighs 13.3 kg and wears a size “5” disposable nappy (11 – 25 kg), mostly because of the width at her hips and tummy. This nappy cover had a rise of 20 inches (from back waistband, around the crotch and up to the front waistband). It is 12 inches wide across that square back piece. It’s shown over a cloth flat nappy, folded using the “Jo” fold. She is a tall girl and is wearing size 3 clothing already. I found that the cover stayed on by itself and didn’t need any elastic in the waistband [Edit: I’ve since added elastic to this cover, trying to solve a nappy leak]. Lucky I didn’t cut it narrower! 🙂
I hope this is useful to those of you who have nappy covers and want to try making a wool version! This technique would also work for copying a PUL cover (the kind you velcro up like a disposable). I find that pull-on covers are much easier to put onto a larger baby than the snap or velcro ones. To use the cover, you will first need to lanolise it so that the moisture stays in the wool and doesn’t come out onto the pants or sheets. I’ll post on how to do this soon. 🙂

Hello there! I found your blog from years ago when you were cloth diapering and hope you still check it now and then. I am starting the process and collecting sweaters to make wool covers. I’ve found a sweater made with possum wool, merino, and silk. I haven’t been able to find any info whether or not possum wool is OK to use and wondering if you have any input as this is from your region of the world 🙂 Thanks in advance!
LikeLike
Hi Karin,
I’m so pleased to hear you are embarking on the wool diaper cover journey! Fantastic.
I’ve recently used possum wool in my weaving and I’ve found it is incredibly soft: like cashmere. There may be longer loose fibres that can be a little itchy after hours of wear, but I think once you shrink it for using in a nappy cover (felt it, basically) they won’t be loose any more. Try it!
The silk component won’t shrink or be absorbent, but shouldn’t make a big difference to the diaper cover if it’s mostly possum and merino. You may find it shrinks a lot, so check it frequently as you agitate.
Good luck!
LikeLike