
Welcome to part two of my tutorial series on constructing an Octopus Softie! We have already constructed the body, and now we are going to make some plaited raggedy legs. 🙂
In the last tutorial I made some suggestions about fabrics for the legs. If you haven’t already sorted this out, go choose some long scraps from fabrics that are slippery (like a nightgown), or loose weave (like cheesecloth), or stretchy (like a t-shirt). For each leg you will need three strips of fabric, about two inches wide, and about 18 inches long.

Here are a bunch of scrappy strips that I have grouped up into threes. Note that the colours are reasonably similar in each group – low contrast. Previously I’ve used some wildly different fabrics and I’ve found that the finished plaited legs look a bit too scrappy.
For each group of strips you will need to prepare your fabric, and then plait it. You will need some safety pins for this step (pins will work too, in a pinch). First up, preparing:


A note on using t-shirt fabric: cut each strip across the bottom of the shirt, then give it a slight stretch along its length. You will find that the strip will automatically curl the raw edges in for you. If you are tricky, you can make one really long piece of “t-shirt yarn” using this technique.
After you have folded and pinned each strip, the raw edges are roughly hidden (at the top end). Now you need to twist each strip so that the raw edges will stay tucked away (mostly) for the length of the strip:


Note that the strip will twist on itself when you pin the end up onto the ironing board: totally normal. If you twist each strip the same way, your plaited leg will also twist. If you twist the middle strip the opposite way, you will have a flatter plait. Both look great on a softie octopus, so don’t let it worry you! I did both techniques on my legs.
Finally, you will plait the legs together:


If you are unfamiliar with plaiting, I suggest you practice on some different coloured shoelaces or ribbons first – something without twist! First take the rightmost strip, and put it over the middle one. Then take the leftmost and put it over the middle one. Then the rightmost again … you will see that the strips start to swap places and work their way left and right across the plait.
To plait the twisted strips: undo the pins you have just secured, and pull the ends away from the ironing board until the strips are unkinked. It is a little challenging to begin the plait by holding the very ends, but that’s what you need to do: keep a little bit of tension to make it easier.
Once you have plaited about a third of the way, it will start to feel easier to manage. The shorter the length you have left, the easier it will be to plait. If you end up in knots, just let go of the ends and secure whatever you managed to plait with a safety pin. Then try twisting only a short section of each strip, so you don’t have to wrestle with really long sections. You will need to stop periodically to secure your plait, and then add more twist to the remaining ends.
Once you have plaited all eight legs, they will come out something like this:
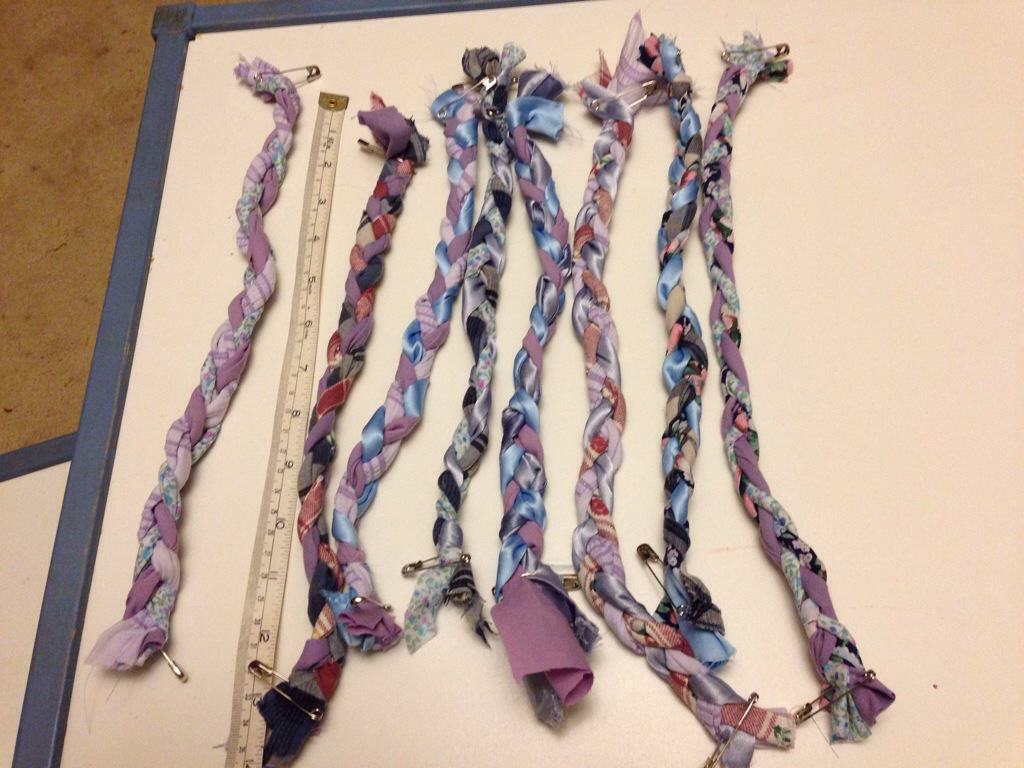
Try to keep any raw edges inside the twist / plait. You may find that it gets more ragged at the bottom. That’s okay! You can always trim off a bit of length off the plait if you feel it may unravel. Once plaited, the legs are quite long – about 12 inches.
Make sure when you unfasten the top strip ends from your ironing board that you secure the them together with a safety pin. You don’t want your plait to come apart at the top!
Your legs won’t necessarily be the same length, or even thickness. The fatter fabrics will make a shorter, chunkier plait. It’s all good, though! This just adds to the scrappiness – and the little one receiving the softie will appreciate exploring the different thicknesses and textures. 🙂
Next time I’ll talk about how to add your legs on to the body.
