Hi folks! I’ve been spending much of my two week vacation time playing with my table loom, and sampling for a new project–a tea towel twill “gamp” (a sample for different twill patterns and colour combinations).

Unlike the last time I warped up a table loom (to weave these tea towels) I’m finding this process incredibly frustrating.
Is it me? Is it the loom?
I’m going to say it’s a little bit of both. I’m definitely not too experienced at weaving, especially the warping of a loom! But this loom is not as easy to use as the one I borrowed for the tea towels!

My loom is a “Jack” type, which means each shaft moves independently of the others, controlled by a lever.
I lock some shafts into the “down” position in order to make a shed–an opening through which I can pass the shuttle.
So, what’s going wrong?
I can’t get a clean shed.
A “clean shed” is one where you can easily pass the shuttle (containing the weft) between the top and bottom threads. With a clean shed it’s easy to see that all the threads are correctly “up” or “down” according to the pattern.
Ideally all the threads would march tidily across the width of the loom, with no threads dipping down or up to interfere with the movement of the shuttle.
On my loom, some threads are not pulled far enough down when I sink the shaft, which causes them to snag the shuttle. It’s also really hard to see whether they are just loose top threads, too.
The shed opening is really small.
Urgh, this is a pain in the butt, combined with the other shed issues I’m having.
✔️ a small shed places less strain on the warp and weft threads.
❌ a small shed is even smaller when using a reed (with the loom’s beater) because the widest part of the shed sits behind the beater, instead of in front where I need it.
❌ a small shed needs to be really clean in order to pass the weft. If the shed is uneven, there’s less “wiggle” room in order to get the shuttle through.
The top of the shed is saggy.
So saggy, in fact, that I have to manually lift the top threads up in order to pass the shuttle.
There’s not much of an advantage to use a loom with shafts if I can get the same experience as using a heddle bar–It’s quite slow to manually adjust the shed with every pick of the weft!
Warp threads are breaking at the back beam.
This started to happen en masse when I added more tension to lift up the saggy top shed. 😞
A Jack loom places an uneven tension on the warp threads, pulling the bottom threads much tighter. This is because the bottom threads travel further (dipping down and then up) than the top threads, which stay horizontal.
What I really want is for the top and bottom of the shed to have equal tension!
Experiment #1–Use heddle rods
The first thing I tried was ditching the shafts altogether and weaving without them, using heddle rods instead.
My aim was to fix up the uneven threads that popped up into the shed and make it possible to pull the shed open wider by manually tugging on the heddle rods.
What’s a heddle rod? In my case, it’s a water colour pencil to which I’ve attached heddles in one long continuous string.

Continuous heddles on a “rod” 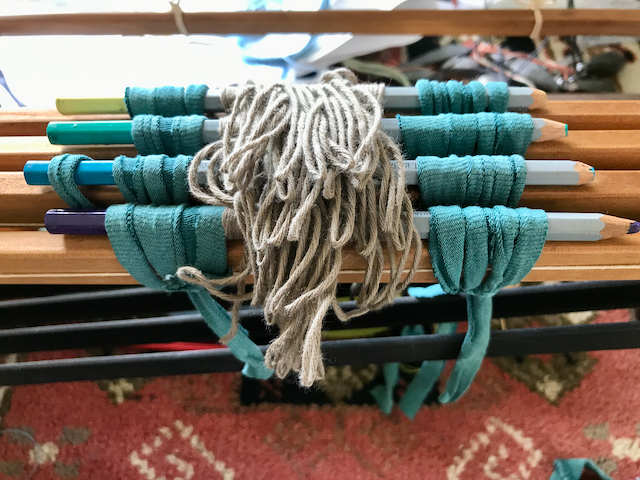
A heddle rod is strapped to each shaft
Laverne Waddington’s tutorial for making continuous heddles is invaluable if you want to try this yourself. I suggest you check out her site, because she’s a master weaver when it comes to Backstrap Weaving (and this technique is also useful if you have a rigid heddle loom and want to weave with multiple shafts).
What did I do?
I pushed aside the existing heddles and removed the reed. This gave me a larger space to “knit” the heddle rods, and more room to pass the weft through the shed.
Once I got going with the sample I then lashed each heddle rod to the matching shaft so I could use the Jack levers “as normal”.
✔️
Observations
Using this method I could skip threading the heddles and sleying the reed, which was … quite nice.
It took me less time and was easier on my back.
I really liked being able to knit the heddles under tension, having chosen which threads to use with a pick-up stick.
The threads ended up more even (horizontally) on each shaft. This made me realise that my old heddles stretched unevenly (yup, they need replacing).
This method works only because the loom is a “Jack” loom, pulling threads always in one direction (down, in my case).
I missed using the reed (which helps maintain the width of the weaving). I struggled to maintain the appropriate width when I was weaving the sample.
Once I was weaving, things were slow. This approach still had problems with the top threads sagging into the shed, due to the mechanics of the Jack loom.
✔️
Final verdict
This worked okay, and I preferred the weaving set up phase.
However, it was slow to weave, and I still couldn’t get a clean shed due to the uneven tension (floppy on top, too tight on the bottom).
My heddles need replacing with something non-stretch, and very even, like Texsolv heddles.
6/10
Experiment #1 sample
I wove this sample without a reed. To separate the threads I used a “coil rod”, which you can see in the image below.

The selvedges are tablet woven, starting off with one tablet in each selvedge.
It was tricky to weave because the single tablet flopped around, and each selvedge had a different shed position to the main weaving.
I added a second tablet to each selvedge with opposite threading direction which helped a bit with the floppiness. I think I’ll go back to a standard floating selvedge for my next sample.

Experiment #2–Change heddle “eye” height
I figured one good way to balance the tension between the top and bottom of the shed was to raise the “resting” threads up to the “top” position in the shed.
Then when the shafts are pulled down, the shed opens out evenly into a diamond shape, placing equal tension on the top and bottom threads.
This is apparently how the David 2 Louët loom works (here’s a fantastic review by Kelly Casanova about this loom).
Retrofitting
Low–I have to replace some heddles anyway, and this doesn’t require changing anything else about how the loom works.
✔️
Scaling up
I can’t use purchased Texsolv heddles (easily) because these come centred vertically in the shaft.
This means I’ll have to make all my own heddles (groan–hundreds of them!) if I go with this approach.
❌
Observations
This kinda worked, but kinda not.
It was a fiddle to work out a good “eye” position and get set up to create the heddles. I don’t think I nailed the measurements.
Once installed on the loom, the replacement heddles moved the top threads up by about 3/4 of an inch.
Unfortunately, when pulled down by the Jack lever, the bottom threads only dipped by 1/2 an inch.
This made the shed opening only 1.25 inches! Which is way off a comfortable opening (should be double that!)
✔️
Final verdict
I’m not so keen on this approach.
I didn’t quite get a balanced shed (top to bottom) and fussing with creating the heddles was a PITA.
I’m not convinced I could do this properly in order to get a larger shed with the shafts I have.
Making these fussy heddles by hand sounds very tedious and time-consuming.
3/10
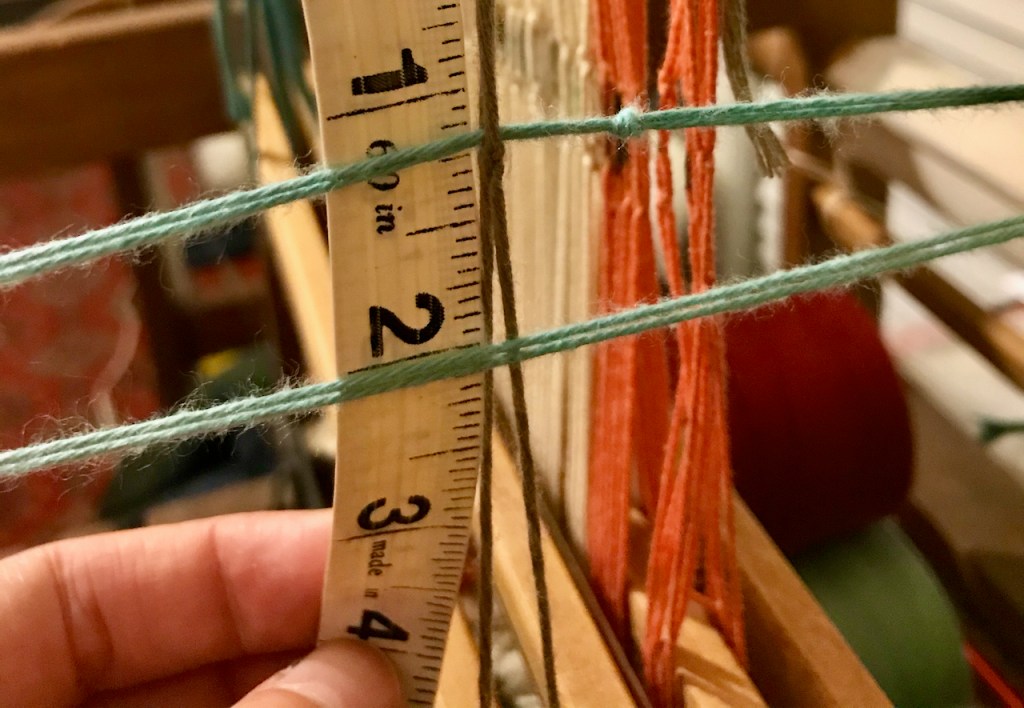
Height of the “top” shed–3/4 inch 
Depth of the “bottom” shed–only 1/2 inch 😵
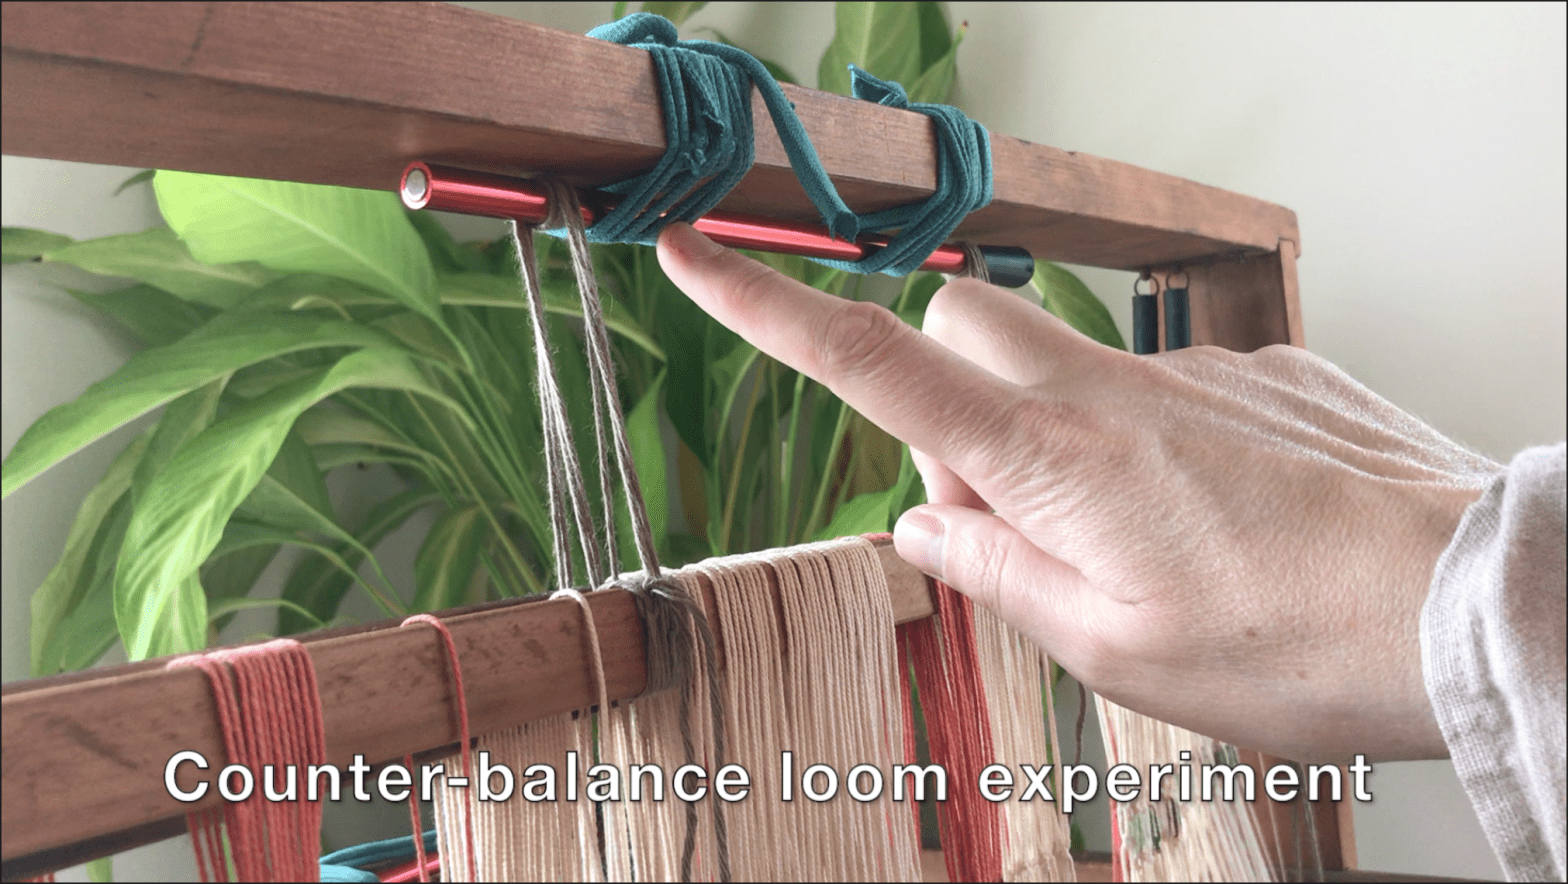
Experiment #3–Convert to Counter-balance
A well documented way get even tension on the top and bottom of the shed is to use to a counter-balance loom action.
A counter-balance loom works by raising and lowering shafts in pairs. When one shaft rises, the paired shaft sinks.
This pulls evenly on both the top and bottom of the shed.
Bonus points for being historically the way most looms worked for the period I like to recreate!
Retrofitting
High–at minimum I’ll need to:
- take the springs off the top of each shaft and install a roll-bar or pair of pulleys to attach adjacent shafts together
- make it possible to change which shafts are paired up
- unhook the bottom of every shaft from the Jack levers
- Find a way to raise / lower the shafts the right amount to create a nice wide shed
Ideally I’d also install a top roll bar (so I can lower both shafts in a pair if I want, e.g. for plain weave). This would require some wood-working, though!
👷🏻♀️=⚙️
Scaling up
I can use purchased Texsolv heddles which are super easy to install.
I could even add more shafts (although making my loom into a proper 8-shaft loom would require carpentry so I could fit all the roll bars vertically stacked).
✔️
Observations
I did a dodgy retrofit of the first two shafts as a proof of concept, which was pretty successful (see my video below).
I got a lovely 2.5 inch open shed, even with the heddles I have currently installed (which appear to be about 8 inches tall).
Changing sheds was relatively quiet (although not fiddle-free) because the Jack loom springs go “Squeeeeak” with every lever pull. The counter-balance loom is quieter (check out the video to see)!
I’d like to use a full-width roll bar (rather than a pulley) because the roll bar seems cheap to fit, and solid (or, I suspect so at full width). Something like a broom handle or thick dowel will do the trick!
✔️
Final verdict
Hell yeah!
I think I can replace the jacks with light-weight alternatives so that I can operate the shafts from the side of the loom.
Or I could drill holes in the castle (the top-most beam) so I can operate the shafts with a cord flipper gadget.
I could even add more shafts (although making my loom into a proper 8-shaft loom would require carpentry so I could fit all the roll bars vertically stacked).
8/10


Next steps
Well, I’ve run out of holiday. 😞
The next thing I want to do is purchase new Texsolv heddles for every shaft, and install them.
Then I’ll fit a better (read: less shonky) roll bar for the first shafts I converted, and compare the weaving experience against the remaining two shafts (which are still set up as Jack shafts).
You’ll hear more from me when I get that going!

Eep. Big sympathy. That all sounds rather frustrating. I have a table loom lurking under my cutting table waiting for when I can have access to L, from whom it came and who knows how to use it.
LikeLiked by 1 person
In-person access is best, but if you’d like some remote help, I’m happy to get involved! Although there are many mutual friends with more skill than I, of course (I consider myself an opinionated beginner, I think). 🙂
LikeLike
I haven’t tried a jack loom before. They look temperamental. My table looms have always pulled the warp thread up rather than down.
What material are you using as your warp? I have found wool to be pretty forgiving on the tension, but I’ve heard that linen is not so forgiving and you do need something like a counter balance loom otherwise you get lots of breakage.
LikeLike
Hey Colin! I’m using Maurice Brassard Cottolin, which is 60% -40% (I’ve forgotten which fibre is the larger quantity). It’s lovely thread!
The last tea towels I did on T’s loom (borrowed from her) which was also a Jack loom, but had a nicer shed / action. It went fairly easily and there was no breakage until 4 towels (also Cottolin). Just goes to show every loom is different!
I’m keen to convert this one to Counter balance and see how it goes. I’m collecting old broom sticks now for roll bars!
LikeLike