Hi everyone!
I’ve been busy like a crazy caffeinated bee over the last two weeks. I wish I could show you all of my completed projects, but that will have to wait until after Christmas! 🙂
Today I wanted to share a tutorial for some re-usable Christmas gift tags.

These are great because I can use the same tags every year without wasting any materials. Frugal! Environmentally friendly!
Plus, it removes a bunch of decisions from my crazy todo list in the insane pre-Christmas period: Saving. My. Sanity.
For the same reasons, I’m doing re-usable cloth gift wrap (Furoshiki). I think these gifts look really, really wonderful. I picked up the scarves at my local op-shop for 50c each. Perfectly splendid.

Okay, so how to make a quilted gift tag? Dig out your scrap basket, because we are going to do some Quilt As You Go (QAYG)!
You will need:
- Batting (I used scrap from my other quilting projects — you could also use an old flannelette cot blanket or some terry towelling).
- Scraps of suitable fabric — cottons are great.
- A fabric marker to write the gift tag messages.
- Something to use as the hanging tie (bias binding, ribbons, cord, whatever you have).
- Buttons, if you want to make it looks extra spiffy! 🙂
Start off with a large scrap of fabric (the backing), and lay out some batting on top. I decided to make 6 tags at once, so I used a piece of batting that was a little bigger than 10 inches by 6 inches.
Next, choose a small piece of scrap fabric and place it on top of the batting, somewhere central. Sew this piece down around the edges, using a thread that will disappear on the backing side (ie. you don’t want the bobbin thread showing up garishly on the back).
I sewed my first piece down very close to the edges. You might find it helpful to stick the fabric to the batting with a glue stick, if your layers shift around.
Now you are going to do some QAYG:

I’ve already done some quilting on this piece — can you see the green strip that is face down? I’ve just sewn this piece to the existing quilting so that when I flip the piece over …

I’ve just added more fabric to my scrappy quilt! I press the seam before and after the “flip” using a pressing cloth (to avoid ironing directly onto the batting).
Want to see it again?


I find this works best if I go round the starter fabric, adding slightly bigger pieces each time. A simple rule is to make sure you completely cover any existing fabric when you make each seam.
You may find that your scrap won’t cover all the way, like this:

Here I am pointing at the problem edge: notice how I’ve made a fold before sewing the seam? Now when I flip the piece over, I have a tidy edge to sew down with some edge stitching:

Oh, oh! That piece didn’t quite cover the batting – I used an itty bitty scrap piece to cover this, and then I trimmed to size (10 inches by 6 inches):

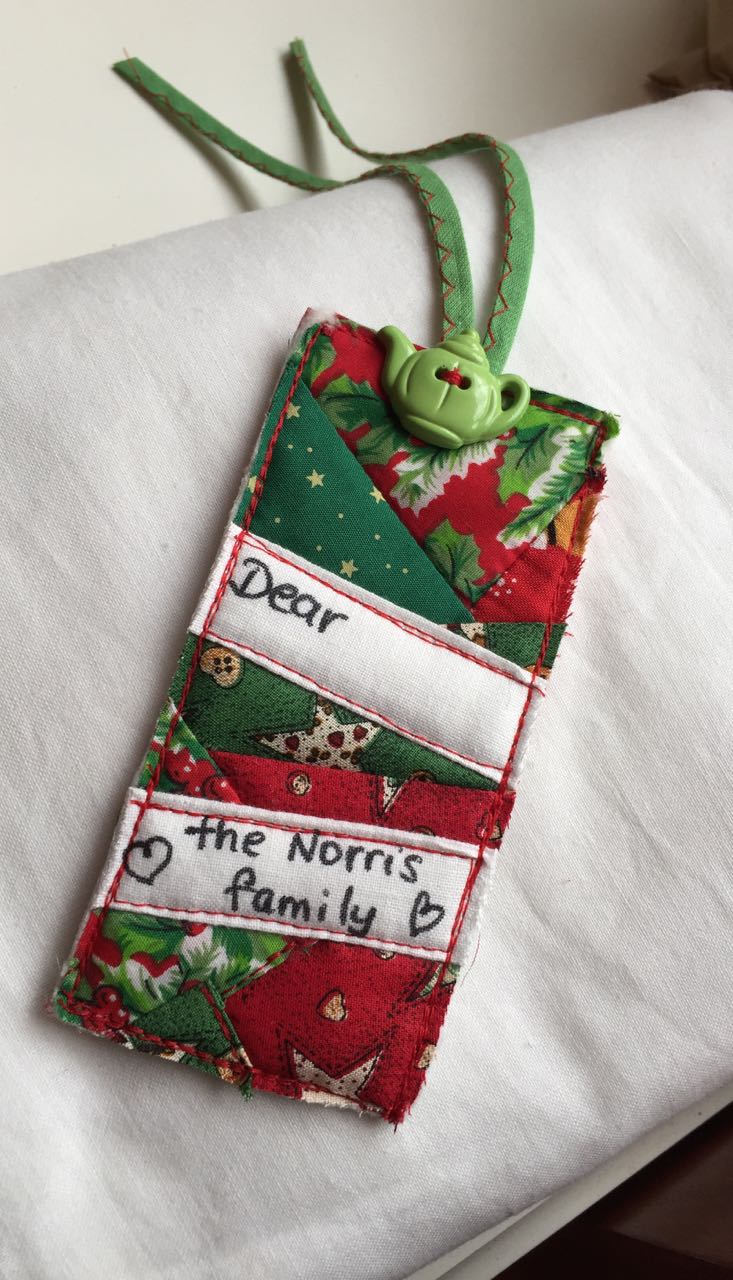
Looking good! Now slice up your mini quilt into gift tags (mine are 5 inches by 2 inches — maybe slightly wider).

Some of the edges of your tags may be a little loose, so now you stitch each tag around all four sides.
What do they look like on the back?

This is why I used a thread (red) that would disappear. You get lots of crazy little quilted tracks on the back, which adds to the charm. I didn’t bother tidily burying my threads, instead I did a bunch of back-stitching on my machine to secure the ends of each seam. I don’t think anyone will notice the rough stitching in the excitement of present opening time!

To make a label, I created a strip of white fabric, quite like bias binding. The edges are folded to the centre, and then folded in half again. This makes a very sturdy, opaque, label that I can write on.

Stitch the label pieces to the top of your tag, offsetting them at a crazy angle, or lining it up if you prefer. I stitched around each label piece (each tag has two). Then I went over the tag edges again, two more times, because I didn’t want the tag edges to unravel. This gives a nice thread-sketching kind of look, I think.
You could finish the edges with a zig-zag stitch, a blanket stitch, a serger, or you could go nuts and bind each tag (yeah, I don’t have time for that kind of crazy! :D)
Trim off the label edges and you are ready to write your messages!

I made my hanging strings out of old bias binding from the op-shop. I found that zig-zag stitching the bias binding in half worked really well. I especially like the Christmassy green and red on this finished tag!

I had a bunch of novelty buttons on hand that I used to secure the hanging strings. I think they look super! Hopefully they will last for many years, and it’s one less thing to worry about next Christmas!
Linking up to Crazy Mom Quilts for a Friday Finish, because Oh Boy I’ve finished a lot lately, I’m a gonna link something! 😀

What a great idea! Your tags are super cute. And how clever to use them for years to come!
LikeLike
Thank you, Lorna! I really need some reusable stuff to de clutter my Christmas brain, I think. With three family birthdays around Christmas Day I have to keep track of a LOT of presents! This will help, I think. 😀
LikeLike